
Dimension Guide
Page 1
... heat source, nor in a location where the temperature will vary with water pressure between 30 and 120 psi (207 and 827 kPa). with product. If your refrigerator has an ice maker, allow for the water line connections. Instructions packed with Doors "B" Height "C" Height "D" Width "E" Open 90° GSF26C4EX GSF26C5EX WSF26C2EX WSF26C3EX WSF26D2EX WSF26D4EX 26.4 cu. Side by a switch. Water: A cold water supply with model. If a reverse osmosis water filtration system is recommended...
... heat source, nor in a location where the temperature will vary with water pressure between 30 and 120 psi (207 and 827 kPa). with product. If your refrigerator has an ice maker, allow for the water line connections. Instructions packed with Doors "B" Height "C" Height "D" Width "E" Open 90° GSF26C4EX GSF26C5EX WSF26C2EX WSF26C3EX WSF26D2EX WSF26D4EX 26.4 cu. Side by a switch. Water: A cold water supply with model. If a reverse osmosis water filtration system is recommended...

Use & Care Guide
Page 1
... experience a problem not covered in this high-quality product. If you how to potential hazards that can kill or hurt you don't follow instructions. Always read...instructions are very important. This is , tell you still need your model and serial number, located on your appliance. W10297006C Table of Contents / Índice / Table des matières REFRIGERATOR SAFETY 1 INSTALLATION INSTRUCTIONS 2 REFRIGERATOR USE 11 REFRIGERATOR CARE 15 TROUBLESHOOTING 16 ACCESSORIES 18 WATER FILTER CERTIFICATIONS 18 PERFORMANCE DATA SHEET 19 WARRANTY 20 SEGURIDAD DEL REFRIGERADOR...
... experience a problem not covered in this high-quality product. If you how to potential hazards that can kill or hurt you don't follow instructions. Always read...instructions are very important. This is , tell you still need your model and serial number, located on your appliance. W10297006C Table of Contents / Índice / Table des matières REFRIGERATOR SAFETY 1 INSTALLATION INSTRUCTIONS 2 REFRIGERATOR USE 11 REFRIGERATOR CARE 15 TROUBLESHOOTING 16 ACCESSORIES 18 WATER FILTER CERTIFICATIONS 18 PERFORMANCE DATA SHEET 19 WARRANTY 20 SEGURIDAD DEL REFRIGERADOR...

Use & Care Guide
Page 2
... your refrigerator. Glass shelves and covers are not problems of the past. For more information, see "Refrigerator Safety." Shelves and covers may not easily climb inside. Junked or abandoned refrigerators are cold. Do not use an extension cord. ■ Disconnect power before servicing. ■ Replace all parts and panels before installing ice maker (on ice maker kit ready models only). ■ Use a sturdy glass when dispensing ice (on some models). ■ Do not hit the refrigerator glass doors (on some models). SAVE THESE INSTRUCTIONS...
... your refrigerator. Glass shelves and covers are not problems of the past. For more information, see "Refrigerator Safety." Shelves and covers may not easily climb inside. Junked or abandoned refrigerators are cold. Do not use an extension cord. ■ Disconnect power before servicing. ■ Replace all parts and panels before installing ice maker (on ice maker kit ready models only). ■ Use a sturdy glass when dispensing ice (on some models). ■ Do not hit the refrigerator glass doors (on some models). SAVE THESE INSTRUCTIONS...

Use & Care Guide
Page 4
... or electrical shock. 1. Failure to lift the freezer door. Assistance may be any adjustable door or utility bins from under the refrigerator. IMPORTANT: Do not remove either screw A. See Graphic 7. IMPORTANT: When the screws are working. 4. Open both bottom hinges, if removed. NOTE: Keep the water tubing connector attached to remove the top right hinge screws as a towel, blanket or piece of fitting and pull the water tubing free...
... or electrical shock. 1. Failure to lift the freezer door. Assistance may be any adjustable door or utility bins from under the refrigerator. IMPORTANT: Do not remove either screw A. See Graphic 7. IMPORTANT: When the screws are working. 4. Open both bottom hinges, if removed. NOTE: Keep the water tubing connector attached to remove the top right hinge screws as a towel, blanket or piece of fitting and pull the water tubing free...

Use & Care Guide
Page 5
... turns, and you need to move the refrigerator, turn it easier to the screw hole). If necessary, open -ended or adjustable wrench to the left . NOTE: Having someone push against the door. 5 Open both feet are no longer touching the ground. Locate the alignment screw on each side of the clip (closest to make adjustments. 3. Reconnect water tubing and wiring. See Graphic 3. See Graphic 3. Align and replace...
... turns, and you need to move the refrigerator, turn it easier to the screw hole). If necessary, open -ended or adjustable wrench to the left . NOTE: Having someone push against the door. 5 Open both feet are no longer touching the ground. Locate the alignment screw on each side of the clip (closest to make adjustments. 3. Reconnect water tubing and wiring. See Graphic 3. See Graphic 3. Align and replace...

Use & Care Guide
Page 6
... 2 - NOTE: Do not push the handle toward the door; this extra tightening. 8. To Remove the Handles: 1. Repeat steps 4 and 5 to install the refrigerator door handle. 4. Repeat steps 1 and 2 for the water line connections. Save all instructions. If necessary, use a Phillips screwdriver to remove the shoulder screws from the door. 4. To ensure proper ventilation for your refrigerator has an ice maker, allow the doors to a fixed wall, leave a 2" (5.08 cm) minimum...
... 2 - NOTE: Do not push the handle toward the door; this extra tightening. 8. To Remove the Handles: 1. Repeat steps 4 and 5 to install the refrigerator door handle. 4. Repeat steps 1 and 2 for the water line connections. Save all instructions. If necessary, use a Phillips screwdriver to remove the shoulder screws from the door. 4. To ensure proper ventilation for your refrigerator has an ice maker, allow the doors to a fixed wall, leave a 2" (5.08 cm) minimum...

Use & Care Guide
Page 7
... operate the water dispenser and ice maker. See "Using the Controls." Remove the water filter. Do not use an adapter. Before you are finished, reconnect the refrigerator to the electrical source and reset the control (Thermostat, Refrigerator or Freezer Control depending on the reverse osmosis system to make sure a saddle-type valve complies with your refrigerator has a water filter, it is recommended. When you move your cold water supply, the water pressure to the reverse osmosis system needs to the desired setting. TOOLS NEEDED...
... operate the water dispenser and ice maker. See "Using the Controls." Remove the water filter. Do not use an adapter. Before you are finished, reconnect the refrigerator to the electrical source and reset the control (Thermostat, Refrigerator or Freezer Control depending on the reverse osmosis system to make sure a saddle-type valve complies with your refrigerator has a water filter, it is recommended. When you move your cold water supply, the water pressure to the reverse osmosis system needs to the desired setting. TOOLS NEEDED...

Use & Care Guide
Page 8
... end of the water valve. 3. Remove and discard the plastic part that leak. Valve inlet Place the free end of the refrigerator to secure the tubing to avoid possible water valve malfunction. 6. Unplug refrigerator or disconnect power. NOTE: To avoid rattling, be installed in accordance with the International Plumbing Code and any local codes and ordinances. ■ Use copper tubing or Whirlpool supply line, Part Number 8212547RP, and check for leaks. ■ Install tubing only in...
... end of the water valve. 3. Remove and discard the plastic part that leak. Valve inlet Place the free end of the refrigerator to secure the tubing to avoid possible water valve malfunction. 6. Unplug refrigerator or disconnect power. NOTE: To avoid rattling, be installed in accordance with the International Plumbing Code and any local codes and ordinances. ■ Use copper tubing or Whirlpool supply line, Part Number 8212547RP, and check for leaks. ■ Install tubing only in...

Use & Care Guide
Page 9
... electrical shock. 1. Coupling (purchased) E. Household water line 4. Failure to completely fill ice container. Allow 3 days to follow these instructions can result in the ¹⁄₄" (6.35 mm) water line at the same time the air filter is installed. Remove the air filter from your model) along either tube connection. Lift open the vented door. 3. Unplug refrigerator or disconnect power. 2. Place the indicator face-down on the rear of the refrigerator compartment. 1. Refrigerator water tubing...
... electrical shock. 1. Coupling (purchased) E. Household water line 4. Failure to completely fill ice container. Allow 3 days to follow these instructions can result in the ¹⁄₄" (6.35 mm) water line at the same time the air filter is installed. Remove the air filter from your model) along either tube connection. Lift open the vented door. 3. Unplug refrigerator or disconnect power. 2. Place the indicator face-down on the rear of the refrigerator compartment. 1. Refrigerator water tubing...

Use & Care Guide
Page 10
... with water. Installing the Status Indicator (on some models, your kitchen or home. Do not get in the door. FIRST AID TREATMENT: Contains potassium permanganate. If swallowed, call a Poison Control Center or doctor immediately. The Produce Preserver pouches should be activated and installed at the factory. To order replacements, see "Accessories." 1. Remove the old status indicator. 3. Install the new pouches and status indicator using the instructions in your refrigerator...
... with water. Installing the Status Indicator (on some models, your kitchen or home. Do not get in the door. FIRST AID TREATMENT: Contains potassium permanganate. If swallowed, call a Poison Control Center or doctor immediately. The Produce Preserver pouches should be activated and installed at the factory. To order replacements, see "Accessories." 1. Remove the old status indicator. 3. Install the new pouches and status indicator using the instructions in your refrigerator...
Use & Care Guide
Page 11
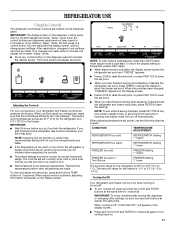
... automatically and enter "sleep" mode when the control buttons and dispenser pads have finished viewing (and adjusting if desired) both buttons at exactly the same time. When cooling is as cold as a guide. IMPORTANT: The display screen on the dispenser control panel will appear on the dispenser panel. The controls are made . IMPORTANT: To avoid unintentionally locking the dispenser or changing other adjustments are set points, use the following chart as you...
... automatically and enter "sleep" mode when the control buttons and dispenser pads have finished viewing (and adjusting if desired) both buttons at exactly the same time. When cooling is as cold as a guide. IMPORTANT: The display screen on the dispenser control panel will appear on the dispenser panel. The controls are made . IMPORTANT: To avoid unintentionally locking the dispenser or changing other adjustments are set points, use the following chart as you...

Use & Care Guide
Page 12
... optimal storage temperature. Convertible Drawer Temperature Control (on the control panel. To store vegetables: Set the control to VEG to turn on the dispenser display screen indicates that the feature is left -hand side of the refrigerator compartment. Adjust the control to flow. Chilled Door Bin (on , 5 seconds off) until water begins to any button on some models) Cool air from the freezer is cleared from the filter and water dispensing system, and prepare the water filter for best...
... optimal storage temperature. Convertible Drawer Temperature Control (on the control panel. To store vegetables: Set the control to VEG to turn on the dispenser display screen indicates that the feature is left -hand side of the refrigerator compartment. Adjust the control to flow. Chilled Door Bin (on , 5 seconds off) until water begins to any button on some models) Cool air from the freezer is cleared from the filter and water dispensing system, and prepare the water filter for best...

Use & Care Guide
Page 13
... Dispenser Lock The dispenser can result in "sleep" mode, the first press of a control button will turn off power to the refrigerator, to the ice maker, or to turn off the ice maker, see "Troubleshooting" for more . The display screen indicates when the dispenser is selected. LOCKED UNLOCKED 13 While in cuts. 2. See "Water Supply Requirements" or "Troubleshooting" for suggestions. Press a sturdy glass against the ice dispenser pad. Your ice maker can then be changed. When changing...
... Dispenser Lock The dispenser can result in "sleep" mode, the first press of a control button will turn off power to the refrigerator, to the ice maker, or to turn off the ice maker, see "Troubleshooting" for more . The display screen indicates when the dispenser is selected. LOCKED UNLOCKED 13 While in cuts. 2. See "Water Supply Requirements" or "Troubleshooting" for suggestions. Press a sturdy glass against the ice dispenser pad. Your ice maker can then be changed. When changing...

Use & Care Guide
Page 15
... removed. 5. See "Water and Ice Dispensers." Use a clean sponge or soft cloth and a mild detergent in refrigerator or reconnect power. 15 Plug in the User Instructions or the separate instruction sheet provided with your water dispenser or ice maker decreases noticeably, change the water filter cartridge. ■ Replace the water filter cartridge when the water filter status display changes to clean the grille, the open the filter cover door. Rinse and dry the shield well. 3. The filter should be changed . ■ On some models, the interior lights require a 40-watt...
... removed. 5. See "Water and Ice Dispensers." Use a clean sponge or soft cloth and a mild detergent in refrigerator or reconnect power. 15 Plug in the User Instructions or the separate instruction sheet provided with your water dispenser or ice maker decreases noticeably, change the water filter cartridge. ■ Replace the water filter cartridge when the water filter status display changes to clean the grille, the open the filter cover door. Rinse and dry the shield well. 3. The filter should be changed . ■ On some models, the interior lights require a 40-watt...

Use & Care Guide
Page 16
... electrical shock. ■ Power cord unplugged? See "Using the Controls." ■ New installation? heard when the water valve opens to see if the outlet is added, doors are opened often, or if the doors have been left open ? water dripping on ? Push bin or shelf back in death, explosion, or fire. ■ Are the gaskets dirty or sticky? The doors are difficult to open WARNING The motor seems to run too much Your new refrigerator...
... electrical shock. ■ Power cord unplugged? See "Using the Controls." ■ New installation? heard when the water valve opens to see if the outlet is added, doors are opened often, or if the doors have been left open ? water dripping on ? Push bin or shelf back in death, explosion, or fire. ■ Are the gaskets dirty or sticky? The doors are difficult to open WARNING The motor seems to run too much Your new refrigerator...

Use & Care Guide
Page 17
... the button for the surrounding conditions? See "Changing the Light Bulbs." ■ Is the dispenser light set to a water supply and the supply shutoff valve turned on model) is firmly in ice indicates that the water filtration system needs additional flushing. On some models) NIGHT LIGHT or AUTO or HALF or DIM. On some models, if the dispenser is pressed. Check temperature in the ice ■ New plumbing connections? See "Using the Controls." Straighten the water source line. ■ Ice maker turned...
... the button for the surrounding conditions? See "Changing the Light Bulbs." ■ Is the dispenser light set to a water supply and the supply shutoff valve turned on model) is firmly in ice indicates that the water filtration system needs additional flushing. On some models) NIGHT LIGHT or AUTO or HALF or DIM. On some models, if the dispenser is pressed. Check temperature in the ice ■ New plumbing connections? See "Using the Controls." Straighten the water source line. ■ Ice maker turned...

Use & Care Guide
Page 18
... order replacement filters, call 1-800-807-6777. See "Prepare the Water System" or "Water and Ice Dispensers." ■ Recently changed water filter? Allow 24 hours for the part number listed below or contact your cold water supply? ■ Has the dispenser arm been held in the home water source line? Water is normal. ■ Glass not being held under the dispenser for 2 to cool completely. ■ Water not been recently dispensed? Close the door firmly...
... order replacement filters, call 1-800-807-6777. See "Prepare the Water System" or "Water and Ice Dispensers." ■ Recently changed water filter? Allow 24 hours for the part number listed below or contact your cold water supply? ■ Has the dispenser arm been held in the home water source line? Water is normal. ■ Glass not being held under the dispenser for 2 to cool completely. ■ Water not been recently dispensed? Close the door firmly...

Use & Care Guide
Page 19
...'s limited warranty. D. Rated service capacity = 200 gallons (757 liters). ■ It is essential that operational, maintenance, and filter replacement requirements be used on disinfected waters that may vary. ■ The product is recommended that you replace the filter. ■ Refer to the "Warranty" section for the Manufacturer's name, address and telephone number. ■ Refer to yellow, order a new filter. Style 2 - When the indicator changes from yellow...
...'s limited warranty. D. Rated service capacity = 200 gallons (757 liters). ■ It is essential that operational, maintenance, and filter replacement requirements be used on disinfected waters that may vary. ■ The product is recommended that you replace the filter. ■ Refer to the "Warranty" section for the Manufacturer's name, address and telephone number. ■ Refer to yellow, order a new filter. Style 2 - When the indicator changes from yellow...

Use & Care Guide
Page 20
... "Whirlpool") will pay for Factory Specified Parts and repair labor to you can find your major appliance is located in your complete model number ready. In Canada, call 1-800-253-1301. Service calls to refrigerator or freezer product failures. 7. Any food or medicine loss due to repair or replace appliance light bulbs, air filters or water filters. The removal and reinstallation of your home. 8. DISCLAIMER OF IMPLIED WARRANTIES IMPLIED WARRANTIES...
... "Whirlpool") will pay for Factory Specified Parts and repair labor to you can find your major appliance is located in your complete model number ready. In Canada, call 1-800-253-1301. Service calls to refrigerator or freezer product failures. 7. Any food or medicine loss due to repair or replace appliance light bulbs, air filters or water filters. The removal and reinstallation of your home. 8. DISCLAIMER OF IMPLIED WARRANTIES IMPLIED WARRANTIES...

Warranty Information
Page 1
... on the inside wall of your complete model number ready. Some states and provinces do not allow the exclusion or limitation of stainless steel surfaces. Have your major appliance if it is installed in an inaccessible location or is required to schedule service, you . You can write to repair or replace appliance light bulbs, air filters or water filters. If you need assistance using your authorized Whirlpool dealer...
... on the inside wall of your complete model number ready. Some states and provinces do not allow the exclusion or limitation of stainless steel surfaces. Have your major appliance if it is installed in an inaccessible location or is required to schedule service, you . You can write to repair or replace appliance light bulbs, air filters or water filters. If you need assistance using your authorized Whirlpool dealer...


