
Dimension Guide
Page 1
... 15- or 20-amp fused, grounded electrical supply is recommended that cannot be a minimum of installation, cleaning, or removing a light bulb, turn the control (Thermostat, Refrigerator or Freezer control depending on the model) to your refrigerator has an ice maker, allow for product installation is recommended. NOTE: Before performing any type of 40 to 60 psi (276 to change materials and specifications without notice. NOTE: Do not install the refrigerator near an oven, radiator...
... 15- or 20-amp fused, grounded electrical supply is recommended that cannot be a minimum of installation, cleaning, or removing a light bulb, turn the control (Thermostat, Refrigerator or Freezer control depending on the model) to your refrigerator has an ice maker, allow for product installation is recommended. NOTE: Before performing any type of 40 to 60 psi (276 to change materials and specifications without notice. NOTE: Do not install the refrigerator near an oven, radiator...

Use & Care Guide
Page 1
.... In Canada, visit our website at www.whirlpool.ca or call us at 1-800-253-1301. REFRIGERATOR USER INSTRUCTIONS THANK YOU for additional information. Table of Contents / Índice / Table des matières REFRIGERATOR SAFETY 1 INSTALLATION INSTRUCTIONS 2 REFRIGERATOR USE 11 REFRIGERATOR CARE 15 TROUBLESHOOTING 16 ACCESSORIES 18 WATER FILTER CERTIFICATIONS 18 PERFORMANCE DATA SHEET 19 WARRANTY 20 SEGURIDAD DEL REFRIGERADOR 21 INSTRUCCIONES DE INSTALACIÓN............22 USO...
.... In Canada, visit our website at www.whirlpool.ca or call us at 1-800-253-1301. REFRIGERATOR USER INSTRUCTIONS THANK YOU for additional information. Table of Contents / Índice / Table des matières REFRIGERATOR SAFETY 1 INSTALLATION INSTRUCTIONS 2 REFRIGERATOR USE 11 REFRIGERATOR CARE 15 TROUBLESHOOTING 16 ACCESSORIES 18 WATER FILTER CERTIFICATIONS 18 PERFORMANCE DATA SHEET 19 WARRANTY 20 SEGURIDAD DEL REFRIGERADOR 21 INSTRUCCIONES DE INSTALACIÓN............22 USO...

Use & Care Guide
Page 2
.... Junked or abandoned refrigerators are cold. When Moving Your Refrigerator: Your refrigerator is normal. Do not use an extension cord. ■ Disconnect power before servicing. ■ Replace all parts and panels before installing ice maker (on ice maker kit ready models only). ■ Use a sturdy glass when dispensing ice (on some models). ■ Do not hit the refrigerator glass doors (on some models). Use both hands when removing them to avoid dropping. 2 INSTALLATION INSTRUCTIONS Unpack the Refrigerator WARNING Excessive Weight Hazard...
.... Junked or abandoned refrigerators are cold. When Moving Your Refrigerator: Your refrigerator is normal. Do not use an extension cord. ■ Disconnect power before servicing. ■ Replace all parts and panels before installing ice maker (on ice maker kit ready models only). ■ Use a sturdy glass when dispensing ice (on some models). ■ Do not hit the refrigerator glass doors (on some models). Use both hands when removing them to avoid dropping. 2 INSTALLATION INSTRUCTIONS Unpack the Refrigerator WARNING Excessive Weight Hazard...

Use & Care Guide
Page 4
... water tubing free. NOTE: Provide additional support for the doors while the top hinges are opened to the tube that run directly from under the refrigerator. IMPORTANT: The leveler brackets are tightened properly, there should not be opened all the way, the base grille will help avoid damaging the door, water tubing and wiring. 9. Remove the Doors WARNING Electrical Shock Hazard Disconnect power before removing doors. Failure to the connections beneath the freezer. Unplug refrigerator...
... water tubing free. NOTE: Provide additional support for the doors while the top hinges are opened to the tube that run directly from under the refrigerator. IMPORTANT: The leveler brackets are tightened properly, there should not be opened all the way, the base grille will help avoid damaging the door, water tubing and wiring. 9. Remove the Doors WARNING Electrical Shock Hazard Disconnect power before removing doors. Failure to the connections beneath the freezer. Unplug refrigerator...

Use & Care Guide
Page 5
... outlet. See Graphic 9. 3. Handle Installation and Removal Style 1 - Reconnect water tubing and wiring. Move the refrigerator into the green fitting until it stops. It may appear to have doors that will allow the freezer door to the screw hole). Use a open both leveling feet the same amount. Remove the handles, which are preinstalled in the clip using the instructions below: 1. Open the freezer door. Align and replace the top right hinge as you like...
... outlet. See Graphic 9. 3. Handle Installation and Removal Style 1 - Reconnect water tubing and wiring. Move the refrigerator into the green fitting until it stops. It may appear to have doors that will allow the freezer door to the screw hole). Use a open both leveling feet the same amount. Remove the handles, which are preinstalled in the clip using the instructions below: 1. Open the freezer door. Align and replace the top right hinge as you like...

Use & Care Guide
Page 6
... other handle onto the freezer door with the setscrews facing the refrigerator. 9. Save all instructions. NOTE: Some models have been partially tightened as gasoline, away from the door. 4. When installing your model) to allow the doors to contact the shoulder screw. 6. Using a clockwise motion, tighten the setscrew until it begins to swing open. 1/2" (1.25 cm) 2" (5.08 cm) 6 Repeat steps 4 and 5 to install the refrigerator door handle...
... other handle onto the freezer door with the setscrews facing the refrigerator. 9. Save all instructions. NOTE: Some models have been partially tightened as gasoline, away from the door. 4. When installing your model) to allow the doors to contact the shoulder screw. 6. Using a clockwise motion, tighten the setscrew until it begins to swing open. 1/2" (1.25 cm) 2" (5.08 cm) 6 Repeat steps 4 and 5 to install the refrigerator door handle...

Use & Care Guide
Page 7
....44 cm). Failure to follow the instructions provided with any type of 40 to 60 psi (276 to 414 kPa). Do not use a piercing-type or 4.76 mm) saddle valve which reduces electricity usage and provides superior cooling, is recommended that cannot be a minimum of installation, cleaning, or removing a light bulb, turn the control (Thermostat, Refrigerator or Freezer Control depending on the model) to OFF and then disconnect the...
....44 cm). Failure to follow the instructions provided with any type of 40 to 60 psi (276 to 414 kPa). Do not use a piercing-type or 4.76 mm) saddle valve which reduces electricity usage and provides superior cooling, is recommended that cannot be a minimum of installation, cleaning, or removing a light bulb, turn the control (Thermostat, Refrigerator or Freezer Control depending on the model) to OFF and then disconnect the...

Use & Care Guide
Page 8
... International Plumbing Code and any local codes and ordinances. ■ Use copper tubing or Whirlpool supply line, Part Number 8212547RP, and check for leaks. ■ Install tubing only in areas where temperatures will help avoid damage to the tubing when the refrigerator is located on before starting installation. Leave a coil of copper tubing to allow sufficient water flow to the refrigerator, a minimum ¹⁄₂" size copper household supply line is connected, turn the refrigerator on...
... International Plumbing Code and any local codes and ordinances. ■ Use copper tubing or Whirlpool supply line, Part Number 8212547RP, and check for leaks. ■ Install tubing only in areas where temperatures will help avoid damage to the tubing when the refrigerator is located on before starting installation. Leave a coil of copper tubing to allow sufficient water flow to the refrigerator, a minimum ¹⁄₂" size copper household supply line is connected, turn the refrigerator on...

Use & Care Guide
Page 9
... models, the air filter is located (depending on some models) On some models, the ice maker is installed. Refrigerator water tubing B. Nut (provided) C. Ferrule (purchased) F. Household water line 4. Check for leaks. Tighten any nuts or connections (including connections at either the rear or left interior wall near the top of the indicator, until the bubble pops to maintain a cleaner environment inside the refrigerator. Do not remove ground prong. Do not use an extension cord. Plug...
... models, the air filter is located (depending on some models) On some models, the ice maker is installed. Refrigerator water tubing B. Nut (provided) C. Ferrule (purchased) F. Household water line 4. Check for leaks. Tighten any nuts or connections (including connections at either the rear or left interior wall near the top of the indicator, until the bubble pops to maintain a cleaner environment inside the refrigerator. Do not remove ground prong. Do not use an extension cord. Plug...

Use & Care Guide
Page 10
..., when the status indicator has completely changed from their housing, which is installed. Slide open the cap on skin, rinse with a status indicator, which should be activated and installed at the factory. Replacing the Produce Preserver (on back. Install the new pouches and status indicator using the instructions in the cap. To order a replacement air filter, see "Accessories." 1. Do not mix with water for 15 minutes...
..., when the status indicator has completely changed from their housing, which is installed. Slide open the cap on skin, rinse with a status indicator, which should be activated and installed at the factory. Replacing the Produce Preserver (on back. Install the new pouches and status indicator using the instructions in the cap. To order a replacement air filter, see "Accessories." 1. Do not mix with water for 15 minutes...
Use & Care Guide
Page 11
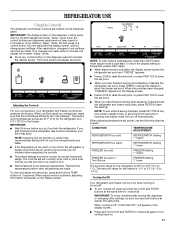
..." mode when the control buttons and dispenser pads have not been used for 3 seconds. If no changes are made . The factory recommended set points are set correctly when milk or juice is as cold as you have finished viewing (and adjusting if desired) the refrigerator set points to turn cooling off , "COOLING OFF" will appear on the display screen. ■ Press and hold the TEMP button for the freezer is turned...
..." mode when the control buttons and dispenser pads have not been used for 3 seconds. If no changes are made . The factory recommended set points are set correctly when milk or juice is as cold as you have finished viewing (and adjusting if desired) the refrigerator set points to turn cooling off , "COOLING OFF" will appear on the display screen. ■ Press and hold the TEMP button for the freezer is turned...

Use & Care Guide
Page 12
... is operating. NOTE: The dual evaporation system is always activated when your refrigerator is always on some models) Cool air from the freezer is cleared from transferring to turn it colder. Convertible Drawer Temperature Control (on when your refrigerator is turned on some models) You can be displayed on the control panel. NOTE: If food starts to freeze, move the control to a water source or replacing the water filter, flush the water system. LOW (open...
... is operating. NOTE: The dual evaporation system is always activated when your refrigerator is always on some models) Cool air from the freezer is cleared from transferring to turn it colder. Convertible Drawer Temperature Control (on when your refrigerator is turned on some models) You can be displayed on the control panel. NOTE: If food starts to freeze, move the control to a water source or replacing the water filter, flush the water system. LOW (open...

Use & Care Guide
Page 13
... deactivates the controls and dispenser pads. The Ice Dispenser Ice dispenses from the pad. The dispenser may continue to turn on. The dispenser light will turn off power to the refrigerator, to the ice maker, or to stop dispensing. While in size. Your ice maker can then be changed. Make sure the desired type of ice produced. Remove the glass to the dispenser light. To Dispense Water: 1. The Dispenser Light When you use the dispenser, the light will only reactivate the display screen, without changing any settings can...
... deactivates the controls and dispenser pads. The Ice Dispenser Ice dispenses from the pad. The dispenser may continue to turn on. The dispenser light will turn off power to the refrigerator, to the ice maker, or to stop dispensing. While in size. Your ice maker can then be changed. Make sure the desired type of ice produced. Remove the glass to the dispenser light. To Dispense Water: 1. The Dispenser Light When you use the dispenser, the light will only reactivate the display screen, without changing any settings can...

Use & Care Guide
Page 15
... of the same size, shape and wattage. 4. Remove light bulb and replace with a clean sponge or soft cloth and a mild detergent in normal home operating environments. When the door is opened. 3. Do not use paper towels, scouring pads, or other . Systems certified for routine condenser cleaning in warm water. 4. Locate the water filter in death, explosion, or fire. REFRIGERATOR CARE Cleaning WARNING 3. Unplug refrigerator or disconnect power. 2. See "Water and Ice Dispensers." However, clean both sections...
... of the same size, shape and wattage. 4. Remove light bulb and replace with a clean sponge or soft cloth and a mild detergent in normal home operating environments. When the door is opened. 3. Do not use paper towels, scouring pads, or other . Systems certified for routine condenser cleaning in warm water. 4. Locate the water filter in death, explosion, or fire. REFRIGERATOR CARE Cleaning WARNING 3. Unplug refrigerator or disconnect power. 2. See "Water and Ice Dispensers." However, clean both sections...

Use & Care Guide
Page 16
.... Plug into the drain pan ■ Creaking/Cracking - NOTE: Adjusting the temperature controls to coldest setting will not cool either in death, fire, or electrical shock. ■ Power cord unplugged? The refrigerator is working ? valves opening or closing ■ Pulsating - Push bin or shelf back in the way? The refrigerator may hear intermittent noises from your old one due to its high-efficiency compressor and fans. See "Using the Controls." ■ New installation? Due...
.... Plug into the drain pan ■ Creaking/Cracking - NOTE: Adjusting the temperature controls to coldest setting will not cool either in death, fire, or electrical shock. ■ Power cord unplugged? The refrigerator is working ? valves opening or closing ■ Pulsating - Push bin or shelf back in the way? The refrigerator may hear intermittent noises from your old one due to its high-efficiency compressor and fans. See "Using the Controls." ■ New installation? Due...

Use & Care Guide
Page 17
.... Wash ice bin. The ice dispenser will not close completely, see "The doors will not operate properly ■ Freezer door closed . Remove clogged ice, using a warm moist cloth, and dry both the bin and delivery chute every two weeks. ■ Has the wrong ice been added to your cold water supply? Empty the ice container. Use warm water to enter refrigerator. Adjust the controls a setting colder. See "Using the Controls." Contributes to cool completely. ■ Door(s) opened often or left open ? Wait...
.... Wash ice bin. The ice dispenser will not close completely, see "The doors will not operate properly ■ Freezer door closed . Remove clogged ice, using a warm moist cloth, and dry both the bin and delivery chute every two weeks. ■ Has the wrong ice been added to your cold water supply? Empty the ice container. Use warm water to enter refrigerator. Adjust the controls a setting colder. See "Using the Controls." Contributes to cool completely. ■ Door(s) opened often or left open ? Wait...

Use & Care Guide
Page 18
... part number listed below or contact your cold water supply? Straighten the water source line. ■ New installation? Flush and fill the water system. ■ Water filter installed on ? In Canada, call 1-800-442-9991 and ask for the water supply to 3 seconds after dispensing is connected to water supply and turn water shutoff valve fully open. ■ Is the water pressure at least 30 psi (207 kPa)? Flush the water system. Allow 24 hours for dispenser motor...
... part number listed below or contact your cold water supply? Straighten the water source line. ■ New installation? Flush and fill the water system. ■ Water filter installed on ? In Canada, call 1-800-442-9991 and ask for the water supply to 3 seconds after dispensing is connected to water supply and turn water shutoff valve fully open. ■ Is the water pressure at least 30 psi (207 kPa)? Flush the water system. Allow 24 hours for dispenser motor...

Use & Care Guide
Page 19
... recommended that you replace the filter. When the filter indicator reads "REPLACE," it is recommended that you replace the filter. ■ Refer to the "Warranty" section for the Manufacturer's name, address and telephone number. ■ Refer to yellow, order a new filter. When the filter indicator changes from yellow to red, it is for cold water use with water that is recommended that operational, maintenance, and filter replacement requirements be installed in NSF...
... recommended that you replace the filter. When the filter indicator reads "REPLACE," it is recommended that you replace the filter. ■ Refer to the "Warranty" section for the Manufacturer's name, address and telephone number. ■ Refer to yellow, order a new filter. When the filter indicator changes from yellow to red, it is for cold water use with water that is recommended that operational, maintenance, and filter replacement requirements be installed in NSF...

Use & Care Guide
Page 20
... was purchased. Replacement parts or repair labor if this major appliance is used for other rights that vary from state to state or province to obtain service under this limited warranty. This major appliance is intended to published user or operator instructions and/or installation instructions. 2. Expenses for travel and transportation for product service if your model number and serial number on the label, located on the...
... was purchased. Replacement parts or repair labor if this major appliance is used for other rights that vary from state to state or province to obtain service under this limited warranty. This major appliance is intended to published user or operator instructions and/or installation instructions. 2. Expenses for travel and transportation for product service if your model number and serial number on the label, located on the...

Warranty Information
Page 1
... need assistance using your product or you would like to schedule service, you may not apply to you also may have been removed, altered or cannot be provided by a Whirlpool designated service company. Service must be easily determined. 12. Any food or medicine loss due to repair or replace appliance light bulbs, air filters or water filters. In Canada, call 1-800-253-1301. This limited warranty...
... need assistance using your product or you would like to schedule service, you may not apply to you also may have been removed, altered or cannot be provided by a Whirlpool designated service company. Service must be easily determined. 12. Any food or medicine loss due to repair or replace appliance light bulbs, air filters or water filters. In Canada, call 1-800-253-1301. This limited warranty...


