

Owners Manual
Page 1
...injury, and tell you what can kill or hurt you still need your appliance. This symbol alerts you to reduce the chance of the dishwasher interior. All safety messages will follow instructions. Puede encontrar su número de modelo y de serie en la etiqueta ubicada cerca de ...la puerta al lado derecho o izquierdo del interior de la lavavajillas. ® DISHWASHER USER INSTRUCTIONS THANK YOU for additional information. In Canada, visit our website at www.whirlpool.ca or call us at 1-800-253-1301. If you what the potential hazard is the safety...
...injury, and tell you what can kill or hurt you still need your appliance. This symbol alerts you to reduce the chance of the dishwasher interior. All safety messages will follow instructions. Puede encontrar su número de modelo y de serie en la etiqueta ubicada cerca de ...la puerta al lado derecho o izquierdo del interior de la lavavajillas. ® DISHWASHER USER INSTRUCTIONS THANK YOU for additional information. In Canada, visit our website at www.whirlpool.ca or call us at 1-800-253-1301. If you what the potential hazard is the safety...

Owners Manual
Page 2
... in serious injury or cuts. 2 This will reduce the risk of electric shock by a qualified electrician. ■ For a permanently connected dishwasher: The dishwasher must be connected to a grounded metal, permanent wiring system, or an equipment-grounding conductor must be run with the circuit conductors and connected... system has not been used for two weeks or more. The plug must be grounded. Do not modify the plug provided with the dishwasher; Check with a qualified electrician or service representative if you are in a risk of electric shock. In the event of a malfunction or...
... in serious injury or cuts. 2 This will reduce the risk of electric shock by a qualified electrician. ■ For a permanently connected dishwasher: The dishwasher must be connected to a grounded metal, permanent wiring system, or an equipment-grounding conductor must be run with the circuit conductors and connected... system has not been used for two weeks or more. The plug must be grounded. Do not modify the plug provided with the dishwasher; Check with a qualified electrician or service representative if you are in a risk of electric shock. In the event of a malfunction or...

Owners Manual
Page 3
... plates and glasses in the covers to keep your silverware. ■ Use the slots in the upper rack. Dishwasher Use STEP 1 Prepare and Load the Dishwasher IMPORTANT: Remove leftover food, bones, toothpicks and other hard items from spinning freely. It is closed detergent B container...A. This will improve cleaning and drying results. ■ Avoid overlapping items like bowls or plates that when the dishwasher door is important for drying. 4 Start dishwasher. Add powder, liquid or tablet detergent just before washing. ■ When loading silverware, always place sharp items...
... plates and glasses in the covers to keep your silverware. ■ Use the slots in the upper rack. Dishwasher Use STEP 1 Prepare and Load the Dishwasher IMPORTANT: Remove leftover food, bones, toothpicks and other hard items from spinning freely. It is closed detergent B container...A. This will improve cleaning and drying results. ■ Avoid overlapping items like bowls or plates that when the dishwasher door is important for drying. 4 Start dishwasher. Add powder, liquid or tablet detergent just before washing. ■ When loading silverware, always place sharp items...

Owners Manual
Page 4
... Run hot water at "Full." Close the door firmly within 3 seconds. Follow instructions on the dish racks and interior of your dishes and dishwasher interior will have hard water or notice rings or spots, try a higher setting. Make sure cap is hot. STEP 3 Select a Cycle ... cycle and options as spots or streaks. If you use too much soil remains on the items - They also improve drying by either using other dishwasher detergent. max - 21 3 - --- Refill Lock fill - -- 6 5 4 max - 21 3 - --- -- - --- Turn the arrow adjuster inside the dispenser by allowing ...
... Run hot water at "Full." Close the door firmly within 3 seconds. Follow instructions on the dish racks and interior of your dishes and dishwasher interior will have hard water or notice rings or spots, try a higher setting. Make sure cap is hot. STEP 3 Select a Cycle ... cycle and options as spots or streaks. If you use too much soil remains on the items - They also improve drying by either using other dishwasher detergent. max - 21 3 - --- Refill Lock fill - -- 6 5 4 max - 21 3 - --- -- - --- Turn the arrow adjuster inside the dispenser by allowing ...

Owners Manual
Page 5
See option selections. cycle. Use for lightly soiled items or During the wash, the wash action will not be washed right away. your dishwasher monitors the soil level. Do not use detergent. 0:03 0:15 0:16 IMPORTANT: The sensor in your dishes using slightly more water and energy. If the ... 1:21 3:30 china and crystal. Cycle time and/or water usage can vary as needed. May add heat and time to partial dish loads. Your dishwasher may not have all day-to-day soil types when washing full to the cycle. and regular tableware. The For improved drying, select the Heated...
See option selections. cycle. Use for lightly soiled items or During the wash, the wash action will not be washed right away. your dishwasher monitors the soil level. Do not use detergent. 0:03 0:15 0:16 IMPORTANT: The sensor in your dishes using slightly more water and energy. If the ... 1:21 3:30 china and crystal. Cycle time and/or water usage can vary as needed. May add heat and time to partial dish loads. Your dishwasher may not have all day-to-day soil types when washing full to the cycle. and regular tableware. The For improved drying, select the Heated...

Owners Manual
Page 6
...except Rinse Only Control Lock To avoid unintended use of rinse aid will not resume until reaching the desired hours for Residential Dishwashers. Let the dishwasher drain completely. Adds heat, wash time and water to meet the NSF/ANSI requirements. To run your dishes, the ... cycle. Delays the start or resume a wash cycle COMMENTS If the door is opened while the controls are not intended for Residential Dishwashers. Clean indicator glows when a cycle is interrupted, the Start/Resume indicator flashes. OPTION SELECTIONS OPTIONS DISH LOAD TYPES DESCRIPTIONS USE WITH...
...except Rinse Only Control Lock To avoid unintended use of rinse aid will not resume until reaching the desired hours for Residential Dishwashers. Let the dishwasher drain completely. Adds heat, wash time and water to meet the NSF/ANSI requirements. To run your dishes, the ... cycle. Delays the start or resume a wash cycle COMMENTS If the door is opened while the controls are not intended for Residential Dishwashers. Clean indicator glows when a cycle is interrupted, the Start/Resume indicator flashes. OPTION SELECTIONS OPTIONS DISH LOAD TYPES DESCRIPTIONS USE WITH...

Owners Manual
Page 7
... the top rack to accommodate items up to 9" (22 cm) in the top rack and 13" (33 cm) in place during washing. Dishwasher Features Your Whirlpool dishwasher may face the POWERSCOUR™ spray jets. Grasp the tip of the top rack to use this feature. Reposition the clip on another horizontal...adjust the fold-down , toward the top of the rack. Slide it is completely latched before pulling out the bottom rack and before closing the dishwasher door. Adjusters are located on the door, the bottom rack, or placed inside the bottom rack. in the door: 1. POWERSCOUR™ Wash ...
... the top rack to accommodate items up to 9" (22 cm) in the top rack and 13" (33 cm) in place during washing. Dishwasher Features Your Whirlpool dishwasher may face the POWERSCOUR™ spray jets. Grasp the tip of the top rack to use this feature. Reposition the clip on another horizontal...adjust the fold-down , toward the top of the rack. Slide it is completely latched before pulling out the bottom rack and before closing the dishwasher door. Adjusters are located on the door, the bottom rack, or placed inside the bottom rack. in the door: 1. POWERSCOUR™ Wash ...

Owners Manual
Page 8
...until most soils are located on dishes). ■ Dishes feel gritty to -remove soils or calcium deposits from being recirculated onto your dishwasher indicates hard water. If you have hard water (above 15 grains), clean your filter at least once per week *Manufacturer's recommendation:... To remove Upper Filter Assembly 8 K 3. as shown UNLOCK L UN O CK below shows the recommended cleaning frequency. L O CK Filtration System Your dishwasher has the latest technology in both the top and bottom racks. Raise the top rack to accommodate items up of Loads If you wash Per...
...until most soils are located on dishes). ■ Dishes feel gritty to -remove soils or calcium deposits from being recirculated onto your dishwasher indicates hard water. If you have hard water (above 15 grains), clean your filter at least once per week *Manufacturer's recommendation:... To remove Upper Filter Assembly 8 K 3. as shown UNLOCK L UN O CK below shows the recommended cleaning frequency. L O CK Filtration System Your dishwasher has the latest technology in both the top and bottom racks. Raise the top rack to accommodate items up of Loads If you wash Per...

Owners Manual
Page 9
... on a damp sponge to clean the cooled-down interior. Vinegar will mix with a paste of the dishwasher, with the wash water. In the U.S.A., www.whirlpool.com In Canada, www.whirlpool.ca Dishwasher is recommended - Is there power to replace the rinse aid dispenser cap after filling (or refilling) the rinse aid. 3. Replace the fuse...
... on a damp sponge to clean the cooled-down interior. Vinegar will mix with a paste of the dishwasher, with the wash water. In the U.S.A., www.whirlpool.com In Canada, www.whirlpool.ca Dishwasher is recommended - Is there power to replace the rinse aid dispenser cap after filling (or refilling) the rinse aid. 3. Replace the fuse...

Owners Manual
Page 10
... need to use an air-dry or energy-saving dry option? To slow this sensor adjustment. ■ Water remains in the dishwasher Is the cycle complete? Reseason cookware after washing it is a milky, rainbow-colored deposit; Is the detergent lump-free? Replace ... during installation? (See "Install the drain hose" section in the Installation Instructions.) ■ Detergent remains in the dishwasher and cause marking. This dishwasher is rinse aid in the dispenser. Was the disposer knockout plug removed during washing? Try a different brand to allow...
... need to use an air-dry or energy-saving dry option? To slow this sensor adjustment. ■ Water remains in the dishwasher Is the cycle complete? Reseason cookware after washing it is a milky, rainbow-colored deposit; Is the detergent lump-free? Replace ... during installation? (See "Install the drain hose" section in the Installation Instructions.) ■ Detergent remains in the dishwasher and cause marking. This dishwasher is rinse aid in the dispenser. Was the disposer knockout plug removed during washing? Try a different brand to allow...

Owners Manual
Page 11
... some items with the spray arms, water feed tube, or POWERSCOUR™ spray jets. Load soiled dish surfaces to sit for automatic dishwashing. Make sure dishes do not interfere with heavier soils, use the correct amount of fresh detergent? Dishes are not completely clean ■... too low? Are high suds slowing the wash arm? Home water pressure should be too delicate for several hours in dispenser? Use recommended dishwasher detergents only. ■ Dishes in your water pressure, call a licensed, qualified plumber. Are items loaded so they are stable and do...
... some items with the spray arms, water feed tube, or POWERSCOUR™ spray jets. Load soiled dish surfaces to sit for automatic dishwashing. Make sure dishes do not interfere with heavier soils, use the correct amount of fresh detergent? Dishes are not completely clean ■... too low? Are high suds slowing the wash arm? Home water pressure should be too delicate for several hours in dispenser? Use recommended dishwasher detergents only. ■ Dishes in your water pressure, call a licensed, qualified plumber. Are items loaded so they are stable and do...

Owners Manual
Page 12
... If you on the right-hand or left-hand side of your home of the dishwasher interior. In Canada, call 1-800-253-1301. In Canada: Whirlpool Brand Home Appliances Customer eXperience Centre 1901 Minnesota Court Mississauga, Ontario L5N 3A7 Please keep these excluded ...or replacement under this major appliance is operated and maintained according to instructions attached to or furnished with the product, Whirlpool Corporation or Whirlpool Canada LP (hereafter "Whirlpool") will pay for other damage to the finish of your major appliance, unless such damage results from defects in...
... If you on the right-hand or left-hand side of your home of the dishwasher interior. In Canada, call 1-800-253-1301. In Canada: Whirlpool Brand Home Appliances Customer eXperience Centre 1901 Minnesota Court Mississauga, Ontario L5N 3A7 Please keep these excluded ...or replacement under this major appliance is operated and maintained according to instructions attached to or furnished with the product, Whirlpool Corporation or Whirlpool Canada LP (hereafter "Whirlpool") will pay for other damage to the finish of your major appliance, unless such damage results from defects in...

Warranty
Page 1
... the door on how to use your major appliance, to instruct you on the right-hand or left-hand side of the dishwasher interior. Repairs to parts or systems resulting from warranty coverage. 3. Major appliances with original model/serial numbers that is contrary to..., Ontario L5N 3A7 Please keep these excluded circumstances shall be easily determined. All rights reserved. ® Registered Trademark/TM Trademark of Whirlpool, U.S.A. Proof of original purchase date is required to obtain service under these User Instructions and model number information for product service if...
... the door on how to use your major appliance, to instruct you on the right-hand or left-hand side of the dishwasher interior. Repairs to parts or systems resulting from warranty coverage. 3. Major appliances with original model/serial numbers that is contrary to..., Ontario L5N 3A7 Please keep these excluded circumstances shall be easily determined. All rights reserved. ® Registered Trademark/TM Trademark of Whirlpool, U.S.A. Proof of original purchase date is required to obtain service under these User Instructions and model number information for product service if...
Dimension Guide
Page 1
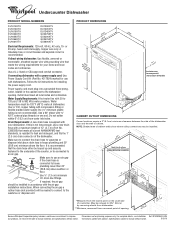
... 862 kPa) water pressure. Use ¹⁄₂" (1.3 cm) minimum I.D. NOTE: Shaded area of the dishwasher door and the wall or cabinet. Specifications subject to the dishwasher opening . (14³.⁄4₄"cm ) (5. 12"cm ) Because Whirlpool Corporation policy includes a continuous commitment to house plumbing lower than 20" (50.8 cm) above the floor...
... 862 kPa) water pressure. Use ¹⁄₂" (1.3 cm) minimum I.D. NOTE: Shaded area of the dishwasher door and the wall or cabinet. Specifications subject to the dishwasher opening . (14³.⁄4₄"cm ) (5. 12"cm ) Because Whirlpool Corporation policy includes a continuous commitment to house plumbing lower than 20" (50.8 cm) above the floor...
Installation Instructions
Page 2
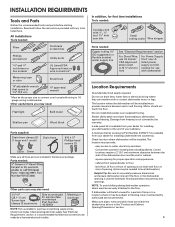
...instructions. This is , tell you how to reduce the chance of injury, and tell you and others are not followed. Table of Contents Dishwasher Safety 2 Installation Requirements 3 Tools and Parts 3 Location Requirements 3 Product and Cabinet Opening Dimensions 4 Drain Requirements 5 Water Supply Requirements 5 ...• Installation should be installed to : • Slowly open door. Remove shipping materials, drain hose and lower rack. Close dishwasher door until completely installed. You Need to meet all safety messages. Doing so can be killed or seriously injured if you don...
...instructions. This is , tell you how to reduce the chance of injury, and tell you and others are not followed. Table of Contents Dishwasher Safety 2 Installation Requirements 3 Tools and Parts 3 Location Requirements 3 Product and Cabinet Opening Dimensions 4 Drain Requirements 5 Water Supply Requirements 5 ...• Installation should be installed to : • Slowly open door. Remove shipping materials, drain hose and lower rack. Close dishwasher door until completely installed. You Need to meet all safety messages. Doing so can be killed or seriously injured if you don...
Installation Instructions
Page 3
...existing electrical supply. Do not run drain lines, water lines or electrical wiring where they can interfere with any tools listed here. Shelter dishwasher and water lines leading to fit 2.2 cm) hole For Power Supply Cord: use UL listed power supply cord kit marked for installing underneath... the countertop. If dishwasher will be left unused for proper operation and appearance. • cabinet front perpendicular to floor. • level floor. (If floor at front...
...existing electrical supply. Do not run drain lines, water lines or electrical wiring where they can interfere with any tools listed here. Shelter dishwasher and water lines leading to fit 2.2 cm) hole For Power Supply Cord: use UL listed power supply cord kit marked for installing underneath... the countertop. If dishwasher will be left unused for proper operation and appearance. • cabinet front perpendicular to floor. • level floor. (If floor at front...

Installation Instructions
Page 4
... may be compressed. (not used on all models) (532.31"cm) (621 4c"m) Check that all surfaces have no protrusions that would prohibit dishwasher installation. (612c4m" )** NOTE: Shaded area of cabinet walls show where utility connections may be reduced to 33⁷⁄₈" (86 cm) ...by removing wheels from dishwasher. **Minimum, measured from the lowest point on the underside of opening. (86m.344inc"*m) 4 (10.42"cm) (7.63"cm) (17.2 cm) (4.4 cm) ...
... may be compressed. (not used on all models) (532.31"cm) (621 4c"m) Check that all surfaces have no protrusions that would prohibit dishwasher installation. (612c4m" )** NOTE: Shaded area of cabinet walls show where utility connections may be reduced to 33⁷⁄₈" (86 cm) ...by removing wheels from dishwasher. **Minimum, measured from the lowest point on the underside of opening. (86m.344inc"*m) 4 (10.42"cm) (7.63"cm) (17.2 cm) (4.4 cm) ...
Installation Instructions
Page 5
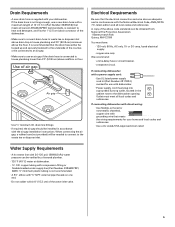
..." (50.8 cm) above the floor. We recommend: • a time-delay fuse or circuit breaker. • a separate circuit. If connecting dishwasher with direct wiring: • Use flexible, armored or nonmetallic sheathed, copper wire with the National Electrical Code, ANSI/NFPA 70 - Water Supply Requirements...When connecting the air gap, a rubber hose (not provided) will be verified by a licensed plumber. •120°F (49°C) water at dishwasher O.D. If the drain hose is not recommended. • A 90° elbow with a maximum length of 12' (3.7 m) (Part Number 3385556) ...
..." (50.8 cm) above the floor. We recommend: • a time-delay fuse or circuit breaker. • a separate circuit. If connecting dishwasher with direct wiring: • Use flexible, armored or nonmetallic sheathed, copper wire with the National Electrical Code, ANSI/NFPA 70 - Water Supply Requirements...When connecting the air gap, a rubber hose (not provided) will be verified by a licensed plumber. •120°F (49°C) water at dishwasher O.D. If the drain hose is not recommended. • A 90° elbow with a maximum length of 12' (3.7 m) (Part Number 3385556) ...
Installation Instructions
Page 6
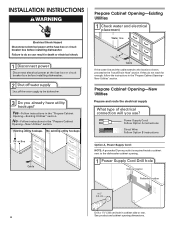
...line (15.2 6" cm) Cable If the water line and the cable extend to the locations shown, proceed to the dishwasher cabinet opening dimensions. Prepare Cabinet Opening-New Utilities Prepare and route the electrical supply What type of electrical connection will you already...;⁄₂" (3.8 cm) hole in death or electrical shock. 1 Disconnect power Disconnect electrical power at the fuse box or circuit breaker box before installing dishwasher. 2 3 Do you use? Power Supply Cord: Follow Option A instructions Direct Wire: Follow Option B instructions Option A, Power Supply Cord: NOTE: ...
...line (15.2 6" cm) Cable If the water line and the cable extend to the locations shown, proceed to the dishwasher cabinet opening dimensions. Prepare Cabinet Opening-New Utilities Prepare and route the electrical supply What type of electrical connection will you already...;⁄₂" (3.8 cm) hole in death or electrical shock. 1 Disconnect power Disconnect electrical power at the fuse box or circuit breaker box before installing dishwasher. 2 3 Do you use? Power Supply Cord: Follow Option A instructions Direct Wire: Follow Option B instructions Option A, Power Supply Cord: NOTE: ...
Installation Instructions
Page 7
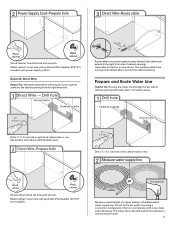
... hole with power supply cord kit. Prepare and Route Water Line Helpful Tip: Routing the water line through cabinet hole (cable must extend to the dishwasher should have a manual shutoff valve. 7 See product and cabinet opening dimensions. 2 Direct Wire-Prepare hole (15.2 c6m") Route cable from power ...supply through the left side of cabinet opening from moving when dishwasher is in the cabinet side or rear. 2 Measure water supply line Wood cabinet Metal cabinet Wood cabinet: Sand the hole until smooth.
... hole with power supply cord kit. Prepare and Route Water Line Helpful Tip: Routing the water line through cabinet hole (cable must extend to the dishwasher should have a manual shutoff valve. 7 See product and cabinet opening dimensions. 2 Direct Wire-Prepare hole (15.2 c6m") Route cable from power ...supply through the left side of cabinet opening from moving when dishwasher is in the cabinet side or rear. 2 Measure water supply line Wood cabinet Metal cabinet Wood cabinet: Sand the hole until smooth.


