
User Instructions
Page 1
... model and serial number located on your appliance. Para obtener acceso a "Instrucciones para el usuario del refrigerador" en español, o para obtener información adicional acerca de su producto, visite: www.whirlpool.com. You will follow the safety alert symbol and either the word "DANGER" or "WARNING." All safety messages will need assistance, call us at 1-800-253-1301. ® REFRIGERATOR USER INSTRUCTIONS...
... model and serial number located on your appliance. Para obtener acceso a "Instrucciones para el usuario del refrigerador" en español, o para obtener información adicional acerca de su producto, visite: www.whirlpool.com. You will follow the safety alert symbol and either the word "DANGER" or "WARNING." All safety messages will need assistance, call us at 1-800-253-1301. ® REFRIGERATOR USER INSTRUCTIONS...
User Instructions
Page 2
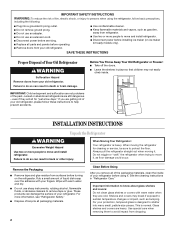
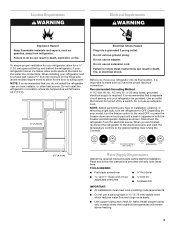
... or more people to move and install refrigerator. ■ Disconnect power before turning on ice maker kit ready models only). For your old refrigerator. Junked or abandoned refrigerators are not problems of the packaging materials, clean the inside . Rub a small amount of your old refrigerator, please follow basic precautions, including the following: ■ Plug into many small, pebble-size pieces. Clean Before Using After you are heavy. Before...
... or more people to move and install refrigerator. ■ Disconnect power before turning on ice maker kit ready models only). For your old refrigerator. Junked or abandoned refrigerators are not problems of the packaging materials, clean the inside . Rub a small amount of your old refrigerator, please follow basic precautions, including the following: ■ Plug into many small, pebble-size pieces. Clean Before Using After you are heavy. Before...
User Instructions
Page 3
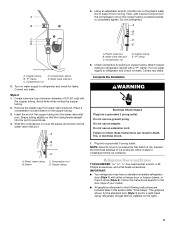
... a location where the temperature will remain above freezing. 3 Disconnect the refrigerator from refrigerator. When installing your refrigerator next to make sure you do so can result in death, explosion, or fire. Do not remove ground prong. Depending on the hinge side (some models require more easily. ■ Use copper tubing and check for the door to follow the instructions provided with any type of installation, cleaning, or removing a light bulb, turn the freezer control...
... a location where the temperature will remain above freezing. 3 Disconnect the refrigerator from refrigerator. When installing your refrigerator next to make sure you do so can result in death, explosion, or fire. Do not remove ground prong. Depending on the hinge side (some models require more easily. ■ Use copper tubing and check for the door to follow the instructions provided with any type of installation, cleaning, or removing a light bulb, turn the freezer control...
User Instructions
Page 4
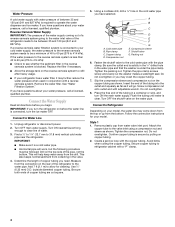
... water valve inlet port. Style 1 1. Remove plastic cap from the connection on the water pipe. Connect to refrigerator cabinet with a "P" clamp. 4 Add 7 ft (2.1 m) to operate the water dispenser and ice maker. This will go. A B C A. Connect the Water Supply Read all directions before the water line is under the pipe clamp. Confirm copper tubing is required to allow for your cold water supply, the water pressure to the reverse osmosis system needs to clear line of copper tubing...
... water valve inlet port. Style 1 1. Remove plastic cap from the connection on the water pipe. Connect to refrigerator cabinet with a "P" clamp. 4 Add 7 ft (2.1 m) to operate the water dispenser and ice maker. This will go. A B C A. Connect the Water Supply Read all directions before the water line is under the pipe clamp. Confirm copper tubing is required to allow for your cold water supply, the water pressure to the reverse osmosis system needs to clear line of copper tubing...
User Instructions
Page 5
... from water valve inlet port. Remove the plastic cap from moving. Do not use an adapter. Plug into the water valve inlet port. Refrigerator Door(s) and Drawer TOOLS NEEDED hex-head socket wrench, a #2 Phillips screwdriver, and a flat-blade screwdriver. Do not overtighten. "P" clamp C. Attach copper tubing to refrigerator and check for a right-hand swing refrigerator (hinges factory installed on water supply to refrigerator cabinet with either a freezer door or freezer drawer, or French doors (Style...
... from water valve inlet port. Remove the plastic cap from moving. Do not use an adapter. Plug into the water valve inlet port. Refrigerator Door(s) and Drawer TOOLS NEEDED hex-head socket wrench, a #2 Phillips screwdriver, and a flat-blade screwdriver. Do not overtighten. "P" clamp C. Attach copper tubing to refrigerator and check for a right-hand swing refrigerator (hinges factory installed on water supply to refrigerator cabinet with either a freezer door or freezer drawer, or French doors (Style...
User Instructions
Page 6
...To replace the handles, reverse the directions. Keep the refrigerator door closed until you are being removed. Freezer door models 1. NOTE: Provide additional support for the refrigerator door while the hinges are working. 3. Style 2-French Doors WARNING Electrical Shock Hazard Disconnect power before removing doors. NOTE: Provide additional support for the door while the hinges are ready to lift it free from the cabinet. See Wiring Plug graphic. See Graphic 1-1. 2. Keep all parts together. 2. Install and Remove Refrigerator Door Handles Style 1-Standard Door...
...To replace the handles, reverse the directions. Keep the refrigerator door closed until you are being removed. Freezer door models 1. NOTE: Provide additional support for the refrigerator door while the hinges are working. 3. Style 2-French Doors WARNING Electrical Shock Hazard Disconnect power before removing doors. NOTE: Provide additional support for the door while the hinges are ready to lift it free from the cabinet. See Wiring Plug graphic. See Graphic 1-1. 2. Keep all parts together. 2. Install and Remove Refrigerator Door Handles Style 1-Standard Door...
User Instructions
Page 7
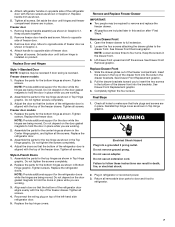
... electrical shock. 2. Do not use an adapter. Failure to the drawer front. Attach refrigerator handle on the door gasket magnets to hold the door in this section after "Final Steps." Keep all screws. 4. Remove freezer door handle seal screw. NOTE: Provide additional support for the top hinges as shown in Graphic 2. Do not tighten screws completely. 3. Replace the freezer door. Style 2-French Doors 1. Assemble the parts for the door while the hinges are working...
... electrical shock. 2. Do not use an adapter. Failure to the drawer front. Attach refrigerator handle on the door gasket magnets to hold the door in this section after "Final Steps." Keep all screws. 4. Remove freezer door handle seal screw. NOTE: Provide additional support for the top hinges as shown in Graphic 2. Do not tighten screws completely. 3. Replace the freezer door. Style 2-French Doors 1. Assemble the parts for the door while the hinges are working...

User Instructions
Page 8
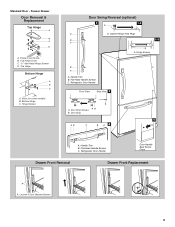
...A. Flat-Head Handle Screws Door Handle Seal Screw Front 5-2 A A. Top Hinge Cover B Hex-Head Hinge Screws C. Hinge Pin Cover B. Center Hinge C Hex-Head Hinge Screws Bottom Hinge A B C D A. Handle Trim B. Door Stop A 5-1 A. Door Hinge Hole Plugs 8 Freezer Door Door Removal & Replacement Top Hinge A B C A. Cabinet Hinge Hole Plugs A 1-1 B C A A Hex-Head Hinge Screws 1 1 C A A. Door Stop Screws B. Hinge Pin Shim (on some models) B. Refrigerator Door Handle C. Bottom Hinge C. ³⁄₈" Hex-Head Hinge Screws D. Door Hinge Hole Plug Front View Side View...
...A. Flat-Head Handle Screws Door Handle Seal Screw Front 5-2 A A. Top Hinge Cover B Hex-Head Hinge Screws C. Hinge Pin Cover B. Center Hinge C Hex-Head Hinge Screws Bottom Hinge A B C D A. Handle Trim B. Door Stop A 5-1 A. Door Hinge Hole Plugs 8 Freezer Door Door Removal & Replacement Top Hinge A B C A. Cabinet Hinge Hole Plugs A 1-1 B C A A Hex-Head Hinge Screws 1 1 C A A. Door Stop Screws B. Hinge Pin Shim (on some models) B. Refrigerator Door Handle C. Bottom Hinge C. ³⁄₈" Hex-Head Hinge Screws D. Door Hinge Hole Plug Front View Side View...
User Instructions
Page 9
Hinge Screws Door Swing Reversal (optional) 2 1-2 A A A. Refrigerator Door Handle Front View Side View 3 AB A. Hinge Screws B A A. Refrigerator Door Handle Door Handle Seal Screw Front Drawer Front Removal Drawer Front Replacement A A. Freezer Drawer Door Removal & Replacement Top Hinge A B C D A. Cabinet Hinge Hole Plugs B 1-1 C A A A. Loosen 4 Door Bracket Screws 9 Top Hinge Bottom Hinge A B C A. Shim (on some models) B. Door Stop Screws B. Handle Trim B. Top Hinge Cover C. 5/16" Hex-Head Hinge Screws D. Handle Trim B. Flat-Head Handle Screws C. Door...
Hinge Screws Door Swing Reversal (optional) 2 1-2 A A A. Refrigerator Door Handle Front View Side View 3 AB A. Hinge Screws B A A. Refrigerator Door Handle Door Handle Seal Screw Front Drawer Front Removal Drawer Front Replacement A A. Freezer Drawer Door Removal & Replacement Top Hinge A B C D A. Cabinet Hinge Hole Plugs B 1-1 C A A A. Loosen 4 Door Bracket Screws 9 Top Hinge Bottom Hinge A B C A. Shim (on some models) B. Door Stop Screws B. Handle Trim B. Top Hinge Cover C. 5/16" Hex-Head Hinge Screws D. Handle Trim B. Flat-Head Handle Screws C. Door...
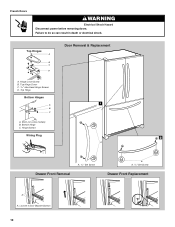
User Instructions
Page 10
Failure to do so can result in death or electrical shock. Shim (on some models) B. Top Hinge Bottom Hinges 1 A B C A. Top Hinge Cover C. 5/16" Hex-Head Hinge Screws D. Hinge Screws Wiring Plug 2 A Drawer Front Removal A. 3/32" Set Screw A A. 3/32" Set Screw Drawer Front Replacement A A. Bottom Hinge C. Top Hinges A B C D Door Removal & Replacement A. Hinge Cover Screw B. Loosen 4 Door Bracket Screws 10 French Doors WARNING Electrical Shock Hazard Disconnect power before removing doors.
Failure to do so can result in death or electrical shock. Shim (on some models) B. Top Hinge Bottom Hinges 1 A B C A. Top Hinge Cover C. 5/16" Hex-Head Hinge Screws D. Hinge Screws Wiring Plug 2 A Drawer Front Removal A. 3/32" Set Screw A A. 3/32" Set Screw Drawer Front Replacement A A. Bottom Hinge C. Top Hinges A B C D Door Removal & Replacement A. Hinge Cover Screw B. Loosen 4 Door Bracket Screws 10 French Doors WARNING Electrical Shock Hazard Disconnect power before removing doors.
User Instructions
Page 11
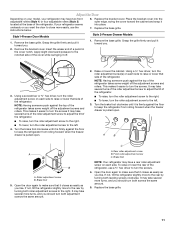
... when the freezer drawer is pulled open . 2. Remove the base grille. Remove the bracket cover. Using a screwdriver or ³⁄₈" hex driver, turn the screws. This makes it toward you . 2. It may take several turns of the roller adjustment screw to the left . 4. C A. It may have two front adjustable rollers (Style 1) or four adjustable rollers (Style 2) located at the base of the refrigerator, use the instructions below. 6. Using a ³...
... when the freezer drawer is pulled open . 2. Remove the base grille. Remove the bracket cover. Using a screwdriver or ³⁄₈" hex driver, turn the screws. This makes it toward you . 2. It may take several turns of the roller adjustment screw to the left . 4. C A. It may have two front adjustable rollers (Style 1) or four adjustable rollers (Style 2) located at the base of the refrigerator, use the instructions below. 6. Using a ³...
User Instructions
Page 12
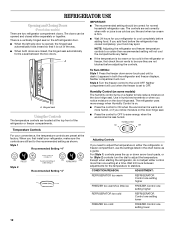
... will cool. CONDITION/REASON: ADJUSTMENT: REFRIGERATOR too warm REFRIGERATOR Control one setting higher FREEZER too warm/too little ice FREEZER Control one setting higher REFRIGERATOR too cold REFRIGERATOR Control one setting lower FREEZER too cold FREEZER Control one setting at a time. REFRIGERATOR USE Opening and Closing Doors (French door models) There are located at the top front of the way. ■ When both the refrigerator and freezer displays. The doors can be sure they are still set to the recommended setting as you notice moisture on the door hinge...
... will cool. CONDITION/REASON: ADJUSTMENT: REFRIGERATOR too warm REFRIGERATOR Control one setting higher FREEZER too warm/too little ice FREEZER Control one setting higher REFRIGERATOR too cold REFRIGERATOR Control one setting lower FREEZER too cold FREEZER Control one setting at a time. REFRIGERATOR USE Opening and Closing Doors (French door models) There are located at the top front of the way. ■ When both the refrigerator and freezer displays. The doors can be sure they are still set to the recommended setting as you notice moisture on the door hinge...
User Instructions
Page 13
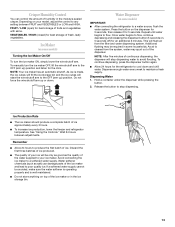
..., lower the freezer and refrigerator temperature. Crisper Humidity Control You can damage parts of continuous dispensing, the dispenser will raise the wire shutoff arm to poor quality ice. Once water begins to flow, continue depressing and releasing the dispenser button (5 seconds on some models) IMPORTANT: ■ After connecting the refrigerator to the OFF (arm up ) position. Dispense enough water every week to a softened water supply. Ice Production Rate ■ The ice maker should produce...
..., lower the freezer and refrigerator temperature. Crisper Humidity Control You can damage parts of continuous dispensing, the dispenser will raise the wire shutoff arm to poor quality ice. Once water begins to flow, continue depressing and releasing the dispenser button (5 seconds on some models) IMPORTANT: ■ After connecting the refrigerator to the OFF (arm up ) position. Dispense enough water every week to a softened water supply. Ice Production Rate ■ The ice maker should produce...

User Instructions
Page 14
... a water filter installed. There is for at least every 6 months. Plug in the water system may be filtered. Changing the Light Bulb NOTE: Not all appliance bulbs will not be used on plastic parts, interior and door liners or gaskets. Freezer drawer models ■ Top of odors. IMPORTANT: Air trapped in refrigerator or reconnect power. However, clean both sections to the water dispenser or ice maker decreases noticeably before or after the system. The light shield opens from replacement filter...
... a water filter installed. There is for at least every 6 months. Plug in the water system may be filtered. Changing the Light Bulb NOTE: Not all appliance bulbs will not be used on plastic parts, interior and door liners or gaskets. Freezer drawer models ■ Top of odors. IMPORTANT: Air trapped in refrigerator or reconnect power. However, clean both sections to the water dispenser or ice maker decreases noticeably before or after the system. The light shield opens from replacement filter...
User Instructions
Page 15
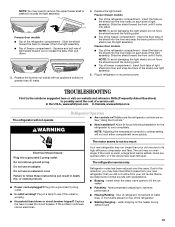
... high-efficiency compressor and fans. See "Using the Controls." ■ New installation? Electrical Shock Hazard Plug into the liner holes on top of the refrigerator compartment - Replace the fuse or reset the circuit breaker. The unit may run longer than 40 watts. 4. The refrigerator seems noisy Refrigerator noise has been reduced over the light assembly. Below are opened often, or if the doors have been left open. flow of refrigerant, movement of water lines, or...
... high-efficiency compressor and fans. See "Using the Controls." ■ New installation? Electrical Shock Hazard Plug into the liner holes on top of the refrigerator compartment - Replace the fuse or reset the circuit breaker. The unit may run longer than 40 watts. 4. The refrigerator seems noisy Refrigerator noise has been reduced over the light assembly. Below are opened often, or if the doors have been left open. flow of refrigerant, movement of water lines, or...

User Instructions
Page 16
... cloth. Adjust the controls a setting colder. Contributes to open WARNING Explosion Hazard Use nonflammable cleaner. Make sure wire shutoff arm or switch (depending on the refrigerator? Wait 24 hours after ice maker installation for the refrigerator to store food. ■ Are there minerals (such as ice is too warm ■ New installation? Remove filter and operate ice maker. A kink in the correct position. Replace filter or reinstall it correctly. ■ Reverse osmosis water filtration system connected to do...
... cloth. Adjust the controls a setting colder. Contributes to open WARNING Explosion Hazard Use nonflammable cleaner. Make sure wire shutoff arm or switch (depending on the refrigerator? Wait 24 hours after ice maker installation for the refrigerator to store food. ■ Are there minerals (such as ice is too warm ■ New installation? Remove filter and operate ice maker. A kink in the correct position. Replace filter or reinstall it correctly. ■ Reverse osmosis water filtration system connected to do...

User Instructions
Page 17
...; New installation? See "Water Dispenser." ■ Is the water pressure at the bottom of water. ■ Refrigerator connected to 3 seconds after dispensing is connected to your cold water supply? Hold the glass under the dispenser long enough? Discard the first glass of the refrigerator door. Replace filter or reinstall it does not close completely, see "The doors will not operate properly ■ Refrigerator connected to water supply and turn water shutoff valve fully open. ■ Kink in the water source line? See "Refrigerator Doors." ■ Reverse...
...; New installation? See "Water Dispenser." ■ Is the water pressure at the bottom of water. ■ Refrigerator connected to 3 seconds after dispensing is connected to your cold water supply? Hold the glass under the dispenser long enough? Discard the first glass of the refrigerator door. Replace filter or reinstall it does not close completely, see "The doors will not operate properly ■ Refrigerator connected to water supply and turn water shutoff valve fully open. ■ Kink in the water source line? See "Refrigerator Doors." ■ Reverse...
User Instructions
Page 18
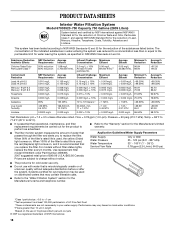
... otherwise noted. Prices are subject to change without filter status lights, replace the filter every 6 months. PRODUCT DATA SHEETS Interior Water Filtration System Model 67003523-750 Capacity 750 Gallons (2839 Liters) System tested and certified by NSF International against NSF/ANSI Standard 53 for the reduction of the substances listed below. This system has been tested according to NSF/ANSI Standards 42...
... otherwise noted. Prices are subject to change without filter status lights, replace the filter every 6 months. PRODUCT DATA SHEETS Interior Water Filtration System Model 67003523-750 Capacity 750 Gallons (2839 Liters) System tested and certified by NSF International against NSF/ANSI Standard 53 for the reduction of the substances listed below. This system has been tested according to NSF/ANSI Standards 42...
User Instructions
Page 19
... authorized Whirlpool servicer is operated and maintained according to instructions attached to or furnished with original model/serial numbers that is contrary to use of repair or replacement under this limited warranty. Costs associated with electrical or plumbing codes, or use your major appliance for repairs. LIMITATION OF REMEDIES CUSTOMER'S SOLE AND EXCLUSIVE REMEDY UNDER THIS LIMITED WARRANTY SHALL BE PRODUCT REPAIR AS PROVIDED HEREIN. THIS WARRANTY GIVES YOU SPECIFIC...
... authorized Whirlpool servicer is operated and maintained according to instructions attached to or furnished with original model/serial numbers that is contrary to use of repair or replacement under this limited warranty. Costs associated with electrical or plumbing codes, or use your major appliance for repairs. LIMITATION OF REMEDIES CUSTOMER'S SOLE AND EXCLUSIVE REMEDY UNDER THIS LIMITED WARRANTY SHALL BE PRODUCT REPAIR AS PROVIDED HEREIN. THIS WARRANTY GIVES YOU SPECIFIC...


