Whirlpool KHMS1850S Support and Manuals
Get Help and Manuals for this Whirlpool item
View All Support Options Below
Free Whirlpool KHMS1850S manuals!
Problems with Whirlpool KHMS1850S?
Ask a Question
Free Whirlpool KHMS1850S manuals!
Problems with Whirlpool KHMS1850S?
Ask a Question
Popular Whirlpool KHMS1850S Manual Pages
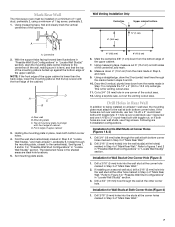
Installation Instructions - Page 1

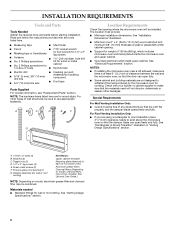
...instructions are very important. This symbol alerts you to Wall 8 Prepare Upper Cabinet 8 Install Damper Assembly 9 Install the Microwave Oven 9 Complete Installation 10 VENTING DESIGN SPECIFICATIONS 11 ASSISTANCE 12 Replacement Parts...you don't follow instructions.
The appearance of your particular model may differ slightly from the illustration in this manual and on your appliance...
Installation Instructions - Page 2
...
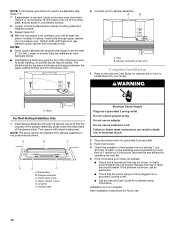
For Wall Venting Installation Only:
s Cutout must provide: s Minimum installation dimensions. See "Rectangular to use appropriate fasteners. Washers (2) C. Toggle nuts (2) D. 1/4" x 2" lag screws (2) E. Sheet metal screws (2) F. See Use and Care Guide.)
NOTE: Depending on model, charcoal filters may be sure to Round Transition" illustration in "Venting Design Specifications" section.
Installation Instructions - Page 4
... microwave oven, and set the mounting plate aside.
Slide damper plate back and lift up. Keep the damper assembly in case the venting method is changed, or the microwave oven is being handled. Wall Venting Installation Only
1. Tape the microwave oven door closed so that attach it to the venting system.
INSTALLATION INSTRUCTIONS
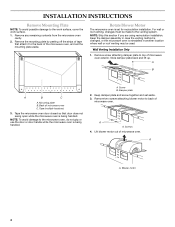
Remove Mounting Plate
NOTE...
Installation Instructions - Page 6
... for lag screws E.
Mounting plate center markers
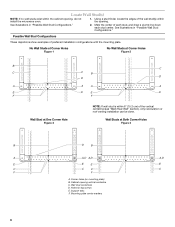
6 See illustrations in "Possible Wall Stud Configurations."
2. Support tabs F. Locate Wall Stud(s)
NOTE: If no wall studs exist within 6" (15.2 cm) of the vertical centerline (see "Mark Rear Wall" section), only recirculation or roof venting installation can be done. See illustrations in "Possible Wall Stud Configurations."
Installation Instructions - Page 7
Rear wall B. Set mounting plate aside.
6" (15.2 cm)
6" (15.2 cm)
6. Using measuring tape, measure out 6" (15.2 ... Wall Stud(s)" section. A
Wall Venting Installation Only
Centerline
Upper cabinet bottom
4" (10.2 cm)
³⁄₈" (1 cm)
A. If the holes are over wall studs, use 2 lag screws.
Mounting plate C. With the support tabs facing forward (see illustrations in...
Installation Instructions - Page 10
... oven.
Save Installation Instructions for troubleshooting information.
s Overtightening bolts may require bolts longer or shorter than 3" (7.6 cm). Do not remove ground prong. A
2. Damper assembly C. Do not use an extension cord. Check the operation of microwave oven by operating the vent fan. 5. Damper assembly (under the raised tabs of mounting plate, and set aside on...
Installation Instructions - Page 12
... Use and Care Guide.
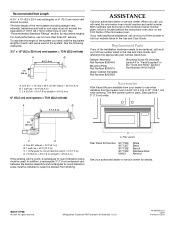
For best performance, use when installing this microwave oven in the "Tools and Parts" section) Part Number W10110238
Accessories...service center. If you will need , add the equivalent lengths of each vent piece used in the system. The filler panels come in China Replacement Parts
If any of the installation hardware needs to round transition piece must be replaced...
Use and Care Guide - Page 1

MICROWAVE HOOD COMBINATION
Use & Care Guide
For questions about features, operation/performance, parts, accessories or service, call: 1-800-422-1230, or visit our website at...www.kitchenaid.com
Table of Contents...2
Model KHMS1850S
W10117504
Use and Care Guide - Page 2

... Power...9 Manual Cooking ...9 Cooking in Stages (or steps)...9 Sensor Cooking...9 One Touch Cooking (Sensor)...10 Preset Cooking...10 Reheating ...10 Defrosting ...11 Keep Warm...12 MICROWAVE OVEN CARE...12 General Cleaning...12 Replacing Filters...13 Replacing Cooktop Light ...13 Replacing Microwave Oven Light...13 TROUBLESHOOTING ...14 ASSISTANCE OR SERVICE...15 Replacement Parts...15 WARRANTY...
Use and Care Guide - Page 5

... oven. The turntable will appear in this manual. Metal shielded window
H
I
J
K
L
H The model you have purchased may cover several different models.
To Turn Off: Touch TURNTABLE ON/OFF... system C. Vent grille D. PARTS AND FEATURES
This manual may have some or all of the features shown here. Control panel G. Microwave oven light F. See "Assistance or Service" section to...
Use and Care Guide - Page 10
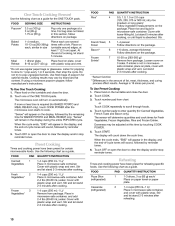
...If more or less time is not in microwave-safe container, and cover with plastic wrap and vent. When the cycle ends, "END" will appear in the amount of popcorn for certain microwavable ...3. The sensor will remain in size INSTRUCTIONS Pop only one package at a time. Doneness may vary by brand and fat content. Use the following chart as a guide.
Place on the turntable and close ...
Use and Care Guide - Page 11

... Defrost control can be used or the microwave oven can be manually set to defrost. Cover with plastic wrap and vent. Cover with plastic wrap and vent. Stir and let stand 2-3 minutes after reheating. 1-4 cups (250 mL-1 L)/ Place in microwave-safe container.
FOOD Soup*
PAD 3
QUANTITY/INSTRUCTION 1-4 cups (250 mL-1 L)/ Place in microwave-safe container...
Use and Care Guide - Page 14

... will operate Lift up the bulb cover. Close bulb cover. 6.
Replace light. A
A. Bulb cover
5. Reattach vent grille. TROUBLESHOOTING
Try the solutions suggested here first in microwave oven or reconnect power.
Plug in order to remove.
4. Replace the mounting screws. 7. Tip the vent grille forward and down, then lift out to avoid the cost of an unnecessary service call.
Use and Care Guide - Page 15
Steam is coming from the vent grille
Use and Care Guide - Page 16

... from the date of purchase, when this appliance is operated and maintained according to instructions attached to or furnished with the product, KitchenAid or KitchenAid Canada (hereafter "KitchenAid") will pay for factory specified parts for factory specified parts and repair labor to or furnished with the product, KitchenAid or KitchenAid Canada will pay for...
Whirlpool KHMS1850S Reviews
We have not received any reviews for Whirlpool yet.