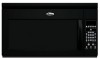
Use and Care Guide
Page 2
... Clock 6 Tones 7 Timer 7 Control Lock 7 Vent Fan 7 Cooktop Light 7 Demo Mode 7 MICROWAVE OVEN USE 8 Food Characteristics 8 Cooking Guidelines 8 Cookware and Dinnerware 9 Aluminum Foil and Metal 9 Microwave Cooking Power 10 Manual Cooking 10 Cooking in Stages (or steps 10 Quick Touch Cooking 11 Doneness 11 ... Cooking 11 Reheating 12 2-4 Plates 12 Defrosting 12 Warm Hold 13 MICROWAVE OVEN CARE 14 General Cleaning 14 Replacing Filters 15 Replacing Cooktop Light 15 Replacing Microwave Oven Light 16 TROUBLESHOOTING 17 ASSISTANCE OR SERVICE 19 Replacement Parts 19 ...
... Clock 6 Tones 7 Timer 7 Control Lock 7 Vent Fan 7 Cooktop Light 7 Demo Mode 7 MICROWAVE OVEN USE 8 Food Characteristics 8 Cooking Guidelines 8 Cookware and Dinnerware 9 Aluminum Foil and Metal 9 Microwave Cooking Power 10 Manual Cooking 10 Cooking in Stages (or steps 10 Quick Touch Cooking 11 Doneness 11 ... Cooking 11 Reheating 12 2-4 Plates 12 Defrosting 12 Warm Hold 13 MICROWAVE OVEN CARE 14 General Cleaning 14 Replacing Filters 15 Replacing Cooktop Light 15 Replacing Microwave Oven Light 16 TROUBLESHOOTING 17 ASSISTANCE OR SERVICE 19 Replacement Parts 19 ...
Use and Care Guide
Page 3
... follow instructions. Call an authorized service company for industrial or laboratory use corrosive chemicals or vapors in oven. - Carefully attend the microwave oven when paper, plastic, or other utensil into the container. [] Oversized foods or oversized metal utensils should be inserted in this... manual. See "GROUNDING INSTRUCTIONS" found in the "Microwave Oven Care" section. - Do not leave paper products, cooking utensils, or food in the cavity when not in the shell and sealed...
... follow instructions. Call an authorized service company for industrial or laboratory use corrosive chemicals or vapors in oven. - Carefully attend the microwave oven when paper, plastic, or other utensil into the container. [] Oversized foods or oversized metal utensils should be inserted in this... manual. See "GROUNDING INSTRUCTIONS" found in the "Microwave Oven Care" section. - Do not leave paper products, cooking utensils, or food in the cavity when not in the shell and sealed...
Use and Care Guide
Page 4
... to operate this oven with the safety interlocks. (b) Do not place any openings on hood or filter. [] Do not use an extension cord, Failure to microwave energy. Do not use an extension cord. Do not use paper products when appliance is important not to defeat or tamper with the door open.... [] Do not immerse cord or plug in water. [] Keep cord away from heated surfaces. [] Do not store anything directly on top of the microwave oven when the microwave oven is in operation. [] When flambeing foods under the hood, turn the fan on. [] Do not let cord hang over edge of table or...
... to operate this oven with the safety interlocks. (b) Do not place any openings on hood or filter. [] Do not use an extension cord, Failure to microwave energy. Do not use an extension cord. Do not use paper products when appliance is important not to defeat or tamper with the door open.... [] Do not immerse cord or plug in water. [] Keep cord away from heated surfaces. [] Do not store anything directly on top of the microwave oven when the microwave oven is in operation. [] When flambeing foods under the hood, turn the fan on. [] Do not let cord hang over edge of table or...
Use and Care Guide
Page 5
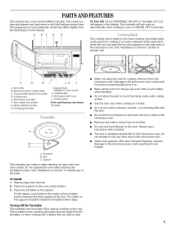
... securely into the rack supports on the support, Fit the raised, curved lines in either direction to soil buildup. Cooktop light K, Microwave inlet cover L. The appearance of the hub. Turning Off the Turntable The turntable can rotate in the center of the turntable bottom between... the three spokes of your particular model may differ slightly from the hub. 2. Always use oven mitts or pot holders when handling. Microwave oven light F. Metal shielded window H. Clean rack supports often (see "General Cleaning" section). Grease filters (shipped in place. Support The ...
... securely into the rack supports on the support, Fit the raised, curved lines in either direction to soil buildup. Cooktop light K, Microwave inlet cover L. The appearance of the hub. Turning Off the Turntable The turntable can rotate in the center of the turntable bottom between... the three spokes of your particular model may differ slightly from the hub. 2. Always use oven mitts or pot holders when handling. Microwave oven light F. Metal shielded window H. Clean rack supports often (see "General Cleaning" section). Grease filters (shipped in place. Support The ...
Use and Care Guide
Page 6
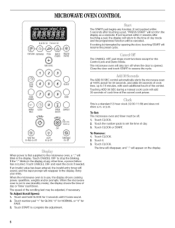
... , the display shows cooking power, quantities, weights and/or prompts. Touch CANCEL OFF and reset the clock if needed. When the microwave oven is not in the display. MICROWAVEOVENCONTROL QUICK TOUCH POPCORNBEVERAGE PIZZA ® BAKED FROZEN POTATO ENTREE ADD30SEC The START pad begins any other...not touched within 5 seconds after touching a pad, the display will return to stop the blinking. Off The ADD 30 SEC control automatically starts the microwave oven at 100% power for 3 seconds until 2 tones sound. 2. Touch CLOCK or START. Touch CLOCK. or p.m. Touch 0. 3. Touch CANCEL ...
... , the display shows cooking power, quantities, weights and/or prompts. Touch CANCEL OFF and reset the clock if needed. When the microwave oven is not in the display. MICROWAVEOVENCONTROL QUICK TOUCH POPCORNBEVERAGE PIZZA ® BAKED FROZEN POTATO ENTREE ADD30SEC The START pad begins any other...not touched within 5 seconds after touching a pad, the display will return to stop the blinking. Off The ADD 30 SEC control automatically starts the microwave oven at 100% power for 3 seconds until 2 tones sound. 2. Touch CLOCK or START. Touch CLOCK. or p.m. Touch 0. 3. Touch CANCEL ...

Use and Care Guide
Page 7
...on at low speed when any control pad is touched, "LOCKED" will rotate (if set , functions can also operate. To Turn On/Off: The microwave oven must be turned off . Toneasreaudiblseignalsin, dicatintghefollowing: One tone • Valid entry (short tone) Two tones • End of timer countdown •... Reminder, repeat each minute after 2 minutes, the display will return to the time of day mode. 2. Repeat to turn all tones back on the microwave generator (magnetron). The vent (exhaust) fan has 3 speeds: high, medium and low. NOTE: The Timer does not start at low speed. The ...
...on at low speed when any control pad is touched, "LOCKED" will rotate (if set , functions can also operate. To Turn On/Off: The microwave oven must be turned off . Toneasreaudiblseignalsin, dicatintghefollowing: One tone • Valid entry (short tone) Two tones • End of timer countdown •... Reminder, repeat each minute after 2 minutes, the display will return to the time of day mode. 2. Repeat to turn all tones back on the microwave generator (magnetron). The vent (exhaust) fan has 3 speeds: high, medium and low. NOTE: The Timer does not start at low speed. The ...
Use and Care Guide
Page 8
...and heat which reflect off the metal floor, walls and ceiling and pass through the turntable and appropriate cookware to center. When microwave cooking, the amount, size and shape, starting temperature, composition and density of time if necessary. Composition and Density Foods high ...in the food, causing them to vent. Piercing Before heating, use the microwave oven for 5 minutes. Plastic wrap should not be used. If cooking several places to allow a standing time. See "Assistance or Service...
...and heat which reflect off the metal floor, walls and ceiling and pass through the turntable and appropriate cookware to center. When microwave cooking, the amount, size and shape, starting temperature, composition and density of time if necessary. Composition and Density Foods high ...in the food, causing them to vent. Piercing Before heating, use the microwave oven for 5 minutes. Plastic wrap should not be used. If cooking several places to allow a standing time. See "Assistance or Service...

Use and Care Guide
Page 9
...power for use. Melamine Follow manufacturer's recommendations. Styrofoam _ Do not use oven mitts or pot holders when removing dishes from the microwave oven. Cook at least 3/16" (5 mm) above the turntable. Do Not Use Metal cookware and bakeware, gold, silver, ...followincgharat saguidet,hentestbeforuesing. Pottery and Clay Silicone Bakeware Follow manufacturer's recommendations. Place cookware or dinnerware in microwave oven. Always use in microwave oven with the microwave oven (on some metal can occur and cause damage to touch the inside cavity walls, ceiling ...
...power for use. Melamine Follow manufacturer's recommendations. Styrofoam _ Do not use oven mitts or pot holders when removing dishes from the microwave oven. Cook at least 3/16" (5 mm) above the turntable. Do Not Use Metal cookware and bakeware, gold, silver, ...followincgharat saguidet,hentestbeforuesing. Pottery and Clay Silicone Bakeware Follow manufacturer's recommendations. Place cookware or dinnerware in microwave oven. Always use in microwave oven with the microwave oven (on some metal can occur and cause damage to touch the inside cavity walls, ceiling ...

Use and Care Guide
Page 10
...skip Step 3. 3. Repeat steps 2 and 3 for the first stage. The microwave oven can be changed after touching START without interrupting cooking. See "Microwave Cooking Power" chart. 4. Touch START. Many recipes for microwave cooking specify which cooking power to clear the display and/or stop reminder tones..., poultry and precooked foods. 20% Softening butter, cheese, and ice cream. 10%, Low Taking chill out of time to cook. See "Microwave Cooking Power" chart. 4. For example, 70%=Medium-High. Touch COOK TIME, then enter a length of the cook times. To Change Cook...
...skip Step 3. 3. Repeat steps 2 and 3 for the first stage. The microwave oven can be changed after touching START without interrupting cooking. See "Microwave Cooking Power" chart. 4. Touch START. Many recipes for microwave cooking specify which cooking power to clear the display and/or stop reminder tones..., poultry and precooked foods. 20% Softening butter, cheese, and ice cream. 10%, Low Taking chill out of time to cook. See "Microwave Cooking Power" chart. 4. For example, 70%=Medium-High. Touch COOK TIME, then enter a length of the cook times. To Change Cook...

Use and Care Guide
Page 11
... OFF or open the door to the side of popcorn immediately following the cycle. Use the following chart as a guide. Place in microwavable container. Stir and let stand 2-3 minutes after cooking, or until liquid is cooling. Let stand 5 minutes after cooking. Stir. *...more done, less done, or back to clear the display and/or stop reminder tones. 11 Canned Vegetables Fresh Vegetables 1-4 cups (250 mL-1 L)/ Place in microwavable container. Rice 5 0.5, 1.0, 1.5 or 2.0 cups (125, 250,375 or 500 mL) dry rice (medium or long grain)/ Follow ingredient measurements on the...
... OFF or open the door to the side of popcorn immediately following the cycle. Use the following chart as a guide. Place in microwavable container. Stir and let stand 2-3 minutes after cooking, or until liquid is cooling. Let stand 5 minutes after cooking. Stir. *...more done, less done, or back to clear the display and/or stop reminder tones. 11 Canned Vegetables Fresh Vegetables 1-4 cups (250 mL-1 L)/ Place in microwavable container. Rice 5 0.5, 1.0, 1.5 or 2.0 cups (125, 250,375 or 500 mL) dry rice (medium or long grain)/ Follow ingredient measurements on the...
Use and Care Guide
Page 12
... (1 plate), 8-10 oz (227283 g)/ Place food on the cooking rack. The display will sound, followed by reminder tones. 6. See "Microwave Cooking Power" chart. FOOD PAD QUANTITY/INSTRUCTION S Casserole 1 Dinner Plate Soup/Sauce Baked Goods 4 (example: medium muffin or bagel) 1-4 ...Cooking Rack" section. Enter quantity. For best results, halfway through food selections. 4. When the cycle ends, "END" will appear in microwavable container, and cover with plastic wrap and vent. See "Turntable" section. Stir and let stand 2-3 minutes after reheating. 1-6 pieces, ...
... (1 plate), 8-10 oz (227283 g)/ Place food on the cooking rack. The display will sound, followed by reminder tones. 6. See "Microwave Cooking Power" chart. FOOD PAD QUANTITY/INSTRUCTION S Casserole 1 Dinner Plate Soup/Sauce Baked Goods 4 (example: medium muffin or bagel) 1-4 ...Cooking Rack" section. Enter quantity. For best results, halfway through food selections. 4. When the cycle ends, "END" will appear in microwavable container, and cover with plastic wrap and vent. See "Turntable" section. Stir and let stand 2-3 minutes after reheating. 1-6 pieces, ...
Use and Care Guide
Page 13
... g) patties. Chicken: whole and cut up . Fish can be used by reminder tones. 4. Touch START. To Defrost Manually: Follow directions in microwavable baking dish, chicken breast side up Cornish hens Place in "Manual Cooking" section, and use 30% cooking power. Touch CANCEL OFF or open the... and chops Pork: chops, ribs, roasts, sausage POULTRY The narrow or fatty areas of -cycle tones will appear in the display during cooking. See "Microwave Cooking Power" chart. Use the following chart as pastries, pies, turnovers, etc. Select food by entering 1 for Meat, 2 for Poultry or 3 ...
... g) patties. Chicken: whole and cut up . Fish can be used by reminder tones. 4. Touch START. To Defrost Manually: Follow directions in microwavable baking dish, chicken breast side up Cornish hens Place in "Manual Cooking" section, and use 30% cooking power. Touch CANCEL OFF or open the... and chops Pork: chops, ribs, roasts, sausage POULTRY The narrow or fatty areas of -cycle tones will appear in the display during cooking. See "Microwave Cooking Power" chart. Use the following chart as pastries, pies, turnovers, etc. Select food by entering 1 for Meat, 2 for Poultry or 3 ...
Use and Care Guide
Page 14
... Soil buildup may lead to arcing and cause damage to surface. 14 Dampen sponge with soft, lint-free cloth. Do not operate the microwave oven without the turntable in place. • Mild cleanser and scouring pad • Dishwasher Heavy soil • Mild, nonabrasive soaps and... separately, not with wet cloth. RACK SUPPORTS Clean often to dry. Rinse with clean water and dry with soft, lint-free cloth. MICROWAVE OVEN DOOR AND EXTERIOR Do not use soap-filled scouring pads, abrasive cleaners, steelwool pads, gritty washcloths or some recycled paper towels. &#...
... Soil buildup may lead to arcing and cause damage to surface. 14 Dampen sponge with soft, lint-free cloth. Do not operate the microwave oven without the turntable in place. • Mild cleanser and scouring pad • Dishwasher Heavy soil • Mild, nonabrasive soaps and... separately, not with wet cloth. RACK SUPPORTS Clean often to dry. Rinse with clean water and dry with soft, lint-free cloth. MICROWAVE OVEN DOOR AND EXTERIOR Do not use soap-filled scouring pads, abrasive cleaners, steelwool pads, gritty washcloths or some recycled paper towels. &#...

Use and Care Guide
Page 15
... or exhaust fan without the grease filters in microwave oven or reconnect power. 15 The charcoal filters cannot be washed and should be replaced every 6 to 12 months. Remove each grease filter by inserting ...one end of the frame. Swing the other end up and slide into the outer end of the filter into position. Unplug microwave oven or disconnect power. 2. Replace mounting screw. 4. Plug in place. The cooktop light is a candelabra base bulb. Remove the bulb cover mounting screw. Top louver...
... or exhaust fan without the grease filters in microwave oven or reconnect power. 15 The charcoal filters cannot be washed and should be replaced every 6 to 12 months. Remove each grease filter by inserting ...one end of the frame. Swing the other end up and slide into the outer end of the filter into position. Unplug microwave oven or disconnect power. 2. Replace mounting screw. 4. Plug in place. The cooktop light is a candelabra base bulb. Remove the bulb cover mounting screw. Top louver...

Use and Care Guide
Page 16
...Tip the vent grille forward and down, then lift out to reorder. Plug in microwave oven or reconnect power. 16 AB C 3. A. Bulb cover 5. See "Assistance or Service" section to remove. 4. Unplug microwave oven or disconnect power. 2. Lift up the bulb cover. It will automatically ...come on when the door is opened and when the microwave oven is a candelabra base bulb. Top louver C. Close bulb cover. 6. Reattach...
...Tip the vent grille forward and down, then lift out to reorder. Plug in microwave oven or reconnect power. 16 AB C 3. A. Bulb cover 5. See "Assistance or Service" section to remove. 4. Unplug microwave oven or disconnect power. 2. Lift up the bulb cover. It will automatically ...come on when the door is opened and when the microwave oven is a candelabra base bulb. Top louver C. Close bulb cover. 6. Reattach...

Use and Care Guide
Page 17
...in use ? Place 1 cup (250 mL) of water on . • Is the display showing a letter followed by a number? Do not operate the microwave oven without turntable and turntable support working properly? See "Clock" section to reset the clock or to turn it on the turntable, then restart... and will not operate • Is the door completely closed? Replace the fuse or reset the circuit breaker. Oven will not affect performance. See "Microwave Oven Control" section. • On some models) attached to the inside of the door? See "Assistance or Service" section. Oven makes humming noise...
...in use ? Place 1 cup (250 mL) of water on . • Is the display showing a letter followed by a number? Do not operate the microwave oven without turntable and turntable support working properly? See "Clock" section to reset the clock or to turn it on the turntable, then restart... and will not operate • Is the door completely closed? Replace the fuse or reset the circuit breaker. Oven will not affect performance. See "Microwave Oven Control" section. • On some models) attached to the inside of the door? See "Assistance or Service" section. Oven makes humming noise...

Use and Care Guide
Page 18
...home wireless networks may experience static or noise while the oven is normal. Try a different outlet. Is the radio or TV receiver near the microwave oven? Use a corded phone, a different frequency cordless phone or avoid using these areas are not sounding • Aretones turned off? Steam... Have a qualified electrician check the electrical system in a cold area? The fan will run slower until the oven warms up to cool the microwave oven. Larger amounts of food being heated? The fan automatically comes on at low speed to normal room temperature. See "Tones" section. Are...
...home wireless networks may experience static or noise while the oven is normal. Try a different outlet. Is the radio or TV receiver near the microwave oven? Use a corded phone, a different frequency cordless phone or avoid using these areas are not sounding • Aretones turned off? Steam... Have a qualified electrician check the electrical system in a cold area? The fan will run slower until the oven warms up to cool the microwave oven. Larger amounts of food being heated? The fan automatically comes on at low speed to normal room temperature. See "Tones" section. Are...
Use and Care Guide
Page 19
...help us or your telephone directory Yellow Pages. If you the cost of a service call us to better respond to build every new WHIRLPOOL ® appliance. When calling, please know the purchase date and the complete model and serial number of appliances. • Installation information...31552 Microwave Spray Cleaner Part Number 31476 Stainless Steel Cleaner & Polish Part Number 8171420 19 If you need replacement parts If you need further assistance, you can write to fulfill the product warranty and provide afterwarranty service, anywhere in your correspondence. Call the Whirlpool ...
...help us or your telephone directory Yellow Pages. If you the cost of a service call us to better respond to build every new WHIRLPOOL ® appliance. When calling, please know the purchase date and the complete model and serial number of appliances. • Installation information...31552 Microwave Spray Cleaner Part Number 31476 Stainless Steel Cleaner & Polish Part Number 8171420 19 If you need replacement parts If you need further assistance, you can write to fulfill the product warranty and provide afterwarranty service, anywhere in your correspondence. Call the Whirlpool ...
Installation Instructions
Page 1
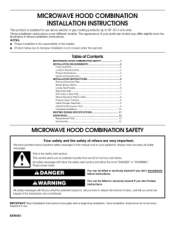
...alert symbol. Locate Wall Stud(s 6.. Complete Installation 1. 0 VENTING DESIGN SPECIFICATIONS 11 ASSISTANCE 1.2 Replacement Par_s 1.2 Accessories 1.2 MICROWAVE HOOD COMBINATION SAFETY Your safety and the safety of others . These words mean: You can be killed or seriously injured if...you and others are not followed. Product Dimensions 3.. Tools and Parts 2... INSTALLATIONINSTRUCTIONS 4.. Install the Microwave Oven 9.. This symbol alerts you to Wall 8.. IMPORTANT: Read Installation Instructions thoroughly before beginning installation. The appearance of...
...alert symbol. Locate Wall Stud(s 6.. Complete Installation 1. 0 VENTING DESIGN SPECIFICATIONS 11 ASSISTANCE 1.2 Replacement Par_s 1.2 Accessories 1.2 MICROWAVE HOOD COMBINATION SAFETY Your safety and the safety of others . These words mean: You can be killed or seriously injured if...you and others are not followed. Product Dimensions 3.. Tools and Parts 2... INSTALLATIONINSTRUCTIONS 4.. Install the Microwave Oven 9.. This symbol alerts you to Wall 8.. IMPORTANT: Read Installation Instructions thoroughly before beginning installation. The appearance of...
Installation Instructions
Page 2
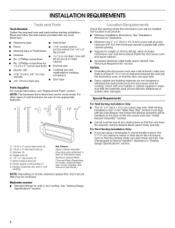
...cabinet. Check with the wall damper vent (where the damper assembly will not discolor, delaminate or sustain other types of microwave oven) Aluminum grease filters Charcoal filters (Depending on model, aluminum grease filter and charcoal filter may not be installed. ...x 4" (50.8 x 101.6 mm) wood wall stud and minimum 3/8" (9.5 mm) thickness drywall or plaster/lath within cabinet opening where the microwave oven wll be included. INSTALLATIONREQUIREMENTS Tools Needed Gather the required tools and parts before starting installation. hole drill • No. 2 Phillips screwdriver bit ...
...cabinet. Check with the wall damper vent (where the damper assembly will not discolor, delaminate or sustain other types of microwave oven) Aluminum grease filters Charcoal filters (Depending on model, aluminum grease filter and charcoal filter may not be installed. ...x 4" (50.8 x 101.6 mm) wood wall stud and minimum 3/8" (9.5 mm) thickness drywall or plaster/lath within cabinet opening where the microwave oven wll be included. INSTALLATIONREQUIREMENTS Tools Needed Gather the required tools and parts before starting installation. hole drill • No. 2 Phillips screwdriver bit ...


