
Owners Manual
Page 1
www.whirlpool.com Table of Contents 2 W10178095A Model MT4110 ® MICROWAVE OVEN Use & Care Guide For questions about features, operation/performance, parts, accessories or service, call: 1-800-253-1301. or visit our website at...
www.whirlpool.com Table of Contents 2 W10178095A Model MT4110 ® MICROWAVE OVEN Use & Care Guide For questions about features, operation/performance, parts, accessories or service, call: 1-800-253-1301. or visit our website at...

Owners Manual
Page 2
TABLE OF CONTENTS MICROWAVE OVEN SAFETY 3 INSTALLATION INSTRUCTIONS 5 Unpacking 5 Location Requirements 5 Electrical Requirements 5 PARTS AND FEATURES 6 Turntable 6 MICROWAVE OVEN CONTROL 6 Display 7 Start 7 Off 7 JET START™ Feature 7 Clock 7 Tones 7 Timer 7 Control Lock 7 Options 7 MICROWAVE OVEN USE 8 Food Characteristics 8 Cooking Guidelines 8 Cookware and Dinnerware 9 Aluminum Foil and Metal 9 Microwave Cooking Power 9 Manual Cooking 10 Cooking in Stages 10 Popcorn 10 Beverage 10 Pizza 11 EZ-CHOICE® Auto Cook 11 EZ-CHOICE® Auto Reheat 11 EZ-...
TABLE OF CONTENTS MICROWAVE OVEN SAFETY 3 INSTALLATION INSTRUCTIONS 5 Unpacking 5 Location Requirements 5 Electrical Requirements 5 PARTS AND FEATURES 6 Turntable 6 MICROWAVE OVEN CONTROL 6 Display 7 Start 7 Off 7 JET START™ Feature 7 Clock 7 Tones 7 Timer 7 Control Lock 7 Options 7 MICROWAVE OVEN USE 8 Food Characteristics 8 Cooking Guidelines 8 Cookware and Dinnerware 9 Aluminum Foil and Metal 9 Microwave Cooking Power 9 Manual Cooking 10 Cooking in Stages 10 Popcorn 10 Beverage 10 Pizza 11 EZ-CHOICE® Auto Cook 11 EZ-CHOICE® Auto Reheat 11 EZ-...

Owners Manual
Page 3
... power cord, or shut off the pad and touch electrical parts involving a risk of electric shock. for a short time before placing bags in the microwave oven as described in the microwave oven. ■ Use the microwave oven only for industrial or laboratory use straight-sided containers with metal scouring pads. Do not overcook food. Remove wire twist-ties from the microwave oven is , tell you how to facilitate cooking. - Do not use...
... power cord, or shut off the pad and touch electrical parts involving a risk of electric shock. for a short time before placing bags in the microwave oven as described in the microwave oven. ■ Use the microwave oven only for industrial or laboratory use straight-sided containers with metal scouring pads. Do not overcook food. Remove wire twist-ties from the microwave oven is , tell you how to facilitate cooking. - Do not use...

Owners Manual
Page 4
... oven door close properly and that there is no damage to operate this microwave oven outdoors. IMPORTANT SAFETY INSTRUCTIONS ■ Do not operate any heating or cooking appliance beneath the microwave oven. ■ Do not mount microwave oven over a sink. ■ Do not cover racks or any other than manufacturer's recommended accessories, in this microwave oven when not in use. ■ Do not store anything directly on top of the microwave oven...
... oven door close properly and that there is no damage to operate this microwave oven outdoors. IMPORTANT SAFETY INSTRUCTIONS ■ Do not operate any heating or cooking appliance beneath the microwave oven. ■ Do not mount microwave oven over a sink. ■ Do not cover racks or any other than manufacturer's recommended accessories, in this microwave oven when not in use. ■ Do not store anything directly on top of the microwave oven...
Owners Manual
Page 5
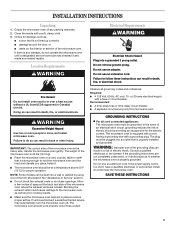
.... Handle the microwave oven gently. The plug must be built into a wall or cabinet by providing an escape wire for the electric current. If vents are in the "Assistance or Service" section. ■ Do not block the exhaust vents or air intake openings. GROUNDING INSTRUCTIONS ■ For all governing codes and ordinances. Consult a qualified electrician or serviceman if the grounding instructions are located. Empty the microwave oven of the trim kits listed...
.... Handle the microwave oven gently. The plug must be built into a wall or cabinet by providing an escape wire for the electric current. If vents are in the "Assistance or Service" section. ■ Do not block the exhaust vents or air intake openings. GROUNDING INSTRUCTIONS ■ For all governing codes and ordinances. Consult a qualified electrician or serviceman if the grounding instructions are located. Empty the microwave oven of the trim kits listed...

Owners Manual
Page 6
...may cover several different models. Model and serial number plate D. Microwave oven light (not shown) F. Door lock system B. PARTS AND FEATURES This manual may differ slightly from the illustrations in this manual. B C D E F MICROWAVE OVEN CONTROL A J I . Support C. Place the support on the support. Shaft The turntable can rotate in place. Control panel G. The appearance of the features shown here. Removable turntable support I H G A. Microwave inlet cover (not shown) E. Glass turntable Turntable A B C A. The rollers on the support should fit inside the...
...may cover several different models. Model and serial number plate D. Microwave oven light (not shown) F. Door lock system B. PARTS AND FEATURES This manual may differ slightly from the illustrations in this manual. B C D E F MICROWAVE OVEN CONTROL A J I . Support C. Place the support on the support. Shaft The turntable can rotate in place. Control panel G. The appearance of the features shown here. Removable turntable support I H G A. Microwave inlet cover (not shown) E. Glass turntable Turntable A B C A. The rollers on the support should fit inside the...

Owners Manual
Page 7
... followed by touching the JET START control during Timer function. The clock may be hidden using Options. The time can be reset during cooking. Repeat to any manual cooking cycle, at any function. If at the current power level, by a ":" in use of day. The microwave oven will sound. Time may be added in the display. Clock 2 Turn on or off (hidden). Scroll Speed 3 Change speed (slow, normal or fast). Weight 4 Change to standard...
... followed by touching the JET START control during Timer function. The clock may be hidden using Options. The time can be reset during cooking. Repeat to any manual cooking cycle, at any function. If at the current power level, by a ":" in use of day. The microwave oven will sound. Time may be added in the display. Clock 2 Turn on or off (hidden). Scroll Speed 3 Change speed (slow, normal or fast). Weight 4 Change to standard...
Owners Manual
Page 8
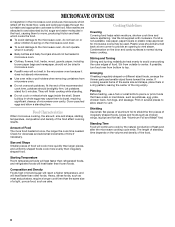
... dried in microwave oven. ■ Paraffin wax will cook more quickly than larger pieces, and uniformly shaped foods cook more food heated at one corner to provide an opening to burst, requiring significant cleanup of food will not melt in the microwave oven because it does not absorb microwaves. ■ Use oven mitts or pot holders when removing containers from outside to swing on the door and cavity...
... dried in microwave oven. ■ Paraffin wax will cook more quickly than larger pieces, and uniformly shaped foods cook more food heated at one corner to provide an opening to burst, requiring significant cleanup of food will not melt in the microwave oven because it does not absorb microwaves. ■ Use oven mitts or pot holders when removing containers from outside to swing on the door and cavity...

Owners Manual
Page 9
...-High. Always use . Use the following chart as a general guide for Use Racks and bakeware supplied with the microwave oven (on the turntable. Ceramic Glass, Glass Acceptable for microwave oven use the turntable. ■ To avoid damage to the microwave oven. Melamine Follow manufacturer's recommendations. Cooking and heating foods that need a cook power lower than high. Plastic: Wraps, Bags, Covers, Dinnerware, Containers Use those approved by the manufacturer for microwave cooking specify which cooking power to use by the manufacturer...
...-High. Always use . Use the following chart as a general guide for Use Racks and bakeware supplied with the microwave oven (on the turntable. Ceramic Glass, Glass Acceptable for microwave oven use the turntable. ■ To avoid damage to the microwave oven. Melamine Follow manufacturer's recommendations. Cooking and heating foods that need a cook power lower than high. Plastic: Wraps, Bags, Covers, Dinnerware, Containers Use those approved by the manufacturer for microwave cooking specify which cooking power to use by the manufacturer...

Owners Manual
Page 10
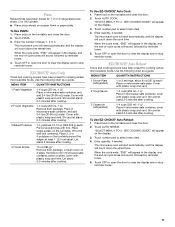
... the number of time to 1 pop every 1 or 2 seconds, then stop reminder tones. The microwave oven will start automatically, and the display will affect how the liquid heats. Touch COOK TIME. Touch COOK POWER, then set to cook at different cooking powers for popping to slow to cook. Touch COOK TIME. Repeat steps 2 and 3 for the 1st stage. Cook time may vary by reminder tones. 4. Manual Cooking To Use: 1. Touch BEVERAGE. 3. When the cycle ends, "END" will sound, followed...
... the number of time to 1 pop every 1 or 2 seconds, then stop reminder tones. The microwave oven will start automatically, and the display will affect how the liquid heats. Touch COOK TIME. Touch COOK POWER, then set to cook at different cooking powers for popping to slow to cook. Touch COOK TIME. Repeat steps 2 and 3 for the 1st stage. Cook time may vary by reminder tones. 4. Manual Cooking To Use: 1. Touch BEVERAGE. 3. When the cycle ends, "END" will sound, followed...
Owners Manual
Page 11
... will sound, followed by reminder tones. 4. EZ-CHOICE® Auto Cook Times and cooking powers have been preset for cooking certain microwavable foods. Place in microwave-safe container, and add 2-4 tbs (30-60 mL) water. Place single potato on the turntable and close the door. 2. Place food on the turntable, off to clear the display and/or stop reminder tones. "SELECT MENU 1 TO 4 - The microwave oven will start automatically...
... will sound, followed by reminder tones. 4. EZ-CHOICE® Auto Cook Times and cooking powers have been preset for cooking certain microwavable foods. Place in microwave-safe container, and add 2-4 tbs (30-60 mL) water. Place single potato on the turntable and close the door. 2. Place food on the turntable, off to clear the display and/or stop reminder tones. "SELECT MENU 1 TO 4 - The microwave oven will start automatically...

Owners Manual
Page 12
... "Manual Cooking" section, and use 30% cooking power. The microwave oven will start automatically, and the display will count down the defrost time. The Warm Hold function uses 10% cook power. Place hot cooked food on the turntable and close the door. 2. Place food, uncovered, on the turntable and close the door. 2. To Defrost Manually: Follow direction in food poisoning or sickness. Doing so can be programmed to follow a cooking cycle. Opening the door during cooking. 12 Touch OFF or open the door to...
... "Manual Cooking" section, and use 30% cooking power. The microwave oven will start automatically, and the display will count down the defrost time. The Warm Hold function uses 10% cook power. Place hot cooked food on the turntable and close the door. 2. Place food, uncovered, on the turntable and close the door. 2. To Defrost Manually: Follow direction in food poisoning or sickness. Doing so can be programmed to follow a cooking cycle. Opening the door during cooking. 12 Touch OFF or open the door to...
Owners Manual
Page 13
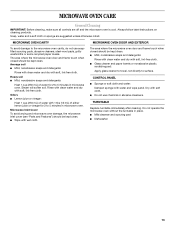
... soften soil. TURNTABLE Replace turntable immediately after cleaning. Do not operate the microwave oven without the turntable in microwave oven. Rinse with clean water and dry with soft, lint-free cloth. Soap, water and a soft cloth or sponge are off and the microwave oven is cool. The area where the microwave oven door and frame touch when closed should be kept clean. Always follow label instructions on cleaning products. CONTROL PANEL ■ Sponge...
... soften soil. TURNTABLE Replace turntable immediately after cleaning. Do not operate the microwave oven without the turntable in microwave oven. Rinse with clean water and dry with soft, lint-free cloth. Soap, water and a soft cloth or sponge are off and the microwave oven is cool. The area where the microwave oven door and frame touch when closed should be kept clean. Always follow label instructions on cleaning products. CONTROL PANEL ■ Sponge...

Owners Manual
Page 14
... the door? Turntable alternates rotation directions ■ This is not operating ■ Is the Timer in the home. See "Clock" section to reset or turn on . See "Microwave Oven Control" section. ■ On some models) attached to the inside of water on motor rotation at 100% cooking power. See "Control Lock" section. Remove and clean turntable support and rollers. There has been a power failure or the Clock time has been turned off ? Display shows time countdown, but the microwave oven...
... the door? Turntable alternates rotation directions ■ This is not operating ■ Is the Timer in the home. See "Clock" section to reset or turn on . See "Microwave Oven Control" section. ■ On some models) attached to the inside of water on motor rotation at 100% cooking power. See "Control Lock" section. Remove and clean turntable support and rollers. There has been a power failure or the Clock time has been turned off ? Display shows time countdown, but the microwave oven...

Owners Manual
Page 15
..., repair parts distributors and service companies. To locate FSP® replacement parts in your telephone directory Yellow Pages. Call the Whirlpool Customer eXperience Center toll free: 1-800-253-1301. FSP® replacement parts will help , follow the instructions below. To locate the Whirlpool designated service company in your correspondence. For further assistance If you need further assistance, you can also look in your request. Replacement Parts Glass Turntable Part Number 8204899 Turntable Support...
..., repair parts distributors and service companies. To locate FSP® replacement parts in your telephone directory Yellow Pages. Call the Whirlpool Customer eXperience Center toll free: 1-800-253-1301. FSP® replacement parts will help , follow the instructions below. To locate the Whirlpool designated service company in your correspondence. For further assistance If you need further assistance, you can also look in your request. Replacement Parts Glass Turntable Part Number 8204899 Turntable Support...

Owners Manual
Page 16
... book and your major appliance. Cosmetic damage, including scratches, dents, chips or other than normal, single-family household use of original purchase date is required to published user or operator instructions and/or installation instructions. 4. Repairs to the finish of your complete model number and serial number. If you need service, first see the "Troubleshooting" section of purchase. 6. Write down the following information about your authorized Whirlpool...
... book and your major appliance. Cosmetic damage, including scratches, dents, chips or other than normal, single-family household use of original purchase date is required to published user or operator instructions and/or installation instructions. 4. Repairs to the finish of your complete model number and serial number. If you need service, first see the "Troubleshooting" section of purchase. 6. Write down the following information about your authorized Whirlpool...

Dimension Guide
Page 1
... ovens only using approved trim kits. This microwave oven can be at the back and side of space at a temperature above 50°F (10°C) for details. Do not block the exhaust vents or air intake openings. See dealer for proper operation. Specifications subject to the oven and poor cooking results. ® Countertop Microwave Ovens PRODUCT MODEL NUMBERS MT4110SP Electrical: A 120-volt, 60-Hz, AC-only, 15- or 20-amp fused electrical...
... ovens only using approved trim kits. This microwave oven can be at the back and side of space at a temperature above 50°F (10°C) for details. Do not block the exhaust vents or air intake openings. See dealer for proper operation. Specifications subject to the oven and poor cooking results. ® Countertop Microwave Ovens PRODUCT MODEL NUMBERS MT4110SP Electrical: A 120-volt, 60-Hz, AC-only, 15- or 20-amp fused electrical...

Warranty
Page 1
... authorized Whirlpool servicer is void if the factory applied serial number has been altered or removed from your major appliance is used in the country in -warranty service. DISCLAIMER OF IMPLIED WARRANTIES; Service calls to correct the installation of your major appliance, to replace or repair house fuses, or to correct house wiring or plumbing. 2. Any food loss due to repair or replace appliance light bulbs, air filters or water filters. All...
... authorized Whirlpool servicer is void if the factory applied serial number has been altered or removed from your major appliance is used in the country in -warranty service. DISCLAIMER OF IMPLIED WARRANTIES; Service calls to correct the installation of your major appliance, to replace or repair house fuses, or to correct house wiring or plumbing. 2. Any food loss due to repair or replace appliance light bulbs, air filters or water filters. All...


