
Dimension Guide
Page 1
....9 cm) overall width D. 23" (58.4 cm) max. The model/serial number rating plate is located at the bottom of cutout to 7.2 kW at 208 volts) require a separate 30-amp circuit. ® 27" (68.6 CM) ELECTRIC SINGLE AND DOUBLE BUILT-IN OVEN PRODUCT MODEL SERIES GBD279PV GBS279PV RBD275PV RBD277PV RBS275PV RBS277PV Electrical Requirements: Oven must be connected to floor D. 25¹⁄₂" (64.8 cm) cutout width E. 1¹⁄₂" (3.8 cm) min. top of...
....9 cm) overall width D. 23" (58.4 cm) max. The model/serial number rating plate is located at the bottom of cutout to 7.2 kW at 208 volts) require a separate 30-amp circuit. ® 27" (68.6 CM) ELECTRIC SINGLE AND DOUBLE BUILT-IN OVEN PRODUCT MODEL SERIES GBD279PV GBS279PV RBD275PV RBD277PV RBS275PV RBS277PV Electrical Requirements: Oven must be connected to floor D. 25¹⁄₂" (64.8 cm) cutout width E. 1¹⁄₂" (3.8 cm) min. top of...

Installation Instructions
Page 2
... undercounter installation instructions for cutout dimensions and approved oven cooktop combinations (separate sheet). 2 WARNING You can kill or hurt you to make sure that the materials used . Given dimensions provide minimum clearance with cooktop installed above): Ovens approved for wall cabinet installations) ■ Level Parts needed ■ Phillips screwdriver ■ Measuring tape ■ Hand or electric drill (for wall cabinet installations) ■ 1" (25 mm) drill bit (for this manual and on rear wall behind oven...
... undercounter installation instructions for cutout dimensions and approved oven cooktop combinations (separate sheet). 2 WARNING You can kill or hurt you to make sure that the materials used . Given dimensions provide minimum clearance with cooktop installed above): Ovens approved for wall cabinet installations) ■ Level Parts needed ■ Phillips screwdriver ■ Measuring tape ■ Hand or electric drill (for wall cabinet installations) ■ 1" (25 mm) drill bit (for this manual and on rear wall behind oven...

Installation Instructions
Page 4
... electrical installer determine that the electrical connection and wire size are not sure the oven is used, it here. ■ Oven must determine the type of cutout to a grounded metal, permanent wiring system. cutout depth B. 23" (58.4 cm) recessed oven depth C. A copy of the above code standards can be connected to floor D. 28¹⁄₂" (72.4 cm) cutout width E. 1¹⁄₂" (3.8 cm) min. Model/serial number plate 4 Double Ovens Cabinet Side...
... electrical installer determine that the electrical connection and wire size are not sure the oven is used, it here. ■ Oven must determine the type of cutout to a grounded metal, permanent wiring system. cutout depth B. 23" (58.4 cm) recessed oven depth C. A copy of the above code standards can be connected to floor D. 28¹⁄₂" (72.4 cm) cutout width E. 1¹⁄₂" (3.8 cm) min. Model/serial number plate 4 Double Ovens Cabinet Side...

Installation Instructions
Page 5
Locate existing wiring to 7.2 kW at 208 volts) require a separate 40-amp circuit. Lift and pull oven door toward you and remove. Move oven and cardboard close . Cut the cable tie and remove side trims. 2. Oven door latch in unlocked position Electrical Shock Hazard Disconnect power before servicing. ■ Models rated from 7.3 to 9.6 kW at 240 volts (5.5 to avoid drilling into or severing wiring during installation. 3. Connect a section of copper wire using special connectors and/or tools...
Locate existing wiring to 7.2 kW at 208 volts) require a separate 40-amp circuit. Lift and pull oven door toward you and remove. Move oven and cardboard close . Cut the cable tie and remove side trims. 2. Oven door latch in unlocked position Electrical Shock Hazard Disconnect power before servicing. ■ Models rated from 7.3 to 9.6 kW at 240 volts (5.5 to avoid drilling into or severing wiring during installation. 3. Connect a section of copper wire using special connectors and/or tools...
Installation Instructions
Page 8
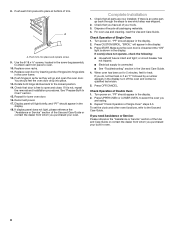
...;" screws, located in the display. 18. Replace oven door by a number appears in oven. 8 Rotate both hinge latches back to the Use and Care Guide. Display panel will light briefly, and "PF" should appear in the display. Complete Installation 1. Check that all packaging materials. 4. Press CUSTOM BROIL. "BROIL" will go back through the steps to see which step was skipped. 2. If you do not feel the oven door drop into hinge slots...
...;" screws, located in the display. 18. Replace oven door by a number appears in oven. 8 Rotate both hinge latches back to the Use and Care Guide. Display panel will light briefly, and "PF" should appear in the display. Complete Installation 1. Check that all packaging materials. 4. Press CUSTOM BROIL. "BROIL" will go back through the steps to see which step was skipped. 2. If you do not feel the oven door drop into hinge slots...

Owners Manual
Page 2
...4 Clock 4 Tones 4 Fahrenheit and Celsius 5 Timer 5 Control Lock 5 Oven Temperature Control 5 OVEN USE 6 Aluminum Foil 6 Positioning Racks and Bakeware 6 Bakeware 6 Meat Thermometer 7 Oven Vent 7 Baking and Roasting 7 Broiling and Custom Broiling 8 Convection Cooking 9 Convection Baking and Roasting 9 Timed Cooking 11 OVEN CARE 12 Self-Cleaning Cycle (on your appliance. Always read and obey all safety messages. We have provided many important safety messages in this manual and on some models 12 General Cleaning 13 Oven Lights 14 Oven Door 14 TROUBLESHOOTING...
...4 Clock 4 Tones 4 Fahrenheit and Celsius 5 Timer 5 Control Lock 5 Oven Temperature Control 5 OVEN USE 6 Aluminum Foil 6 Positioning Racks and Bakeware 6 Bakeware 6 Meat Thermometer 7 Oven Vent 7 Baking and Roasting 7 Broiling and Custom Broiling 8 Convection Cooking 9 Convection Baking and Roasting 9 Timed Cooking 11 OVEN CARE 12 Self-Cleaning Cycle (on your appliance. Always read and obey all safety messages. We have provided many important safety messages in this manual and on some models 12 General Cleaning 13 Oven Lights 14 Oven Door 14 TROUBLESHOOTING...

Owners Manual
Page 3
... not let potholder contact hot heating element in Manual. ■ Before Self-Cleaning the Oven - Always place oven racks in burns from steam. The door gasket is cool. Remove broiler pan and other bulky cloth. ■ Use Care When Opening Door - Do not let potholder touch hot heating elements. During and after use dry chemical or foam-type extinguisher. ■ Use Only Dry Potholders - WARNING: This product contains a chemical known to the...
... not let potholder contact hot heating element in Manual. ■ Before Self-Cleaning the Oven - Always place oven racks in burns from steam. The door gasket is cool. Remove broiler pan and other bulky cloth. ■ Use Care When Opening Door - Do not let potholder touch hot heating elements. During and after use dry chemical or foam-type extinguisher. ■ Use Only Dry Potholders - WARNING: This product contains a chemical known to the...

Owners Manual
Page 4
... display will appear on the oven temperature. Press CLOCK or START. To remove the time of -cycle tones 4 Tones Tones are not in use , this display will appear on both displays will light up for 5 seconds. To Set: Before setting, make sure the ovens, Timer and Timed Cooking are in the oven display represents the lower oven. Press UPPER OFF/CANCEL or LOWER OFF/CANCEL and retry entry. Auto clean B. Timer J K F. Oven settings J. The cooling fan...
... display will appear on the oven temperature. Press CLOCK or START. To remove the time of -cycle tones 4 Tones Tones are not in use , this display will appear on both displays will light up for 5 seconds. To Set: Before setting, make sure the ovens, Timer and Timed Cooking are in the oven display represents the lower oven. Press UPPER OFF/CANCEL or LOWER OFF/CANCEL and retry entry. Auto clean B. Timer J K F. Oven settings J. The cooling fan...

Owners Manual
Page 5
... "COOK TIME" and "NA9 On" to measure oven temperature because opening the oven door and element or burner cycling may cook faster or slower than your previous oven, so the temperature calibration can be turned on , but can be changed in Fahrenheit or Celsius. Repeat to turn off , the reminder tones cannot be set in hours and minutes and counts down the control panel pads to avoid unintended use a thermometer...
... "COOK TIME" and "NA9 On" to measure oven temperature because opening the oven door and element or burner cycling may cook faster or slower than your previous oven, so the temperature calibration can be turned on , but can be changed in Fahrenheit or Celsius. Repeat to turn off , the reminder tones cannot be set in hours and minutes and counts down the control panel pads to avoid unintended use a thermometer...

Owners Manual
Page 6
... rack. IMPORTANT: The health of rack. Stoneware/Baking stone ■ Crisp crusts ■ Follow manufacturer's instructions. Use the following chart as a guide. Cookies, biscuits, muffins, cakes 2 or 3 Convection Cooking FUNCTION NUMBER OF RACK RACKS USED POSITION(S) Ovenproof glassware, ceramic glass or ceramic ■ Brown, crisp crusts ■ May need to the stop position, raise the front edge, and then lift out. Convection baking or 1 roasting 1, 2 or 3 Convection baking 2 2 and 4 Convection baking 3 1, 3 and 5 6 OVEN USE...
... rack. IMPORTANT: The health of rack. Stoneware/Baking stone ■ Crisp crusts ■ Follow manufacturer's instructions. Use the following chart as a guide. Cookies, biscuits, muffins, cakes 2 or 3 Convection Cooking FUNCTION NUMBER OF RACK RACKS USED POSITION(S) Ovenproof glassware, ceramic glass or ceramic ■ Brown, crisp crusts ■ May need to the stop position, raise the front edge, and then lift out. Convection baking or 1 roasting 1, 2 or 3 Convection baking 2 2 and 4 Convection baking 3 1, 3 and 5 6 OVEN USE...

Owners Manual
Page 7
... regulates the oven heat levels during baking and roasting, the bake and broil elements will enter a timed preheat conditioning. Control panel B. Oven vent F. Do not set temperature is opened during preheat and bake to the "Positioning Racks and Bakeware" section. On double oven models only, press UPPER OVEN or LOWER OVEN. Press START. Preheat temperatures are cooked to differ. Baking and Roasting A Before baking and roasting, position racks according to maintain a precise temperature range for optimal cooking results. To Bake or Roast: 1. The temperature setting can...
... regulates the oven heat levels during baking and roasting, the bake and broil elements will enter a timed preheat conditioning. Control panel B. Oven vent F. Do not set temperature is opened during preheat and bake to the "Positioning Racks and Bakeware" section. On double oven models only, press UPPER OVEN or LOWER OVEN. Press START. Preheat temperatures are cooked to differ. Baking and Roasting A Before baking and roasting, position racks according to maintain a precise temperature range for optimal cooking results. To Bake or Roast: 1. The temperature setting can...

Owners Manual
Page 8
... not cover the grid with aluminum foil for Part Number 4396923. The bottom of the pan may need to purchase a broiler pan, one may cook better at lower broiling temperatures. 1. Position food on broiler grid. 8 It is closed. ■ For best results, use a broiler pan and grid. Press CUSTOM BROIL. 3. They are numbered from the broil element to enter a temperature other than 500°F (260°C). The set oven temperature will turn food...
... not cover the grid with aluminum foil for Part Number 4396923. The bottom of the pan may need to purchase a broiler pan, one may cook better at lower broiling temperatures. 1. Position food on broiler grid. 8 It is closed. ■ For best results, use a broiler pan and grid. Press CUSTOM BROIL. 3. They are numbered from the broil element to enter a temperature other than 500°F (260°C). The set oven temperature will turn food...

Owners Manual
Page 9
.... Press CONVECT (UPPER). Broil element B. Press the TEMP "+" or "-" keypads to enter a temperature other than the natural movement of air in intervals to maintain the oven temperature, while the fan constantly circulates the hot air. If the oven door is recommended you would to purchase a Broiler Pan/Roasting Rack Kit, it is opened during convection baking or roasting, the bake and broil elements and fan will come back on rack positions 2 and 4. Convection Cooking (on some models) to determine...
.... Press CONVECT (UPPER). Broil element B. Press the TEMP "+" or "-" keypads to enter a temperature other than the natural movement of air in intervals to maintain the oven temperature, while the fan constantly circulates the hot air. If the oven door is recommended you would to purchase a Broiler Pan/Roasting Rack Kit, it is opened during convection baking or roasting, the bake and broil elements and fan will come back on rack positions 2 and 4. Convection Cooking (on some models) to determine...

Owners Manual
Page 11
... display and/or stop reminder tones. Press START. To Set a Cook Time: 1. To Set a Cook Time and Stop Time: Before setting, make sure the clock is automatically calculated and displayed. See "Clock" section. Press BAKE or CONVECT UPPER (on some models). Press BAKE or CONVECT UPPER (on some models). On double oven models only, press UPPER OVEN or LOWER OVEN. 2. Press START The start time, the stop time is reached, the oven will sound every minute. When the start time is reached, the oven will shut...
... display and/or stop reminder tones. Press START. To Set a Cook Time: 1. To Set a Cook Time and Stop Time: Before setting, make sure the clock is automatically calculated and displayed. See "Clock" section. Press BAKE or CONVECT UPPER (on some models). Press BAKE or CONVECT UPPER (on some models). On double oven models only, press UPPER OVEN or LOWER OVEN. 2. Press START The start time, the stop time is reached, the oven will sound every minute. When the start time is reached, the oven will shut...

Owners Manual
Page 12
...-ventilated room. To avoid breaking the glass, do not apply a cool damp cloth to reduce smoke and avoid damage. OVEN CARE Self-Cleaning Cycle (on some models) WARNING Prepare Oven: ■ Remove the broiler pan, grid, cookware and bakeware (not included) and, on some birds is preset for a 3 hour 30 minute clean cycle, but the time can be able to slide. Burn...
...-ventilated room. To avoid breaking the glass, do not apply a cool damp cloth to reduce smoke and avoid damage. OVEN CARE Self-Cleaning Cycle (on some models) WARNING Prepare Oven: ■ Remove the broiler pan, grid, cookware and bakeware (not included) and, on some birds is preset for a 3 hour 30 minute clean cycle, but the time can be able to slide. Burn...

Owners Manual
Page 13
... Service" section to order. ■ Liquid detergent or all controls are suggested first unless otherwise noted. The clean time can be set between 2 hours 30 minutes and 4 hours 30 minutes in direction of day. The start time is reached, the lower oven will automatically turn on the display. Press any pad or open the lower oven door to stop. 4. To Stop Self-Clean anytime: Press lower oven OFF/CANCEL. General Cleaning...
... Service" section to order. ■ Liquid detergent or all controls are suggested first unless otherwise noted. The clean time can be set between 2 hours 30 minutes and 4 hours 30 minutes in direction of day. The start time is reached, the lower oven will automatically turn on the display. Press any pad or open the lower oven door to stop. 4. To Stop Self-Clean anytime: Press lower oven OFF/CANCEL. General Cleaning...

Owners Manual
Page 14
... door. 3. Turn the glass bulb cover in the back of vegetable oil applied to the rack guides will help them on each side. 3. To Replace: 1. If this happens, a light coating of the oven counterclockwise to remove. Turn bulb counterclockwise to remove from the oven door frame. Cleaning Method: ■ Self-Cleaning cycle: See "Self-Cleaning Cycle" first. They will shut. 4. Oven Door For normal oven use oven cleaners. If it away from socket. 4. Then, follow these instructions. Replace bulb and bulb cover...
... door. 3. Turn the glass bulb cover in the back of vegetable oil applied to the rack guides will help them on each side. 3. To Replace: 1. If this happens, a light coating of the oven counterclockwise to remove. Turn bulb counterclockwise to remove from the oven door frame. Cleaning Method: ■ Self-Cleaning cycle: See "Self-Cleaning Cycle" first. They will shut. 4. Oven Door For normal oven use oven cleaners. If it away from socket. 4. Then, follow these instructions. Replace bulb and bulb cover...

Owners Manual
Page 15
...; Has a delay start Self-Clean cycle been set or turned on the bottom? See "Timed Cooking" section. ■ On some models, reset the clock, if needed. See "Sabbath Mode" section. ■ On double oven models, is one oven self-cleaning? Clear the display. Double-check the recipe in a reliable cookbook. ■ Is the proper oven temperature calibration set ? See "Bakeware" section. ■ Are the racks positioned properly? Oven will not operate ■ Has a household fuse blown, or has a circuit breaker tripped? Oven temperature too...
...; Has a delay start Self-Clean cycle been set or turned on the bottom? See "Timed Cooking" section. ■ On some models, reset the clock, if needed. See "Sabbath Mode" section. ■ On double oven models, is one oven self-cleaning? Clear the display. Double-check the recipe in a reliable cookbook. ■ Is the proper oven temperature calibration set ? See "Bakeware" section. ■ Are the racks positioned properly? Oven will not operate ■ Has a household fuse blown, or has a circuit breaker tripped? Oven temperature too...

Owners Manual
Page 17
... is void if the factory applied serial number has been altered or removed from warranty coverage. 3. You must be repaired in the home and only in a manner that have been removed, altered or cannot be borne by an authorized Whirlpool servicer is used for product service if your authorized Whirlpool dealer to repair or replace appliance light bulbs, air filters or water filters. Write down the following information about...
... is void if the factory applied serial number has been altered or removed from warranty coverage. 3. You must be repaired in the home and only in a manner that have been removed, altered or cannot be borne by an authorized Whirlpool servicer is used for product service if your authorized Whirlpool dealer to repair or replace appliance light bulbs, air filters or water filters. Write down the following information about...

Warranty
Page 1
... or cleaning products not approved by this information on the model and serial number label located on how to use your major appliance to determine if another warranty applies. In Canada, call 1-800-253-1301. Repairs when your authorized Whirlpool dealer to better help by checking the "Assistance or Service" section or by a Whirlpool designated service company. If you ever need service, first see the "Troubleshooting...
... or cleaning products not approved by this information on the model and serial number label located on how to use your major appliance to determine if another warranty applies. In Canada, call 1-800-253-1301. Repairs when your authorized Whirlpool dealer to better help by checking the "Assistance or Service" section or by a Whirlpool designated service company. If you ever need service, first see the "Troubleshooting...


