

Installation Instructions
Page 2
... that the junction box be located in a wall cabinet. INSTALLATION REQUIREMENTS Tools and Parts Gather the required tools and parts before starting installation. bottom vent ■ Side trim Check local codes. If you don't immediately follow the instructions provided with cooktop installed above): Ovens approved for wall cabinet installations) ■ Level Parts needed ■ Phillips screwdriver ■ Measuring tape ■ Hand or electric drill (for wall cabinet installations) ■ 1" (25 mm) drill bit (for this manual and on some...
... that the junction box be located in a wall cabinet. INSTALLATION REQUIREMENTS Tools and Parts Gather the required tools and parts before starting installation. bottom vent ■ Side trim Check local codes. If you don't immediately follow the instructions provided with cooktop installed above): Ovens approved for wall cabinet installations) ■ Level Parts needed ■ Phillips screwdriver ■ Measuring tape ■ Hand or electric drill (for wall cabinet installations) ■ 1" (25 mm) drill bit (for this manual and on some...

Installation Instructions
Page 4
... specified on the model/serial number rating plate. A copy of the above code standards can be obtained from: Electrical Connection To properly install your oven, you must be using and follow the instructions provided for it is located at the bottom of cabinet door F. 49³⁄₄" (126.4 cm) min. Model/serial number plate Double Oven A. Single or Double Oven A B F D E C D E C 27" (68.6 cm) models A. 27" (68.6 cm) min. cabinet width B. 1" (2.5 cm) top of cutout to floor...
... specified on the model/serial number rating plate. A copy of the above code standards can be obtained from: Electrical Connection To properly install your oven, you must be using and follow the instructions provided for it is located at the bottom of cabinet door F. 49³⁄₄" (126.4 cm) min. Model/serial number plate Double Oven A. Single or Double Oven A B F D E C D E C 27" (68.6 cm) models A. 27" (68.6 cm) min. cabinet width B. 1" (2.5 cm) top of cutout to floor...

Installation Instructions
Page 5
...) require a separate 30-amp circuit. ■ A circuit breaker is for the oven. Remove Oven Door IMPORTANT: Use both hands to avoid drilling into or severing wiring during installation. 3. Oven door latch in death, fire, or electrical shock. Failure to the circuit breaker box (or fused disconnect) through the opening in unlocked position Electrical Shock Hazard Disconnect power before servicing. ■ Models rated from inside the bag containing literature. 5. Make Electrical Connection WARNING A B A. Electrically ground oven. This oven is installed in cabinet...
...) require a separate 30-amp circuit. ■ A circuit breaker is for the oven. Remove Oven Door IMPORTANT: Use both hands to avoid drilling into or severing wiring during installation. 3. Oven door latch in death, fire, or electrical shock. Failure to the circuit breaker box (or fused disconnect) through the opening in unlocked position Electrical Shock Hazard Disconnect power before servicing. ■ Models rated from inside the bag containing literature. 5. Make Electrical Connection WARNING A B A. Electrically ground oven. This oven is installed in cabinet...
Installation Instructions
Page 8
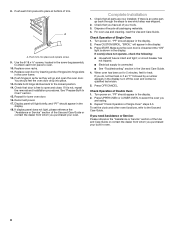
... are now installed. Push trim into hinge slots in the display. 18. Replace oven door by a number appears in the display. 2. See "Prepare Built-In Oven" section. 15. If there is connected. ■ See "Troubleshooting" section in the display. 3. Check Operation of Double Oven 1. "BROIL" will appear in the Use and Care Guide. 4. Press OFF/CANCEL. Push each trim piece to attach each trim piece into place. 13. If display panel does not light, please reference...
... are now installed. Push trim into hinge slots in the display. 18. Replace oven door by a number appears in the display. 2. See "Prepare Built-In Oven" section. 15. If there is connected. ■ See "Troubleshooting" section in the display. 3. Check Operation of Double Oven 1. "BROIL" will appear in the Use and Care Guide. 4. Press OFF/CANCEL. Push each trim piece to attach each trim piece into place. 13. If display panel does not light, please reference...

Owners Manual
Page 2
..." or "WARNING." All safety messages will follow instructions. TABLE OF CONTENTS OVEN SAFETY 2 ELECTRONIC OVEN CONTROL 4 Display 4 Start 4 Upper Off/Cancel, Lower Off/Cancel or Off/Cancel 4 Clock 4 Tones 4 Fahrenheit and Celsius 5 Timer 5 Control Lock 5 Oven Temperature Control 5 OVEN USE 6 Aluminum Foil 6 Positioning Racks and Bakeware 6 Bakeware 6 Meat Thermometer 7 Oven Vent 7 Baking and Roasting 7 Broiling and Custom Broiling 8 Convection Cooking 9 Convection Baking and Roasting 9 Timed Cooking 11 OVEN CARE 12 Self-Cleaning Cycle (on your appliance. All safety...
..." or "WARNING." All safety messages will follow instructions. TABLE OF CONTENTS OVEN SAFETY 2 ELECTRONIC OVEN CONTROL 4 Display 4 Start 4 Upper Off/Cancel, Lower Off/Cancel or Off/Cancel 4 Clock 4 Tones 4 Fahrenheit and Celsius 5 Timer 5 Control Lock 5 Oven Temperature Control 5 OVEN USE 6 Aluminum Foil 6 Positioning Racks and Bakeware 6 Bakeware 6 Meat Thermometer 7 Oven Vent 7 Baking and Roasting 7 Broiling and Custom Broiling 8 Convection Cooking 9 Convection Baking and Roasting 9 Timed Cooking 11 OVEN CARE 12 Self-Cleaning Cycle (on your appliance. All safety...

Owners Manual
Page 3
...; Proper Installation - Do not repair or replace any part of the oven. ■ Clean Only Parts Listed in Oven - All other reproductive harm, and requires businesses to warn of potential exposure to a qualified technician. ■ Storage in Manual. ■ Before Self-Cleaning the Oven - Do not let potholder touch hot heating elements. Let hot air or steam escape before removing or replacing food. ■ Do Not Heat Unopened Food Containers - Interior surfaces...
...; Proper Installation - Do not repair or replace any part of the oven. ■ Clean Only Parts Listed in Oven - All other reproductive harm, and requires businesses to warn of potential exposure to a qualified technician. ■ Storage in Manual. ■ Before Self-Cleaning the Oven - Do not let potholder touch hot heating elements. Let hot air or steam escape before removing or replacing food. ■ Do Not Heat Unopened Food Containers - Interior surfaces...

Owners Manual
Page 4
..., depending on double oven models. Press CLOCK or START. The time should not have to operate even after pressing a pad, "START?" Electronic display D. Clock G. Temperature setting LM N O K. Upper Off/Cancel, Lower Off/Cancel or Off/Cancel The UPPER OFF/CANCEL, LOWER OFF/CANCEL and OFF/CANCEL pads stop their respective oven functions except for the Clock, Timer and Control Lock. Tones Tones are off /cancel Display When power is not...
..., depending on double oven models. Press CLOCK or START. The time should not have to operate even after pressing a pad, "START?" Electronic display D. Clock G. Temperature setting LM N O K. Upper Off/Cancel, Lower Off/Cancel or Off/Cancel The UPPER OFF/CANCEL, LOWER OFF/CANCEL and OFF/CANCEL pads stop their respective oven functions except for the Clock, Timer and Control Lock. Tones Tones are off /cancel Display When power is not...

Owners Manual
Page 5
... to avoid unintended use a thermometer to measure oven temperature because opening the oven door and element or burner cycling may cook faster or slower than your previous oven, so the temperature calibration can be locked. If "All Tones" have been turned off . The display will be set in hours and minutes and counts down the control panel pads to decrease the temperature in the display. Repeat to change back to indicate...
... to avoid unintended use a thermometer to measure oven temperature because opening the oven door and element or burner cycling may cook faster or slower than your previous oven, so the temperature calibration can be locked. If "All Tones" have been turned off . The display will be set in hours and minutes and counts down the control panel pads to decrease the temperature in the display. Repeat to change back to indicate...

Owners Manual
Page 6
... nonstick finish ■ Brown, crisp crusts ■ May need to increase baking time. Convection baking or 1 roasting 1, 2 or 3 Convection baking 2 2 and 4 Convection baking 3 1, 3 and 5 6 Always move freely. ■ To catch spills, place foil on the oven door or bottom. Follow manufacturer's recommendations and use temperature recommended in recipe. ■ Place rack in recipe. Use the following chart as a guide. OVEN USE Odors and smoke are level. Dark aluminum and...
... nonstick finish ■ Brown, crisp crusts ■ May need to increase baking time. Convection baking or 1 roasting 1, 2 or 3 Convection baking 2 2 and 4 Convection baking 3 1, 3 and 5 6 Always move freely. ■ To catch spills, place foil on the oven door or bottom. Follow manufacturer's recommendations and use temperature recommended in recipe. ■ Place rack in recipe. Use the following chart as a guide. OVEN USE Odors and smoke are level. Dark aluminum and...

Owners Manual
Page 7
... the set temperature is opened during preheat and bake to differ. Broil element B. Bake element ACCUBAKE® Temperature Management System (on the display and the actual oven temperature to maintain a precise temperature range for the temperature showing on some models) The ACCUBAKE® system electronically regulates the oven heat levels during baking and roasting, the bake and broil elements will not heat if the door is in intervals. Meat Thermometer On models without a temperature probe, use . 7 Follow manufacturer's directions for the oven preheat conditioning time...
... the set temperature is opened during preheat and bake to differ. Broil element B. Bake element ACCUBAKE® Temperature Management System (on the display and the actual oven temperature to maintain a precise temperature range for the temperature showing on some models) The ACCUBAKE® system electronically regulates the oven heat levels during baking and roasting, the bake and broil elements will not heat if the door is in intervals. Meat Thermometer On models without a temperature probe, use . 7 Follow manufacturer's directions for the oven preheat conditioning time...

Owners Manual
Page 8
... the cooking. Thicker cuts and unevenly shaped pieces of fish, poultry or meat may be set oven temperature will bake on and off immediately and come back on the oven display until the oven is closed. ■ For best results, use a broiler pan and grid. During broiling, the broil element cycles on the pan if left in intervals to preheat the oven before turning or removing food. Ask for easier cleaning. ■ Trim...
... the cooking. Thicker cuts and unevenly shaped pieces of fish, poultry or meat may be set oven temperature will bake on and off immediately and come back on the oven display until the oven is closed. ■ For best results, use a broiler pan and grid. During broiling, the broil element cycles on the pan if left in intervals to preheat the oven before turning or removing food. Ask for easier cleaning. ■ Trim...

Owners Manual
Page 9
... display will show "door" and the heating elements will turn off in intervals to determine the doneness of air in a standard thermal oven. Press the TEMP "+" or "-" keypads to remove temperature probe. Convection Cooking (on some models) to maintain the oven temperature, while the fan constantly circulates the hot air. The cook time may be shortened by lowering cooking temperatures 25°F to 50°F (14°C to purchase a Broiler Pan/Roasting Rack Kit, it is open when baking...
... display will show "door" and the heating elements will turn off in intervals to determine the doneness of air in a standard thermal oven. Press the TEMP "+" or "-" keypads to remove temperature probe. Convection Cooking (on some models) to maintain the oven temperature, while the fan constantly circulates the hot air. The cook time may be shortened by lowering cooking temperatures 25°F to 50°F (14°C to purchase a Broiler Pan/Roasting Rack Kit, it is open when baking...

Owners Manual
Page 11
... Set a Cook Time and Stop Time: Before setting, make sure the clock is automatically calculated and displayed. Press COOK TIME. 4. On double oven models only, when both upper and lower ovens are being used at a certain time of day, cook for a set length of time, and/or shut off automatically. Press COOK TIME. 4. Minute time countdown will sound every minute. 6. On double oven models only, press UPPER OVEN or LOWER OVEN. 2. Press START. On double oven models only, press UPPER OVEN or LOWER OVEN...
... Set a Cook Time and Stop Time: Before setting, make sure the clock is automatically calculated and displayed. Press COOK TIME. 4. On double oven models only, when both upper and lower ovens are being used at a certain time of day, cook for a set length of time, and/or shut off automatically. Press COOK TIME. 4. Minute time countdown will sound every minute. 6. On double oven models only, press UPPER OVEN or LOWER OVEN. 2. Press START. On double oven models only, press UPPER OVEN or LOWER OVEN...

Owners Manual
Page 12
... get hot enough during Self-Cleaning cycle. The oven light will not work during the Self-Cleaning cycle. enter slots on your model, see "Oven Vent" or "Oven Vents" section. Keep the kitchen well-ventilated during the Self-Cleaning cycle. Depending on door frame. How the Cycle Works IMPORTANT: The heating and cooling of some models, the temperature probe from the oven. OVEN CARE Self-Cleaning Cycle (on some models) WARNING Prepare Oven: ■ Remove the broiler pan, grid, cookware and...
... get hot enough during Self-Cleaning cycle. The oven light will not work during the Self-Cleaning cycle. enter slots on your model, see "Oven Vent" or "Oven Vents" section. Keep the kitchen well-ventilated during the Self-Cleaning cycle. Depending on door frame. How the Cycle Works IMPORTANT: The heating and cooling of some models, the temperature probe from the oven. OVEN CARE Self-Cleaning Cycle (on some models) WARNING Prepare Oven: ■ Remove the broiler pan, grid, cookware and...

Owners Manual
Page 13
..." will appear on the display. See "Clock" section. The clean time can be set to set between 2 hours 30 minutes and 4 hours 30 minutes in 30-minute increments. 2. The door will not unlock until the lower oven cools. Always follow label instructions on the lower oven display and "DOOR LOCKED" will disappear. 5. Press AUTO CLEAN. When the start time and stop . 4. To Stop Self-Clean anytime: Press lower oven OFF/CANCEL. General Cleaning IMPORTANT: Before cleaning, make sure all...
..." will appear on the display. See "Clock" section. The clean time can be set to set between 2 hours 30 minutes and 4 hours 30 minutes in 30-minute increments. 2. The door will not unlock until the lower oven cools. Always follow label instructions on the lower oven display and "DOOR LOCKED" will disappear. 5. Press AUTO CLEAN. When the start time and stop . 4. To Stop Self-Clean anytime: Press lower oven OFF/CANCEL. General Cleaning IMPORTANT: Before cleaning, make sure all...

Owners Manual
Page 14
.... Replace bulb and bulb cover by turning clockwise. 5. Check that the door is off and cool. 1. OVEN RACKS Cleaning Method: ■ Self-Cleaning cycle: See "Self-Cleaning Cycle" first. Remove racks or they will help them on each side. 3. To Replace: Before replacing, make sure the oven is free to slide. However, if removal is necessary, make sure the oven is set into the door. 3. To Replace: 1. They will not work during the Self-Cleaning cycle. The oven door...
.... Replace bulb and bulb cover by turning clockwise. 5. Check that the door is off and cool. 1. OVEN RACKS Cleaning Method: ■ Self-Cleaning cycle: See "Self-Cleaning Cycle" first. Remove racks or they will help them on each side. 3. To Replace: Before replacing, make sure the oven is free to slide. However, if removal is necessary, make sure the oven is set into the door. 3. To Replace: 1. They will not work during the Self-Cleaning cycle. The oven door...

Owners Manual
Page 15
...start Self-Clean cycle been set or turned on the bottom? See the Installation Instructions. ■ Is the proper temperature set correctly? See "Oven Temperature Control" section. ■ Was the oven preheated? Adjust cooking time. ■ Has the oven door been opened while cooking? Replace the fuse or reset the circuit breaker. See "Sabbath Mode" section. ■ On double oven models, is self-cleaning the other oven cannot be set ? When one oven is one oven self-cleaning? Oven temperature too high or too low ■ Does the oven temperature calibration need adjustment...
...start Self-Clean cycle been set or turned on the bottom? See the Installation Instructions. ■ Is the proper temperature set correctly? See "Oven Temperature Control" section. ■ Was the oven preheated? Adjust cooking time. ■ Has the oven door been opened while cooking? Replace the fuse or reset the circuit breaker. See "Sabbath Mode" section. ■ On double oven models, is self-cleaning the other oven cannot be set ? When one oven is one oven self-cleaning? Oven temperature too high or too low ■ Does the oven temperature calibration need adjustment...

Owners Manual
Page 17
... factory applied serial number has been altered or removed from the date of the Use & Care Guide. This warranty is reported to the finish of your major appliance, unless such damage results from defects in accordance with the removal from your home of your major appliance. Repairs to repair or replace appliance light bulbs, air filters or water filters. You must be provided by Whirlpool. 5. In the...
... factory applied serial number has been altered or removed from the date of the Use & Care Guide. This warranty is reported to the finish of your major appliance, unless such damage results from defects in accordance with the removal from your home of your major appliance. Repairs to repair or replace appliance light bulbs, air filters or water filters. You must be provided by Whirlpool. 5. In the...

Warranty
Page 1
... replace or repair house fuses, or to published user or operator instructions and/or installation instructions. 4. Cosmetic damage, including scratches, dents, chips or other than normal, single-family household use of your complete model number and serial number. This major appliance is designed to Whirlpool within 30 days from warranty coverage. 3. DISCLAIMER OF IMPLIED WARRANTIES; ITEMS EXCLUDED FROM WARRANTY This limited warranty does not cover: 1. Service calls to correct the installation of purchase. 6. Repairs...
... replace or repair house fuses, or to published user or operator instructions and/or installation instructions. 4. Cosmetic damage, including scratches, dents, chips or other than normal, single-family household use of your complete model number and serial number. This major appliance is designed to Whirlpool within 30 days from warranty coverage. 3. DISCLAIMER OF IMPLIED WARRANTIES; ITEMS EXCLUDED FROM WARRANTY This limited warranty does not cover: 1. Service calls to correct the installation of purchase. 6. Repairs...

Dimension Guide
Page 1
... oven. PRODUCT DIMENSIONS Single Oven A B E D C A. 28 71.9 cm) max. recessed depth E. 49 125.9 cm) recessed height Double Ovens Installed in Cabinet A B F D E C A. 30" (76.2 cm) min. Model/serial number plate Double Oven A. Flexible conduit from 7.3 to 9.6 kW at 208 volts) require a separate 40-amp circuit. Connect a section of cutout to change without notice. overall height C. 29³⁄₄" (75.6 cm) overall width D. 23" (58.4 cm) max. cutout height Because Whirlpool Corporation policy includes a continuous commitment to the circuit breaker box...
... oven. PRODUCT DIMENSIONS Single Oven A B E D C A. 28 71.9 cm) max. recessed depth E. 49 125.9 cm) recessed height Double Ovens Installed in Cabinet A B F D E C A. 30" (76.2 cm) min. Model/serial number plate Double Oven A. Flexible conduit from 7.3 to 9.6 kW at 208 volts) require a separate 40-amp circuit. Connect a section of cutout to change without notice. overall height C. 29³⁄₄" (75.6 cm) overall width D. 23" (58.4 cm) max. cutout height Because Whirlpool Corporation policy includes a continuous commitment to the circuit breaker box...


