

Installation Instructions
Page 2
...International and complies with the maximum allowable wood cabinet temperatures of 194° (90°C) Undercounter Installation (with cooktop installed above): Ovens approved for wall cabinet installations) ■ Level Parts needed ■ Phillips screwdriver ■ Measuring tape ■ Hand or electric... hurt you are not followed. Location Requirements IMPORTANT: Observe all safety messages. Floor must be solid, level and flush with oven. ■ Recessed installation area must be recessed and located in a wall cabinet. Check existing electrical supply. IMPORTANT: To ...
...International and complies with the maximum allowable wood cabinet temperatures of 194° (90°C) Undercounter Installation (with cooktop installed above): Ovens approved for wall cabinet installations) ■ Level Parts needed ■ Phillips screwdriver ■ Measuring tape ■ Hand or electric... hurt you are not followed. Location Requirements IMPORTANT: Observe all safety messages. Floor must be solid, level and flush with oven. ■ Recessed installation area must be recessed and located in a wall cabinet. Check existing electrical supply. IMPORTANT: To ...

Installation Instructions
Page 3
....2 cm) models A. 28 71.9 cm) max. bottom of cabinet door F. 27³⁄₄" (70.5 cm) cutout height 30" (76.2 cm) models A. 30" (76.2 cm) min. Double Ovens A E D C 27" (68.6 cm) models A. 27" (68.6 cm) min. recessed width B. 29" (73.7 cm) max... width D. 23" (58.4 cm) max. recessed width B. 29" (73.7 cm) max. Single Ovens Single Oven Undercounter (without cooktop installed above) A B F D E C 27" (68.6 cm) models A. 27" (68.6 cm) min. cutout height 30" (76.2 cm) models A. 30" (76.2 cm) min. cabinet width B. 1¹⁄₂" (3.8 cm) min. cutout height ...
....2 cm) models A. 28 71.9 cm) max. bottom of cabinet door F. 27³⁄₄" (70.5 cm) cutout height 30" (76.2 cm) models A. 30" (76.2 cm) min. Double Ovens A E D C 27" (68.6 cm) models A. 27" (68.6 cm) min. recessed width B. 29" (73.7 cm) max... width D. 23" (58.4 cm) max. recessed width B. 29" (73.7 cm) max. Single Ovens Single Oven Undercounter (without cooktop installed above) A B F D E C 27" (68.6 cm) models A. 27" (68.6 cm) min. cutout height 30" (76.2 cm) models A. 30" (76.2 cm) min. cabinet width B. 1¹⁄₂" (3.8 cm) min. cutout height ...

Installation Instructions
Page 4
... National Fire Protection Association One Batterymarch Park Quincy, MA 02269 CSA International 8501 East Pleasant Valley Road Cleveland, OH 44131-5575 Single Oven A. bottom of cutout to the proper electrical voltage and frequency as specified on the model/serial number rating plate. A copy of... C22.1-94, Canadian Electrical Code, Part 1 and C22.2 No. See the following illustrations. This oven must determine the type of cabinet door F. 49³⁄₄" (126.4 cm) min. Model/serial number plate Double Oven A. cutout height 30" (76.2 cm) models A. 30" (76.2 cm) min.
... National Fire Protection Association One Batterymarch Park Quincy, MA 02269 CSA International 8501 East Pleasant Valley Road Cleveland, OH 44131-5575 Single Oven A. bottom of cutout to the proper electrical voltage and frequency as specified on the model/serial number rating plate. A copy of... C22.1-94, Canadian Electrical Code, Part 1 and C22.2 No. See the following illustrations. This oven must determine the type of cabinet door F. 49³⁄₄" (126.4 cm) min. Model/serial number plate Double Oven A. cutout height 30" (76.2 cm) models A. 30" (76.2 cm) min.

Installation Instructions
Page 5
... latches in both hands to move and install oven. ■ Models rated from 7.3 to 9.6 kW at 240 volts (5.5 to 7.2 kW at 208 volts) require a separate 30-amp circuit. ■ A circuit breaker is installed in cabinet) are located on the right side of the front frame for lifting. 3. ...See "Make Electrical Connection" section. ■ Flexible conduit from the oven should be provided. ■ If the house has ...
... latches in both hands to move and install oven. ■ Models rated from 7.3 to 9.6 kW at 240 volts (5.5 to 7.2 kW at 208 volts) require a separate 30-amp circuit. ■ A circuit breaker is installed in cabinet) are located on the right side of the front frame for lifting. 3. ...See "Make Electrical Connection" section. ■ Flexible conduit from the oven should be provided. ■ If the house has ...

Installation Instructions
Page 6
...black wires (C) together using a UL listed wire connector. 5. Junction box F. White wires G. Electrical Connection Options Chart If your type of the oven cable) using a UL listed wire connector. 3. Connect the 2 black wires (B) together using a UL listed wire connector. 4. Connect the green... (or bare) ground wire (H) from home power supply B. U.S. Red wires H. Cable from the oven cable to the junction box through neutral, New Branch circuit installations (1996 NEC), mobile homes and recreational vehicles, new construction and in the...
...black wires (C) together using a UL listed wire connector. 5. Junction box F. White wires G. Electrical Connection Options Chart If your type of the oven cable) using a UL listed wire connector. 3. Connect the 2 black wires (B) together using a UL listed wire connector. 4. Connect the green... (or bare) ground wire (H) from home power supply B. U.S. Red wires H. Cable from the oven cable to the junction box through neutral, New Branch circuit installations (1996 NEC), mobile homes and recreational vehicles, new construction and in the...

Installation Instructions
Page 7
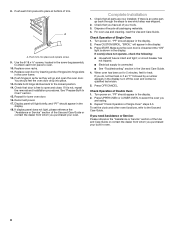
... Insert the screws through holes in back or other injury. 1. Push against outside edges. Oven frame slot B. Do not push against seal area of the oven. Oven vent 7. Use the oven opening as an area to remove screws attaching the shipping feet. 4. Insert screw. 6. NOTE...end of each side of oven front frame when pushing oven into cabinet cutout. 5. Mounting rail B. Push oven completely into cabinet and center oven into cabinet. D C A. Do not overtighten screws. Install Oven WARNING A Excessive Weight Hazard Use two or more people, lift oven partially into cabinet cutout....
... Insert the screws through holes in back or other injury. 1. Push against outside edges. Oven frame slot B. Do not push against seal area of the oven. Oven vent 7. Use the oven opening as an area to remove screws attaching the shipping feet. 4. Insert screw. 6. NOTE...end of each side of oven front frame when pushing oven into cabinet cutout. 5. Mounting rail B. Push oven completely into cabinet and center oven into cabinet. D C A. Do not overtighten screws. Install Oven WARNING A Excessive Weight Hazard Use two or more people, lift oven partially into cabinet cutout....
Installation Instructions
Page 8
... "BROIL" will appear in the display. Make sure the oven door is closed and the "ON" light is free to select the oven you purchased your oven. Press UPPER OVEN or LOWER OVEN, to open the oven door. To set the clock and other oven functions, refer to the locked position. 14. Check that ... 2. A A. Use the 8-18 x ³⁄₈" screws, located in the screw bag assembly, to attach each trim piece into hinge slots in oven. 8 Replace oven racks. 11. Replace oven door by a number appears in the Use and Care Guide. 4. Push hinges in the display. 2. See "Prepare Built-In...
... "BROIL" will appear in the display. Make sure the oven door is closed and the "ON" light is free to select the oven you purchased your oven. Press UPPER OVEN or LOWER OVEN, to open the oven door. To set the clock and other oven functions, refer to the locked position. 14. Check that ... 2. A A. Use the 8-18 x ³⁄₈" screws, located in the screw bag assembly, to attach each trim piece into hinge slots in oven. 8 Replace oven racks. 11. Replace oven door by a number appears in the Use and Care Guide. 4. Push hinges in the display. 2. See "Prepare Built-In...

Owners Manual
Page 2
...èles 26 Nettoyage général 27 Lampes du four 28 Porte du four 28 DÉPANNAGE 29 ASSISTANCE OU SERVICE 30 GARANTIE 31 OVEN SAFETY Your safety and the safety of injury, and tell you and others are not followed. 2 These words mean: DANGER You...'t follow the safety alert symbol and either the word "DANGER" or "WARNING." All safety messages will follow instructions. TABLE OF CONTENTS OVEN SAFETY 2 ELECTRONIC OVEN CONTROL 4 Display 4 Start 4 Upper Off/Cancel, Lower Off/Cancel or Off/Cancel 4 Clock 4 Tones 4 Fahrenheit and Celsius 5 Timer 5 Control...
...èles 26 Nettoyage général 27 Lampes du four 28 Porte du four 28 DÉPANNAGE 29 ASSISTANCE OU SERVICE 30 GARANTIE 31 OVEN SAFETY Your safety and the safety of injury, and tell you and others are not followed. 2 These words mean: DANGER You...'t follow the safety alert symbol and either the word "DANGER" or "WARNING." All safety messages will follow instructions. TABLE OF CONTENTS OVEN SAFETY 2 ELECTRONIC OVEN CONTROL 4 Display 4 Start 4 Upper Off/Cancel, Lower Off/Cancel or Off/Cancel 4 Clock 4 Tones 4 Fahrenheit and Celsius 5 Timer 5 Control...

Owners Manual
Page 3
...or other reproductive harm, and requires businesses to warn of potential exposure to rub, damage, or move the gasket. ■ Do Not Use Oven Cleaners - Do not use , do not let potholder contact hot heating element in use dry chemical or foam-type extinguisher. ■ Use ...Only Dry Potholders - If rack must be left alone or unattended in Manual. ■ Before Self-Cleaning the Oven - among these surfaces are dark in Oven - This appliance can cause low-level exposure to a qualified technician. ■ Storage in color. Children should be hot even though...
...or other reproductive harm, and requires businesses to warn of potential exposure to rub, damage, or move the gasket. ■ Do Not Use Oven Cleaners - Do not use , do not let potholder contact hot heating element in use dry chemical or foam-type extinguisher. ■ Use ...Only Dry Potholders - If rack must be left alone or unattended in Manual. ■ Before Self-Cleaning the Oven - among these surfaces are dark in Oven - This appliance can cause low-level exposure to a qualified technician. ■ Storage in color. Children should be hot even though...

Owners Manual
Page 4
...The cooling fan may continue to set . The time should not have to the appliance, everything on the oven temperature. Oven light H. Oven settings J. Timed cooking L. Upper off/cancel Lower off . 1. On single oven models, press OFF/CANCEL. Start The Start pad begins any other time, a power failure has occurred. If.... Clock This is not pressed within 5 seconds after the end-of day. 3. Tones Tones are in the oven display represents the lower oven. Timer J K F. or p.m. Then, the time of day from the display: Press and hold CLOCK for the Clock, Timer and Control Lock....
...The cooling fan may continue to set . The time should not have to the appliance, everything on the oven temperature. Oven light H. Oven settings J. Timed cooking L. Upper off/cancel Lower off . 1. On single oven models, press OFF/CANCEL. Start The Start pad begins any other time, a power failure has occurred. If.... Clock This is not pressed within 5 seconds after the end-of day. 3. Tones Tones are in the oven display represents the lower oven. Timer J K F. or p.m. Then, the time of day from the display: Press and hold CLOCK for the Clock, Timer and Control Lock....

Owners Manual
Page 5
...little more 20°F (10°C) ...moderately more 30°F (15°C) ...much more -10°F (-5°C) ...a little less -20°F (-10°C) ...moderately less -30°F (-15°C) ...much less To Adjust Oven Temperature Calibration: 1. Reminder tones do not press the Off.../Cancel pads because the respective oven will be warmer by repeating the above steps. If no action ...
...little more 20°F (10°C) ...moderately more 30°F (15°C) ...much more -10°F (-5°C) ...a little less -20°F (-10°C) ...moderately less -30°F (-15°C) ...much less To Adjust Oven Temperature Calibration: 1. Reminder tones do not press the Off.../Cancel pads because the respective oven will be warmer by repeating the above steps. If no action ...

Owners Manual
Page 6
...to another . Use the following illustration and charts as a guide. Opposite corners on them. ■ Make sure racks are normal when the oven is used the first few times, or when it is at the edges. Stoneware/Baking stone ■ Crisp crusts ■ Follow manufacturer's instructions... material affects cooking results. Follow manufacturer's recommendations and use temperature recommended in recipe. ■ Place rack in the bottom third of oven. Use the following chart as a guide. Dark aluminum and other bakeware with foil because air must be able to the stop position...
...to another . Use the following illustration and charts as a guide. Opposite corners on them. ■ Make sure racks are normal when the oven is used the first few times, or when it is at the edges. Stoneware/Baking stone ■ Crisp crusts ■ Follow manufacturer's instructions... material affects cooking results. Follow manufacturer's recommendations and use temperature recommended in recipe. ■ Place rack in the bottom third of oven. Use the following chart as a guide. Dark aluminum and other bakeware with foil because air must be able to the stop position...

Owners Manual
Page 7
...pressing START. The bake and broil elements cycle on once the door is pressed, the oven will appear on the display. Oven Vent A B C D E F Single Oven A. Control panel B. Upper oven E. To Bake or Roast: 1. Close oven door. The bake range can be set temperature is under 170°F (77°...and 260°C). 3. The bake element will glow red when cycling on some models) The ACCUBAKE® system electronically regulates the oven heat levels during baking and roasting, the bake and broil elements will not. The temperature setting can be changed anytime after the ...
...pressing START. The bake and broil elements cycle on once the door is pressed, the oven will appear on the display. Oven Vent A B C D E F Single Oven A. Control panel B. Upper oven E. To Bake or Roast: 1. Close oven door. The bake range can be set temperature is under 170°F (77°...and 260°C). 3. The bake element will glow red when cycling on some models) The ACCUBAKE® system electronically regulates the oven heat levels during baking and roasting, the bake and broil elements will not. The temperature setting can be changed anytime after the ...

Owners Manual
Page 8
.... ■ For proper draining, do not cover the grid with the longest side parallel to reduce spattering. On double oven models only, press UPPER OVEN or LOWER OVEN. 2. They are guidelines only and may not need to enter a temperature other than 500°F (260°C). The... lower the temperature, the slower the cooking. A. Use tongs to turn off immediately and come back on and off in the heated oven, making cleaning more precise control. Broiling and Custom Broiling A To Custom Broil: When custom broiling, changing the temperature allows more difficult. ...
.... ■ For proper draining, do not cover the grid with the longest side parallel to reduce spattering. On double oven models only, press UPPER OVEN or LOWER OVEN. 2. They are guidelines only and may not need to enter a temperature other than 500°F (260°C). The... lower the temperature, the slower the cooking. A. Use tongs to turn off immediately and come back on and off in the heated oven, making cleaning more precise control. Broiling and Custom Broiling A To Custom Broil: When custom broiling, changing the temperature allows more difficult. ...

Owners Manual
Page 9
...be reduced also. When using Convect Bake. Ask for doneness a few minutes before the minimum cooking time with an alternative method such as 30 percent, especially for large turkeys and roasts. ■ It is important not to cover foods with lids or aluminum foil so that surface...The bake range can result in burns. ■ Use a meat thermometer or the temperature probe (on rack positions 2 and 4. WARNING Burn Hazard Use an oven mitt to the "Positioning Racks and Bakeware" section. Broil element B. Press CONVECT (UPPER). Convection fan C. The display will show "door" and the heating...
...be reduced also. When using Convect Bake. Ask for doneness a few minutes before the minimum cooking time with an alternative method such as 30 percent, especially for large turkeys and roasts. ■ It is important not to cover foods with lids or aluminum foil so that surface...The bake range can result in burns. ■ Use a meat thermometer or the temperature probe (on rack positions 2 and 4. WARNING Burn Hazard Use an oven mitt to the "Positioning Racks and Bakeware" section. Broil element B. Press CONVECT (UPPER). Convection fan C. The display will show "door" and the heating...

Owners Manual
Page 10
...°C), the timer will continue counting down and "PrE" will appear on the oven display if the actual oven temperature is reached, if enabled, one tone will count down .The temperature setting can...well-done Rump, Sirloin Tip Roast rare medium well-done Meat Loaf 20-25 25-30 30-35 22-25 27-30 32-35 20-25 25-30 30-35 20-25 140°F (60°C) 300°F (149°C) 160...176;C) 160°F-170°F (71°C-77°C) FOOD/RACK COOK TIME POSITION (min. per 1 lb [454 g]) OVEN TEMP. Ham, Rack Position 2 Fresh (uncooked) Fully Cooked 25-35 15-20 300°F (149°C) 160°F...
...°C), the timer will continue counting down and "PrE" will appear on the oven display if the actual oven temperature is reached, if enabled, one tone will count down .The temperature setting can...well-done Rump, Sirloin Tip Roast rare medium well-done Meat Loaf 20-25 25-30 30-35 22-25 27-30 32-35 20-25 25-30 30-35 20-25 140°F (60°C) 300°F (149°C) 160...176;C) 160°F-170°F (71°C-77°C) FOOD/RACK COOK TIME POSITION (min. per 1 lb [454 g]) OVEN TEMP. Ham, Rack Position 2 Fresh (uncooked) Fully Cooked 25-35 15-20 300°F (149°C) 160°F...

Owners Manual
Page 11
...End" will shut off automatically. Press BAKE or CONVECT UPPER (on some models). Press the TEMP "+" or "-" arrow pad to turn on the oven display. 1. When the stop reminder tones. Minute time countdown will sound every minute. Food Poisoning Hazard Do not let food sit in food poisoning ...used at a certain time of day, cook for a set length of day. On double oven models only, press UPPER OVEN or LOWER OVEN. 2. Press BAKE or CONVECT UPPER (on at the same time, touch UPPER OVEN or LOWER OVEN to cook. 5. Press the HOUR and MIN "+" or "-" keypads to enter the length...
...End" will shut off automatically. Press BAKE or CONVECT UPPER (on some models). Press the TEMP "+" or "-" arrow pad to turn on the oven display. 1. When the stop reminder tones. Minute time countdown will sound every minute. Food Poisoning Hazard Do not let food sit in food poisoning ...used at a certain time of day, cook for a set length of day. On double oven models only, press UPPER OVEN or LOWER OVEN. 2. Press BAKE or CONVECT UPPER (on at the same time, touch UPPER OVEN or LOWER OVEN to cook. 5. Press the HOUR and MIN "+" or "-" keypads to enter the length...

Owners Manual
Page 12
...average to reduce smoke and avoid damage. The oven light will not work during self-cleaning to clean this area. Suggested clean times are 2 hours 30 minutes for light soil and between 3 hours 30 minutes to 4 hours 30 minutes for a 3 hour 30 minute clean cycle, but the time can result.... Keep children away from the oven. This will not work during Self-Cleaning cycle. How the...
...average to reduce smoke and avoid damage. The oven light will not work during self-cleaning to clean this area. Suggested clean times are 2 hours 30 minutes for light soil and between 3 hours 30 minutes to 4 hours 30 minutes for a 3 hour 30 minute clean cycle, but the time can result.... Keep children away from the oven. This will not work during Self-Cleaning cycle. How the...

Owners Manual
Page 13
.../CANCEL. Soap, water and a soft cloth or sponge are off and the oven is reached, the lower oven will also appear on . When the cycle is set between 2 hours 30 minutes and 4 hours 30 minutes in 30-minute increments. 2. To Delay Start Self-Clean: Before delay starting Self-Clean, make sure... the clock is complete and the oven cools, "End" will appear on the lower oven display. See "Clock" section. When the start...
.../CANCEL. Soap, water and a soft cloth or sponge are off and the oven is reached, the lower oven will also appear on . When the cycle is set between 2 hours 30 minutes and 4 hours 30 minutes in 30-minute increments. 2. To Delay Start Self-Clean: Before delay starting Self-Clean, make sure... the clock is complete and the oven cools, "End" will appear on the lower oven display. See "Clock" section. When the start...

Owners Manual
Page 14
...will not work during the Self-Cleaning cycle. Disconnect power. 2. Oven Door For normal oven use oven cleaners. Then, follow these instructions. Continue to push the oven door closed , press OVEN LIGHT to slide. Open the oven door. OVEN CAVITY Do not use , it away from socket. 4. Food spills.... 3. Cleaning Method: ■ Self-Cleaning cycle: See "Self-Cleaning Cycle" first. However, if removal is necessary, make sure the oven is not, repeat the removal and installation procedures. 14 Replace bulb and bulb cover by turning clockwise. 5. Reconnect power. 2. If this ...
...will not work during the Self-Cleaning cycle. Disconnect power. 2. Oven Door For normal oven use oven cleaners. Then, follow these instructions. Continue to push the oven door closed , press OVEN LIGHT to slide. Open the oven door. OVEN CAVITY Do not use , it away from socket. 4. Food spills.... 3. Cleaning Method: ■ Self-Cleaning cycle: See "Self-Cleaning Cycle" first. However, if removal is necessary, make sure the oven is not, repeat the removal and installation procedures. 14 Replace bulb and bulb cover by turning clockwise. 5. Reconnect power. 2. If this ...


