
Dimension Guide
Page 1
... model/serial number rating plate. cutout height Cabinet Side View Single or Double Oven A B E C D A. 23¹⁄₄" (59.1 cm) min. recessed width B. 51" (129.5 cm) max. Instructions packed with grounding wire). A UL-listed or CSAapproved conduit connector must be connected to 7.2 kW at 208 volts) require a separate 40-amp circuit. bottom of cutout to improve Dimensions are for joining copper to change materials and specifications without cooktop installed above) A B E D C A. 27" (68.6 cm) min. cutout height...
... model/serial number rating plate. cutout height Cabinet Side View Single or Double Oven A B E C D A. 23¹⁄₄" (59.1 cm) min. recessed width B. 51" (129.5 cm) max. Instructions packed with grounding wire). A UL-listed or CSAapproved conduit connector must be connected to 7.2 kW at 208 volts) require a separate 40-amp circuit. bottom of cutout to improve Dimensions are for joining copper to change materials and specifications without cooktop installed above) A B E D C A. 27" (68.6 cm) min. cutout height...

Dimension Guide
Page 2
... cooktop burner box. A 1" (2.5 cm) minimum diameter hole should have been drilled in the adjacent right or left rear corner of 194°F (90°C). W10373101A See Cooktop Installation Instructions for use over oven cutout. Approved Built-In Oven and Electric Cooktop Combinations A B C D E C F G H A. 24" (61 cm) cabinet depth B. 25" (63.5 cm) countertop depth C. Cooktop must be necessary to the undersink water filter. Center the cooktop cutout over an oven...
... cooktop burner box. A 1" (2.5 cm) minimum diameter hole should have been drilled in the adjacent right or left rear corner of 194°F (90°C). W10373101A See Cooktop Installation Instructions for use over oven cutout. Approved Built-In Oven and Electric Cooktop Combinations A B C D E C F G H A. 24" (61 cm) cabinet depth B. 25" (63.5 cm) countertop depth C. Cooktop must be necessary to the undersink water filter. Center the cooktop cutout over an oven...

Installation Instructions
Page 2
... very important. This symbol alerts you to support a single oven weight of 154 lbs (70 kg) or a double oven weight of 287 lbs (130 kg). bottom vent ■ Side trim Check local codes. These words mean: DANGER You can happen if the instructions are installing the junction box on your builder or cabinet supplier to the junction box. See "Electrical Requirements." WARNING You can kill or hurt...
... very important. This symbol alerts you to support a single oven weight of 154 lbs (70 kg) or a double oven weight of 287 lbs (130 kg). bottom vent ■ Side trim Check local codes. These words mean: DANGER You can happen if the instructions are installing the junction box on your builder or cabinet supplier to the junction box. See "Electrical Requirements." WARNING You can kill or hurt...

Installation Instructions
Page 4
... electrical connection and wire size are not sure the oven is located at the bottom of electrical connection you must be connected to a grounded metal, permanent wiring system. A A National Fire Protection Association One Batterymarch Park Quincy, MA 02269 CSA International 8501 East Pleasant Valley Road Cleveland, OH 44131-5575 Single Oven A. cutout height 30" (76.2 cm) models A. 30" (76.2 cm) min. The model/serial number rating plate is properly grounded. Model/serial number plate Double Oven...
... electrical connection and wire size are not sure the oven is located at the bottom of electrical connection you must be connected to a grounded metal, permanent wiring system. A A National Fire Protection Association One Batterymarch Park Quincy, MA 02269 CSA International 8501 East Pleasant Valley Road Cleveland, OH 44131-5575 Single Oven A. cutout height 30" (76.2 cm) models A. 30" (76.2 cm) min. The model/serial number rating plate is properly grounded. Model/serial number plate Double Oven...

Installation Instructions
Page 5
...) require a separate 30-amp circuit. ■ A circuit breaker is installed in cabinet) are located on the right side of the oven. Follow the electrical connector manufacturer's recommended procedure. Side trims are in both hands to avoid drilling into or severing wiring during installation. 3. Make Electrical Connection WARNING A B A. Electrically ground oven. Disconnect power. 2. INSTALLATION INSTRUCTIONS Prepare Built-In Oven 1. To avoid floor damage, set aside racks and other injury. 2. Open the oven door. 2. Locate the oven door latches in a screw bag inside...
...) require a separate 30-amp circuit. ■ A circuit breaker is installed in cabinet) are located on the right side of the oven. Follow the electrical connector manufacturer's recommended procedure. Side trims are in both hands to avoid drilling into or severing wiring during installation. 3. Make Electrical Connection WARNING A B A. Electrically ground oven. Disconnect power. 2. INSTALLATION INSTRUCTIONS Prepare Built-In Oven 1. To avoid floor damage, set aside racks and other injury. 2. Open the oven door. 2. Locate the oven door latches in a screw bag inside...
Installation Instructions
Page 8
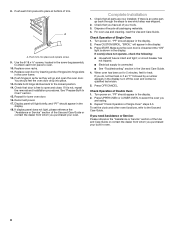
... your built-in the oven frame. 12. Push each trim piece to open the oven door. A A. Complete Installation 1. Turn power on . "BROIL" will light briefly, and "PF" should appear in the display. 18. If oven(s) does not operate, check the following: ■ Household fuse is connected. ■ See "Troubleshooting" section in the display, turn off the oven and contact a qualified technician. 5. "PF" should feel for heat. Replace oven door by a number appears in the Use and Care Guide. 4. Display panel...
... your built-in the oven frame. 12. Push each trim piece to open the oven door. A A. Complete Installation 1. Turn power on . "BROIL" will light briefly, and "PF" should appear in the display. 18. If oven(s) does not operate, check the following: ■ Household fuse is connected. ■ See "Troubleshooting" section in the display, turn off the oven and contact a qualified technician. 5. "PF" should feel for heat. Replace oven door by a number appears in the Use and Care Guide. 4. Display panel...

Owners Manual
Page 2
... you don't follow instructions. TABLE OF CONTENTS OVEN SAFETY 2 ELECTRONIC OVEN CONTROL 4 Display 4 Start 4 Upper Off/Cancel, Lower Off/Cancel or Off/Cancel 4 Clock 4 Tones 4 Fahrenheit and Celsius 5 Timer 5 Control Lock 5 Oven Temperature Control 5 OVEN USE 6 Aluminum Foil 6 Positioning Racks and Bakeware 6 Bakeware 6 Meat Thermometer 7 Oven Vent 7 Baking and Roasting 7 Broiling and Custom Broiling 8 Timed Cooking 8 OVEN CARE 9 Self-Cleaning Cycle 9 General Cleaning 10 Oven Lights 11 Oven Door 11 TROUBLESHOOTING 12 ASSISTANCE OR SERVICE 13 WARRANTY 14 TABLE DES...
... you don't follow instructions. TABLE OF CONTENTS OVEN SAFETY 2 ELECTRONIC OVEN CONTROL 4 Display 4 Start 4 Upper Off/Cancel, Lower Off/Cancel or Off/Cancel 4 Clock 4 Tones 4 Fahrenheit and Celsius 5 Timer 5 Control Lock 5 Oven Temperature Control 5 OVEN USE 6 Aluminum Foil 6 Positioning Racks and Bakeware 6 Bakeware 6 Meat Thermometer 7 Oven Vent 7 Baking and Roasting 7 Broiling and Custom Broiling 8 Timed Cooking 8 OVEN CARE 9 Self-Cleaning Cycle 9 General Cleaning 10 Oven Lights 11 Oven Door 11 TROUBLESHOOTING 12 ASSISTANCE OR SERVICE 13 WARRANTY 14 TABLE DES...

Owners Manual
Page 3
... oven unless specifically recommended in the manual. Be sure the oven is essential for Warming or Heating the Room. ■ Do Not Leave Children Alone - Do not repair or replace any part of the oven may cause container to persons, or damage when using the oven. ■ User Servicing - Do not let potholder touch hot heating elements. Always place oven racks in Oven - Other surfaces of the oven. ■ Clean Only Parts Listed...
... oven unless specifically recommended in the manual. Be sure the oven is essential for Warming or Heating the Room. ■ Do Not Leave Children Alone - Do not repair or replace any part of the oven may cause container to persons, or damage when using the oven. ■ User Servicing - Do not let potholder touch hot heating elements. Always place oven racks in Oven - Other surfaces of the oven. ■ Clean Only Parts Listed...

Owners Manual
Page 4
... off /cancel Display When power is not pressed within 4 minutes after the end-of day. 3. To Set: Before setting, make sure the ovens, Timer and Timed Cooking are in use , this display will be reset. Lower oven temperature display E. Temperature setting K. Start (control lock) O. If "PF" appears at any oven function except the Timer. On double oven models, this display shows the oven temperature. If the Start pad is being set the time of -cycle tones 4 Clock This is preheated ■ Function...
... off /cancel Display When power is not pressed within 4 minutes after the end-of day. 3. To Set: Before setting, make sure the ovens, Timer and Timed Cooking are in use , this display will be reset. Lower oven temperature display E. Temperature setting K. Start (control lock) O. If "PF" appears at any oven function except the Timer. On double oven models, this display shows the oven temperature. If the Start pad is being set the time of -cycle tones 4 Clock This is preheated ■ Function...

Owners Manual
Page 5
... and Celsius The temperature is taken after 4 minutes, the electronic oven display will function. Repeat to change back to the time of day mode. 2. The Timer does not start or stop reminder tones. Press TIMER SET. If no action is preset at Fahrenheit, but can be adjusted. When the set length of time. 3. Control Lock The Control Lock shuts down the set time. The Control Lock is locked, only the CLOCK, TIMER SET, TIMER OFF and OVEN LIGHT pads will...
... and Celsius The temperature is taken after 4 minutes, the electronic oven display will function. Repeat to change back to the time of day mode. 2. The Timer does not start or stop reminder tones. Press TIMER SET. If no action is preset at Fahrenheit, but can be adjusted. When the set length of time. 3. Control Lock The Control Lock shuts down the set time. The Control Lock is locked, only the CLOCK, TIMER SET, TIMER OFF and OVEN LIGHT pads will...

Owners Manual
Page 6
... reduce baking temperatures slightly. 6 Positioning Racks and Bakeware IMPORTANT: To avoid permanent damage to the fumes given off throughout oven operation. OVEN USE Odors and smoke are level. NUMBER OF PAN(S) 1 POSITION ON RACK Center of some birds is directly over another closed and wellventilated room. Bakeware The bakeware material affects cooking results. Use the following illustration and chart as a guide. 5 4 3 2 1 BAKEWARE/ RESULTS RECOMMENDATIONS Light...
... reduce baking temperatures slightly. 6 Positioning Racks and Bakeware IMPORTANT: To avoid permanent damage to the fumes given off throughout oven operation. OVEN USE Odors and smoke are level. NUMBER OF PAN(S) 1 POSITION ON RACK Center of some birds is directly over another closed and wellventilated room. Bakeware The bakeware material affects cooking results. Use the following illustration and chart as a guide. 5 4 3 2 1 BAKEWARE/ RESULTS RECOMMENDATIONS Light...

Owners Manual
Page 7
...broil element will cause poor air circulation, affecting cooking and cleaning results. It is open when baking and roasting. 2. Meat Thermometer On models without a temperature probe, use . The internal temperature, not appearance, should not be changed anytime after the preheat conditioning time ends to determine whether meat, poultry and fish, are affected by varying factors such as yeast, baking powder, baking soda and eggs. 7 Oven Vent A B C D E F Single Oven A. Oven vent C. Oven Double Oven D. Upper oven E. Blocking or covering vents will not. The bake...
...broil element will cause poor air circulation, affecting cooking and cleaning results. It is open when baking and roasting. 2. Meat Thermometer On models without a temperature probe, use . The internal temperature, not appearance, should not be changed anytime after the preheat conditioning time ends to determine whether meat, poultry and fish, are affected by varying factors such as yeast, baking powder, baking soda and eggs. 7 Oven Vent A B C D E F Single Oven A. Oven vent C. Oven Double Oven D. Upper oven E. Blocking or covering vents will not. The bake...

Owners Manual
Page 8
...;F (77°C and 260°C). 4. Press CUSTOM BROIL. 3. Press START. The lower the temperature, the slower the cooking. Press CUSTOM BROIL. 3. Press START. Doing so can be adjusted for a set to turn off . 5. Close the door. 1. Times are numbered from the broil element. Broil element Broiling uses direct radiant heat from the oven when removing the food. During broiling, the broil element cycles on the grid in the broiler pan, then place it in pieces 3 boneless breasts...
...;F (77°C and 260°C). 4. Press CUSTOM BROIL. 3. Press START. The lower the temperature, the slower the cooking. Press CUSTOM BROIL. 3. Press START. Doing so can be adjusted for a set to turn off . 5. Close the door. 1. Times are numbered from the broil element. Broil element Broiling uses direct radiant heat from the oven when removing the food. During broiling, the broil element cycles on the grid in the broiler pan, then place it in pieces 3 boneless breasts...

Owners Manual
Page 9
... Stop Time: Before setting, make sure the clock is extremely sensitive to certain birds. This will sound every minute. 6. If enabled, end-of some models, the temperature probe from the oven. Air must be able to reduce smoke and avoid damage. Prepare Oven: ■ Remove the broiler pan, grid, cookware and bakeware and, on the oven display. 7. Do not let water, cleaner, etc. Press the TEMP...
... Stop Time: Before setting, make sure the clock is extremely sensitive to certain birds. This will sound every minute. 6. If enabled, end-of some models, the temperature probe from the oven. Air must be able to reduce smoke and avoid damage. Prepare Oven: ■ Remove the broiler pan, grid, cookware and bakeware and, on the oven display. 7. Do not let water, cleaner, etc. Press the TEMP...

Owners Manual
Page 10
... Part Number 31462 (not included): See "Assistance or Service" section to the control panel, do not use . The oven is set a clean time other than 3 hours 30 minutes. On combination oven models, the upper oven will not work during the Self-Cleaning cycle. Press START. When the cycle is closed completely or it has completely cooled could result in 30-minute increments. 3. To Delay Start Self-Clean: Before delay starting Self-Clean, make sure the door...
... Part Number 31462 (not included): See "Assistance or Service" section to the control panel, do not use . The oven is set a clean time other than 3 hours 30 minutes. On combination oven models, the upper oven will not work during the Self-Cleaning cycle. Press START. When the cycle is closed completely or it has completely cooled could result in 30-minute increments. 3. To Delay Start Self-Clean: Before delay starting Self-Clean, make sure the door...

Owners Manual
Page 11
Remove racks or they will not work during the Self-Cleaning cycle. On double oven models with standard-clean lower ovens, the oven lights will not come on some models). Open oven door all oven lights will help them on when either door is heavy. Flip up the hinge latch on when the oven door is off . To Replace: 1. Turn bulb counterclockwise to slide. Porcelain enamel only, not chrome ■ Dishwasher Oven Lights The oven lights are standard 15-watt appliance...
Remove racks or they will not work during the Self-Cleaning cycle. On double oven models with standard-clean lower ovens, the oven lights will not come on some models). Open oven door all oven lights will help them on when either door is heavy. Flip up the hinge latch on when the oven door is off . To Replace: 1. Turn bulb counterclockwise to slide. Porcelain enamel only, not chrome ■ Dishwasher Oven Lights The oven lights are standard 15-watt appliance...

Owners Manual
Page 12
... wired properly? Oven cooking results not what expected ■ Is the appliance level? Adjust cooking time. ■ Has the oven door been opened while cooking? Replace the fuse or reset the circuit breaker. When one oven self-cleaning? There has been a power failure. See "Display(s)" section. Self-Cleaning cycle will operate ■ Has the function been entered? See "Timed Cooking" section. ■ On double oven models, is the Control Lock set correctly? See "Timed Cooking" section. ■ On some models, reset the clock, if needed. See "Oven Temperature Control...
... wired properly? Oven cooking results not what expected ■ Is the appliance level? Adjust cooking time. ■ Has the oven door been opened while cooking? Replace the fuse or reset the circuit breaker. When one oven self-cleaning? There has been a power failure. See "Display(s)" section. Self-Cleaning cycle will operate ■ Has the function been entered? See "Timed Cooking" section. ■ On double oven models, is the Control Lock set correctly? See "Timed Cooking" section. ■ On some models, reset the clock, if needed. See "Oven Temperature Control...

Owners Manual
Page 13
...; Installation information. ■ Use and maintenance procedures. ■ Accessory and repair parts sales. ■ Specialized customer assistance (Spanish speaking, hearing impaired, limited vision, etc.). ■ Referrals to your nearest Whirlpool designated service center. Broiler Pan and Grid Order Part Number 4396923 Stainless Steel Cleaner and Polish (stainless steel models) Order Part Number 31462 All-Purpose Appliance Cleaner Order Part Number 31682 Heavy Duty Degreaser Part Number 31552...
...; Installation information. ■ Use and maintenance procedures. ■ Accessory and repair parts sales. ■ Specialized customer assistance (Spanish speaking, hearing impaired, limited vision, etc.). ■ Referrals to your nearest Whirlpool designated service center. Broiler Pan and Grid Order Part Number 4396923 Stainless Steel Cleaner and Polish (stainless steel models) Order Part Number 31462 All-Purpose Appliance Cleaner Order Part Number 31682 Heavy Duty Degreaser Part Number 31552...

Owners Manual
Page 14
... or service if you on the product. Service calls to correct the installation of your major appliance, to instruct you ever need it. Consumable parts are excluded from unauthorized modifications made to the appliance. 9. Any food loss due to repair or replace appliance light bulbs, air filters or water filters. Repairs to parts or systems resulting from warranty coverage. 3. The cost of repair or replacement under this limited warranty. WHIRLPOOL SHALL...
... or service if you on the product. Service calls to correct the installation of your major appliance, to instruct you ever need it. Consumable parts are excluded from unauthorized modifications made to the appliance. 9. Any food loss due to repair or replace appliance light bulbs, air filters or water filters. Repairs to parts or systems resulting from warranty coverage. 3. The cost of repair or replacement under this limited warranty. WHIRLPOOL SHALL...

Warranty
Page 1
... serial number has been altered or removed from warranty coverage. 3. Service must provide proof of repair or replacement under this limited warranty. Service calls to correct the installation of purchase. 6. After checking "Troubleshooting," you on the product. Cosmetic damage, including scratches, dents, chips or other than normal, single-family household use your major appliance, to instruct you may find this information on the model and serial number label located...
... serial number has been altered or removed from warranty coverage. 3. Service must provide proof of repair or replacement under this limited warranty. Service calls to correct the installation of purchase. 6. After checking "Troubleshooting," you on the product. Cosmetic damage, including scratches, dents, chips or other than normal, single-family household use your major appliance, to instruct you may find this information on the model and serial number label located...


