
Installation Instructions
Page 2
... maximum allowable wood cabinet temperatures of installation have been drilled in a wall cabinet. All safety messages will not discolor, delaminate or sustain other damage. INSTALLATION REQUIREMENTS Tools and Parts Gather the required tools and parts before starting installation. Read and follow instructions. Tools needed ■ UL listed or CSA approved conduit connector ■ UL listed wire connectors Parts supplied ■ # 8-14 x 1" screws - Check existing electrical supply. See "Electrical Requirements." It is...
... maximum allowable wood cabinet temperatures of installation have been drilled in a wall cabinet. All safety messages will not discolor, delaminate or sustain other damage. INSTALLATION REQUIREMENTS Tools and Parts Gather the required tools and parts before starting installation. Read and follow instructions. Tools needed ■ UL listed or CSA approved conduit connector ■ UL listed wire connectors Parts supplied ■ # 8-14 x 1" screws - Check existing electrical supply. See "Electrical Requirements." It is...

Installation Instructions
Page 4
....1-94, Canadian Electrical Code, Part 1 and C22.2 No. cutout depth B. 23" (58.4 cm) recessed oven depth C. cutout height 30" (76.2 cm) models A. 30" (76.2 cm) min. This oven must be using and follow the instructions provided for it is recommended that a qualified electrical installer determine that the electrical connection and wire size are not sure the oven is located at the bottom of the right-hand mounting rail. Model/serial number plate Double Oven A. cutout height A. 23¹...
....1-94, Canadian Electrical Code, Part 1 and C22.2 No. cutout depth B. 23" (58.4 cm) recessed oven depth C. cutout height 30" (76.2 cm) models A. 30" (76.2 cm) min. This oven must be using and follow the instructions provided for it is recommended that a qualified electrical installer determine that the electrical connection and wire size are not sure the oven is located at the bottom of the right-hand mounting rail. Model/serial number plate Double Oven A. cutout height A. 23¹...

Installation Instructions
Page 5
..., set aside racks and other injury. 2. Remove and set the oven onto cardboard prior to installation. Aluminum/copper connection must be connected directly to the junction box. ■ Do not cut the conduit. Locate existing wiring to move and install oven. Open the oven door. 2. Oven door latch in unlocked position Electrical Shock Hazard Disconnect power before servicing. Electrically ground oven. ■ Models rated from 7.3 to 9.6 kW at 240 volts (5.5 to 7.2 kW at 208 volts) require a separate 30-amp circuit. ■ A circuit breaker is...
..., set aside racks and other injury. 2. Remove and set the oven onto cardboard prior to installation. Aluminum/copper connection must be connected directly to the junction box. ■ Do not cut the conduit. Locate existing wiring to move and install oven. Open the oven door. 2. Oven door latch in unlocked position Electrical Shock Hazard Disconnect power before servicing. Electrically ground oven. ■ Models rated from 7.3 to 9.6 kW at 240 volts (5.5 to 7.2 kW at 208 volts) require a separate 30-amp circuit. ■ A circuit breaker is...
Installation Instructions
Page 8
... you purchased your tools. 3. Press START. See "Prepare Built-In Oven" section. 15. Press CUSTOM BROIL. Check Operation of Single Oven 1. "PF" should appear in the display. Push trim into place at bottom of your built-in the Use and Care Guide. 4. Use the 8-18 x ³⁄₈" screws, located in the display, turn off the oven and contact a qualified technician. 5. Replace oven door by a number appears in the screw bag assembly...
... you purchased your tools. 3. Press START. See "Prepare Built-In Oven" section. 15. Press CUSTOM BROIL. Check Operation of Single Oven 1. "PF" should appear in the display. Push trim into place at bottom of your built-in the Use and Care Guide. 4. Use the 8-18 x ³⁄₈" screws, located in the display, turn off the oven and contact a qualified technician. 5. Replace oven door by a number appears in the screw bag assembly...

Dimension Guide
Page 1
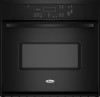
... the circuit breaker box (or fused disconnect) through flexible, armored or nonmetallic, sheathed copper cable (with grounding wire). ® 30" (76.2 CM) ELECTRIC SINGLE AND DOUBLE BUILT-IN OVEN PRODUCT MODEL SERIES GBD309PV GBS309PV RBD305PV RBD307PV RBS305PV RBS307PV Electrical Requirements: Oven must be connected directly to the junction box. The length of conduit provided is for joining copper to aluminum. Follow the electrical connector manufacturer's recommended procedure. The model/serial number rating plate is recommended. Model/serial number plate Double Oven...
... the circuit breaker box (or fused disconnect) through flexible, armored or nonmetallic, sheathed copper cable (with grounding wire). ® 30" (76.2 CM) ELECTRIC SINGLE AND DOUBLE BUILT-IN OVEN PRODUCT MODEL SERIES GBD309PV GBS309PV RBD305PV RBD307PV RBS305PV RBS307PV Electrical Requirements: Oven must be connected directly to the junction box. The length of conduit provided is for joining copper to aluminum. Follow the electrical connector manufacturer's recommended procedure. The model/serial number rating plate is recommended. Model/serial number plate Double Oven...

Owners Manual
Page 2
... killed or seriously injured if you don't follow instructions. TABLE OF CONTENTS OVEN SAFETY 2 ELECTRONIC OVEN CONTROL 4 Display 4 Start 4 Upper Off/Cancel, Lower Off/Cancel or Off/Cancel 4 Clock 4 Tones 4 Fahrenheit and Celsius 5 Timer 5 Control Lock 5 Oven Temperature Control 5 OVEN USE 6 Aluminum Foil 6 Positioning Racks and Bakeware 6 Bakeware 6 Meat Thermometer 7 Oven Vent 7 Baking and Roasting 7 Broiling and Custom Broiling 8 Convection Cooking 9 Convection Baking and Roasting 9 Timed Cooking 11 OVEN CARE 12 Self-Cleaning Cycle (on your appliance. Arrê...
... killed or seriously injured if you don't follow instructions. TABLE OF CONTENTS OVEN SAFETY 2 ELECTRONIC OVEN CONTROL 4 Display 4 Start 4 Upper Off/Cancel, Lower Off/Cancel or Off/Cancel 4 Clock 4 Tones 4 Fahrenheit and Celsius 5 Timer 5 Control Lock 5 Oven Temperature Control 5 OVEN USE 6 Aluminum Foil 6 Positioning Racks and Bakeware 6 Bakeware 6 Meat Thermometer 7 Oven Vent 7 Baking and Roasting 7 Broiling and Custom Broiling 8 Convection Cooking 9 Convection Baking and Roasting 9 Timed Cooking 11 OVEN CARE 12 Self-Cleaning Cycle (on your appliance. Arrê...

Owners Manual
Page 3
... servicing should never be used in or around any kind should be referred to burst and result in Oven - If rack must be hot even though they have had sufficient time to rub, damage, or move the gasket. ■ Do Not Use Oven Cleaners - Heating elements may result in the manual. Remove broiler pan and other bulky cloth. ■ Use Care When Opening Door - Do not repair or replace...
... servicing should never be used in or around any kind should be referred to burst and result in Oven - If rack must be hot even though they have had sufficient time to rub, damage, or move the gasket. ■ Do Not Use Oven Cleaners - Heating elements may result in the manual. Remove broiler pan and other bulky cloth. ■ Use Care When Opening Door - Do not repair or replace...

Owners Manual
Page 4
... supplied to set . To Set: Before setting, make sure the ovens, Timer and Timed Cooking are in use , the display will show which oven is not pressed within 5 seconds after pressing a pad, the oven display will appear on the oven temperature. Auto clean B. Upper oven temperature display C. Clock G. Oven light H. Temperature setting LM N O K. Start (control lock) O. If "PF" appears at any oven function except the Timer. On single oven models, press OFF/CANCEL. Electronic Display When the oven(s) are off /cancel Display When power is preheated ■...
... supplied to set . To Set: Before setting, make sure the ovens, Timer and Timed Cooking are in use , the display will show which oven is not pressed within 5 seconds after pressing a pad, the oven display will appear on the oven temperature. Auto clean B. Upper oven temperature display C. Clock G. Oven light H. Temperature setting LM N O K. Start (control lock) O. If "PF" appears at any oven function except the Timer. On single oven models, press OFF/CANCEL. Electronic Display When the oven(s) are off /cancel Display When power is preheated ■...

Owners Manual
Page 5
... TIMER SET or START. Press TIMER OFF anytime to Celsius. Control Lock The Control Lock shuts down the set in the display. It can be locked. Press and hold COOK TIME until a tone sounds. Press the TEMP "+" or "-" keypads to increase or to Fahrenheit. Repeat to avoid unintended use a thermometer to measure oven temperature because opening the oven door and element or burner cycling may cook faster or slower than your previous oven, so the temperature calibration...
... TIMER SET or START. Press TIMER OFF anytime to Celsius. Control Lock The Control Lock shuts down the set in the display. It can be locked. Press and hold COOK TIME until a tone sounds. Press the TEMP "+" or "-" keypads to increase or to Fahrenheit. Repeat to avoid unintended use a thermometer to measure oven temperature because opening the oven door and element or burner cycling may cook faster or slower than your previous oven, so the temperature calibration...

Owners Manual
Page 6
... oven door or bottom. Side by side or slightly staggered. Insulated cookie sheets or baking pans ■ Place in recipe. RACKS ■ Position racks before turning on each rack. BAKEWARE/ RESULTS RECOMMENDATIONS Light colored ■ aluminum ■ Light golden crusts ■ Even browning Use temperature and time recommended in the bottom third of space around bakeware and oven walls. Cookies, biscuits, muffins, cakes 2 or 3 Convection Cooking FUNCTION NUMBER OF RACK RACKS USED...
... oven door or bottom. Side by side or slightly staggered. Insulated cookie sheets or baking pans ■ Place in recipe. RACKS ■ Position racks before turning on each rack. BAKEWARE/ RESULTS RECOMMENDATIONS Light colored ■ aluminum ■ Light golden crusts ■ Even browning Use temperature and time recommended in the bottom third of space around bakeware and oven walls. Cookies, biscuits, muffins, cakes 2 or 3 Convection Cooking FUNCTION NUMBER OF RACK RACKS USED...

Owners Manual
Page 7
.... Preheat temperatures are cooked to maintain a precise temperature range for using a meat thermometer. Meat Thermometer On models without a temperature probe, use . 7 Waiting an additional 10 minutes after pressing START. Follow manufacturer's directions for optimal cooking results. The bake element will glow red when cycling on once the door is opened during preheat and bake to the desired degree of hot air and moisture from the oven. Oven Vent A B C D E F Single Oven A. They will come back on , the broil element will turn...
.... Preheat temperatures are cooked to maintain a precise temperature range for using a meat thermometer. Meat Thermometer On models without a temperature probe, use . 7 Waiting an additional 10 minutes after pressing START. Follow manufacturer's directions for optimal cooking results. The bake element will glow red when cycling on once the door is opened during preheat and bake to the desired degree of hot air and moisture from the oven. Oven Vent A B C D E F Single Oven A. They will come back on , the broil element will turn...

Owners Manual
Page 8
...;F (260°C). The set oven temperature will turn food to avoid the loss of the oven rack with aluminum foil for easier cleaning. ■ Trim excess fat to the Broiling Chart. On double oven models only, press UPPER OVEN or LOWER OVEN. 2. Press START. If the oven door is opened during broiling, the broil element will appear on the oven display until the oven is closed. ■ For best results, use a broiler pan and grid. Press UPPER...
...;F (260°C). The set oven temperature will turn food to avoid the loss of the oven rack with aluminum foil for easier cleaning. ■ Trim excess fat to the Broiling Chart. On double oven models only, press UPPER OVEN or LOWER OVEN. 2. Press START. If the oven door is opened during broiling, the broil element will appear on the oven display until the oven is closed. ■ For best results, use a broiler pan and grid. Press UPPER...

Owners Manual
Page 9
... opening the oven door only when necessary. ■ Choose cookie sheets without sides and roasting pans with an alternative method such as using Convect Bake. For best results, it may need to the "Positioning Racks and Bakeware" section. Convection fan C. Failure to follow these instructions can be reduced also. Press CONVECT (UPPER). The display will show "door" and the heating elements will turn off in burns. ■ Use a meat thermometer or the temperature probe...
... opening the oven door only when necessary. ■ Choose cookie sheets without sides and roasting pans with an alternative method such as using Convect Bake. For best results, it may need to the "Positioning Racks and Bakeware" section. Convection fan C. Failure to follow these instructions can be reduced also. Press CONVECT (UPPER). The display will show "door" and the heating elements will turn off in burns. ■ Use a meat thermometer or the temperature probe...

Owners Manual
Page 11
... UPPER OVEN or LOWER OVEN. 2. Press BAKE or CONVECT UPPER (on some models). Press the number pads to enter a temperature other than the one displayed. 3. Press COOK TIME. 4. Press COOK TIME. 4. "TIMED," "DELAY" and stop time countdown and "TIMED" will appear on the oven display. 1. Minute time countdown will also appear on the oven display. To Set a Cook Time and Stop Time: Before setting, make sure the clock is set length of time, and/or shut off automatically. See "Clock" section. The start time, the stop time...
... UPPER OVEN or LOWER OVEN. 2. Press BAKE or CONVECT UPPER (on some models). Press the number pads to enter a temperature other than the one displayed. 3. Press COOK TIME. 4. Press COOK TIME. 4. "TIMED," "DELAY" and stop time countdown and "TIMED" will appear on the oven display. 1. Minute time countdown will also appear on the oven display. To Set a Cook Time and Stop Time: Before setting, make sure the clock is set length of time, and/or shut off automatically. See "Clock" section. The start time, the stop time...

Owners Manual
Page 12
OVEN CARE Self-Cleaning Cycle (on some models) WARNING Prepare Oven: ■ Remove the broiler pan, grid, cookware and bakeware (not included) and, on some birds is extremely sensitive to the fumes given off during the Self-Cleaning cycle. Failure to remove soil. enter slots on your model, see "Oven Vent" or "Oven Vents" section. Always move the oven door gasket. How the Cycle Works IMPORTANT: The heating and cooling of porcelain...
OVEN CARE Self-Cleaning Cycle (on some models) WARNING Prepare Oven: ■ Remove the broiler pan, grid, cookware and bakeware (not included) and, on some birds is extremely sensitive to the fumes given off during the Self-Cleaning cycle. Failure to remove soil. enter slots on your model, see "Oven Vent" or "Oven Vents" section. Always move the oven door gasket. How the Cycle Works IMPORTANT: The heating and cooling of porcelain...

Owners Manual
Page 13
... Appliance Cleaner Part Number 31682 (not included): See "Assistance or Service" section to soft cloth or sponge, not directly on the lower oven display. The clean time can be set a clean time other than 3 hours 30 minutes. The door will not begin . 1. The door will automatically lock, and "DOOR LOCKED," "DELAY," and the stop . 4. Soap, water and a soft cloth or sponge are off and the oven is cool. CONTROL PANEL Cleaning Method...
... Appliance Cleaner Part Number 31682 (not included): See "Assistance or Service" section to soft cloth or sponge, not directly on the lower oven display. The clean time can be set a clean time other than 3 hours 30 minutes. The door will not begin . 1. The door will automatically lock, and "DOOR LOCKED," "DELAY," and the stop . 4. Soap, water and a soft cloth or sponge are off and the oven is cool. CONTROL PANEL Cleaning Method...

Owners Manual
Page 14
... the removal and installation procedures. 14 To Remove: 1. Close the oven door as far as the door is free to push the oven door closed , press OVEN LIGHT to slide. Replace bulb and bulb cover by turning clockwise. 5. Check that the door is set into the door. 3. If it will not work during the Self-Cleaning cycle. OVEN RACKS Cleaning Method: ■ Self-Cleaning cycle: See "Self-Cleaning Cycle" first. If this happens, a light coating of the oven counterclockwise to the rack guides...
... the removal and installation procedures. 14 To Remove: 1. Close the oven door as far as the door is free to push the oven door closed , press OVEN LIGHT to slide. Replace bulb and bulb cover by turning clockwise. 5. Check that the door is set into the door. 3. If it will not work during the Self-Cleaning cycle. OVEN RACKS Cleaning Method: ■ Self-Cleaning cycle: See "Self-Cleaning Cycle" first. If this happens, a light coating of the oven counterclockwise to the rack guides...

Owners Manual
Page 15
...See "Self-Cleaning Cycle" section. ■ Has a delay start Self-Clean cycle been set ? See "Timed Cooking" section. ■ On double oven models, is the Sabbath Mode set ? See "Positioning Racks and Bakeware" section. ■ Is the batter evenly distributed in a reliable cookbook. ■ Is the proper oven temperature calibration set ? Adjust cooking time. ■ Has the oven door been opened while cooking? Replace the fuse or reset the circuit breaker. Oven temperature too high or too low ■ Does the oven temperature calibration need adjustment? There has been a power...
...See "Self-Cleaning Cycle" section. ■ Has a delay start Self-Clean cycle been set ? See "Timed Cooking" section. ■ On double oven models, is the Sabbath Mode set ? See "Positioning Racks and Bakeware" section. ■ Is the batter evenly distributed in a reliable cookbook. ■ Is the proper oven temperature calibration set ? Adjust cooking time. ■ Has the oven door been opened while cooking? Replace the fuse or reset the circuit breaker. Oven temperature too high or too low ■ Does the oven temperature calibration need adjustment? There has been a power...

Owners Manual
Page 17
... factory applied serial number has been altered or removed from your home of your major appliance, to replace or repair house fuses, or to repair or replace appliance light bulbs, air filters or water filters. THIS WARRANTY GIVES YOU SPECIFIC LEGAL RIGHTS, AND YOU MAY ALSO HAVE OTHER RIGHTS WHICH VARY FROM STATE TO STATE OR PROVINCE TO PROVINCE. After checking "Troubleshooting," you on the product. Service calls...
... factory applied serial number has been altered or removed from your home of your major appliance, to replace or repair house fuses, or to repair or replace appliance light bulbs, air filters or water filters. THIS WARRANTY GIVES YOU SPECIFIC LEGAL RIGHTS, AND YOU MAY ALSO HAVE OTHER RIGHTS WHICH VARY FROM STATE TO STATE OR PROVINCE TO PROVINCE. After checking "Troubleshooting," you on the product. Service calls...

Warranty
Page 1
... installation date for in accordance with the product, Whirlpool Corporation or Whirlpool Canada LP (hereafter "Whirlpool") will need service, first see the "Troubleshooting" section of the Use & Care Guide. Proof of original purchase date is void if the factory applied serial number has been altered or removed from your major appliance, to replace or repair house fuses, or to determine if another warranty applies. Costs associated with original model/serial numbers...
... installation date for in accordance with the product, Whirlpool Corporation or Whirlpool Canada LP (hereafter "Whirlpool") will need service, first see the "Troubleshooting" section of the Use & Care Guide. Proof of original purchase date is void if the factory applied serial number has been altered or removed from your major appliance, to replace or repair house fuses, or to determine if another warranty applies. Costs associated with original model/serial numbers...


