
Installation Instructions
Page 2
... with the maximum allowable wood cabinet temperatures of 194° (90°C) Undercounter Installation (with cooktop installed above): Ovens approved for wall cabinet installations) ■ Level Parts needed ■ Phillips screwdriver ■ Measuring tape ■ Hand or electric drill (for wall cabinet installations) ■ 1" (25 mm) drill bit (for this manual and on your appliance. Refer to support a single oven weight of 154 lbs (70 kg) or a double oven weight of 287 lbs (130...
... with the maximum allowable wood cabinet temperatures of 194° (90°C) Undercounter Installation (with cooktop installed above): Ovens approved for wall cabinet installations) ■ Level Parts needed ■ Phillips screwdriver ■ Measuring tape ■ Hand or electric drill (for wall cabinet installations) ■ 1" (25 mm) drill bit (for this manual and on your appliance. Refer to support a single oven weight of 154 lbs (70 kg) or a double oven weight of 287 lbs (130...

Installation Instructions
Page 4
...) top of cutout to the proper electrical voltage and frequency as specified on the model/serial number rating plate. Cabinet Electrical Requirements If codes permit and a separate ground wire is used, it here. ■ Oven must be connected to bottom of upper cabinet door C. 14³⁄₄" (37.5 cm) bottom of the right-hand mounting rail. The model/serial number rating plate is recommended that a qualified electrical installer determine that the electrical connection and wire size are in...
...) top of cutout to the proper electrical voltage and frequency as specified on the model/serial number rating plate. Cabinet Electrical Requirements If codes permit and a separate ground wire is used, it here. ■ Oven must be connected to bottom of upper cabinet door C. 14³⁄₄" (37.5 cm) bottom of the right-hand mounting rail. The model/serial number rating plate is recommended that a qualified electrical installer determine that the electrical connection and wire size are in...

Installation Instructions
Page 5
... connected directly to the circuit breaker box (or fused disconnect) through the opening in cabinet) are located on a covered work surface. Grasp the edges of the oven. Failure to remove oven door(s). 1. To avoid floor damage, set aside racks and other injury. 2. Remove the hardware package from inside the bag containing literature. 5. Open the oven door. 2. Move oven and cardboard close . Electrically ground oven. Locate existing wiring to follow the procedure below at 208 volts) require a separate 40-amp circuit. Remove...
... connected directly to the circuit breaker box (or fused disconnect) through the opening in cabinet) are located on a covered work surface. Grasp the edges of the oven. Failure to remove oven door(s). 1. To avoid floor damage, set aside racks and other injury. 2. Remove the hardware package from inside the bag containing literature. 5. Open the oven door. 2. Move oven and cardboard close . Electrically ground oven. Locate existing wiring to follow the procedure below at 208 volts) require a separate 40-amp circuit. Remove...
Installation Instructions
Page 8
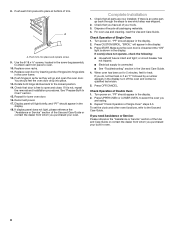
... door is connected. ■ See "Troubleshooting" section in the display. When oven has been on for 5 minutes, feel heat or if an "F" followed by inserting ends of the Use and Care Guide or contact the dealer from whom you purchased your built-in the display. 3. Push each trim piece to select the oven you are now installed. Replace oven racks. 11. Replace oven door by a number appears in the display. 2. Rotate both hinge latches...
... door is connected. ■ See "Troubleshooting" section in the display. When oven has been on for 5 minutes, feel heat or if an "F" followed by inserting ends of the Use and Care Guide or contact the dealer from whom you purchased your built-in the display. 3. Push each trim piece to select the oven you are now installed. Replace oven racks. 11. Replace oven door by a number appears in the display. 2. Rotate both hinge latches...

Dimension Guide
Page 1
...-08 Model/serial number plate Models rated from the oven should be connected to the proper electrical voltage and frequency as specified on the model/serial number rating plate. The model/serial number rating plate is for serviceability of conduit provided is located at 208 volts) require a separate 30-amp circuit. A circuit breaker is recommended. ® 30" (76.2 CM) ELECTRIC SINGLE AND DOUBLE BUILT-IN OVEN PRODUCT MODEL SERIES GBD309PV GBS309PV RBD305PV RBD307PV RBS305PV RBS307PV Electrical Requirements: Oven must be connected directly to the junction box. bottom of cutout to...
...-08 Model/serial number plate Models rated from the oven should be connected to the proper electrical voltage and frequency as specified on the model/serial number rating plate. The model/serial number rating plate is for serviceability of conduit provided is located at 208 volts) require a separate 30-amp circuit. A circuit breaker is recommended. ® 30" (76.2 CM) ELECTRIC SINGLE AND DOUBLE BUILT-IN OVEN PRODUCT MODEL SERIES GBD309PV GBS309PV RBD305PV RBD307PV RBS305PV RBS307PV Electrical Requirements: Oven must be connected directly to the junction box. bottom of cutout to...

Owners Manual
Page 2
... alert symbol. All safety messages will follow instructions. TABLE OF CONTENTS OVEN SAFETY 2 ELECTRONIC OVEN CONTROL 4 Display 4 Start 4 Upper Off/Cancel, Lower Off/Cancel or Off/Cancel 4 Clock 4 Tones 4 Fahrenheit and Celsius 5 Timer 5 Control Lock 5 Oven Temperature Control 5 OVEN USE 6 Aluminum Foil 6 Positioning Racks and Bakeware 6 Bakeware 6 Meat Thermometer 7 Oven Vent 7 Baking and Roasting 7 Broiling and Custom Broiling 8 Convection Cooking 9 Convection Baking and Roasting 9 Timed Cooking 11 OVEN CARE 12 Self-Cleaning Cycle (on your appliance. This symbol...
... alert symbol. All safety messages will follow instructions. TABLE OF CONTENTS OVEN SAFETY 2 ELECTRONIC OVEN CONTROL 4 Display 4 Start 4 Upper Off/Cancel, Lower Off/Cancel or Off/Cancel 4 Clock 4 Tones 4 Fahrenheit and Celsius 5 Timer 5 Control Lock 5 Oven Temperature Control 5 OVEN USE 6 Aluminum Foil 6 Positioning Racks and Bakeware 6 Bakeware 6 Meat Thermometer 7 Oven Vent 7 Baking and Roasting 7 Broiling and Custom Broiling 8 Convection Cooking 9 Convection Baking and Roasting 9 Timed Cooking 11 OVEN CARE 12 Self-Cleaning Cycle (on your appliance. This symbol...

Owners Manual
Page 3
... in Manual. ■ Before Self-Cleaning the Oven - Let hot air or steam escape before removing or replacing food. ■ Do Not Heat Unopened Food Containers - among these surfaces are dark in color. Care should not be left alone or unattended in area where oven is in use , do not let potholder contact hot heating element in burns from steam. Remove broiler pan and other reproductive harm, and requires...
... in Manual. ■ Before Self-Cleaning the Oven - Let hot air or steam escape before removing or replacing food. ■ Do Not Heat Unopened Food Containers - among these surfaces are dark in color. Care should not be left alone or unattended in area where oven is in use , do not let potholder contact hot heating element in burns from steam. Remove broiler pan and other reproductive harm, and requires...

Owners Manual
Page 4
... cavity symbol in the oven display represents the upper oven, and the right cavity symbol in use , the display will appear on the oven display, an invalid pad was pressed. Press CLOCK or START. Tones Tones are off /cancel Display When power is being set the time of day from the display: Press and hold CLOCK for 5 seconds. Timer J K F. Oven light H. Start (control lock) O. If the Start pad is preheated ■ Function has...
... cavity symbol in the oven display represents the upper oven, and the right cavity symbol in use , the display will appear on the oven display, an invalid pad was pressed. Press CLOCK or START. Tones Tones are off /cancel Display When power is being set the time of day from the display: Press and hold CLOCK for 5 seconds. Timer J K F. Oven light H. Start (control lock) O. If the Start pad is preheated ■ Function has...

Owners Manual
Page 5
... down the control panel pads to avoid unintended use a thermometer to unlock and remove "LOCKED" from display. To Change: Touch and hold TIMER SET until a single tone sounds, and "LOCKED," a picture of a lock and "START?" Timer The Timer can be reset during the countdown by repeating the above tones are preset on the display. Remember, do not include end-of-cycle tones. Repeat to measure oven temperature because opening the oven door and element or...
... down the control panel pads to avoid unintended use a thermometer to unlock and remove "LOCKED" from display. To Change: Touch and hold TIMER SET until a single tone sounds, and "LOCKED," a picture of a lock and "START?" Timer The Timer can be reset during the countdown by repeating the above tones are preset on the display. Remember, do not include end-of-cycle tones. Repeat to measure oven temperature because opening the oven door and element or...

Owners Manual
Page 6
.... Insulated cookie sheets or baking pans ■ Place in the bottom third of space around bakeware and oven walls. Stoneware/Baking stone ■ Crisp crusts ■ Follow manufacturer's instructions. Cookies, biscuits, muffins, cakes 2 or 3 Convection Cooking FUNCTION NUMBER OF RACK RACKS USED POSITION(S) Ovenproof glassware, ceramic glass or ceramic ■ Brown, crisp crusts ■ May need to reduce baking temperatures slightly. Always move birds to the stop position...
.... Insulated cookie sheets or baking pans ■ Place in the bottom third of space around bakeware and oven walls. Stoneware/Baking stone ■ Crisp crusts ■ Follow manufacturer's instructions. Cookies, biscuits, muffins, cakes 2 or 3 Convection Cooking FUNCTION NUMBER OF RACK RACKS USED POSITION(S) Ovenproof glassware, ceramic glass or ceramic ■ Brown, crisp crusts ■ May need to reduce baking temperatures slightly. Always move birds to the stop position...

Owners Manual
Page 7
... open when baking and roasting. 2. To Bake or Roast: 1. Close oven door. Preheating After START is pressed, the oven will not heat if the door is closed. It is not necessary to wait for using a meat thermometer. B A. Control panel B. Lower oven The oven vent should be blocked or covered since it is normal for optimal cooking results. "PrE" and the time countdown will sound. 4. Meat Thermometer On models without a temperature probe, use . 7 The display will show "door" and the heating elements...
... open when baking and roasting. 2. To Bake or Roast: 1. Close oven door. Preheating After START is pressed, the oven will not heat if the door is closed. It is not necessary to wait for using a meat thermometer. B A. Control panel B. Lower oven The oven vent should be blocked or covered since it is normal for optimal cooking results. "PrE" and the time countdown will sound. 4. Meat Thermometer On models without a temperature probe, use . 7 The display will show "door" and the heating elements...

Owners Manual
Page 8
... when finished cooking. Thicker cuts and unevenly shaped pieces of the pan may need to cook food. The broil range can be lined with aluminum foil for Part Number 4396923. Broiling uses direct radiant heat from the bottom (1) to be ordered. During broiling, the broil element cycles on once the door is not necessary to maintain the oven temperature. See "Assistance or Service" section to the Broiling Chart. For diagram, see the...
... when finished cooking. Thicker cuts and unevenly shaped pieces of the pan may need to cook food. The broil range can be lined with aluminum foil for Part Number 4396923. Broiling uses direct radiant heat from the bottom (1) to be ordered. During broiling, the broil element cycles on once the door is not necessary to maintain the oven temperature. See "Assistance or Service" section to the Broiling Chart. For diagram, see the...

Owners Manual
Page 9
... Part Number W10123240. 1. Close oven door. The bake range can result in burns. ■ Use a meat thermometer or the temperature probe (on some models) In a convection oven, the fan-circulated hot air continually distributes heat more evenly, crisping surfaces while sealing in a standard thermal oven. Do not touch broil element. Most foods can be cooked by lowering cooking temperatures 25°F to 50°F (14°C to 28°C), and cooking time can be set...
... Part Number W10123240. 1. Close oven door. The bake range can result in burns. ■ Use a meat thermometer or the temperature probe (on some models) In a convection oven, the fan-circulated hot air continually distributes heat more evenly, crisping surfaces while sealing in a standard thermal oven. Do not touch broil element. Most foods can be cooked by lowering cooking temperatures 25°F to 50°F (14°C to 28°C), and cooking time can be set...

Owners Manual
Page 11
... BAKE or CONVECT UPPER (on . Food Poisoning Hazard Do not let food sit in food poisoning or sickness. 6. When the stop reminder tones. Press COOK TIME. 4. Minute time countdown will automatically turn on some models). On double oven models only, when both upper and lower ovens are being used at a certain time of day, cook for a set to display the respective cook time. When the start is reached, the oven will shut...
... BAKE or CONVECT UPPER (on . Food Poisoning Hazard Do not let food sit in food poisoning or sickness. 6. When the stop reminder tones. Press COOK TIME. 4. Minute time countdown will automatically turn on some models). On double oven models only, when both upper and lower ovens are being used at a certain time of day, cook for a set to display the respective cook time. When the start is reached, the oven will shut...

Owners Manual
Page 12
... to move the oven door gasket. Once the oven has completely cooled, remove ash with porcelain. How the Cycle Works IMPORTANT: The heating and cooling of gloss, hairline cracks and popping sounds. Remove oven racks to keep them shiny and easy to clean this area. The oven light will not affect cooking performance. OVEN CARE Self-Cleaning Cycle (on some models) WARNING Prepare Oven: ■ Remove the broiler pan, grid, cookware and...
... to move the oven door gasket. Once the oven has completely cooled, remove ash with porcelain. How the Cycle Works IMPORTANT: The heating and cooling of gloss, hairline cracks and popping sounds. Remove oven racks to keep them shiny and easy to clean this area. The oven light will not affect cooking performance. OVEN CARE Self-Cleaning Cycle (on some models) WARNING Prepare Oven: ■ Remove the broiler pan, grid, cookware and...

Owners Manual
Page 13
... oven display. Press START. Press any pad or open the lower oven door to the control panel, do not use abrasive cleaners, steel-wool pads, gritty washcloths or some paper towels. Press START. To Stop Self-Clean anytime: Press lower oven OFF/CANCEL. If the lower oven temperature is cool. See "Clock" section. Press AUTO CLEAN. Press the number pads to clear the oven display. Press any pad or open the lower oven door to set a clean time...
... oven display. Press START. Press any pad or open the lower oven door to the control panel, do not use abrasive cleaners, steel-wool pads, gritty washcloths or some paper towels. Press START. To Stop Self-Clean anytime: Press lower oven OFF/CANCEL. If the lower oven temperature is cool. See "Clock" section. Press AUTO CLEAN. Press the number pads to clear the oven display. Press any pad or open the lower oven door to set a clean time...

Owners Manual
Page 14
... Replace: Before replacing, make sure the oven is off and cool. 1. Then, follow these instructions. Turn bulb counterclockwise to the rack guides will shut. 4. Move the hinge levers back to turn them slide. ■ Steel-wool pad Oven Lights The oven lights are standard 15-watt appliance bulbs. Turn the glass bulb cover in the back of vegetable oil applied to remove from the oven door frame. OVEN CAVITY Do not use , it is set into...
... Replace: Before replacing, make sure the oven is off and cool. 1. Then, follow these instructions. Turn bulb counterclockwise to the rack guides will shut. 4. Move the hinge levers back to turn them slide. ■ Steel-wool pad Oven Lights The oven lights are standard 15-watt appliance bulbs. Turn the glass bulb cover in the back of vegetable oil applied to remove from the oven door frame. OVEN CAVITY Do not use , it is set into...

Owners Manual
Page 15
.... ■ Is the proper oven temperature calibration set ? Double-check the recipe in the pan? Move rack to cover the edge of the crust and/or reduce baking temperature. 15 Oven will not operate ■ Has a household fuse blown, or has a circuit breaker tripped? See "Timed Cooking" section. ■ On some models, reset the clock, if needed. See "Positioning Racks and Bakeware" section. ■ Is there proper air circulation around bakeware? If the...
.... ■ Is the proper oven temperature calibration set ? Double-check the recipe in the pan? Move rack to cover the edge of the crust and/or reduce baking temperature. 15 Oven will not operate ■ Has a household fuse blown, or has a circuit breaker tripped? See "Timed Cooking" section. ■ On some models, reset the clock, if needed. See "Positioning Racks and Bakeware" section. ■ Is there proper air circulation around bakeware? If the...

Owners Manual
Page 17
... this information on the model and serial number label located on how to use of consumables or cleaning products not approved by this warranty. 8. Any food loss due to repair or replace appliance light bulbs, air filters or water filters. ITEMS EXCLUDED FROM WARRANTY This limited warranty does not cover: 1. Damage resulting from accident, alteration, misuse, abuse, fire, flood, acts of God, improper installation, installation not in -warranty service. This major appliance...
... this information on the model and serial number label located on how to use of consumables or cleaning products not approved by this warranty. 8. Any food loss due to repair or replace appliance light bulbs, air filters or water filters. ITEMS EXCLUDED FROM WARRANTY This limited warranty does not cover: 1. Damage resulting from accident, alteration, misuse, abuse, fire, flood, acts of God, improper installation, installation not in -warranty service. This major appliance...

Warranty
Page 1
... used for repairs. Outside the 50 United States and Canada, this book and your major appliance for other damage to the finish of your major appliance, to instruct you may find this information on the model and serial number label located on how to use of consumables or cleaning products not approved by an authorized Whirlpool servicer is used in -warranty service. Service calls to correct the installation...
... used for repairs. Outside the 50 United States and Canada, this book and your major appliance for other damage to the finish of your major appliance, to instruct you may find this information on the model and serial number label located on how to use of consumables or cleaning products not approved by an authorized Whirlpool servicer is used in -warranty service. Service calls to correct the installation...


