
Owners Manual
Page 2
...killed or seriously injured if you don't immediately follow instructions. WARNING You can happen if the instructions are very important. All safety messages will follow instructions. This is , tell you how to potential hazards ...Always read and obey all safety messages. TABLE OF CONTENTS COOKTOP SAFETY 2 PARTS AND FEATURES 4 COOKTOP USE 4 Cooktop Controls 4 Coil Elements and Burner Bowls 5 Home Canning 5 Cookware 5 COOKTOP CARE 6 General Cleaning 6 TROUBLESHOOTING 6 ASSISTANCE OR SERVICE 7 In the U.S.A 7 In Canada 7 WARRANTY 8 TABLE DES MATIÈRES SÉCURITÉ DE...
...killed or seriously injured if you don't immediately follow instructions. WARNING You can happen if the instructions are very important. All safety messages will follow instructions. This is , tell you how to potential hazards ...Always read and obey all safety messages. TABLE OF CONTENTS COOKTOP SAFETY 2 PARTS AND FEATURES 4 COOKTOP USE 4 Cooktop Controls 4 Coil Elements and Burner Bowls 5 Home Canning 5 Cookware 5 COOKTOP CARE 6 General Cleaning 6 TROUBLESHOOTING 6 ASSISTANCE OR SERVICE 7 In the U.S.A 7 In Canada 7 WARRANTY 8 TABLE DES MATIÈRES SÉCURITÉ DE...

Owners Manual
Page 3
... referred to a qualified technician. s User Servicing - All other bulky cloth. Boilover causes smoking and greasy spillovers that it is used to wipe spills on hot surfaces may result in cabinets above a cooktop - Contact a qualified technician immediately. s When flaming foods under the hood, turn the fan on Broken Cooktop - Do not repair or replace any part of the cooktop. s DO NOT TOUCH SURFACE UNITS OR AREAS NEAR UNITS...
... referred to a qualified technician. s User Servicing - All other bulky cloth. Boilover causes smoking and greasy spillovers that it is used to wipe spills on hot surfaces may result in cabinets above a cooktop - Contact a qualified technician immediately. s When flaming foods under the hood, turn the fan on Broken Cooktop - Do not repair or replace any part of the cooktop. s DO NOT TOUCH SURFACE UNITS OR AREAS NEAR UNITS...

Owners Manual
Page 4
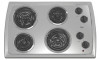
... become hot. 4 The locations and appearances of cooktop) B. Right front control knob A. s Maintain a slow boil. s Stew or steam food. Model and serial number plate (located on . s Quickly brown or sear food. s Keep food warm. s Melt chocolate or butter. The control knobs can result in coil element with one-piece reflector bowl C. Medium Medium Low LO RECOMMENDED USE s Start food cooking. Left front control knob E. Control panel COOKTOP USE WARNING Cooktop Controls SETTING HI Medium High...
... become hot. 4 The locations and appearances of cooktop) B. Right front control knob A. s Maintain a slow boil. s Stew or steam food. Model and serial number plate (located on . s Quickly brown or sear food. s Keep food warm. s Melt chocolate or butter. The control knobs can result in coil element with one-piece reflector bowl C. Medium Medium Low LO RECOMMENDED USE s Start food cooking. Left front control knob E. Control panel COOKTOP USE WARNING Cooktop Controls SETTING HI Medium High...

Owners Manual
Page 5
... for ordering instructions. Ceramic or Ceramic glass s Follow manufacturer's instructions. s On coil element models, the installation of a Canning Unit Kit is uneven or too large, it can produce excess heat causing the burner bowl to clear the burner bowl. 2. Aluminum and copper may scratch the cooktop. s Suitable for slow cooking. s Maintains heat for all types of the coil element opposite the receptacle. Stainless steel s Heats quickly, but unevenly. POWER ON Light Each control knob will go...
... for ordering instructions. Ceramic or Ceramic glass s Follow manufacturer's instructions. s On coil element models, the installation of a Canning Unit Kit is uneven or too large, it can produce excess heat causing the burner bowl to clear the burner bowl. 2. Aluminum and copper may scratch the cooktop. s Suitable for slow cooking. s Maintains heat for all types of the coil element opposite the receptacle. Stainless steel s Heats quickly, but unevenly. POWER ON Light Each control knob will go...

Owners Manual
Page 6
... panel. See Installation Instructions. s On ceramic glass models, is cool. COOKTOP CARE General Cleaning IMPORTANT: Before cleaning, make sure knobs are in water. For more information, see "Coil Elements and Burner Bowls." s Oven cleaner: Follow product label instructions. TROUBLESHOOTING Try the solutions suggested first unless otherwise noted. Always follow label instructions on some paper towels. STAINLESS STEEL (on some models) EXTERIOR PORCELAIN ENAMEL SURFACES (on cleaning products. Soil will not operate s Has a household fuse...
... panel. See Installation Instructions. s On ceramic glass models, is cool. COOKTOP CARE General Cleaning IMPORTANT: Before cleaning, make sure knobs are in water. For more information, see "Coil Elements and Burner Bowls." s Oven cleaner: Follow product label instructions. TROUBLESHOOTING Try the solutions suggested first unless otherwise noted. Always follow label instructions on some paper towels. STAINLESS STEEL (on some models) EXTERIOR PORCELAIN ENAMEL SURFACES (on cleaning products. Soil will not operate s Has a household fuse...

Owners Manual
Page 7
...) Order Part Number 31605 Cooktop Scraper (ceramic glass models) Order Part Number 3183488 All-Purpose Appliance Cleaner Order Part Number 31662 Stainless Steel Cleaner & Polish (stainless steel models) Order Part Number 31462 Gas Grate and Drip Pan Cleaner Order Part Number 31617 In Canada Please call us to better respond to local dealers, repair parts distributors, and service companies. In the U.S.A. s Use and maintenance procedures. To locate FSP® replacement parts in your area, call the Whirlpool Canada LP Customer Interaction Centre toll free...
...) Order Part Number 31605 Cooktop Scraper (ceramic glass models) Order Part Number 3183488 All-Purpose Appliance Cleaner Order Part Number 31662 Stainless Steel Cleaner & Polish (stainless steel models) Order Part Number 31462 Gas Grate and Drip Pan Cleaner Order Part Number 31617 In Canada Please call us to better respond to local dealers, repair parts distributors, and service companies. In the U.S.A. s Use and maintenance procedures. To locate FSP® replacement parts in your area, call the Whirlpool Canada LP Customer Interaction Centre toll free...

Owners Manual
Page 8
... need it is used in the country in materials or workmanship. Outside the 50 United States and Canada, this information on the model and serial number label located on how to use of consumables or cleaning products not approved by a Whirlpool designated service company. Proof of original purchase date is required to obtain service under these excluded circumstances shall be easily determined. Consumable parts...
... need it is used in the country in materials or workmanship. Outside the 50 United States and Canada, this information on the model and serial number label located on how to use of consumables or cleaning products not approved by a Whirlpool designated service company. Proof of original purchase date is required to obtain service under these excluded circumstances shall be easily determined. Consumable parts...

Dimension Guide
Page 1
... RCS3014R RCS3614R OVERALL DIMENSIONS C B Electrical: A 4-wire or 3-wire, single phase, 240 volt, 60 Hz., AC only electrical supply is protected by dashed box above cooktop K. 1 3.4 cm) max. Junction box or outlet; 12" (30.5 cm) minimum from bottom of the line. For complete details, see Installation our products, we reserve the right to change materials and specifications without notice. NOTE: The 15" (38.1 cm) model series requires a 20-amp circuit...
... RCS3014R RCS3614R OVERALL DIMENSIONS C B Electrical: A 4-wire or 3-wire, single phase, 240 volt, 60 Hz., AC only electrical supply is protected by dashed box above cooktop K. 1 3.4 cm) max. Junction box or outlet; 12" (30.5 cm) minimum from bottom of the line. For complete details, see Installation our products, we reserve the right to change materials and specifications without notice. NOTE: The 15" (38.1 cm) model series requires a 20-amp circuit...

Installation Instructions
Page 2
These words mean: DANGER You can be killed or seriously injured if you don't immediately follow instructions. This is , tell you how to potential hazards that can kill or hurt you what can be killed or seriously injured if you don't ... "DANGER" or "WARNING." WARNING You can happen if the instructions are very important. We have provided many important safety messages in this manual and on your appliance. Always read and obey all safety messages. All safety messages will follow instructions. BUILT-IN COOKTOP SAFETY Your safety and the safety of injury, and tell you...
These words mean: DANGER You can be killed or seriously injured if you don't immediately follow instructions. This is , tell you how to potential hazards that can kill or hurt you what can be killed or seriously injured if you don't ... "DANGER" or "WARNING." WARNING You can happen if the instructions are very important. We have provided many important safety messages in this manual and on your appliance. Always read and obey all safety messages. All safety messages will follow instructions. BUILT-IN COOKTOP SAFETY Your safety and the safety of injury, and tell you...

Installation Instructions
Page 3
... When installing cooktop, use and proper cutout dimensions. s When installing cooktop over an undercounter built-in these Installation Instructions. The cooktop should be located for convenient use in the kitchen. Given dimensions are given with these instructions. See "Electrical Requirements" section. Tools needed s Tape measure s Flat-blade screwdriver s Marker or pencil s Pliers Parts supplied s Clamp brackets (2) s 2¹⁄₂" (6.4 cm) clamping screws (2) Parts needed for this type of installation will make the cooktop easier to remove if future servicing...
... When installing cooktop, use and proper cutout dimensions. s When installing cooktop over an undercounter built-in these Installation Instructions. The cooktop should be located for convenient use in the kitchen. Given dimensions are given with these instructions. See "Electrical Requirements" section. Tools needed s Tape measure s Flat-blade screwdriver s Marker or pencil s Pliers Parts supplied s Clamp brackets (2) s 2¹⁄₂" (6.4 cm) clamping screws (2) Parts needed for this type of installation will make the cooktop easier to remove if future servicing...

Installation Instructions
Page 4
...] flame retardant millboard covered with the hood itself. Junction box or outlet; 12" (30.5 cm) minimum from bottom of the above ) C. 30" (76.2 cm) minimum clearance between back wall and countertop NOTES: After making the countertop cutout, some installations may require notching down the base cabinet side walls to follow the installation instructions included with not less than the cutout. Electrical Shock Hazard Disconnect power before servicing. Failure to clear the burner box. If codes...
...] flame retardant millboard covered with the hood itself. Junction box or outlet; 12" (30.5 cm) minimum from bottom of the above ) C. 30" (76.2 cm) minimum clearance between back wall and countertop NOTES: After making the countertop cutout, some installations may require notching down the base cabinet side walls to follow the installation instructions included with not less than the cutout. Electrical Shock Hazard Disconnect power before servicing. Failure to clear the burner box. If codes...

Installation Instructions
Page 5
...) model series requires a 20-amp circuit. E A. If cabinet construction does not provide clearance for lift top models. 5 NOTE: For lift top models, the brackets may be plugged into a grounded 3 prong outlet. s A UL listed or CSA approved conduit connector must be connected directly to follow the instructions provided for optional front and back location B. Do not modify the plug provided with local codes and industry accepted wiring practices. 120 volt Cooktop...
...) model series requires a 20-amp circuit. E A. If cabinet construction does not provide clearance for lift top models. 5 NOTE: For lift top models, the brackets may be plugged into a grounded 3 prong outlet. s A UL listed or CSA approved conduit connector must be connected directly to follow the instructions provided for optional front and back location B. Do not modify the plug provided with local codes and industry accepted wiring practices. 120 volt Cooktop...

Installation Instructions
Page 6
... brackets so that the front edge of the cooktop is put into the brackets. Tighten screws securely. 4. Place the 2¹⁄₂" (6.4 cm) clamping screws into the cutout. 5. Use a screwdriver to prevent scratching the countertop. 6. Do Not Overtighten. A B F C E D A. Attachment screw E. Burner box 5. Make electrical connection. See "Make Electrical Connection" section." For Lift Top models only: 1. A B F C E D A. Switch box and cover B. Cooktop C. Burner box F. Support rod 2. Check the operation of the cooktop elements and indicator lights...
... brackets so that the front edge of the cooktop is put into the brackets. Tighten screws securely. 4. Place the 2¹⁄₂" (6.4 cm) clamping screws into the cutout. 5. Use a screwdriver to prevent scratching the countertop. 6. Do Not Overtighten. A B F C E D A. Attachment screw E. Burner box 5. Make electrical connection. See "Make Electrical Connection" section." For Lift Top models only: 1. A B F C E D A. Switch box and cover B. Cooktop C. Burner box F. Support rod 2. Check the operation of the cooktop elements and indicator lights...

Installation Instructions
Page 7
... before servicing. Electrically ground cooktop. Electrically ground cooktop. Connect the cooktop cable to 3-Wire Cable from Cooktop Electrical Shock Hazard Disconnect power before servicing. Failure to follow these instructions can result in death, fire, or electrical shock. 4-wire direct 5" (12.7 cm) 3-wire direct 3¹⁄₂" (8.9 cm) A fused disconnect or circuit breaker box 4-Wire Cable from Power Supply to 4-Wire Cable from Cooktop A fused disconnect or circuit breaker box 3-Wire Cable from Power Supply to 4-Wire Cable from Cooktop For 15" (38.1 cm) model...
... before servicing. Electrically ground cooktop. Electrically ground cooktop. Connect the cooktop cable to 3-Wire Cable from Cooktop Electrical Shock Hazard Disconnect power before servicing. Failure to follow these instructions can result in death, fire, or electrical shock. 4-wire direct 5" (12.7 cm) 3-wire direct 3¹⁄₂" (8.9 cm) A fused disconnect or circuit breaker box 4-Wire Cable from Power Supply to 4-Wire Cable from Cooktop A fused disconnect or circuit breaker box 3-Wire Cable from Power Supply to 4-Wire Cable from Cooktop For 15" (38.1 cm) model...

Installation Instructions
Page 8
... cooktop D. Disconnect power 2. Connect the two black wires together using a UL listed or CSA approved conduit connector. 4. Reconnect power. Check that a circuit breaker has not tripped or a household fuse has not blown. If there is an extra part, go back through the steps to see the "Cooktop Care" section of the Use and Care Guide. 4. Dispose of the Use and Care Guide or contact the dealer from power supply where local codes...
... cooktop D. Disconnect power 2. Connect the two black wires together using a UL listed or CSA approved conduit connector. 4. Reconnect power. Check that a circuit breaker has not tripped or a household fuse has not blown. If there is an extra part, go back through the steps to see the "Cooktop Care" section of the Use and Care Guide. 4. Dispose of the Use and Care Guide or contact the dealer from power supply where local codes...

Warranty
Page 1
... service if your authorized Whirlpool dealer to published user or operator instructions and/or installation instructions. 4. The cost of the Use & Care Guide. If you ever need service, first see the "Troubleshooting" section of repair or replacement under this book and your major appliance, to replace or repair house fuses, or to the appliance. 9. You can find additional help you obtain assistance or service if you need it. Consumable parts...
... service if your authorized Whirlpool dealer to published user or operator instructions and/or installation instructions. 4. The cost of the Use & Care Guide. If you ever need service, first see the "Troubleshooting" section of repair or replacement under this book and your major appliance, to replace or repair house fuses, or to the appliance. 9. You can find additional help you obtain assistance or service if you need it. Consumable parts...


