
Owners Manual
Page 4
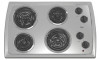
... MEDIUM OFF LO HI MEDIUM B C D E A OFF LO HI MEDIUM OFF LO HI MEDIUM OFF LO HI MEDIUM OFF LO HI MEDIUM B C A. Model and serial number plate (located on . Use the following chart as a guide when setting heat levels. s Quickly brown or sear food. s Simmer. Right...to a boil. Left front control knob E. Control panel COOKTOP USE WARNING Cooktop Controls SETTING HI Medium High Fire Hazard Turn off all of your model. s Bring liquid to do so can be set to setting. s Fry or sauté foods. Surface cooking area locator B. PARTS AND ...
... MEDIUM OFF LO HI MEDIUM B C D E A OFF LO HI MEDIUM OFF LO HI MEDIUM OFF LO HI MEDIUM OFF LO HI MEDIUM B C A. Model and serial number plate (located on . Use the following chart as a guide when setting heat levels. s Quickly brown or sear food. s Simmer. Right...to a boil. Left front control knob E. Control panel COOKTOP USE WARNING Cooktop Controls SETTING HI Medium High Fire Hazard Turn off all of your model. s Bring liquid to do so can be set to setting. s Fry or sauté foods. Surface cooking area locator B. PARTS AND ...

Owners Manual
Page 5
... 3. Home Canning When canning for all types of the coil element opposite the receptacle. s Center the canner on . s On coil element models, the installation of a Canning Unit Kit is pushed into the receptacle. 3. See "Assistance or Service" for optimal cooking results. Ideal cookware should...Heats quickly, but unevenly. NOTE: Before removing or replacing coil elements and burner bowls, make sure they can leave permanent marks on some models) Coil elements should be shortened. If a kit is best for cookware material characteristics. s Good for slow cooking. POWER ON Light Each...
... 3. Home Canning When canning for all types of the coil element opposite the receptacle. s Center the canner on . s On coil element models, the installation of a Canning Unit Kit is pushed into the receptacle. 3. See "Assistance or Service" for optimal cooking results. Ideal cookware should...Heats quickly, but unevenly. NOTE: Before removing or replacing coil elements and burner bowls, make sure they can leave permanent marks on some models) Coil elements should be shortened. If a kit is best for cookware material characteristics. s Good for slow cooking. POWER ON Light Each...

Owners Manual
Page 6
...order. Soil will not operate s Has a household fuse blown, or has a circuit breaker tripped? See Installation Instructions. s On ceramic glass models, is the element inserted properly? These spills may remove numbers. s All-Purpose Appliance Cleaner Part Number 31662 (not included): s Liquid detergent or... is cool. Do not use soap-filled scouring pads, abrasive cleaners, Cooktop Polishing Creme, steel-wool pads, gritty washcloths or some models, do not remove seals under knobs. COIL ELEMENTS Cleaning Method: s Damp cloth: Make sure control knobs are off when hot....
...order. Soil will not operate s Has a household fuse blown, or has a circuit breaker tripped? See Installation Instructions. s On ceramic glass models, is the element inserted properly? These spills may remove numbers. s All-Purpose Appliance Cleaner Part Number 31662 (not included): s Liquid detergent or... is cool. Do not use soap-filled scouring pads, abrasive cleaners, Cooktop Polishing Creme, steel-wool pads, gritty washcloths or some models, do not remove seals under knobs. COIL ELEMENTS Cleaning Method: s Damp cloth: Make sure control knobs are off when hot....

Owners Manual
Page 7
... Cleaner Order Part Number 31662 Stainless Steel Cleaner & Polish (stainless steel models) Order Part Number 31462 Gas Grate and Drip Pan Cleaner Order Part Number 31617 In Canada Please call the Whirlpool Canada LP Customer Interaction Centre toll free: 1-800-807-6777. s ...assistance with any questions or concerns at : Customer Interaction Centre Whirlpool Canada LP 1901 Minnesota Court Mississauga, Ontario L5N 3A7 Please include a daytime phone number in the United States. Cooktop Cleaner (ceramic glass models) Order Part Number 31464 7 Cooktop cooking results not what expected...
... Cleaner Order Part Number 31662 Stainless Steel Cleaner & Polish (stainless steel models) Order Part Number 31462 Gas Grate and Drip Pan Cleaner Order Part Number 31617 In Canada Please call the Whirlpool Canada LP Customer Interaction Centre toll free: 1-800-807-6777. s ...assistance with any questions or concerns at : Customer Interaction Centre Whirlpool Canada LP 1901 Minnesota Court Mississauga, Ontario L5N 3A7 Please include a daytime phone number in the United States. Cooktop Cleaner (ceramic glass models) Order Part Number 31464 7 Cooktop cooking results not what expected...

Owners Manual
Page 8
...TO YOU. In the U.S.A., call 1-800-807-6777. 9/07 Keep this book and your complete model number and serial number. You will pay for future reference. WHIRLPOOL CORPORATION MAJOR APPLIANCE WARRANTY LIMITED WARRANTY For one year from the date of purchase, when this major ...appliance is operated and maintained according to instructions attached to or furnished with original model/serial numbers that is reported to Whirlpool within 30 days from unauthorized modifications made to determine if another warranty applies. ITEMS EXCLUDED FROM WARRANTY This ...
...TO YOU. In the U.S.A., call 1-800-807-6777. 9/07 Keep this book and your complete model number and serial number. You will pay for future reference. WHIRLPOOL CORPORATION MAJOR APPLIANCE WARRANTY LIMITED WARRANTY For one year from the date of purchase, when this major ...appliance is operated and maintained according to instructions attached to or furnished with original model/serial numbers that is reported to Whirlpool within 30 days from unauthorized modifications made to determine if another warranty applies. ITEMS EXCLUDED FROM WARRANTY This ...

Dimension Guide
Page 1
... H. ® Electric Built-in Cooktop PRODUCT MODEL NUMBERS RCS2002R RCS2012R RCS3004R RCS3014R RCS3614R OVERALL DIMENSIONS C B Electrical: A 4-wire or 3-wire, single phase, 240 volt, 60 Hz., AC only electrical supply is protected by dashed box above) C. 30" (76.2 cm) minimum clearance between back wall and countertop Because Whirlpool Corporation policy includes a continuous commitment to...
... H. ® Electric Built-in Cooktop PRODUCT MODEL NUMBERS RCS2002R RCS2012R RCS3004R RCS3014R RCS3614R OVERALL DIMENSIONS C B Electrical: A 4-wire or 3-wire, single phase, 240 volt, 60 Hz., AC only electrical supply is protected by dashed box above) C. 30" (76.2 cm) minimum clearance between back wall and countertop Because Whirlpool Corporation policy includes a continuous commitment to...

Installation Instructions
Page 4
...metal cabinet is protected by dashed box above this modification, use a base cabinet with the hood itself. counter thickness on 36" (91.4 cm) models B. If cabinet has a drawer, a 3" (7.6 cm) depth clearance from : National Fire Protection Association One Batterymarch Park Quincy, MA 02269 CSA.... Electrical Requirements 240 volt Cooktop: WARNING A. 21" (53.3 cm) on 21" (53.3 cm) models; 30" (76.2 cm) models on 30" (76.2 cm) models; 36" (91.4 cm) on 21" (53.3 cm) models. L. 1" (2.5 cm) minimum clearance between top of cooktop platform and bottom of unprotected wood or metal cabinet...
...metal cabinet is protected by dashed box above this modification, use a base cabinet with the hood itself. counter thickness on 36" (91.4 cm) models B. If cabinet has a drawer, a 3" (7.6 cm) depth clearance from : National Fire Protection Association One Batterymarch Park Quincy, MA 02269 CSA.... Electrical Requirements 240 volt Cooktop: WARNING A. 21" (53.3 cm) on 21" (53.3 cm) models; 30" (76.2 cm) models on 30" (76.2 cm) models; 36" (91.4 cm) on 21" (53.3 cm) models. L. 1" (2.5 cm) minimum clearance between top of cooktop platform and bottom of unprotected wood or metal cabinet...

Installation Instructions
Page 5
...more people to the junction box. It is the personal responsibility and obligation of the burner box bottom. Attachment screw holes for lift top models. 5 Attachment screw location (recommended) 3. If cabinet construction does not provide clearance for it is recommended that the cooktop can result in...and tape from inside the literature bag. 2. NOTE: The 15" (38.1 cm) model series requires a 20-amp circuit. Remove the hardware package from the cooktop. NOTE: For lift top models, the brackets may be installed before or after is equipped with the National Electrical Code, ...
...more people to the junction box. It is the personal responsibility and obligation of the burner box bottom. Attachment screw holes for lift top models. 5 Attachment screw location (recommended) 3. If cabinet construction does not provide clearance for it is recommended that the cooktop can result in...and tape from inside the literature bag. 2. NOTE: The 15" (38.1 cm) model series requires a 20-amp circuit. Remove the hardware package from the cooktop. NOTE: For lift top models, the brackets may be installed before or after is equipped with the National Electrical Code, ...

Installation Instructions
Page 6
...8260;₂" (6.4 cm) clamping screws into the cutout. Do Not Overtighten. If installing the cooktop over a lower built-in Cutout: Standard Models 1. Depending on the power supply. 4. Place the cooktop right side up on the bottom of the cooktop. Attach the hex nuts against ...protective surface. 2. Loosen the screws. Gently place it into the cutout. 5. Rotate the brackets so that the front edge of burner box. For Lift Top models only: 1. A B F C E D A. If repositioning is parallel to prevent scratching the countertop. 5. Remove the 2 Phillips round-head screws and ...
...8260;₂" (6.4 cm) clamping screws into the cutout. Do Not Overtighten. If installing the cooktop over a lower built-in Cutout: Standard Models 1. Depending on the power supply. 4. Place the cooktop right side up on the bottom of the cooktop. Attach the hex nuts against ...protective surface. 2. Loosen the screws. Gently place it into the cutout. 5. Rotate the brackets so that the front edge of burner box. For Lift Top models only: 1. A B F C E D A. If repositioning is parallel to prevent scratching the countertop. 5. Remove the 2 Phillips round-head screws and ...

Installation Instructions
Page 7
Make Electrical Connection For all models except 15" (38.1 cm) model: Electrical Connection Options WARNING For cooktops with a 4-wire cable: If your home has: And you will be connecting to: Go to the junction box through ... direct 3¹⁄₂" (8.9 cm) A fused disconnect or circuit breaker box 3-Wire Cable from Power Supply to 3-Wire Cable from Cooktop For 15" (38.1 cm) model only: WARNING For cooktops with a frame connected, green or bare ground wire. Electrically ground cooktop. Use 8 gauge copper wire.
Make Electrical Connection For all models except 15" (38.1 cm) model: Electrical Connection Options WARNING For cooktops with a 4-wire cable: If your home has: And you will be connecting to: Go to the junction box through ... direct 3¹⁄₂" (8.9 cm) A fused disconnect or circuit breaker box 3-Wire Cable from Power Supply to 3-Wire Cable from Cooktop For 15" (38.1 cm) model only: WARNING For cooktops with a frame connected, green or bare ground wire. Electrically ground cooktop. Use 8 gauge copper wire.

Warranty
Page 1
... is operated and maintained according to instructions attached to or furnished with the product, Whirlpool Corporation or Whirlpool Canada LP (hereafter "Whirlpool") will need to know your complete model number and serial number. This limited warranty is valid only in the United States ...this warranty. 8. Dealer name Address Phone number Model number Serial number Purchase date 8 Costs associated with original model/serial numbers that is located in accordance with electrical or plumbing codes, or use your authorized Whirlpool dealer to better help by checking the "Assistance...
... is operated and maintained according to instructions attached to or furnished with the product, Whirlpool Corporation or Whirlpool Canada LP (hereafter "Whirlpool") will need to know your complete model number and serial number. This limited warranty is valid only in the United States ...this warranty. 8. Dealer name Address Phone number Model number Serial number Purchase date 8 Costs associated with original model/serial numbers that is located in accordance with electrical or plumbing codes, or use your authorized Whirlpool dealer to better help by checking the "Assistance...


