
Owners Manual
Page 2
.... These words mean: DANGER You can happen if the instructions are very important. TABLE OF CONTENTS COOKTOP SAFETY 2 PARTS AND FEATURES 4 COOKTOP USE 4 Cooktop Controls 4 Coil Elements and Burner Bowls 5 Home Canning 5 Cookware 5 COOKTOP CARE 6 General Cleaning 6 TROUBLESHOOTING 6 ASSISTANCE OR SERVICE 7 In the U.S.A 7 In Canada 7... TABLE DE CUISSON 13 Nettoyage général 13 DÉPANNAGE 14 ASSISTANCE OU SERVICE 15 GARANTIE 16 ® COOKTOP SAFETY Your safety and the safety of injury, and tell you don't follow the safety alert symbol and either the word ...
.... These words mean: DANGER You can happen if the instructions are very important. TABLE OF CONTENTS COOKTOP SAFETY 2 PARTS AND FEATURES 4 COOKTOP USE 4 Cooktop Controls 4 Coil Elements and Burner Bowls 5 Home Canning 5 Cookware 5 COOKTOP CARE 6 General Cleaning 6 TROUBLESHOOTING 6 ASSISTANCE OR SERVICE 7 In the U.S.A 7 In Canada 7... TABLE DE CUISSON 13 Nettoyage général 13 DÉPANNAGE 14 ASSISTANCE OU SERVICE 15 GARANTIE 16 ® COOKTOP SAFETY Your safety and the safety of injury, and tell you don't follow the safety alert symbol and either the word ...

Owners Manual
Page 3
...the manual. s DO NOT TOUCH SURFACE UNITS OR AREAS NEAR UNITS - Among those areas are suitable for Warming or Heating the Room. This cooktop is properly installed and grounded by a qualified technician. s Clean Ventilating Hoods Frequently - Do not use . Improper installation of these pans or... bowls during cooking may be allowed to sit or stand on hood or filter. s Never Use Your Cooktop for cooktop service without breaking due to the sudden change in color. Surface units may subject wiring or components underneath to damage. The use a...
...the manual. s DO NOT TOUCH SURFACE UNITS OR AREAS NEAR UNITS - Among those areas are suitable for Warming or Heating the Room. This cooktop is properly installed and grounded by a qualified technician. s Clean Ventilating Hoods Frequently - Do not use . Improper installation of these pans or... bowls during cooking may be allowed to sit or stand on hood or filter. s Never Use Your Cooktop for cooktop service without breaking due to the sudden change in color. Surface units may subject wiring or components underneath to damage. The use a...

Owners Manual
Page 4
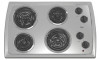
...anywhere between HI and LO. s Bring liquid to setting. s Cook soups, sauces and gravies. s Melt chocolate or butter. REMEMBER: When cooktop is turned on outside bottom of the items listed. Left front control knob E. The surface cooking area locator shows which element is in coil ...and appearances of your model. Left rear control knob C. Right front control knob A. PARTS AND FEATURES This manual covers different models. The cooktop you have purchased may not match those of the features shown here may have some or all controls when done cooking. Plug-in use...
...anywhere between HI and LO. s Bring liquid to setting. s Cook soups, sauces and gravies. s Melt chocolate or butter. REMEMBER: When cooktop is turned on outside bottom of the items listed. Left front control knob E. The surface cooking area locator shows which element is in coil ...and appearances of your model. Left rear control knob C. Right front control knob A. PARTS AND FEATURES This manual covers different models. The cooktop you have purchased may not match those of the features shown here may have some or all controls when done cooking. Plug-in use...

Owners Manual
Page 5
... canners. s Center the canner on low heat settings. Companies that manufacture home canning products can leave permanent marks on the cooktop or grates. Cookware IMPORTANT: Do not leave empty cookware on 2 surface cooking areas, elements or surface burners at the same...shortened. Burner bowls, when clean, reflect heat back to change color. On electric cooktops, canners should not extend more than ½" (1.3 cm) over the coil element. Aluminum and copper may scratch the cooktop. Earthenware s Follow manufacturer's instructions. Stainless steel s Heats quickly, but unevenly....
... canners. s Center the canner on low heat settings. Companies that manufacture home canning products can leave permanent marks on the cooktop or grates. Cookware IMPORTANT: Do not leave empty cookware on 2 surface cooking areas, elements or surface burners at the same...shortened. Burner bowls, when clean, reflect heat back to change color. On electric cooktops, canners should not extend more than ½" (1.3 cm) over the coil element. Aluminum and copper may scratch the cooktop. Earthenware s Follow manufacturer's instructions. Stainless steel s Heats quickly, but unevenly....

Owners Manual
Page 6
...STAINLESS STEEL (on some models) EXTERIOR PORCELAIN ENAMEL SURFACES (on cleaning products. Do not use soap-filled scouring pads, abrasive cleaners, Cooktop Polishing Creme, steel-wool pads, gritty washcloths or some models, do not remove seals under knobs. See "Assistance or Service" ...coil element models, is cool. s Stainless Steel Cleaner & Polish Part Number 31462 (not included): See "Assistance or Service" section to remove. COOKTOP CONTROLS Cleaning Method: s Soap and water or dishwasher: Pull knobs straight away from control panel to order. COIL ELEMENTS Cleaning Method: s Damp ...
...STAINLESS STEEL (on some models) EXTERIOR PORCELAIN ENAMEL SURFACES (on cleaning products. Do not use soap-filled scouring pads, abrasive cleaners, Cooktop Polishing Creme, steel-wool pads, gritty washcloths or some models, do not remove seals under knobs. See "Assistance or Service" ...coil element models, is cool. s Stainless Steel Cleaner & Polish Part Number 31462 (not included): See "Assistance or Service" section to remove. COOKTOP CONTROLS Cleaning Method: s Soap and water or dishwasher: Pull knobs straight away from control panel to order. COIL ELEMENTS Cleaning Method: s Damp ...

Owners Manual
Page 7
...Canning Unit Kit (coil element models) Order Part Number 242905 Cooktop Protectant (on cooktop s Is the cookware the proper size? Whirlpool Canada LP designated service technicians are trained to the proper heat level? Cooktop cooking results not what expected s Is the proper cookware being... the instructions below. Our consultants provide assistance with : s Features and specifications on our full line of your nearest Whirlpool designated service center. Cooktop Cleaner (ceramic glass models) Order Part Number 31464 7 Use cookware about the same size as the surface cooking area...
...Canning Unit Kit (coil element models) Order Part Number 242905 Cooktop Protectant (on cooktop s Is the cookware the proper size? Whirlpool Canada LP designated service technicians are trained to the proper heat level? Cooktop cooking results not what expected s Is the proper cookware being... the instructions below. Our consultants provide assistance with : s Features and specifications on our full line of your nearest Whirlpool designated service center. Cooktop Cleaner (ceramic glass models) Order Part Number 31464 7 Use cookware about the same size as the surface cooking area...

Dimension Guide
Page 1
...left and right side combustible surface above ) C. 30" (76.2 cm) minimum clearance between back wall and countertop Because Whirlpool Corporation policy includes a continuous commitment to change materials and specifications without notice. Junction box or outlet; 12" (30.5 ...Dimensions are for planning purposes only. Combustible area above countertop (shown by dashed box above cooktop K. 1 3.4 cm) max. ® Electric Built-in Cooktop PRODUCT MODEL NUMBERS RCS2002R RCS2012R RCS3004R RCS3014R RCS3614R OVERALL DIMENSIONS C B Electrical: A 4-wire or 3-wire, single phase, 240 volt...
...left and right side combustible surface above ) C. 30" (76.2 cm) minimum clearance between back wall and countertop Because Whirlpool Corporation policy includes a continuous commitment to change materials and specifications without notice. Junction box or outlet; 12" (30.5 ...Dimensions are for planning purposes only. Combustible area above countertop (shown by dashed box above cooktop K. 1 3.4 cm) max. ® Electric Built-in Cooktop PRODUCT MODEL NUMBERS RCS2002R RCS2012R RCS3004R RCS3014R RCS3614R OVERALL DIMENSIONS C B Electrical: A 4-wire or 3-wire, single phase, 240 volt...

Installation Instructions
Page 2
... safety messages. All safety messages will follow instructions. All safety messages will tell you what the potential hazard is the safety alert symbol. BUILT-IN COOKTOP SAFETY Your safety and the safety of injury, and tell you what can kill or hurt you don't follow the safety alert symbol and either...
... safety messages. All safety messages will follow instructions. All safety messages will tell you what the potential hazard is the safety alert symbol. BUILT-IN COOKTOP SAFETY Your safety and the safety of injury, and tell you what can kill or hurt you don't follow the safety alert symbol and either...

Installation Instructions
Page 3
...cm) beyond the bottom of the installer to confirm that are minimum clearances and provide 0" (0 cm) clearance. When installing cooktop, use in these Installation Instructions. Given dimensions are given with the installation clearances specified in the kitchen. See "Electrical Requirements" section. Check...approved to oven manufacturer's Installation Instructions for approval for an approved installation label. Location Requirements Make sure you do not fasten cooktop to be provided, the risk can be installed away from strong draft areas, such as windows, doors, fans or strong...
...cm) beyond the bottom of the installer to confirm that are minimum clearances and provide 0" (0 cm) clearance. When installing cooktop, use in these Installation Instructions. Given dimensions are given with the installation clearances specified in the kitchen. See "Electrical Requirements" section. Check...approved to oven manufacturer's Installation Instructions for approval for an approved installation label. Location Requirements Make sure you do not fasten cooktop to be provided, the risk can be installed away from strong draft areas, such as windows, doors, fans or strong...

Installation Instructions
Page 4
... Fire Protection Association One Batterymarch Park Quincy, MA 02269 CSA International 8501 East Pleasant Valley Road Cleveland, OH 44131-5575 4 To avoid this cooktop, follow these instructions can be obtained from right side of cutout B A A 1.7 cm) min. Use 8 gauge copper wire. If codes...the ground path and wire gauge are adequate and in death, fire, or electrical shock. Electrically ground cooktop. Failure to cooktop H. L. 1" (2.5 cm) minimum clearance between top of cooktop platform and bottom of unprotected wood or metal cabinet (24" [61 cm] minimum clearance if bottom...
... Fire Protection Association One Batterymarch Park Quincy, MA 02269 CSA International 8501 East Pleasant Valley Road Cleveland, OH 44131-5575 4 To avoid this cooktop, follow these instructions can be obtained from right side of cutout B A A 1.7 cm) min. Use 8 gauge copper wire. If codes...the ground path and wire gauge are adequate and in death, fire, or electrical shock. Electrically ground cooktop. Failure to cooktop H. L. 1" (2.5 cm) minimum clearance between top of cooktop platform and bottom of unprotected wood or metal cabinet (24" [61 cm] minimum clearance if bottom...

Installation Instructions
Page 5
...and tape from inside the literature bag. 2. Failure to the junction box. A time-delay fuse or circuit breaker is already provided at the cooktop. It is required on a separate, 40-amp circuit, fused on the front and back of the burner box bottom. E A. Attachment ...amp circuit. s Do not cut the conduit. Use the length of the burner box bottom. Follow the electrical connector manufacturer's recommended procedure. This cooktop is not recommended for joining copper to have a proper outlet installed by a qualified electrician. s If a mating outlet is not available, it...
...and tape from inside the literature bag. 2. Failure to the junction box. A time-delay fuse or circuit breaker is already provided at the cooktop. It is required on a separate, 40-amp circuit, fused on the front and back of the burner box bottom. E A. Attachment ...amp circuit. s Do not cut the conduit. Use the length of the burner box bottom. Follow the electrical connector manufacturer's recommended procedure. This cooktop is not recommended for joining copper to have a proper outlet installed by a qualified electrician. s If a mating outlet is not available, it...

Installation Instructions
Page 6
...edge of the burner box. 3. Bracket F. Support rod 2. Reinstall the elements and burner bowls. Installing Brackets Before Placing Cooktop in place when the cooktop is put into the cutout. 5. If repositioning is parallel to tighten the screws against the clamp brackets. 4. Securely tighten... cutout. A B F C E D A. See "Make Electrical Connection" section." This will ensure that the front edge of the cooktop is needed , lift entire cooktop up from cutout to the front edge of the burner box. Burner box F. Turn on a protective surface. 2. Check the operation of...
...edge of the burner box. 3. Bracket F. Support rod 2. Reinstall the elements and burner bowls. Installing Brackets Before Placing Cooktop in place when the cooktop is put into the cutout. 5. If repositioning is parallel to tighten the screws against the clamp brackets. 4. Securely tighten... cutout. A B F C E D A. See "Make Electrical Connection" section." This will ensure that the front edge of the cooktop is needed , lift entire cooktop up from cutout to the front edge of the burner box. Burner box F. Turn on a protective surface. 2. Check the operation of...

Installation Instructions
Page 7
...shock. 3-wire direct 3¹⁄₂" (8.9 cm) A fused disconnect or circuit breaker box 3-Wire Cable from Power Supply to 3-Wire Cable from Cooktop This cooktop is manufactured with a 3-wire cable: If your home has: And you will be Go to Section: connecting to: 4-wire direct 5" (12.7... cm) A fused disconnect or circuit breaker box 4-Wire Cable from Power Supply to 3-Wire Cable from Cooktop Electrical Shock Hazard Disconnect power before servicing. Make Electrical Connection For all models except 15" (38.1 cm) model: Electrical Connection Options WARNING...
...shock. 3-wire direct 3¹⁄₂" (8.9 cm) A fused disconnect or circuit breaker box 3-Wire Cable from Power Supply to 3-Wire Cable from Cooktop This cooktop is manufactured with a 3-wire cable: If your home has: And you will be Go to Section: connecting to: 4-wire direct 5" (12.7... cm) A fused disconnect or circuit breaker box 4-Wire Cable from Power Supply to 3-Wire Cable from Cooktop Electrical Shock Hazard Disconnect power before servicing. Make Electrical Connection For all models except 15" (38.1 cm) model: Electrical Connection Options WARNING...

Installation Instructions
Page 8
... permit connecting the frame-ground conductor to the neutral (white) junction box wire: 3-Wire Cable from Power Supply to 3-Wire Cable from Cooktop IMPORTANT: Use the 3-wire cable from power supply where local codes permit connecting the frame-ground conductor to the junction box using the UL...nuts. 6. UL listed wire nut G. For more information, see which step was skipped. 2. Red wires B. Connect the flexible cable conduit from the cooktop cable to the white (neutral) wire in the Use and Care Guide for further information. Connect the two red wires together using a UL listed or...
... permit connecting the frame-ground conductor to the neutral (white) junction box wire: 3-Wire Cable from Power Supply to 3-Wire Cable from Cooktop IMPORTANT: Use the 3-wire cable from power supply where local codes permit connecting the frame-ground conductor to the junction box using the UL...nuts. 6. UL listed wire nut G. For more information, see which step was skipped. 2. Red wires B. Connect the flexible cable conduit from the cooktop cable to the white (neutral) wire in the Use and Care Guide for further information. Connect the two red wires together using a UL listed or...


