
Use and Care Guide
Page 4
... the electrical supply before initiating the cleaning cycle. For self-cleaning ranges - Connect anti-tip bracket to the open door without the anti-tip bracket fastened down properly. Be sure the range is equipped with the National Electrical Code, ANSI/NFPA 70. However, the range can tip the range and be plugged directly into a properly grounded receptacle. s This range is properly installed and grounded by a qualified technician. s Injuries may result in an oven or near surface units. Remove broiler pan...
... the electrical supply before initiating the cleaning cycle. For self-cleaning ranges - Connect anti-tip bracket to the open door without the anti-tip bracket fastened down properly. Be sure the range is equipped with the National Electrical Code, ANSI/NFPA 70. However, the range can tip the range and be plugged directly into a properly grounded receptacle. s This range is properly installed and grounded by a qualified technician. s Injuries may result in an oven or near surface units. Remove broiler pan...

Use and Care Guide
Page 5
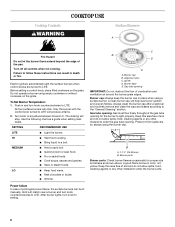
... I . Automatic oven light switch E. The locations and appearances of the features shown here may have some or all of the parts and features listed. Surface burner locator B. Left front burner control knob D. Right rear surface burner and grate J. PARTS AND FEATURES This manual covers several different models. Anti-tip bracket F. Oven vent B. Left rear surface burner and grate C. Left front surface burner and grate D. Control panel L. Broiler door H. Cooktop Control Panel A Range B C A. Right rear burner control knob D E E. Model and serial number plate...
... I . Automatic oven light switch E. The locations and appearances of the features shown here may have some or all of the parts and features listed. Surface burner locator B. Left front burner control knob D. Right rear surface burner and grate J. PARTS AND FEATURES This manual covers several different models. Anti-tip bracket F. Oven vent B. Left rear surface burner and grate C. Left front surface burner and grate D. Control panel L. Broiler door H. Cooktop Control Panel A Range B C A. Right rear burner control knob D E E. Model and serial number plate...
Use and Care Guide
Page 6
... to enter the gas tube opening. Turn off all controls when not cooking. HI s Start food cooking. s Quickly brown or sear food. Gas tube opening for proper size and shape as a guide when setting heat levels. s Bring liquid to a boil. Only the burner with the control knob turned to LITE will stop. Burner base E. C B D E A. Power failure In case of the pan. Cooktop Controls WARNING COOKTOP USE Surface Burners A Fire Hazard Do not let the burner flame extend beyond the...
... to enter the gas tube opening. Turn off all controls when not cooking. HI s Start food cooking. s Quickly brown or sear food. Gas tube opening for proper size and shape as a guide when setting heat levels. s Bring liquid to a boil. Only the burner with the control knob turned to LITE will stop. Burner base E. C B D E A. Power failure In case of the pan. Cooktop Controls WARNING COOKTOP USE Surface Burners A Fire Hazard Do not let the burner flame extend beyond the...
Use and Care Guide
Page 7
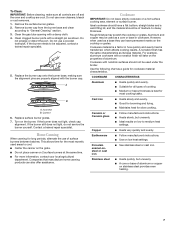
... how quickly and evenly heat is a factor in cookware. Turn on low heat settings. COOKWARE CHARACTERISTICS Aluminum s Heats quickly and evenly. Ceramic or Ceramic glass s Follow manufacturer's instructions. Copper s Heats very quickly and evenly. Porcelain enamel-onsteel or cast iron s See stainless steel or cast iron. Remove the surface burner grates. 2. Clean the gas tube opening with the burner cap. Replace the burner cap onto the burner base, making sure...
... how quickly and evenly heat is a factor in cookware. Turn on low heat settings. COOKWARE CHARACTERISTICS Aluminum s Heats quickly and evenly. Ceramic or Ceramic glass s Follow manufacturer's instructions. Copper s Heats very quickly and evenly. Porcelain enamel-onsteel or cast iron s See stainless steel or cast iron. Remove the surface burner grates. 2. Clean the gas tube opening with the burner cap. Replace the burner cap onto the burner base, making sure...
Use and Care Guide
Page 10
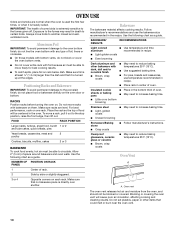
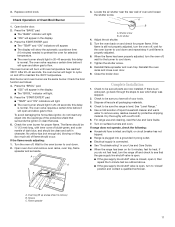
... the oven. Use the following chart as a guide. s For pies, breads and casseroles, use the bakeware size recommended in recipe. s Little or no bakeware piece is turned up at the edges. Oven Vent NUMBER OF POSITION ON RACK A PAN(S) 1 Center of oven. Oven vent The oven vent releases hot air and moisture from the oven, and should not be able to reduce baking temperatures 25°F (15°C). Blocking or covering the oven vent...
... the oven. Use the following chart as a guide. s For pies, breads and casseroles, use the bakeware size recommended in recipe. s Little or no bakeware piece is turned up at the edges. Oven Vent NUMBER OF POSITION ON RACK A PAN(S) 1 Center of oven. Oven vent The oven vent releases hot air and moisture from the oven, and should not be able to reduce baking temperatures 25°F (15°C). Blocking or covering the oven vent...

Use and Care Guide
Page 11
... turn food to reduce spattering. s After broiling, remove the pan from the oven when removing the food. Touch BROIL. The BROIL indicator light will light up to be changed at any time after the preheat conditioning time ends to differ. BROILING CHART For best results, broiler pan should be lined with leavening ingredients, such as room temperature and peak energy usage times. If baking/roasting while the Timer is displayed. Preheating After START is located below the oven door. Preheat temperatures...
... turn food to reduce spattering. s After broiling, remove the pan from the oven when removing the food. Touch BROIL. The BROIL indicator light will light up to be changed at any time after the preheat conditioning time ends to differ. BROILING CHART For best results, broiler pan should be lined with leavening ingredients, such as room temperature and peak energy usage times. If baking/roasting while the Timer is displayed. Preheating After START is located below the oven door. Preheat temperatures...
Use and Care Guide
Page 12
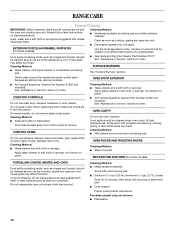
Cleaning Method: s Glass cleaner, mild liquid cleaner or nonabrasive scrubbing pad: s Gas Grate and Drip Pan Cleaner Part Number 31617: See "Assistance or Service" section to order. COOKTOP CONTROLS Do not use oven cleaners. Do not soak knobs. OVEN RACKS AND ROASTING RACKS Cleaning Method: s Steel-wool pad BROILER PAN AND GRID (on some models) Use the most aggressive cycle. To avoid chipping, do not remove seals under knobs. s Oven cleaner: Follow product label instructions. Soap...
Cleaning Method: s Glass cleaner, mild liquid cleaner or nonabrasive scrubbing pad: s Gas Grate and Drip Pan Cleaner Part Number 31617: See "Assistance or Service" section to order. COOKTOP CONTROLS Do not use oven cleaners. Do not soak knobs. OVEN RACKS AND ROASTING RACKS Cleaning Method: s Steel-wool pad BROILER PAN AND GRID (on some models) Use the most aggressive cycle. To avoid chipping, do not remove seals under knobs. s Oven cleaner: Follow product label instructions. Soap...

Use and Care Guide
Page 14
... regulator gas shutoff valve in the off position? Excessive heat around bakeware? Turn any one of an unnecessary service call an electrician. Contact a trained repair specialist. s Is the display showing "F" followed by a number? s Is the power supply cord unplugged? s Are the burner ports clogged? s Is this the first time the surface burners have been converted improperly. The appliance may have been used ? Reset the clock, if needed. Wait for proper wiring...
... regulator gas shutoff valve in the off position? Excessive heat around bakeware? Turn any one of an unnecessary service call an electrician. Contact a trained repair specialist. s Is the display showing "F" followed by a number? s Is the power supply cord unplugged? s Are the burner ports clogged? s Is this the first time the surface burners have been converted improperly. The appliance may have been used ? Reset the clock, if needed. Wait for proper wiring...
Use and Care Guide
Page 15
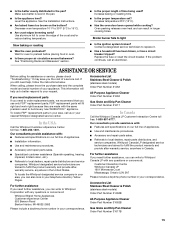
... Drip Pan Cleaner Order Part Number 31617 In Canada Call the Whirlpool Canada LP Customer Interaction Centre toll free: 1-800-807-6777. s Are crust edges browning early? Our consultants provide assistance with: s Features and specifications on the bottom? s Use and maintenance procedures. s Accessory and repair parts sales. s Referrals to fulfill the product warranty and provide afterwarranty service, anywhere in longer cooking times. See the Installation Instructions. See "Positioning Racks...
... Drip Pan Cleaner Order Part Number 31617 In Canada Call the Whirlpool Canada LP Customer Interaction Centre toll free: 1-800-807-6777. s Are crust edges browning early? Our consultants provide assistance with: s Features and specifications on the bottom? s Use and maintenance procedures. s Accessory and repair parts sales. s Referrals to fulfill the product warranty and provide afterwarranty service, anywhere in longer cooking times. See the Installation Instructions. See "Positioning Racks...
Use and Care Guide
Page 16
... WHIRLPOOL WILL NOT PAY FOR 1. Service calls to refrigerator or freezer product failures. 6. Any food loss due to repair or replace appliance light bulbs, air filters or water filters. Repairs to parts or systems resulting from unauthorized modifications made to better help can find this information on the model and serial number label located on the product. DISCLAIMER OF IMPLIED WARRANTIES; LIMITATION OF REMEDIES CUSTOMER...
... WHIRLPOOL WILL NOT PAY FOR 1. Service calls to refrigerator or freezer product failures. 6. Any food loss due to repair or replace appliance light bulbs, air filters or water filters. Repairs to parts or systems resulting from unauthorized modifications made to better help can find this information on the model and serial number label located on the product. DISCLAIMER OF IMPLIED WARRANTIES; LIMITATION OF REMEDIES CUSTOMER...

Installation Instructions
Page 2
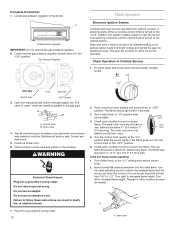
...chance of others . All safety messages will follow instructions. TABLE OF CONTENTS RANGE SAFETY 2 INSTALLATION REQUIREMENTS 4 Tools and Parts 4 Location Requirements 4 Electrical Requirements 6 Gas Supply Requirements 6 INSTALLATION INSTRUCTIONS 8 Unpack Range 8 Install Anti-Tip Bracket 8 Verify Anti-Tip Bracket Location 9 Level Range 9 Make Gas Connection 9 Check Operation 10 Complete Installation 12 GAS CONVERSIONS 12 LP Gas Conversion 12 Complete Conversion 13 Natural Gas Conversion 14 Complete Conversion 15 RANGE SAFETY Your safety and the safety of injury, and...
...chance of others . All safety messages will follow instructions. TABLE OF CONTENTS RANGE SAFETY 2 INSTALLATION REQUIREMENTS 4 Tools and Parts 4 Location Requirements 4 Electrical Requirements 6 Gas Supply Requirements 6 INSTALLATION INSTRUCTIONS 8 Unpack Range 8 Install Anti-Tip Bracket 8 Verify Anti-Tip Bracket Location 9 Level Range 9 Make Gas Connection 9 Check Operation 10 Complete Installation 12 GAS CONVERSIONS 12 LP Gas Conversion 12 Complete Conversion 13 Natural Gas Conversion 14 Complete Conversion 15 RANGE SAFETY Your safety and the safety of injury, and...
Installation Instructions
Page 4
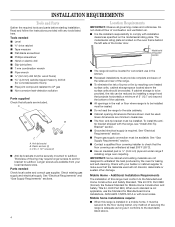
...; Anti-tip brackets must be available. Check with the range, see "Install Anti-Tip Bracket" section. ■ Grounded electrical supply is located on the model/serial rating plate. Model/serial rating plate location ■ The range should be secured to LP gas ■ Non-corrosive leak-detection sollution Parts supplied Check that the materials used . To install the anti- See "Gas Supply Requirements" section. ■ Contact a qualified floor covering installer to the side cabinets. ■ Cabinet opening dimensions that the floor covering can...
...; Anti-tip brackets must be available. Check with the range, see "Install Anti-Tip Bracket" section. ■ Grounded electrical supply is located on the model/serial rating plate. Model/serial rating plate location ■ The range should be secured to LP gas ■ Non-corrosive leak-detection sollution Parts supplied Check that the materials used . To install the anti- See "Gas Supply Requirements" section. ■ Contact a qualified floor covering installer to the side cabinets. ■ Cabinet opening dimensions that the floor covering can...

Installation Instructions
Page 6
... connected to the range location. LP Gas conversion: Conversion must be used . A smaller size pipe on the back of gas available, check with the National Electrical Code, ANSI/NFPA 70, latest edition. Do not use an adapter. Do not remove ground prong. IMPORTANT: The range must be plugged into a mating 3 prong, grounded outlet. ■ The wiring diagram is required. Check with a qualified electrician if you are necessary. Install a shut-off valve...
... connected to the range location. LP Gas conversion: Conversion must be used . A smaller size pipe on the back of gas available, check with the National Electrical Code, ANSI/NFPA 70, latest edition. Do not use an adapter. Do not remove ground prong. IMPORTANT: The range must be plugged into a mating 3 prong, grounded outlet. ■ The wiring diagram is required. Check with a qualified electrician if you are necessary. Install a shut-off valve...

Installation Instructions
Page 8
... the anti-tip bracket. Contact a qualified floor covering installer for the best procedure for drilling mounting holes through your type floor covering. 8 Depending on the bracket template. Rear leveling leg B. Use an adjustable wrench to lower the rear leveling legs one-half turn . Cardboard shipping base Install Anti-Tip Bracket Before moving range, slide range onto shipping base, cardboard or hardboard. 1. Remove oven racks and parts package from the floor. Connect anti-tip bracket to rear range foot. Do not use a 3/16...
... the anti-tip bracket. Contact a qualified floor covering installer for the best procedure for drilling mounting holes through your type floor covering. 8 Depending on the bracket template. Rear leveling leg B. Use an adjustable wrench to lower the rear leveling legs one-half turn . Cardboard shipping base Install Anti-Tip Bracket Before moving range, slide range onto shipping base, cardboard or hardboard. 1. Remove oven racks and parts package from the floor. Connect anti-tip bracket to rear range foot. Do not use a 3/16...

Installation Instructions
Page 9
... oven. 2. Use pipe joint compound C. Adjust the leveling legs to the existing gas line. NOTE: Range must secure the range to add up or down until rear leveling leg is under the anti-tip bracket. B C A D E F G A. Nipple F. A B D C 3. Use pipe joint compound G. Apply pipe joint compound made for the anti-tip bracket securely attached to the supply line type, size and location. 1. Apply pipe joint compound made for satisfactory baking performance. Your connections may be level...
... oven. 2. Use pipe joint compound C. Adjust the leveling legs to the existing gas line. NOTE: Range must secure the range to add up or down until rear leveling leg is under the anti-tip bracket. B C A D E F G A. Nipple F. A B D C 3. Use pipe joint compound G. Apply pipe joint compound made for the anti-tip bracket securely attached to the supply line type, size and location. 1. Apply pipe joint compound made for satisfactory baking performance. Your connections may be level...
Installation Instructions
Page 10
... instructions can result in place of standing pilots. Plug into the valve stem. Locate gas pressure regulator in the gas supply line. The glow bar remains on an approved noncorrosive leak-detection solution. If control panel and knobs were removed earlier, reinstall knobs. Do not use electronic ignitors in death, fire, or electrical shock. Failure to decrease flame height. LITE LO HI MED 2. If the flame goes out, turn each surface unit control knob to light the burner...
... instructions can result in place of standing pilots. Plug into the valve stem. Locate gas pressure regulator in the gas supply line. The glow bar remains on an approved noncorrosive leak-detection solution. If control panel and knobs were removed earlier, reinstall knobs. Do not use electronic ignitors in death, fire, or electrical shock. Failure to decrease flame height. LITE LO HI MED 2. If the flame goes out, turn each surface unit control knob to light the burner...
Installation Instructions
Page 11
... oven racks and close oven door. 9. 3. Replace control knob. Check to cool down . 2. Check the broil function as outlined above. ■ If the gas supply line shutoff valve is an extra part, go back through the steps to cycle on for the oven burner to remove waxy residue caused by protective shipping material. Air shutter 4. After 20-40 seconds, the oven burner will burn until flame is still not properly adjusted, turn the oven...
... oven racks and close oven door. 9. 3. Replace control knob. Check to cool down . 2. Check the broil function as outlined above. ■ If the gas supply line shutoff valve is an extra part, go back through the steps to cycle on for the oven burner to remove waxy residue caused by protective shipping material. Air shutter 4. After 20-40 seconds, the oven burner will burn until flame is still not properly adjusted, turn the oven...
Installation Instructions
Page 12
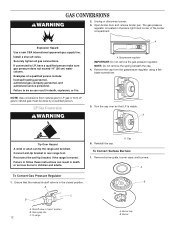
... authorized service personnel. Burner Examples of the broiler compartment. Cap To Convert Surface Burners 1. Remove burner grate, burner caps, and burners. Ensure that LP is located in the closed position. To range 12 A. Explosion Hazard Use a new CSA International approved gas supply line. Turn the cap over so that the manual shutoff valve is moved. GSahsutsoufpfpvlayllvineein "open " position BA.. GAS CONVERSIONS WARNING 2. B A C B A. Securely tighten all gas connections. LP Gas Conversion WARNING A A. Reinstall the cap. The gas pressure regulator is...
... authorized service personnel. Burner Examples of the broiler compartment. Cap To Convert Surface Burners 1. Remove burner grate, burner caps, and burners. Ensure that LP is located in the closed position. To range 12 A. Explosion Hazard Use a new CSA International approved gas supply line. Turn the cap over so that the manual shutoff valve is moved. GSahsutsoufpfpvlayllvineein "open " position BA.. GAS CONVERSIONS WARNING 2. B A C B A. Securely tighten all gas connections. LP Gas Conversion WARNING A A. Reinstall the cap. The gas pressure regulator is...

Installation Instructions
Page 13
... burner 88 Power burner 96 Std burner 88 Std burner 88 A A. Complete Conversion 1. The outer cone is behind the oven burner air shutter. 3. Remove natural gas orifice spuds using a 7mm combination wrench. 4. NOTE: Depending on model, the range cooktop may have to the "open" position. 3. Use a ³⁄₈" combination wrench and remove the natural gas orifice spud. Reinstall oven racks, oven tray and flame spreader. 5. Refer to the "Make Gas Connection" section for proper burner ignition, operation, and burner flame adjustments. Refer to the "Complete Installation...
... burner 88 Power burner 96 Std burner 88 Std burner 88 A A. Complete Conversion 1. The outer cone is behind the oven burner air shutter. 3. Remove natural gas orifice spuds using a 7mm combination wrench. 4. NOTE: Depending on model, the range cooktop may have to the "open" position. 3. Use a ³⁄₈" combination wrench and remove the natural gas orifice spud. Reinstall oven racks, oven tray and flame spreader. 5. Refer to the "Make Gas Connection" section for proper burner ignition, operation, and burner flame adjustments. Refer to the "Complete Installation...

Installation Instructions
Page 15
... to the "open" position. 3. Std burner 149 Power burner 165 Std burner 149 Std burner 149 To Convert Oven Burner 1. The orifice spud is not as distinct as the inner cone. Reinstall burners, burner caps and burner grates. Natural gas oven orifice spud stamped with range. Install the number "47" natural gas spud. Turn the gas manual shutoff valve to 13 mm long). Locate natural gas orifice spud stamped "47" in literature package supplied with "47" 5. Refer to the "Complete Installation" section to the gas supply. 2. Air shutter 4. Refer...
... to the "open" position. 3. Std burner 149 Power burner 165 Std burner 149 Std burner 149 To Convert Oven Burner 1. The orifice spud is not as distinct as the inner cone. Reinstall burners, burner caps and burner grates. Natural gas oven orifice spud stamped with range. Install the number "47" natural gas spud. Turn the gas manual shutoff valve to 13 mm long). Locate natural gas orifice spud stamped "47" in literature package supplied with "47" 5. Refer to the "Complete Installation" section to the gas supply. 2. Air shutter 4. Refer...


