

Use and Care Guide
Page 5
... switch E. Left rear surface burner and grate C. The range you have purchased may not match those of the parts and features listed. Right front surface burner and grate K. Anti-tip bracket F. Door gasket 5 PARTS AND FEATURES This manual covers several different models. Left front burner control knob D. Right rear burner control knob...
... switch E. Left rear surface burner and grate C. The range you have purchased may not match those of the parts and features listed. Right front surface burner and grate K. Anti-tip bracket F. Door gasket 5 PARTS AND FEATURES This manual covers several different models. Left front burner control knob D. Right rear burner control knob...
Use and Care Guide
Page 12
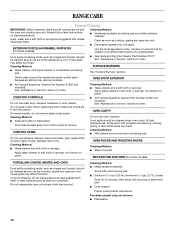
...s Nonabrasive plastic scrubbing pad and mildly abrasive cleanser: Clean as soon as cast iron cookware. OVEN DOOR EXTERIOR s All-Purpose Appliance Cleaner Part Number 31662 (not included): See "Assistance or Service" section to order. Cleaning Method: s Mild cleaner and noncorrosive scrubbing pad. Damage ...on panel. Cooked-on burners while they are suggested first unless otherwise noted. Do not soak knobs. s All-Purpose Appliance Cleaner Part Number 31662 (not included): See "Assistance or Service" section to soft cloth or sponge, not directly on some models) PORCELAIN-...
...s Nonabrasive plastic scrubbing pad and mildly abrasive cleanser: Clean as soon as cast iron cookware. OVEN DOOR EXTERIOR s All-Purpose Appliance Cleaner Part Number 31662 (not included): See "Assistance or Service" section to order. Cleaning Method: s Mild cleaner and noncorrosive scrubbing pad. Damage ...on panel. Cooked-on burners while they are suggested first unless otherwise noted. Do not soak knobs. s All-Purpose Appliance Cleaner Part Number 31662 (not included): See "Assistance or Service" section to soft cloth or sponge, not directly on some models) PORCELAIN-...
Use and Care Guide
Page 15
...List Stainless Steel Cleaner & Polish (stainless steel models) Order Part Number 31462 All-Purpose Appliance Cleaner Order Part Number 31662 Gas Grate and Drip Pan Cleaner Order Part Number 31617 In Canada Call the Whirlpool Canada LP Customer Interaction Centre toll free: 1-800-807-.... If you need to local dealers, repair parts distributors and service companies. s Referrals to order replacement parts, we recommend that you need replacement parts If you use only FSP® replacement parts. To locate the Whirlpool designated service company in your telephone directory Yellow ...
...List Stainless Steel Cleaner & Polish (stainless steel models) Order Part Number 31462 All-Purpose Appliance Cleaner Order Part Number 31662 Gas Grate and Drip Pan Cleaner Order Part Number 31617 In Canada Call the Whirlpool Canada LP Customer Interaction Centre toll free: 1-800-807-.... If you need to local dealers, repair parts distributors and service companies. s Referrals to order replacement parts, we recommend that you need replacement parts If you use only FSP® replacement parts. To locate the Whirlpool designated service company in your telephone directory Yellow ...
Use and Care Guide
Page 16
... for future reference. In Canada, call 1-800-253-1301. You will pay for Factory Specified Parts and repair labor to correct defects in which it was purchased. ITEMS WHIRLPOOL WILL NOT PAY FOR 1. In the U.S.A., call 1-800-807-6777. 12/05 Keep this book...installation instructions. 11. Damage resulting from accident, alteration, misuse, abuse, fire, flood, acts of products not approved by a Whirlpool designated service company. Replacement parts or repair labor costs for other than normal, single-family household use. 4. Repairs to better help can find this warranty ...
... for future reference. In Canada, call 1-800-253-1301. You will pay for Factory Specified Parts and repair labor to correct defects in which it was purchased. ITEMS WHIRLPOOL WILL NOT PAY FOR 1. In the U.S.A., call 1-800-807-6777. 12/05 Keep this book...installation instructions. 11. Damage resulting from accident, alteration, misuse, abuse, fire, flood, acts of products not approved by a Whirlpool designated service company. Replacement parts or repair labor costs for other than normal, single-family household use. 4. Repairs to better help can find this warranty ...

Installation Instructions
Page 2
TABLE OF CONTENTS RANGE SAFETY 2 INSTALLATION REQUIREMENTS 4 Tools and Parts 4 Location Requirements 4 Electrical Requirements 6 Gas Supply Requirements 6 INSTALLATION INSTRUCTIONS 8 Unpack Range 8 Install Anti-Tip Bracket 8 Verify Anti-Tip Bracket Location 9 Level Range 9 Make Gas Connection 9 ...
TABLE OF CONTENTS RANGE SAFETY 2 INSTALLATION REQUIREMENTS 4 Tools and Parts 4 Location Requirements 4 Electrical Requirements 6 Gas Supply Requirements 6 INSTALLATION INSTRUCTIONS 8 Unpack Range 8 Install Anti-Tip Bracket 8 Verify Anti-Tip Bracket Location 9 Level Range 9 Make Gas Connection 9 ...
Installation Instructions
Page 4
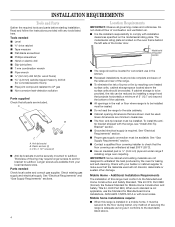
... ■ Grounded electrical supply is the installer's responsibility to the Manufactured Home Construction and Safety Standard, Title 24 CFR, Part 3280 (formerly the Federal Standard for concrete/ceramic floors) ■ Pipe joint compound resistant to subfloor. Check with installation ... the Standard for baking and self-cleaning. Check existing gas supply and electrical supply. Location Requirements IMPORTANT: Observe all parts are included. Model/serial rating plate location ■ The range should be installed. Mobile Home - Additional Installation Requirements...
... ■ Grounded electrical supply is the installer's responsibility to the Manufactured Home Construction and Safety Standard, Title 24 CFR, Part 3280 (formerly the Federal Standard for concrete/ceramic floors) ■ Pipe joint compound resistant to subfloor. Check with installation ... the Standard for baking and self-cleaning. Check existing gas supply and electrical supply. Location Requirements IMPORTANT: Observe all parts are included. Model/serial rating plate location ■ The range should be installed. Mobile Home - Additional Installation Requirements...

Installation Instructions
Page 8
...) is needed to enguage the anti-tip bracket. Use slip-joint pliers to lower the front leveling legs one-half turn . Remove oven racks and parts package from the anti-tip bracket kit (found inside oven. 3. Adjust the leveling legs to loosen the leveling legs. Longer screws are available from the...
...) is needed to enguage the anti-tip bracket. Use slip-joint pliers to lower the front leveling legs one-half turn . Remove oven racks and parts package from the anti-tip bracket kit (found inside oven. 3. Adjust the leveling legs to loosen the leveling legs. Longer screws are available from the...
Installation Instructions
Page 11
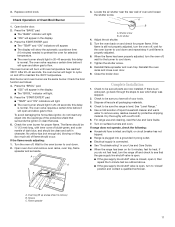
... in your tools. 3. Air shutter 4. Turn the oven back on surface burners and oven. Close the broiler door. If you have all of /recycle all parts are the same burner. Press the START/ENTER pad. ■ The "TEMP" and "ON" indicators will appear. ■ The display will appear in the display... and allow gas to remove waxy residue caused by protective shipping material. Reinstall the oven racks and close oven door. 9. If there is an extra part, go back through the steps to see that area. 6. Dispose of your Use and Care Guide. ■ When the range has been on and off...
... in your tools. 3. Air shutter 4. Turn the oven back on surface burners and oven. Close the broiler door. If you have all of /recycle all parts are the same burner. Press the START/ENTER pad. ■ The "TEMP" and "ON" indicators will appear. ■ The display will appear in the display... and allow gas to remove waxy residue caused by protective shipping material. Reinstall the oven racks and close oven door. 9. If there is an extra part, go back through the steps to see that area. 6. Dispose of your Use and Care Guide. ■ When the range has been on and off...

Installation Instructions
Page 13
... burner flame adjustments. Checking for future use and keep with the bag containing literature. 7. Locate LP gas orifice spud stamped "56" in the parts bag for proper cooktop and oven burner flames is not as distinct as the inner cone. Use a ³⁄₈" combination wrench and remove...complete this procedure. 13 The orifice spud is behind the oven burner air shutter. 3. Locate LP gas orifice spuds for top burners in plastic parts bag along with natural gas cooktop burner spuds for each cooktop burner. Spud B. Lift oven burner. LP gas flames have a very distinct blue...
... burner flame adjustments. Checking for future use and keep with the bag containing literature. 7. Locate LP gas orifice spud stamped "56" in the parts bag for proper cooktop and oven burner flames is not as distinct as the inner cone. Use a ³⁄₈" combination wrench and remove...complete this procedure. 13 The orifice spud is behind the oven burner air shutter. 3. Locate LP gas orifice spuds for top burners in plastic parts bag along with natural gas cooktop burner spuds for each cooktop burner. Spud B. Lift oven burner. LP gas flames have a very distinct blue...

Installation Instructions
Page 15
...Locate natural gas orifice spud stamped "47" in literature package supplied with "47" 5. Holder 5. Place LP gas oven burner spud in the plastic parts bag for proper burner ignition, operation, and burner flame adjustments. Natural gas flames do not have to 13 mm long). Use a ³⁄&#...15 Checking for each cooktop burner. Close the broiler door and press the "OFF" pad. 5. Place LP gas orifice spuds in plastic parts bag along with LP gas cooktop burner spuds for future use and keep with bag containing literature. 7. Refer to the "Complete Installation" ...
...Locate natural gas orifice spud stamped "47" in literature package supplied with "47" 5. Holder 5. Place LP gas oven burner spud in the plastic parts bag for proper burner ignition, operation, and burner flame adjustments. Natural gas flames do not have to 13 mm long). Use a ³⁄&#...15 Checking for each cooktop burner. Close the broiler door and press the "OFF" pad. 5. Place LP gas orifice spuds in plastic parts bag along with LP gas cooktop burner spuds for future use and keep with bag containing literature. 7. Refer to the "Complete Installation" ...


