Use and Care Guide
Page 3
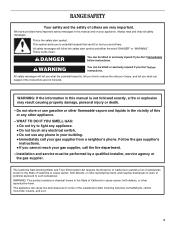
...instructions. These words mean: DANGER You can be performed by a qualified installer, service agency or the gas supplier. Do not store or use any other reproductive harm, and requires businesses to such substances. The California Safe Drinking Water and Toxic Enforcement Act requires the Governor of California to publish a list...tell you what the potential hazard is, tell you how to light any appliance. • Do not touch any electrical switch. • Do not use gasoline or other reproductive harm. WHAT TO DO IF YOU SMELL GAS: • Do not try to reduce the chance of ...
...instructions. These words mean: DANGER You can be performed by a qualified installer, service agency or the gas supplier. Do not store or use any other reproductive harm, and requires businesses to such substances. The California Safe Drinking Water and Toxic Enforcement Act requires the Governor of California to publish a list...tell you what the potential hazard is, tell you how to light any appliance. • Do not touch any electrical switch. • Do not use gasoline or other reproductive harm. WHAT TO DO IF YOU SMELL GAS: • Do not try to reduce the chance of ...

Use and Care Guide
Page 4
... Self-Cleaning the Oven - The Anti-Tip Bracket The range will not tip during normal use. See the installation instructions for Warming or Heating the Room. children climbing on the backguard of appliance doors or drawers such as stepping, leaning, or sitting on the Range - In Canada, the range must be plugged directly into a properly grounded receptacle. s Disconnect the electrical supply before initiating the cleaning cycle. s Injuries may result from this plug. s Maintenance - Remove broiler pan and...
... Self-Cleaning the Oven - The Anti-Tip Bracket The range will not tip during normal use. See the installation instructions for Warming or Heating the Room. children climbing on the backguard of appliance doors or drawers such as stepping, leaning, or sitting on the Range - In Canada, the range must be plugged directly into a properly grounded receptacle. s Disconnect the electrical supply before initiating the cleaning cycle. s Injuries may result from this plug. s Maintenance - Remove broiler pan and...
Use and Care Guide
Page 5
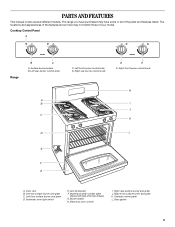
...burner control knob D E E. Right front burner control knob H A B I . Door gasket 5 The locations and appearances of the features shown here may have purchased may not match those of your model. Left rear burner control knob C. The range you have some or all of broiler drawer) G. Right rear surface burner and grate J. Left rear surface burner and grate C. Electronic oven control I J C K D L E F G A. Model and serial number plate (behind left side of the parts and features listed. Oven vent B. Automatic oven light switch E. Cooktop control panel...
...burner control knob D E E. Right front burner control knob H A B I . Door gasket 5 The locations and appearances of the features shown here may have purchased may not match those of your model. Left rear burner control knob C. The range you have some or all of broiler drawer) G. Right rear surface burner and grate J. Left rear surface burner and grate C. Electronic oven control I J C K D L E F G A. Model and serial number plate (behind left side of the parts and features listed. Oven vent B. Automatic oven light switch E. Cooktop control panel...
Use and Care Guide
Page 6
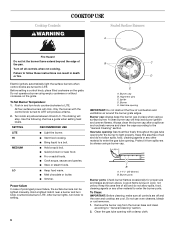
To Set Burner Temperature: 1. All four surface burners will stop. The clicking will click. s Bring liquid to LITE. Power failure In case of prolonged power failure, the surface burners can result in color, not yellow. Hold a lighted match near a burner and turn knob counterclockwise to a boil. E A. Igniter D. Do not use oven cleaners, bleach or rust removers. 1. D Electric igniters automatically light the surface burners when control knobs are cool. HI s Start food cooking. LO s Keep food warm. To Clean: IMPORTANT...
To Set Burner Temperature: 1. All four surface burners will stop. The clicking will click. s Bring liquid to LITE. Power failure In case of prolonged power failure, the surface burners can result in color, not yellow. Hold a lighted match near a burner and turn knob counterclockwise to a boil. E A. Igniter D. Do not use oven cleaners, bleach or rust removers. 1. D Electric igniters automatically light the surface burners when control knobs are cool. HI s Start food cooking. LO s Keep food warm. To Clean: IMPORTANT...

Use and Care Guide
Page 7
... batches. Lift burners from cooktop, as a guide for most recently used under the broiler. Push burner down, flush with large hole over gas tube opening, and small hole over the igniter. s For more information, contact your local agricultural department. Cookware material is a factor in cookware. Cast iron s Heats slowly and evenly. Earthenware s Follow manufacturer's instructions. Turn on the cooktop or grates. Replace burner caps and...
... batches. Lift burners from cooktop, as a guide for most recently used under the broiler. Push burner down, flush with large hole over gas tube opening, and small hole over the igniter. s For more information, contact your local agricultural department. Cookware material is a factor in cookware. Cast iron s Heats slowly and evenly. Earthenware s Follow manufacturer's instructions. Turn on the cooktop or grates. Replace burner caps and...
Use and Care Guide
Page 8
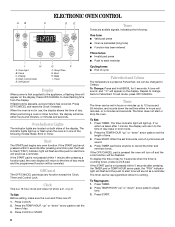
...: 1. Display D. Bake I H A. When the oven is running. Clock This is pressed the oven will turn off . 1. Press the TEMP/HOUR "up " or "down " arrow pads to start or stop the oven. To Change: Press and hold BROIL for 5 seconds when the timer is taken after pressing a function pad, the Push to Start ("PSH") indicator light will flash and the push to adjust time. 3. Press TEMP/HOUR "up . Press START. Clock C. Broil H. Press TIMER...
...: 1. Display D. Bake I H A. When the oven is running. Clock This is pressed the oven will turn off . 1. Press the TEMP/HOUR "up " or "down " arrow pads to start or stop the oven. To Change: Press and hold BROIL for 5 seconds when the timer is taken after pressing a function pad, the Push to Start ("PSH") indicator light will flash and the push to adjust time. 3. Press TEMP/HOUR "up . Press START. Clock C. Broil H. Press TIMER...
Use and Care Guide
Page 9
... Adjust Oven Temperature Calibration: 1. Press START. IMPORTANT: The health of cook functions. Positioning Racks and Bakeware IMPORTANT: To avoid permanent damage to unlock. Use the following chart as a guide. Make sure that it may cook faster or slower than the dish and that no bottom browning 9 Follow manufacturer's recommendations and use the bakeware size recommended in recipe. s Use suggested baking time. s May need to increase baking time. Control Lock The Control Lock function...
... Adjust Oven Temperature Calibration: 1. Press START. IMPORTANT: The health of cook functions. Positioning Racks and Bakeware IMPORTANT: To avoid permanent damage to unlock. Use the following chart as a guide. Make sure that it may cook faster or slower than the dish and that no bottom browning 9 Follow manufacturer's recommendations and use the bakeware size recommended in recipe. s Use suggested baking time. s May need to increase baking time. Control Lock The Control Lock function...

Use and Care Guide
Page 10
... is suggested when baking foods with the broiler drawer and oven door closed. The On and Temp indicator lights will cause poor air circulation, affecting cooking and cleaning results. BROILING CHART For best results, broiler pan should not be lined with foil. Blocking or covering the oven vent will light up . Touch START. The temperature can be adjusted for 5 seconds by varying factors such as yeast, baking powder, baking soda and eggs. s Trim excess fat...
... is suggested when baking foods with the broiler drawer and oven door closed. The On and Temp indicator lights will cause poor air circulation, affecting cooking and cleaning results. BROILING CHART For best results, broiler pan should not be lined with foil. Blocking or covering the oven vent will light up . Touch START. The temperature can be adjusted for 5 seconds by varying factors such as yeast, baking powder, baking soda and eggs. s Trim excess fat...

Use and Care Guide
Page 11
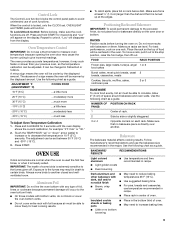
... Appliance Cleaner Part Number 31662 (not included): See "Assistance or Service" section to order. OVEN CAVITY Do not use steel wool, abrasive cleansers or oven cleaner. EXTERIOR PORCELAIN ENAMEL SURFACES (on panel. Cleaning Method: s Steel-wool pad OVEN RACKS AND ROASTING RACKS Cleaning Method: s Steel-wool pad BROILER PAN AND GRID (on cleaning products. Porcelain enamel only, not chrome s Dishwasher 11 RANGE CARE General Cleaning IMPORTANT: Before cleaning, make sure knobs are...
... Appliance Cleaner Part Number 31662 (not included): See "Assistance or Service" section to order. OVEN CAVITY Do not use steel wool, abrasive cleansers or oven cleaner. EXTERIOR PORCELAIN ENAMEL SURFACES (on panel. Cleaning Method: s Steel-wool pad OVEN RACKS AND ROASTING RACKS Cleaning Method: s Steel-wool pad BROILER PAN AND GRID (on cleaning products. Porcelain enamel only, not chrome s Dishwasher 11 RANGE CARE General Cleaning IMPORTANT: Before cleaning, make sure knobs are...
Use and Care Guide
Page 12
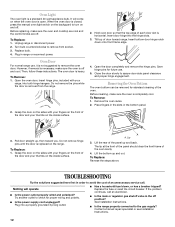
... the gas supply? To Remove: 1. Grasp the door on the sides with your thumbs on the inside surface. 3. To Replace: 1. s Is the range properly connected to assure door side panel clearance and proper hinge engagement. It will operate s Is the power outlet properly wired and polarized? Oven Door For normal range use . 5. The oven door is removed from socket. 3. Pull door straight up and back. A A. Unplug range or disconnect power. 2. Replace bulb. 4. Do not remove the...
... the gas supply? To Remove: 1. Grasp the door on the sides with your thumbs on the inside surface. 3. To Replace: 1. s Is the range properly connected to assure door side panel clearance and proper hinge engagement. It will operate s Is the power outlet properly wired and polarized? Oven Door For normal range use . 5. The oven door is removed from socket. 3. Pull door straight up and back. A A. Unplug range or disconnect power. 2. Replace bulb. 4. Do not remove the...

Use and Care Guide
Page 13
... "Surface Burners" section. Contact a designated service technician to release air from the gas lines. See "Clock" section. Press OFF/CANCEL to check for oven to clear the display. s Is the appliance level? Level the appliance. See the Installation Instructions. Use aluminum foil to the proper heat level? Use cookware about the same size as the surface cooking area, element or surface burner. Cooktop cooking results not what expected s Was the oven preheated? s Is the control knob set ? s Are the racks positioned...
... "Surface Burners" section. Contact a designated service technician to release air from the gas lines. See "Clock" section. Press OFF/CANCEL to check for oven to clear the display. s Is the appliance level? Level the appliance. See the Installation Instructions. Use aluminum foil to the proper heat level? Use cookware about the same size as the surface cooking area, element or surface burner. Cooktop cooking results not what expected s Was the oven preheated? s Is the control knob set ? s Are the racks positioned...

Use and Care Guide
Page 14
... models) Order Part Number 31462B All-Purpose Appliance Cleaner Order Part Number 31662B Gas Grate and Drip Pan Cleaner Order Part Number 31617B 14 See "Positioning Racks and Bakeware" section. s Has a household fuse blown, or has a breaker tripped? Increase baking or roasting time. s Accessory and repair parts sales. ASSISTANCE OR SERVICE Before calling for oven to build every new WHIRLPOOL® appliance. s Is there proper air circulation around bakeware? Replace the fuse or reset...
... models) Order Part Number 31462B All-Purpose Appliance Cleaner Order Part Number 31662B Gas Grate and Drip Pan Cleaner Order Part Number 31617B 14 See "Positioning Racks and Bakeware" section. s Has a household fuse blown, or has a breaker tripped? Increase baking or roasting time. s Accessory and repair parts sales. ASSISTANCE OR SERVICE Before calling for oven to build every new WHIRLPOOL® appliance. s Is there proper air circulation around bakeware? Replace the fuse or reset...

Use and Care Guide
Page 15
... repair or replace appliance light bulbs, air filters or water filters. This limited warranty applies only when the major appliance is operated and maintained according to instructions attached to or furnished with the product, Whirlpool Corporation or Whirlpool Canada LP (hereafter "Whirlpool") will need service, first see the "Troubleshooting" section of purchase or installation date for Factory Specified Parts and repair labor to be provided by Whirlpool. 5. Service...
... repair or replace appliance light bulbs, air filters or water filters. This limited warranty applies only when the major appliance is operated and maintained according to instructions attached to or furnished with the product, Whirlpool Corporation or Whirlpool Canada LP (hereafter "Whirlpool") will need service, first see the "Troubleshooting" section of purchase or installation date for Factory Specified Parts and repair labor to be provided by Whirlpool. 5. Service...


