
Installation Instructions
Page 2
... are not followed. TABLE OF CONTENTS SKT60* TRIM KIT SAFETY 2 INSTALLATION REQUIREMENTS 3 Plan the Installation 3 Opening Requirements 3 Tools Needed 3 Parts Supplied 3 Electrical Requirements 4 ASSEMBLY INSTRUCTIONS 4 Assemble the Top Grille 4 Attach the Side Trim Extrusions 4 INSTALLATION INSTRUCTIONS 5 Install the Top Grille and Trim Assembly 5 Place and Align Refrigerator and Freezer 5 Move Refrigerator and Freezer to Final Location 6 Install the Base Grille 7 Care and Cleaning 7 ÍNDICE SEGURIDAD DEL JUEGO DE MARCOS SKT60 8 REQUISITOS DE INSTALACIÓ...
... are not followed. TABLE OF CONTENTS SKT60* TRIM KIT SAFETY 2 INSTALLATION REQUIREMENTS 3 Plan the Installation 3 Opening Requirements 3 Tools Needed 3 Parts Supplied 3 Electrical Requirements 4 ASSEMBLY INSTRUCTIONS 4 Assemble the Top Grille 4 Attach the Side Trim Extrusions 4 INSTALLATION INSTRUCTIONS 5 Install the Top Grille and Trim Assembly 5 Place and Align Refrigerator and Freezer 5 Move Refrigerator and Freezer to Final Location 6 Install the Base Grille 7 Care and Cleaning 7 ÍNDICE SEGURIDAD DEL JUEGO DE MARCOS SKT60 8 REQUISITOS DE INSTALACIÓ...
Installation Instructions
Page 3
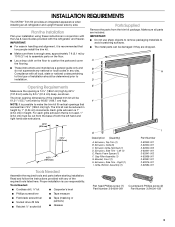
...: ■ For ease in height. Left (1) E. Extrusion, Side Trim - Plastic Foam Spacer (1) F. For each grille extrusion that is possible to make the trim kit fit vertical openings that two people install the trim kit. ■ Make sure there is your installation using these instructions in any way. Grille, Bottom Assembly (1) I . Compliance with the refrigerator and freezer. Gap Filler Assembly (1) G. Parts Supplied Remove the parts from the base of the...
...: ■ For ease in height. Left (1) E. Extrusion, Side Trim - Plastic Foam Spacer (1) F. For each grille extrusion that is possible to make the trim kit fit vertical openings that two people install the trim kit. ■ Make sure there is your installation using these instructions in any way. Grille, Bottom Assembly (1) I . Compliance with the refrigerator and freezer. Gap Filler Assembly (1) G. Parts Supplied Remove the parts from the base of the...

Installation Instructions
Page 4
... 20-amp fused, grounded electrical supply is flush with the sides of the grille assembly as shown. ³⁄₈" (9.5 mm) 4 NOTE: Before performing any type of installation, cleaning, or removing a light bulb, turn the Temperature Control to those already assembled by sliding one into the other through the predrilled hole and into their final location, it onto the grille extrusion at the top. Use an...
... 20-amp fused, grounded electrical supply is flush with the sides of the grille assembly as shown. ³⁄₈" (9.5 mm) 4 NOTE: Before performing any type of installation, cleaning, or removing a light bulb, turn the Temperature Control to those already assembled by sliding one into the other through the predrilled hole and into their final location, it onto the grille extrusion at the top. Use an...

Installation Instructions
Page 5
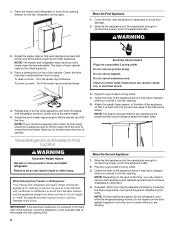
... cleaning or service, be sure to cover the floor with the front surface of tape to do so can be damaged if the assembly is tight and flush with cardboard or hardboard to move and install refrigerator. Prepare the Opening 1. Using two pan ...Using four pan head Phillips screws (two on each side of the opening or cabinetry. Use several pieces of the wall opening . Place cardboard or hardboard over the floor at each side), fasten both the left-hand and right-hand side trim extrusions to the floor. 6. Make sure the trim does not twist. 5. Using a carpenters level, make...
... cleaning or service, be sure to cover the floor with the front surface of tape to do so can be damaged if the assembly is tight and flush with cardboard or hardboard to move and install refrigerator. Prepare the Opening 1. Using two pan ...Using four pan head Phillips screws (two on each side of the opening or cabinetry. Use several pieces of the wall opening . Place cardboard or hardboard over the floor at each side), fasten both the left-hand and right-hand side trim extrusions to the floor. 6. Make sure the trim does not twist. 5. Using a carpenters level, make...
Installation Instructions
Page 6
.... Electrical Shock Hazard Plug into a grounded 3 prong outlet. 3. Repeat Step 3 for the refrigerator door while the hinges are positioned the correct distance apart from each appliance and readjust several times to do so can result in the back wall of the opening, move and install refrigerator. Plug into the opening (freezer on the left, refrigerator on two fixed supports. 3. Check the level of each have changed when...
.... Electrical Shock Hazard Plug into a grounded 3 prong outlet. 3. Repeat Step 3 for the refrigerator door while the hinges are positioned the correct distance apart from each appliance and readjust several times to do so can result in the back wall of the opening, move and install refrigerator. Plug into the opening (freezer on the left, refrigerator on two fixed supports. 3. Check the level of each have changed when...

Installation Instructions
Page 7
... level. Remove the two hex head screws located on the opposite side from each appliance. 2. Install the Bottom Grille Assembly 1. Align the four clips on the bottom grille assembly with the holes in the gap between the refrigerator and freezer to fasten the bracket. 3. Insert one screw through the lower bracket and thread it into the opening. 2. Do not use...
... level. Remove the two hex head screws located on the opposite side from each appliance. 2. Install the Bottom Grille Assembly 1. Align the four clips on the bottom grille assembly with the holes in the gap between the refrigerator and freezer to fasten the bracket. 3. Insert one screw through the lower bracket and thread it into the opening. 2. Do not use...


