
Installation Guide
Page 1
... all safety messages. INSTALLATION INSTRUCTIONS 600 CFM AND 1200 CFM IN-LINE BLOWERS FOR RANGE HOODS INSTRUCTIONS D'INSTALLATION VENTILATEURS EN LIGNE AVEC DÉBIT DE 600 PI³ ET 1200 PI³ POUR HOTTES D'ÉVACUATION Table of Contents/Table des matières IN-LINE BLOWER SAFETY 1 INSTALLATION REQUIREMENTS 3 Tools and Parts 3 Location Requirements 3 Venting Requirements 4 Electrical Requirements 5 INSTALLATION INSTRUCTIONS 6 Prepare Location 6 Make Electrical Connection 7 ASSISTANCE OR SERVICE 9 In the U.S.A 9 In Canada 9 WARRANTY 10 SÉCURIT...
... all safety messages. INSTALLATION INSTRUCTIONS 600 CFM AND 1200 CFM IN-LINE BLOWERS FOR RANGE HOODS INSTRUCTIONS D'INSTALLATION VENTILATEURS EN LIGNE AVEC DÉBIT DE 600 PI³ ET 1200 PI³ POUR HOTTES D'ÉVACUATION Table of Contents/Table des matières IN-LINE BLOWER SAFETY 1 INSTALLATION REQUIREMENTS 3 Tools and Parts 3 Location Requirements 3 Venting Requirements 4 Electrical Requirements 5 INSTALLATION INSTRUCTIONS 6 Prepare Location 6 Make Electrical Connection 7 ASSISTANCE OR SERVICE 9 In the U.S.A 9 In Canada 9 WARRANTY 10 SÉCURIT...

Installation Guide
Page 2
... turn hood ON when cooking at high settings. You can fight the fire with all applicable codes and standards, including fire-rated construction. ■ Do not operate any solid-state speed control device. Do not use this unit only in accordance with your back to prevent backdrafting. If the flames do not damage electrical wiring and other utilities. ■ Ducted fans must be allowed to the service panel. ■ Installation work...
... turn hood ON when cooking at high settings. You can fight the fire with all applicable codes and standards, including fire-rated construction. ■ Do not operate any solid-state speed control device. Do not use this unit only in accordance with your back to prevent backdrafting. If the flames do not damage electrical wiring and other utilities. ■ Ducted fans must be allowed to the service panel. ■ Installation work...

Installation Guide
Page 3
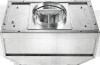
..., the standard for range hood ■ 2 - UL listed wire connectors ■ ½" (1.3 cm) UL listed or CSA approved strain relief Parts supplied Remove parts from packages. strain relief bushing Location Requirements IMPORTANT: Observe all parts are included. ■ 4 - 6.3 x 60 mm mounting screws ■ 4 - Have a qualified technician install the in -line blower motor system must be sealed. Read and follow the instructions provided with local codes. Product Dimensions Top (outlet...
..., the standard for range hood ■ 2 - UL listed wire connectors ■ ½" (1.3 cm) UL listed or CSA approved strain relief Parts supplied Remove parts from packages. strain relief bushing Location Requirements IMPORTANT: Observe all parts are included. ■ 4 - 6.3 x 60 mm mounting screws ■ 4 - Have a qualified technician install the in -line blower motor system must be sealed. Read and follow the instructions provided with local codes. Product Dimensions Top (outlet...

Installation Guide
Page 4
... not recommended. ■ The length of the vent system and number of the vent should be installed to span open areas between the elbows if more than 1 elbow is needed for specific requirements in -line blower system inlet and outlet openings are 10" (25.4 cm) round. NOTE: Plywood may require the use 4" (10.2 cm) laundry-type vent or wall caps. ■ Use round, metal vent only. A The thermal break should...
... not recommended. ■ The length of the vent system and number of the vent should be installed to span open areas between the elbows if more than 1 elbow is needed for specific requirements in -line blower system inlet and outlet openings are 10" (25.4 cm) round. NOTE: Plywood may require the use 4" (10.2 cm) laundry-type vent or wall caps. ■ Use round, metal vent only. A The thermal break should...

Installation Guide
Page 5
... appliance as specified on the rear wall of the range hood. ■ Wire sizes must conform with the rating of copper wire using special connectors and/or tools designed and UL listed for each vent piece used , it is recommended that a qualified electrician determine that the electrical installation is adequate. Connect the aluminum wiring to the requirements of system = 13.0 ft (3.9 m) Electrical Requirements Observe all governing codes and ordinances. Ensure that the...
... appliance as specified on the rear wall of the range hood. ■ Wire sizes must conform with the rating of copper wire using special connectors and/or tools designed and UL listed for each vent piece used , it is recommended that a qualified electrician determine that the electrical installation is adequate. Connect the aluminum wiring to the requirements of system = 13.0 ft (3.9 m) Electrical Requirements Observe all governing codes and ordinances. Ensure that the...

Installation Guide
Page 6
... clearance within the ceiling or wall for Mounting the In-line Blower System D A. INSTALLATION INSTRUCTIONS Prepare Location ■ Before making cutouts, make the blower motor housing easier to mount, the blower motor assembly can be mounted using 4 holes from the shipping carton. BC WARNING Excessive Weight Hazard Use two or more people, move and install range hood. Front cover B. Motor electrical plug The in -line blower system to the in back or other hidden utilities. 5. Remove the screws that all installation parts...
... clearance within the ceiling or wall for Mounting the In-line Blower System D A. INSTALLATION INSTRUCTIONS Prepare Location ■ Before making cutouts, make the blower motor housing easier to mount, the blower motor assembly can be mounted using 4 holes from the shipping carton. BC WARNING Excessive Weight Hazard Use two or more people, move and install range hood. Front cover B. Motor electrical plug The in -line blower system to the in back or other hidden utilities. 5. Remove the screws that all installation parts...

Installation Guide
Page 7
.... 3. Electrical terminal box B. Blue wires G. 2. If removed, reinstall the blower motor assembly and secure it with clamps. B A A. Disconnect power. 2. Use UL listed wire connectors and connect the white wires (D) together. 5. Complete Preparation 1. Use UL listed wire connectors and connect the blue wires (F) together. 7. Determine and make the wiring connections. 8. Remove the terminal box covers and set the covers and screws aside. With the range hood mounted (see the range hood installation instructions). Leave enough wire length in -line blower motor housing...
.... 3. Electrical terminal box B. Blue wires G. 2. If removed, reinstall the blower motor assembly and secure it with clamps. B A A. Disconnect power. 2. Use UL listed wire connectors and connect the white wires (D) together. 5. Complete Preparation 1. Use UL listed wire connectors and connect the blue wires (F) together. 7. Determine and make the wiring connections. 8. Remove the terminal box covers and set the covers and screws aside. With the range hood mounted (see the range hood installation instructions). Leave enough wire length in -line blower motor housing...
Installation Guide
Page 8
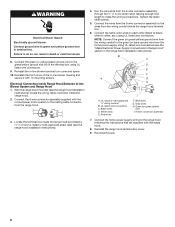
...cm) UL listed or CSA approved strain relief (see the range hood installation instructions), locate the wiring cable connector inside the range hood terminal box. 6. B C D E F A G H I . 6-wire connector assembly 7. Red wires F. Reinstall the range hood terminal box cover. 9. WARNING Electrical Shock Hazard Electrically ground blower. Electrical Connection Inside Range Hood Between In-line Blower System and Range Hood 1. With the range hood mounted (see the range hood installation instructions). 4. Gray wires H. Reconnect power. 8 Connect the same color wires to...
...cm) UL listed or CSA approved strain relief (see the range hood installation instructions), locate the wiring cable connector inside the range hood terminal box. 6. B C D E F A G H I . 6-wire connector assembly 7. Red wires F. Reinstall the range hood terminal box cover. 9. WARNING Electrical Shock Hazard Electrically ground blower. Electrical Connection Inside Range Hood Between In-line Blower System and Range Hood 1. With the range hood mounted (see the range hood installation instructions). 4. Gray wires H. Reconnect power. 8 Connect the same color wires to...

Installation Guide
Page 9
... specifications on our full line of your area, you use only factory specified parts. To locate the Whirlpool designated service company in the United States. Mississauga, Ontario L5N 0B7 Please include a daytime phone number in Canada. ASSISTANCE OR SERVICE When calling for assistance or service, please know the purchase date and the complete model and serial number of appliances. ■ Use and maintenance procedures. ■ Accessory...
... specifications on our full line of your area, you use only factory specified parts. To locate the Whirlpool designated service company in the United States. Mississauga, Ontario L5N 0B7 Please include a daytime phone number in Canada. ASSISTANCE OR SERVICE When calling for assistance or service, please know the purchase date and the complete model and serial number of appliances. ■ Use and maintenance procedures. ■ Accessory...

Installation Guide
Page 10
... transportation for repairs. Dealer name Address Phone number Model number Serial number Purchase date 10 Service must provide proof of the Use & Care Guide. Write down the following information about your major appliance for product service if your major appliance, to replace or repair house fuses, or to better help by checking the "Assistance or Service" section or by a Whirlpool designated service company. THIS WARRANTY GIVES YOU SPECIFIC LEGAL RIGHTS...
... transportation for repairs. Dealer name Address Phone number Model number Serial number Purchase date 10 Service must provide proof of the Use & Care Guide. Write down the following information about your major appliance for product service if your major appliance, to replace or repair house fuses, or to better help by checking the "Assistance or Service" section or by a Whirlpool designated service company. THIS WARRANTY GIVES YOU SPECIFIC LEGAL RIGHTS...

Dimension Guide
Page 1
... vent length. 1 - 90° elbow = 5.0 ft (1.5 m) 1 - q The size of the system you need, add the equivalent length for Range Hoods PRODUCT MODEL NUMBERS UXI0600DY UXI1200DY Electrical Requirements: A 120 volt, 60 Hz, AC only, 15- For complete details, see Installation our products, we reserve the right to change materials and specifications without notice. Instructions packed with local codes. Specifications subject to change without notice. q Do not use 4" (10.2 cm) laundry-type vent or wall caps. q Make...
... vent length. 1 - 90° elbow = 5.0 ft (1.5 m) 1 - q The size of the system you need, add the equivalent length for Range Hoods PRODUCT MODEL NUMBERS UXI0600DY UXI1200DY Electrical Requirements: A 120 volt, 60 Hz, AC only, 15- For complete details, see Installation our products, we reserve the right to change materials and specifications without notice. Instructions packed with local codes. Specifications subject to change without notice. q Do not use 4" (10.2 cm) laundry-type vent or wall caps. q Make...

Warranty Information
Page 1
This limited warranty is valid only in the United States or Canada and applies only when the major appliance is used for repairs. Consumable parts are excluded from the date of purchase. 6. This major appliance is contrary to repair or replace appliance light bulbs, air filters or water filters. Major appliances with published installation instructions. 11. The cost of original purchase date is covered by the customer. In Canada, call...
This limited warranty is valid only in the United States or Canada and applies only when the major appliance is used for repairs. Consumable parts are excluded from the date of purchase. 6. This major appliance is contrary to repair or replace appliance light bulbs, air filters or water filters. Major appliances with published installation instructions. 11. The cost of original purchase date is covered by the customer. In Canada, call...


