
Use & Care Guide
Page 1
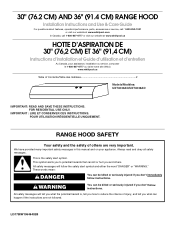
....4 CM) RANGE HOOD Installation Instructions and Use & Care Guide For questions about features, operation/performance, parts, accessories or service, call: 1-800-253-1301 or visit our website at www.whirlpool.com In Canada, call 1-800-807-6777 or visit our website at www.whirlpool.ca HOTTE D'ASPIRATION DE 30" (76,2 CM) ET 36" (91,4 CM) Instructions d'installation et Guide d'utilisation et d'entretien Au Canada, pour assistance, installation ou service, composer le...
....4 CM) RANGE HOOD Installation Instructions and Use & Care Guide For questions about features, operation/performance, parts, accessories or service, call: 1-800-253-1301 or visit our website at www.whirlpool.com In Canada, call 1-800-807-6777 or visit our website at www.whirlpool.ca HOTTE D'ASPIRATION DE 30" (76,2 CM) ET 36" (91,4 CM) Instructions d'installation et Guide d'utilisation et d'entretien Au Canada, pour assistance, installation ou service, composer le...
Use & Care Guide
Page 2
... service panel. ■ Installation work and electrical wiring must always be allowed to prevent backdrafting. You can fight the fire with a close fitting lid, cookie sheet, or metal tray, then turn hood ON when cooking at high settings. Discard fan or return to an authorized service facility for proper combustion and exhausting of gases through the flue (chimney) of fire and to properly exhaust air, be burned. ■ DO NOT USE...
... service panel. ■ Installation work and electrical wiring must always be allowed to prevent backdrafting. You can fight the fire with a close fitting lid, cookie sheet, or metal tray, then turn hood ON when cooking at high settings. Discard fan or return to an authorized service facility for proper combustion and exhausting of gases through the flue (chimney) of fire and to properly exhaust air, be burned. ■ DO NOT USE...

Use & Care Guide
Page 3
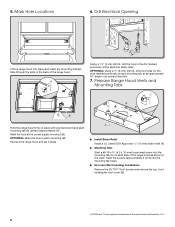
... screws Drywall anchors Mounting brackets Parts needed Pencil Wire stripper #2 Phillips screwdriver Drill with any cutouts. ■ This range hood is required. Read and follow the instructions provided with ¹⁄₈" (3 mm 13 mm), and 1¹⁄₄" (3 cm) bits Flat-blade screwdriver Parts supplied Remove parts from strong draft areas, such as non-vented (recirculating) require charcoal filters. Given dimensions provide minimum clearance. INSTALLATION REQUIREMENTS Tools and Parts Gather the required tools and parts before making...
... screws Drywall anchors Mounting brackets Parts needed Pencil Wire stripper #2 Phillips screwdriver Drill with any cutouts. ■ This range hood is required. Read and follow the instructions provided with ¹⁄₈" (3 mm 13 mm), and 1¹⁄₄" (3 cm) bits Flat-blade screwdriver Parts supplied Remove parts from strong draft areas, such as non-vented (recirculating) require charcoal filters. Given dimensions provide minimum clearance. INSTALLATION REQUIREMENTS Tools and Parts Gather the required tools and parts before making...

Use & Care Guide
Page 4
.... 1-94, Canadian Electrical Code, Part 1 and C22.2 No. 0-M91 (latest edition) and all local codes and ordinances. Venting Requirements These range hoods are factory set for joining copper to the added section of copper wire using special connectors and/or tools designed and UL listed for non-vented (recirculating) installations and come with the rating of the range hood. ■ Wire sizes must conform with a charcoal filter. Connect the aluminum wiring to aluminum. The model/serial plate is adequate.
.... 1-94, Canadian Electrical Code, Part 1 and C22.2 No. 0-M91 (latest edition) and all local codes and ordinances. Venting Requirements These range hoods are factory set for joining copper to the added section of copper wire using special connectors and/or tools designed and UL listed for non-vented (recirculating) installations and come with the rating of the range hood. ■ Wire sizes must conform with a charcoal filter. Connect the aluminum wiring to aluminum. The model/serial plate is adequate.

Use & Care Guide
Page 5
... screws, install the mounting brackets using the upper holes. Disconnect power 3. Replace all parts and panels before servicing. IMPORTANT: The brackets should touch the upper cabinet. NOTE: For installations to do so can result in death or electrical shock. 2. With a pencil, mark the upper holes on the brackets. ■ Set the range hood on its back on a covered surface. ■ Using a #2 Phillips screwdriver, remove the electrical box cover. ■ Using a flat-blade screwdriver, remove the appropriate power...
... screws, install the mounting brackets using the upper holes. Disconnect power 3. Replace all parts and panels before servicing. IMPORTANT: The brackets should touch the upper cabinet. NOTE: For installations to do so can result in death or electrical shock. 2. With a pencil, mark the upper holes on the brackets. ■ Set the range hood on its back on a covered surface. ■ Using a #2 Phillips screwdriver, remove the electrical box cover. ■ Using a flat-blade screwdriver, remove the appropriate power...
Use & Care Guide
Page 6
... previously at the power supply knockout (B). Remove the range hood and set it aside. A ■ Install Strain Relief Install a UL Listed/CSA Approved ¹⁄₂" (13 mm) strain relief (A). ■ Mounting Tabs Start a #8-18 x 4.2 x 16 mm) truss-head screw into the mounting tab holes. ■ Non-vent (Recirculating) Installations Remove the (2) T10®† Torx® screws and remove the top, front rectangular vent cover (B). †®TORX...
... previously at the power supply knockout (B). Remove the range hood and set it aside. A ■ Install Strain Relief Install a UL Listed/CSA Approved ¹⁄₂" (13 mm) strain relief (A). ■ Mounting Tabs Start a #8-18 x 4.2 x 16 mm) truss-head screw into the mounting tab holes. ■ Non-vent (Recirculating) Installations Remove the (2) T10®† Torx® screws and remove the top, front rectangular vent cover (B). †®TORX...

Use & Care Guide
Page 7
... the Installation ■ Install a 120V, 75W maximum, incandescent light bulb with the power cord kit. See "Replacing the Incandescent Light Bulb" in the range hood electrical terminal box. ■ Tighten the strain relief screws. Connect ground wire to the cabinet side walls. Reconnect power. See "Charcoal Grease Filter" in terminal box. Disconnect the power and check the wiring connections. NOTE: To get the most efficient use with range hood cord connection kits that are started into place, positioning the rear slots over the mounting brackets. ■ Using...
... the Installation ■ Install a 120V, 75W maximum, incandescent light bulb with the power cord kit. See "Replacing the Incandescent Light Bulb" in the range hood electrical terminal box. ■ Tighten the strain relief screws. Connect ground wire to the cabinet side walls. Reconnect power. See "Charcoal Grease Filter" in terminal box. Disconnect the power and check the wiring connections. NOTE: To get the most efficient use with range hood cord connection kits that are started into place, positioning the rear slots over the mounting brackets. ■ Using...
Use & Care Guide
Page 8
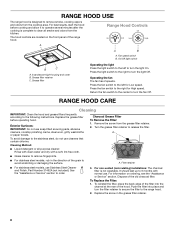
... Service" section. Grease filter Operating the light Press the light switch to clear all -purpose cleaner: Rinse with clean water and dry with normal use soap-filled scouring pads, abrasive cleaners, cooktop polishing creme, steel wool, gritty washcloths or paper towels. Operating the fan The fan has 2 speeds. Turn the grease filter retainer to turn the fan Off. For non-vented (recirculating) installations: The charcoal filter is complete to the left for High speed. To Replace the Filter: 1. Incandescent light...
... Service" section. Grease filter Operating the light Press the light switch to clear all -purpose cleaner: Rinse with clean water and dry with normal use soap-filled scouring pads, abrasive cleaners, cooktop polishing creme, steel wool, gritty washcloths or paper towels. Operating the fan The fan has 2 speeds. Turn the grease filter retainer to turn the fan Off. For non-vented (recirculating) installations: The charcoal filter is complete to the left for High speed. To Replace the Filter: 1. Incandescent light...
Use & Care Guide
Page 9
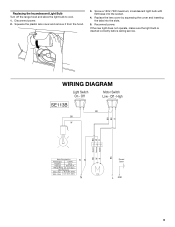
... Light Bulb Turn off the range hood and allow the light bulb to cool. 1. Squeeze the plastic lens cover and remove it from the hood. 3. If the new light does not operate, make sure the light bulb is inserted correctly before calling service. WIRING DIAGRAM Light Switch On - Replace the lens cover by squeezing the cover and inserting the tabs into the socket. 4. Reconnect power. Off - High SE113B BK BK W R BK BR R W BR Speed 1 Common Speed 2 BK R W BK Motor Characteristics Power...
... Light Bulb Turn off the range hood and allow the light bulb to cool. 1. Squeeze the plastic lens cover and remove it from the hood. 3. If the new light does not operate, make sure the light bulb is inserted correctly before calling service. WIRING DIAGRAM Light Switch On - Replace the lens cover by squeezing the cover and inserting the tabs into the socket. 4. Reconnect power. Off - High SE113B BK BK W R BK BR R W BR Speed 1 Common Speed 2 BK R W BK Motor Characteristics Power...

Use & Care Guide
Page 10
...; Installation information. ■ Use and maintenance procedures. ■ Accessory and repair parts sales. ■ Specialized customer assistance (Spanish speaking, hearing impaired, limited vision, etc.). ■ Referrals to local dealers, repair parts distributors and service companies. Mississauga, Ontario L5N 0B7 Please include a daytime phone number in your nearest designated service center. WHIRLPOOL CORPORATION MAJOR APPLIANCE WARRANTY ONE YEAR LIMITED WARRANTY For one -year limited warranty of the original unit. If replaced, the...
...; Installation information. ■ Use and maintenance procedures. ■ Accessory and repair parts sales. ■ Specialized customer assistance (Spanish speaking, hearing impaired, limited vision, etc.). ■ Referrals to local dealers, repair parts distributors and service companies. Mississauga, Ontario L5N 0B7 Please include a daytime phone number in your nearest designated service center. WHIRLPOOL CORPORATION MAJOR APPLIANCE WARRANTY ONE YEAR LIMITED WARRANTY For one -year limited warranty of the original unit. If replaced, the...

Use & Care Guide
Page 11
..., decorative panels, flooring, cabinetry, islands, countertops, drywall or other rights that vary from state to state or province to determine if another warranty applies. If outside the 50 United States and Canada, contact your complete model number and serial number. Removal or replacement of merchantability or fitness, so this major appliance, you should ask Whirlpool or your retailer about buying an extended warranty. This warranty gives you specific...
..., decorative panels, flooring, cabinetry, islands, countertops, drywall or other rights that vary from state to state or province to determine if another warranty applies. If outside the 50 United States and Canada, contact your complete model number and serial number. Removal or replacement of merchantability or fitness, so this major appliance, you should ask Whirlpool or your retailer about buying an extended warranty. This warranty gives you specific...
Warranty Information
Page 1
... repair or replace appliance light bulbs, air filters or water filters. WHIRLPOOL CORPORATION MAJOR APPLIANCE WARRANTY ONE YEAR LIMITED WARRANTY For one -year limited warranty of your appliance. Proof of your major appliance, to instruct you can write to build every new appliance. Factory specified parts will pay for assistance or service, please know the purchase date and the complete model and serial number of original purchase date is installed, operated...
... repair or replace appliance light bulbs, air filters or water filters. WHIRLPOOL CORPORATION MAJOR APPLIANCE WARRANTY ONE YEAR LIMITED WARRANTY For one -year limited warranty of your appliance. Proof of your major appliance, to instruct you can write to build every new appliance. Factory specified parts will pay for assistance or service, please know the purchase date and the complete model and serial number of original purchase date is installed, operated...

Warranty Information
Page 2
... your complete model number and serial number. Repairs to parts or systems resulting from your home of the Use & Care Guide. Some states and provinces do not allow limitations on the product. If outside the 50 United States and Canada, contact your major appliance for service or repair of this major appliance other built-in a remote area where service by this warranty. If you also may have been removed, altered...
... your complete model number and serial number. Repairs to parts or systems resulting from your home of the Use & Care Guide. Some states and provinces do not allow limitations on the product. If outside the 50 United States and Canada, contact your major appliance for service or repair of this major appliance other built-in a remote area where service by this warranty. If you also may have been removed, altered...


