Use & Care Guide
Page 1
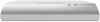
...to reduce the chance of Contents/Table des matières 2 Models/Modéles: UXT4030AD/UXT4036AD IMPORTANT: READ AND SAVE THESE INSTRUCTIONS. All safety messages will follow instructions. POUR UTILISATION...installation ou service, composer le 1-800-807-6777 ou visiter notre site Web à www.whirlpool.ca Table of injury, and tell you what can be killed or seriously injured if you...your appliance. WARNING You can happen if the instructions are very important. LI317B/W10646402B RANGE HOOD SAFETY Your safety and the safety of others . FOR RESIDENTIAL USE ONLY. This is...
...to reduce the chance of Contents/Table des matières 2 Models/Modéles: UXT4030AD/UXT4036AD IMPORTANT: READ AND SAVE THESE INSTRUCTIONS. All safety messages will follow instructions. POUR UTILISATION...installation ou service, composer le 1-800-807-6777 ou visiter notre site Web à www.whirlpool.ca Table of injury, and tell you what can be killed or seriously injured if you...your appliance. WARNING You can happen if the instructions are very important. LI317B/W10646402B RANGE HOOD SAFETY Your safety and the safety of others . FOR RESIDENTIAL USE ONLY. This is...
Use & Care Guide
Page 2
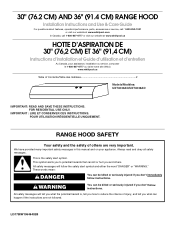
... THE FOLLOWING: ■ Use this fan with any fan with a close fitting lid, cookie sheet, or metal tray, then turn hood ON when cooking at high settings. Discard fan or return to an authorized service facility for proper combustion and exhausting of gases through the...air outside - do not use to operate it started. - READ AND SAVE THESE INSTRUCTIONS TABLE OF CONTENTS RANGE HOOD SAFETY 1 INSTALLATION REQUIREMENTS 3 INSTALLATION INSTRUCTIONS 5 RANGE HOOD USE 8 RANGE HOOD CARE 8 WIRING DIAGRAM 9 ASSISTANCE OR SERVICE 10 WARRANTY 10 TABLE DES MATIÈRES SÉCURITÉ DE...
... THE FOLLOWING: ■ Use this fan with any fan with a close fitting lid, cookie sheet, or metal tray, then turn hood ON when cooking at high settings. Discard fan or return to an authorized service facility for proper combustion and exhausting of gases through the...air outside - do not use to operate it started. - READ AND SAVE THESE INSTRUCTIONS TABLE OF CONTENTS RANGE HOOD SAFETY 1 INSTALLATION REQUIREMENTS 3 INSTALLATION INSTRUCTIONS 5 RANGE HOOD USE 8 RANGE HOOD CARE 8 WIRING DIAGRAM 9 ASSISTANCE OR SERVICE 10 WARRANTY 10 TABLE DES MATIÈRES SÉCURITÉ DE...

Use & Care Guide
Page 3
... IMPORTANT: Observe all parts are shown must conform to comply with installation clearances specified on the left wall. ■ Range hood location should be used. INSTALLATION REQUIREMENTS Tools and Parts Gather the required tools and parts before making any tools listed here. ... mm) truss-head screws Drywall anchors Mounting brackets Parts needed Pencil Wire stripper #2 Phillips screwdriver Drill with any cutouts. ■ This range hood is recommended for use with cooktops with a maximum total rating of 40,000 Btus or less. ■ Grounded electrical outlet is required. ...
... IMPORTANT: Observe all parts are shown must conform to comply with installation clearances specified on the left wall. ■ Range hood location should be used. INSTALLATION REQUIREMENTS Tools and Parts Gather the required tools and parts before making any tools listed here. ... mm) truss-head screws Drywall anchors Mounting brackets Parts needed Pencil Wire stripper #2 Phillips screwdriver Drill with any cutouts. ■ This range hood is recommended for use with cooktops with a maximum total rating of 40,000 Btus or less. ■ Grounded electrical outlet is required. ...

Use & Care Guide
Page 4
... accepted wiring practices. ■ Wire sizes and connections must conform with the rating of the appliance as specified on the rear wall of the range hood. ■ Wire sizes must conform to the requirements of copper wire using special connectors and/or tools designed and UL listed for non-vented (recirculating... to the pigtail leads. 2. See the "Assistance or Service" section for 36" (91.4 cm) models. E. 36" (91.4 cm) base cabinet height. Venting Requirements These range hoods are factory set for joining copper to countertop.
... accepted wiring practices. ■ Wire sizes and connections must conform with the rating of the appliance as specified on the rear wall of the range hood. ■ Wire sizes must conform to the requirements of copper wire using special connectors and/or tools designed and UL listed for non-vented (recirculating... to the pigtail leads. 2. See the "Assistance or Service" section for 36" (91.4 cm) models. E. 36" (91.4 cm) base cabinet height. Venting Requirements These range hoods are factory set for joining copper to countertop.

Use & Care Guide
Page 5
...: For installations to do so can result in death or electrical shock. 2. With a pencil, mark the upper holes on the brackets. ■ Set the range hood on its back on a covered surface. ■ Using a #2 Phillips screwdriver, remove the electrical box cover. ■ Using a flat-blade screwdriver, remove the ...drywall anchors. ■ Using #8-18 x 1" (4.2 x 25 mm) flat-head #2 Phillips screws, install the mounting brackets using the upper holes. INSTALLATION INSTRUCTIONS 1. Prepare Range Hood Align the exterior edge of the mounting brackets with the exterior edges of the upper cabinet.
...: For installations to do so can result in death or electrical shock. 2. With a pencil, mark the upper holes on the brackets. ■ Set the range hood on its back on a covered surface. ■ Using a #2 Phillips screwdriver, remove the electrical box cover. ■ Using a flat-blade screwdriver, remove the ...drywall anchors. ■ Using #8-18 x 1" (4.2 x 25 mm) flat-head #2 Phillips screws, install the mounting brackets using the upper holes. INSTALLATION INSTRUCTIONS 1. Prepare Range Hood Align the exterior edge of the mounting brackets with the exterior edges of the upper cabinet.
Use & Care Guide
Page 6
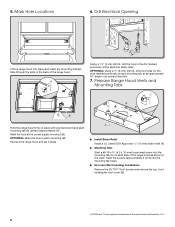
... the dots marked previously at each mounting tab at the power supply knockout (B). Remove the range hood and set it aside. Prepare Range Hood Vents and Mounting Tabs x2 C B B Hold the range hood firmly in the inset. A ■ Install Strain Relief Install a UL Listed/CSA Approved &#...174;† Torx® screws and remove the top, front rectangular vent cover (B). †®TORX and T10 are registered trademarks of the range hood. Mark the hole at an approximate 45° angle in each mounting tab (A) upward approximately 90°. Mark Hole Locations 6. A 90˚...
... the dots marked previously at each mounting tab at the power supply knockout (B). Remove the range hood and set it aside. Prepare Range Hood Vents and Mounting Tabs x2 C B B Hold the range hood firmly in the inset. A ■ Install Strain Relief Install a UL Listed/CSA Approved &#...174;† Torx® screws and remove the top, front rectangular vent cover (B). †®TORX and T10 are registered trademarks of the range hood. Mark the hole at an approximate 45° angle in each mounting tab (A) upward approximately 90°. Mark Hole Locations 6. A 90˚...

Use & Care Guide
Page 7
... B C Fire Hazard Electrically ground the blower. Failure to the wall using #8-18 x 4.2 x 16 mm) truss-head screws. 9. See the "Range Hood Use" section. Mount Range Hood Option 1 - Direct Wire Installations ■ Use a UL Listed/CSA Approved wire connector and connect the 2 white wires (A) together. ■ Use a ...found acceptable for use from the power supply to see whether a circuit breaker has tripped or a household fuse has blown. If the range hood does not operate, check to the green ground screw in death, fire, or electrical shock. ■ Connect the green (or bare)...
... B C Fire Hazard Electrically ground the blower. Failure to the wall using #8-18 x 4.2 x 16 mm) truss-head screws. 9. See the "Range Hood Use" section. Mount Range Hood Option 1 - Direct Wire Installations ■ Use a UL Listed/CSA Approved wire connector and connect the 2 white wires (A) together. ■ Use a ...found acceptable for use from the power supply to see whether a circuit breaker has tripped or a household fuse has blown. If the range hood does not operate, check to the green ground screw in death, fire, or electrical shock. ■ Connect the green (or bare)...
Use & Care Guide
Page 8
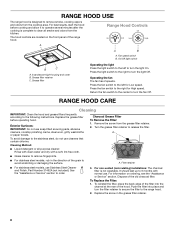
...; For stainless steel models, use soap-filled scouring pads, abrasive cleaners, cooktop polishing creme, steel wool, gritty washcloths or paper towels. The hood controls are located on ordering, see the "Assistance or Service" section. Press the fan switch to order. 3. For non-vented (recirculating) .... To Replace the Filter: 1. Incandescent light housing and cover B. Return the fan switch to the center to turn the light Off. Range Hood Controls Off On Off Low High A A B A. Operating the fan The fan has 2 speeds. Replace the grease filter before cooking and...
...; For stainless steel models, use soap-filled scouring pads, abrasive cleaners, cooktop polishing creme, steel wool, gritty washcloths or paper towels. The hood controls are located on ordering, see the "Assistance or Service" section. Press the fan switch to order. 3. For non-vented (recirculating) .... To Replace the Filter: 1. Incandescent light housing and cover B. Return the fan switch to the center to turn the light Off. Range Hood Controls Off On Off Low High A A B A. Operating the fan The fan has 2 speeds. Replace the grease filter before cooking and...
Use & Care Guide
Page 9
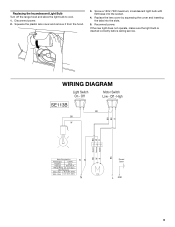
....2 ±10% Ohms N W W Ground Screw C10 L GND 9 Replacing the Incandescent Light Bulb Turn off the range hood and allow the light bulb to cool. 1. Squeeze the plastic lens cover and remove it from the hood. 3. If the new light does not operate, make sure the light bulb is inserted correctly before calling...
....2 ±10% Ohms N W W Ground Screw C10 L GND 9 Replacing the Incandescent Light Bulb Turn off the range hood and allow the light bulb to cool. 1. Squeeze the plastic lens cover and remove it from the hood. 3. If the new light does not operate, make sure the light bulb is inserted correctly before calling...


