Use & Care Guide
Page 1
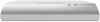
...les: UXT4030AD/UXT4036AD IMPORTANT: READ AND SAVE THESE INSTRUCTIONS. WARNING You can kill or hurt you don't follow instructions. All safety messages will follow the safety alert symbol and either the word "DANGER" or "WARNING." 30" (76.2 CM) AND 36" (91.4 CM) RANGE HOOD Installation Instructions...composer le 1-800-807-6777 ou visiter notre site Web à www.whirlpool.ca Table of injury, and tell you don't immediately follow instructions. POUR UTILISATION RÉSIDENTIELLE UNIQUEMENT. LI317B/W10646402B RANGE HOOD SAFETY Your safety and the safety of others . This is , tell you...
...les: UXT4030AD/UXT4036AD IMPORTANT: READ AND SAVE THESE INSTRUCTIONS. WARNING You can kill or hurt you don't follow instructions. All safety messages will follow the safety alert symbol and either the word "DANGER" or "WARNING." 30" (76.2 CM) AND 36" (91.4 CM) RANGE HOOD Installation Instructions...composer le 1-800-807-6777 ou visiter notre site Web à www.whirlpool.ca Table of injury, and tell you don't immediately follow instructions. POUR UTILISATION RÉSIDENTIELLE UNIQUEMENT. LI317B/W10646402B RANGE HOOD SAFETY Your safety and the safety of others . This is , tell you...
Use & Care Guide
Page 2
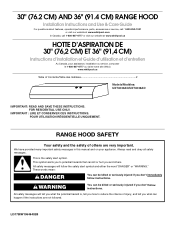
... walls or ceilings, attics or into wall or ceiling; READ AND SAVE THESE INSTRUCTIONS TABLE OF CONTENTS RANGE HOOD SAFETY 1 INSTALLATION REQUIREMENTS 3 INSTALLATION INSTRUCTIONS 5 RANGE HOOD USE 8 RANGE HOOD CARE 8 WIRING DIAGRAM 9 ASSISTANCE OR SERVICE 10 WARRANTY 10 TABLE DES MATIÈRES SÉCURIT...needed for the size of fuel burning equipment to prevent power from being called. - WARNING: TO REDUCE THE RISK OF A RANGE TOP GREASE FIRE: ■ Never leave surface units unattended at service panel and lock the service disconnecting means to prevent backdrafting. ...
... walls or ceilings, attics or into wall or ceiling; READ AND SAVE THESE INSTRUCTIONS TABLE OF CONTENTS RANGE HOOD SAFETY 1 INSTALLATION REQUIREMENTS 3 INSTALLATION INSTRUCTIONS 5 RANGE HOOD USE 8 RANGE HOOD CARE 8 WIRING DIAGRAM 9 ASSISTANCE OR SERVICE 10 WARRANTY 10 TABLE DES MATIÈRES SÉCURIT...needed for the size of fuel burning equipment to prevent power from being called. - WARNING: TO REDUCE THE RISK OF A RANGE TOP GREASE FIRE: ■ Never leave surface units unattended at service panel and lock the service disconnecting means to prevent backdrafting. ...

Use & Care Guide
Page 3
...mm) truss-head screws Drywall anchors Mounting brackets Parts needed Pencil Wire stripper #2 Phillips screwdriver Drill with any cutouts. ■ This range hood is recommended for use with cooktops with a maximum total rating of being installed as windows, doors and strong heating vents. ■ ...Cabinet opening dimensions that are factory set for information on the left wall. ■ Range hood location should be away from package. See the "Assistance or Service" section for vented installations. Location Requirements IMPORTANT: Observe all...
...mm) truss-head screws Drywall anchors Mounting brackets Parts needed Pencil Wire stripper #2 Phillips screwdriver Drill with any cutouts. ■ This range hood is recommended for use with cooktops with a maximum total rating of being installed as windows, doors and strong heating vents. ■ ...Cabinet opening dimensions that are factory set for information on the left wall. ■ Range hood location should be away from package. See the "Assistance or Service" section for vented installations. Location Requirements IMPORTANT: Observe all...

Use & Care Guide
Page 4
...opening width for 30" (76.2 cm) models and 36" (91.4 cm) minimum cabinet width for joining copper to the added section of the range hood. ■ Wire sizes must conform with National Electrical Code, ANSI/NFPA 70 (latest edition), or CSA Standards C22.1-94, Canadian Electrical Code, Part... and come with a charcoal filter. A copy of solid copper wire to countertop. B. 18" (45.7 cm) minimum clearance - Venting Requirements These range hoods are factory set for information on the rear wall of copper wire using special connectors and/or tools designed and UL listed for 36" (91...
...opening width for 30" (76.2 cm) models and 36" (91.4 cm) minimum cabinet width for joining copper to the added section of the range hood. ■ Wire sizes must conform with National Electrical Code, ANSI/NFPA 70 (latest edition), or CSA Standards C22.1-94, Canadian Electrical Code, Part... and come with a charcoal filter. A copy of solid copper wire to countertop. B. 18" (45.7 cm) minimum clearance - Venting Requirements These range hoods are factory set for information on the rear wall of copper wire using special connectors and/or tools designed and UL listed for 36" (91...

Use & Care Guide
Page 5
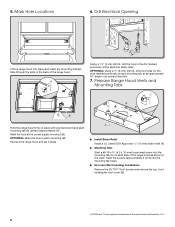
... contractor determine the anchoring method. 4. IMPORTANT: The brackets should touch the upper cabinet. Replace all parts and panels before servicing. Prepare Range Hood Align the exterior edge of the mounting brackets with the exterior edges of the upper cabinet. With a pencil, mark the upper holes ...on the brackets. ■ Set the range hood on its back on a covered surface. ■ Using a #2 Phillips screwdriver, remove the electrical box cover. ■ Using a flat-blade ...
... contractor determine the anchoring method. 4. IMPORTANT: The brackets should touch the upper cabinet. Replace all parts and panels before servicing. Prepare Range Hood Align the exterior edge of the mounting brackets with the exterior edges of the upper cabinet. With a pencil, mark the upper holes ...on the brackets. ■ Set the range hood on its back on a covered surface. ■ Using a #2 Phillips screwdriver, remove the electrical box cover. ■ Using a flat-blade ...
Use & Care Guide
Page 6
...6 OPTIONAL: Mark the hole in the dot marked previously at the electrical strain relief. Prepare Range Hood Vents and Mounting Tabs x2 C B B Hold the range hood firmly in an upward direction. 7. Remove the range hood and set it aside. 5. A ■ Install Strain Relief Install a UL Listed/CSA...mm) truss-head screw into place and insert the mounting bracket tabs through the slots in the inset. Drill Electrical Opening Lift the range hood into the mounting tab (C) on each mounting tab (A) upward approximately 90°. Mark Hole Locations 6. Insert the screws approximately 2 ...
...6 OPTIONAL: Mark the hole in the dot marked previously at the electrical strain relief. Prepare Range Hood Vents and Mounting Tabs x2 C B B Hold the range hood firmly in an upward direction. 7. Remove the range hood and set it aside. 5. A ■ Install Strain Relief Install a UL Listed/CSA...mm) truss-head screw into place and insert the mounting bracket tabs through the slots in the inset. Drill Electrical Opening Lift the range hood into the mounting tab (C) on each mounting tab (A) upward approximately 90°. Mark Hole Locations 6. Insert the screws approximately 2 ...

Use & Care Guide
Page 7
... a UL Listed/CSA Approved wire connector and connect the 2 black wires (B) together. There must be enough wiring from your new range hood, read the "Range Hood Use" section. 7 NOTE: Do not reconnect power until the installation is complete. Make Electrical Connection A B C Fire Hazard Electrically...relief screws. See "Replacing the Incandescent Light Bulb" in the electrical box and tighten the screw securely. Mount Range Hood Option 1 - WARNING ■ Lift the range hood into place, positioning the rear slots over the mounting brackets. ■ Using a Phillips screwdriver, push on...
... a UL Listed/CSA Approved wire connector and connect the 2 black wires (B) together. There must be enough wiring from your new range hood, read the "Range Hood Use" section. 7 NOTE: Do not reconnect power until the installation is complete. Make Electrical Connection A B C Fire Hazard Electrically...relief screws. See "Replacing the Incandescent Light Bulb" in the electrical box and tighten the screw securely. Mount Range Hood Option 1 - WARNING ■ Lift the range hood into place, positioning the rear slots over the mounting brackets. ■ Using a Phillips screwdriver, push on...
Use & Care Guide
Page 8
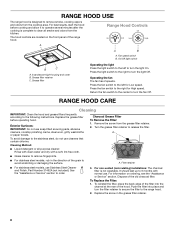
...Service" section. Incandescent light housing and cover B. Push the filter into the channel at the rear of the old charcoal filter. RANGE HOOD USE The range hood is not washable. Charcoal Grease Filter To Remove the Filter: 1. It should last up to 6 months with a soft, lint... Exterior Surfaces: IMPORTANT: Do not use cleaners that contain chlorine. Remove the screw from the cooktop area. RANGE HOOD CARE Cleaning IMPORTANT: Clean the hood and grease filters frequently according to release the filter. Turn the grease filter retainer to the following instructions. A...
...Service" section. Incandescent light housing and cover B. Push the filter into the channel at the rear of the old charcoal filter. RANGE HOOD USE The range hood is not washable. Charcoal Grease Filter To Remove the Filter: 1. It should last up to 6 months with a soft, lint... Exterior Surfaces: IMPORTANT: Do not use cleaners that contain chlorine. Remove the screw from the cooktop area. RANGE HOOD CARE Cleaning IMPORTANT: Clean the hood and grease filters frequently according to release the filter. Turn the grease filter retainer to the following instructions. A...
Use & Care Guide
Page 9
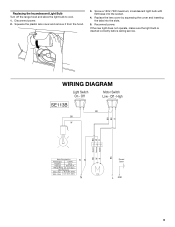
... Amperage 60 Hz 0.35 ±10% A Wattage Rating 21 ±10% Watts Motor Resistance White - Squeeze the plastic lens cover and remove it from the hood. 3. Off Motor Switch Low - Red 46.9 ±10% Ohms White - Black 37.2 ±10% Ohms N W W Ground Screw C10 L GND 9 Replace the lens cover by squeezing... the cover and inserting the tabs into the socket. 4. Replacing the Incandescent Light Bulb Turn off the range hood and allow the light bulb to cool. 1. Disconnect power. 2.
... Amperage 60 Hz 0.35 ±10% A Wattage Rating 21 ±10% Watts Motor Resistance White - Squeeze the plastic lens cover and remove it from the hood. 3. Off Motor Switch Low - Red 46.9 ±10% Ohms White - Black 37.2 ±10% Ohms N W W Ground Screw C10 L GND 9 Replace the lens cover by squeezing... the cover and inserting the tabs into the socket. 4. Replacing the Incandescent Light Bulb Turn off the range hood and allow the light bulb to cool. 1. Disconnect power. 2.


