
Use & Care Guide
Page 2
... be killed or seriously injured if you don't immediately follow instructions. TABLE OF CONTENTS RANGE HOOD SAFETY 2 INSTALLATION REQUIREMENTS 4 Tools and Parts 4 Location Requirements 4 Venting Requirements 5 Electrical Requirements 6 INSTALLATION INSTRUCTIONS 7 Prepare Location 7 Install Range Hood 9 Make Electrical Connection 11 Complete Installation 11 RANGE HOOD USE 12 Range Hood Controls 12 RANGE HOOD CARE 12 Cleaning 12 WIRING DIAGRAM 14 ASSISTANCE OR SERVICE 15 In the U.S.A 15 In Canada 15 Accessories 15 WARRANTY 16 TABLE DES MATIÈRES SÉCURITÉ DE...
... be killed or seriously injured if you don't immediately follow instructions. TABLE OF CONTENTS RANGE HOOD SAFETY 2 INSTALLATION REQUIREMENTS 4 Tools and Parts 4 Location Requirements 4 Venting Requirements 5 Electrical Requirements 6 INSTALLATION INSTRUCTIONS 7 Prepare Location 7 Install Range Hood 9 Make Electrical Connection 11 Complete Installation 11 RANGE HOOD USE 12 Range Hood Controls 12 RANGE HOOD CARE 12 Cleaning 12 WIRING DIAGRAM 14 ASSISTANCE OR SERVICE 15 In the U.S.A 15 In Canada 15 Accessories 15 WARRANTY 16 TABLE DES MATIÈRES SÉCURITÉ DE...

Use & Care Guide
Page 3
... servicing or cleaning the unit, switch power off the burner. CAUTION: For general ventilating use to prevent backdrafting. Heat oils slowly on accidentally. Crepes Suzette, Cherries Jubilee, Peppercorn Beef Flambé). ■ Clean ventilating fans frequently. Discard fan or return to an authorized service facility for examination and/or repair. ■ Sufficient air is needed for proper combustion and exhausting of gases through the flue (chimney) of fire or electrical...
... servicing or cleaning the unit, switch power off the burner. CAUTION: For general ventilating use to prevent backdrafting. Heat oils slowly on accidentally. Crepes Suzette, Cherries Jubilee, Peppercorn Beef Flambé). ■ Clean ventilating fans frequently. Discard fan or return to an authorized service facility for examination and/or repair. ■ Sufficient air is needed for proper combustion and exhausting of gases through the flue (chimney) of fire or electrical...

Use & Care Guide
Page 4
... "Accessories" section. ■ 7" (17.8 cm) round vent mounting plate. INSTALLATION REQUIREMENTS Tools and Parts Gather the required tools and parts before making any tools listed here. Read and follow the instructions provided with installation clearances specified on ordering, see the "Accessories" section. Tools needed ■ Wall or roof cap with recessed bottoms: ■ Two 2" (5.1 cm) wide filler strips. For information on the model/serial rating plate. Location Requirements IMPORTANT: Observe all parts are factory set for Manufactured Home Installation...
... "Accessories" section. ■ 7" (17.8 cm) round vent mounting plate. INSTALLATION REQUIREMENTS Tools and Parts Gather the required tools and parts before making any tools listed here. Read and follow the instructions provided with installation clearances specified on ordering, see the "Accessories" section. Tools needed ■ Wall or roof cap with recessed bottoms: ■ Two 2" (5.1 cm) wide filler strips. For information on the model/serial rating plate. Location Requirements IMPORTANT: Observe all parts are factory set for Manufactured Home Installation...

Use & Care Guide
Page 6
... copper wire using special connectors and/or tools designed and UL listed for each vent piece used , it is recommended that a qualified electrician determine that the electrical installation is located behind the filter on the model/serial rating plate. If codes permit and a separate ground wire is used in conformance with the rating of the appliance as specified on the rear wall of the range hood. ■ Wire sizes must conform with National Electrical Code, ANSI...
... copper wire using special connectors and/or tools designed and UL listed for each vent piece used , it is recommended that a qualified electrician determine that the electrical installation is located behind the filter on the model/serial rating plate. If codes permit and a separate ground wire is used in conformance with the rating of the appliance as specified on the rear wall of the range hood. ■ Wire sizes must conform with National Electrical Code, ANSI...
Use & Care Guide
Page 7
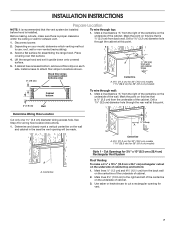
....4 cm) models Cabinet bottom 3" (7.6 cm) Wall To wire through the rear wall at this point. Determine and clearly mark a vertical centerline on your model, determine which venting method to cut a rectangular opening will be installed before hood is proper clearance within the ceiling or wall for exhaust vent. 1. Mark lines 5¼" (13.3 cm) to attach filler strips in the area the vent opening for vent. 7 To wire through the cabinet at...
....4 cm) models Cabinet bottom 3" (7.6 cm) Wall To wire through the rear wall at this point. Determine and clearly mark a vertical centerline on your model, determine which venting method to cut a rectangular opening will be installed before hood is proper clearance within the ceiling or wall for exhaust vent. 1. Mark lines 5¼" (13.3 cm) to attach filler strips in the area the vent opening for vent. 7 To wire through the cabinet at...

Use & Care Guide
Page 9
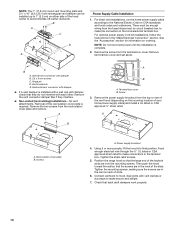
Remove metal grease filter. See the "Range Hood Care" section. 7. Pull down on the inside your range hood. 3. NOTE: Your model will have a 3¼" x 10" (8.3 x 25.4 cm) rectangular vent damper on the front of the panel and pull the panel away from damper flap. Set range hood aside on the inside your range hood. 4. For wall installations, remove the rear rectangular vent knockout. Non-vent (recirculating) installations - NOTE: The 7" (17.8 cm) round vent mounting plate is also available as shown. A B C D A A. Install the 4 - 4.5 mm...
Remove metal grease filter. See the "Range Hood Care" section. 7. Pull down on the inside your range hood. 3. NOTE: Your model will have a 3¼" x 10" (8.3 x 25.4 cm) rectangular vent damper on the front of the panel and pull the panel away from damper flap. Set range hood aside on the inside your range hood. 4. For wall installations, remove the rear rectangular vent knockout. Non-vent (recirculating) installations - NOTE: The 7" (17.8 cm) round vent mounting plate is also available as shown. A B C D A A. Install the 4 - 4.5 mm...
Use & Care Guide
Page 10
... Cable Installation 1. Remove the screw from the recirculation cover plate and remove. No vent attachments. A A B A. Then push the hood toward the wall so that the large end of the keyhole slots are in the "Make Electrical Connection" section. C B A. Vent knockouts E. Removal of the slots. Screws A. Tighten the strain relief screws. 5. Position the range hood so that the screws are in the terminal box. NOTE: Do not reconnect power until the installation is required. Remove terminal box cover and set...
... Cable Installation 1. Remove the screw from the recirculation cover plate and remove. No vent attachments. A A B A. Then push the hood toward the wall so that the large end of the keyhole slots are in the "Make Electrical Connection" section. C B A. Vent knockouts E. Removal of the slots. Screws A. Tighten the strain relief screws. 5. Position the range hood so that the screws are in the terminal box. NOTE: Do not reconnect power until the installation is required. Remove terminal box cover and set...

Use & Care Guide
Page 11
...hood fan and light. Disconnect power and check wiring connections. G C D E A B F A. Fire Hazard Electrically ground the blower. Install terminal box cover. 6. Complete Installation 1. WARNING Electrical Shock Hazard Disconnect power before operating. UL listed wire connector D. Green ground screw 2. a. UL listed or CSA approved ½" strain relief G. If range hood does not operate, check to green ground screw in place. 2. Replace grease filter. Check the operation of the panel clear the front mounting flange. Home power supply cable or power cord accessory kit...
...hood fan and light. Disconnect power and check wiring connections. G C D E A B F A. Fire Hazard Electrically ground the blower. Install terminal box cover. 6. Complete Installation 1. WARNING Electrical Shock Hazard Disconnect power before operating. UL listed wire connector D. Green ground screw 2. a. UL listed or CSA approved ½" strain relief G. If range hood does not operate, check to green ground screw in place. 2. Replace grease filter. Check the operation of the panel clear the front mounting flange. Home power supply cable or power cord accessory kit...

Use & Care Guide
Page 12
... be changed anytime during fan operation by pressing the desired blower speed button. RANGE HOOD USE The range hood is designed to remove smoke, cooking vapors and odors from the filter retainer. 2. Halogen lights B. Exterior Surfaces: IMPORTANT: Do not use cleaners that contain chlorine. Cleaning Method: ■ Rub in a dishwasher or hot detergent solution. Press the BLOWER OFF button a second time to turn the blower on the front panel of old charcoal filter. 12 Screw B. For non-vented (recirculating) installations: The charcoal filter...
... be changed anytime during fan operation by pressing the desired blower speed button. RANGE HOOD USE The range hood is designed to remove smoke, cooking vapors and odors from the filter retainer. 2. Halogen lights B. Exterior Surfaces: IMPORTANT: Do not use cleaners that contain chlorine. Cleaning Method: ■ Rub in a dishwasher or hot detergent solution. Press the BLOWER OFF button a second time to turn the blower on the front panel of old charcoal filter. 12 Screw B. For non-vented (recirculating) installations: The charcoal filter...

Use & Care Guide
Page 13
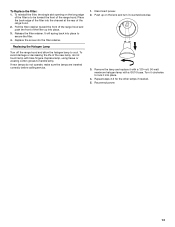
... be toward the front of the range hood and push the front of the new lamp, do not operate, make sure the lamps are inserted correctly before calling service. 1. Replace the screw into place. 4. If new lamps do not touch lamp with a GU10 base. To Replace the Filter: 1. Remove the lamp and replace it counterclockwise. 3. Turn it clockwise to secure the filter. 4. Pull the filter retainer toward the front of...
... be toward the front of the range hood and push the front of the new lamp, do not operate, make sure the lamps are inserted correctly before calling service. 1. Replace the screw into place. 4. If new lamps do not touch lamp with a GU10 base. To Replace the Filter: 1. Remove the lamp and replace it counterclockwise. 3. Turn it clockwise to secure the filter. 4. Pull the filter retainer toward the front of...

Use & Care Guide
Page 15
... U.S.A. In Canada Call the Whirlpool Canada LP Customer eXperience Centre toll free: 1-800-807-6777. Whirlpool Canada LP designated service technicians are trained to your area, call us to better respond to fulfill the product warranty and provide after-warranty service, anywhere in the United States. Accessories Stainless Steel Cleaner and Polish Order Part Number 31462A Charcoal Filter Kit Order Part Number W10386873 Power Cord Kit Order Part Number W10355452 7" (17.8 cm) Round Damper Order Part Number W10355451 7" (17.8 cm) Round Vent Mounting Plate Order Part Number W10388168...
... U.S.A. In Canada Call the Whirlpool Canada LP Customer eXperience Centre toll free: 1-800-807-6777. Whirlpool Canada LP designated service technicians are trained to your area, call us to better respond to fulfill the product warranty and provide after-warranty service, anywhere in the United States. Accessories Stainless Steel Cleaner and Polish Order Part Number 31462A Charcoal Filter Kit Order Part Number W10386873 Power Cord Kit Order Part Number W10355452 7" (17.8 cm) Round Damper Order Part Number W10355451 7" (17.8 cm) Round Vent Mounting Plate Order Part Number W10388168...

Use & Care Guide
Page 16
... additional help you obtain assistance or service if you need to correct house wiring or plumbing. 2. Proof of God, improper installation, installation not in -warranty service. Costs associated with original model/serial numbers that is covered by a Whirlpool designated service company. Service must provide proof of your major appliance, to replace or repair house fuses, or to know your major appliance. After checking "Troubleshooting," you on the product. Write...
... additional help you obtain assistance or service if you need to correct house wiring or plumbing. 2. Proof of God, improper installation, installation not in -warranty service. Costs associated with original model/serial numbers that is covered by a Whirlpool designated service company. Service must provide proof of your major appliance, to replace or repair house fuses, or to know your major appliance. After checking "Troubleshooting," you on the product. Write...

Warranty Information
Page 1
... ever need service, first see the "Troubleshooting" section of the Use & Care Guide. You must be provided by an authorized Whirlpool servicer is not available. 10. Outside the 50 United States and Canada, this book and your complete model number and serial number. ITEMS EXCLUDED FROM WARRANTY This limited warranty does not cover: 1. If outside the 50 United States and Canada, contact your major appliance, to replace or repair house fuses, or to correct house wiring...
... ever need service, first see the "Troubleshooting" section of the Use & Care Guide. You must be provided by an authorized Whirlpool servicer is not available. 10. Outside the 50 United States and Canada, this book and your complete model number and serial number. ITEMS EXCLUDED FROM WARRANTY This limited warranty does not cover: 1. If outside the 50 United States and Canada, contact your major appliance, to replace or repair house fuses, or to correct house wiring...
Installation Guide
Page 3
... not vent exhaust air into spaces within walls or ceilings, attics or into wall or ceiling; do not damage electrical wiring and other utilities. ■ Ducted fans must be sure to duct air outside - Heat oils slowly on accidentally. WARNING: TO REDUCE THE RISK OF INJURY TO PERSONS IN THE EVENT OF A RANGE TOP GREASE FIRE, OBSERVE THE FOLLOWING:a ■ SMOTHER FLAMES with all applicable codes and...
... not vent exhaust air into spaces within walls or ceilings, attics or into wall or ceiling; do not damage electrical wiring and other utilities. ■ Ducted fans must be sure to duct air outside - Heat oils slowly on accidentally. WARNING: TO REDUCE THE RISK OF INJURY TO PERSONS IN THE EVENT OF A RANGE TOP GREASE FIRE, OBSERVE THE FOLLOWING:a ■ SMOTHER FLAMES with all applicable codes and...

Installation Guide
Page 4
For cabinets with any cutouts. ■ Grounded electrical outlet is required. Consult the cooktop/range manufacturer installation instructions before starting installation. See the "Accessories" section to attach filler strips). Location Requirements IMPORTANT: Observe all parts are factory set for vented installations. Models that are shown must be used. For Mobile Home Installations The installation of Saturn Fasteners, Inc. 4 UL listed wire connectors ■ Vent clamps/duct tape as non-vented (recirculating) require charcoal filters. For 3¹⁄&#...
For cabinets with any cutouts. ■ Grounded electrical outlet is required. Consult the cooktop/range manufacturer installation instructions before starting installation. See the "Accessories" section to attach filler strips). Location Requirements IMPORTANT: Observe all parts are factory set for vented installations. Models that are shown must be used. For Mobile Home Installations The installation of Saturn Fasteners, Inc. 4 UL listed wire connectors ■ Vent clamps/duct tape as non-vented (recirculating) require charcoal filters. For 3¹⁄&#...

Installation Guide
Page 10
... relief. For optional power supply cord kit installations, follow the instructions in the narrow neck of slots. 6. Vent knockouts E. No vent attachments. A A B A. Using 2 or more people, lift the hood into final position. Remove the vent connector damper flap if they do not interfere with damper B. 3.5 x 5 mm screws C. B A C D E Power Supply Cable Installation 1. See the "Accessories" section for information on ordering. Removal of the keyhole slots are in the "Make Electrical Connection" section. Recirculation cover plate B. Tighten the...
... relief. For optional power supply cord kit installations, follow the instructions in the narrow neck of slots. 6. Vent knockouts E. No vent attachments. A A B A. Using 2 or more people, lift the hood into final position. Remove the vent connector damper flap if they do not interfere with damper B. 3.5 x 5 mm screws C. B A C D E Power Supply Cable Installation 1. See the "Accessories" section for information on ordering. Removal of the keyhole slots are in the "Make Electrical Connection" section. Recirculation cover plate B. Tighten the...

Installation Guide
Page 11
... tighten. 5. Reconnect power. Home power supply cable or power cord accessory kit F. Use UL listed wire connectors and connect white wires (A) together. Replace grease filter. NOTE: To get the most efficient use from power supply to see whether a circuit breaker has tripped or a household fuse has blown. Install terminal box cover. 6. See the "Range Hood Care" section. 3. Use UL listed wire connectors and connect black wires (B) together. White wires B. Complete Installation 1. Replace the 2 bottom panels. Make Electrical Connection WARNING 3. UL listed or CSA...
... tighten. 5. Reconnect power. Home power supply cable or power cord accessory kit F. Use UL listed wire connectors and connect white wires (A) together. Replace grease filter. NOTE: To get the most efficient use from power supply to see whether a circuit breaker has tripped or a household fuse has blown. Install terminal box cover. 6. See the "Range Hood Care" section. 3. Use UL listed wire connectors and connect black wires (B) together. White wires B. Complete Installation 1. Replace the 2 bottom panels. Make Electrical Connection WARNING 3. UL listed or CSA...

Installation Guide
Page 12
... remove fingerprints. Blower speed maximum button Operating the light The On/Off light button controls both lights. Exterior Surfaces: IMPORTANT: Do not use cleaners that contain chlorine. To remove, pull the filter retainer toward the front of the range hood and pull down on the front panel of old charcoal filter. 12 Grease filter 3. For non-vented (recirculating) installations: The charcoal filter is complete to the stainless steel, do not use soap-filled scouring pads, abrasive cleaners, Cooktop Polishing Creme, steel...
... remove fingerprints. Blower speed maximum button Operating the light The On/Off light button controls both lights. Exterior Surfaces: IMPORTANT: Do not use cleaners that contain chlorine. To remove, pull the filter retainer toward the front of the range hood and pull down on the front panel of old charcoal filter. 12 Grease filter 3. For non-vented (recirculating) installations: The charcoal filter is complete to the stainless steel, do not use soap-filled scouring pads, abrasive cleaners, Cooktop Polishing Creme, steel...
Installation Guide
Page 13
... of the range hood. It will spring back into place. 3. Replace the screw into the channel at the rear of the filter up on the long edge of the filter is to be toward the front of the range hood and push the front of the range hood. 2. Remove the lamp and replace it counterclockwise. 3. Replacing the Halogen Lamp Turn off the range hood and allow the halogen lamp to handle lamp. To...
... of the range hood. It will spring back into place. 3. Replace the screw into the channel at the rear of the filter up on the long edge of the filter is to be toward the front of the range hood and push the front of the range hood. 2. Remove the lamp and replace it counterclockwise. 3. Replacing the Halogen Lamp Turn off the range hood and allow the halogen lamp to handle lamp. To...

Installation Guide
Page 16
... the product, Whirlpool Corporation or Whirlpool Canada LP (hereafter "Whirlpool") will need service, first see the "Troubleshooting" section of the Use & Care Guide. In the U.S.A., call 1-800-807-6777. 9/07 Keep this book and your major appliance, to replace or repair house fuses, or to repair or replace appliance light bulbs, air filters or water filters. Service must provide proof of purchase or installation date for repairs. This major appliance is designed to correct...
... the product, Whirlpool Corporation or Whirlpool Canada LP (hereafter "Whirlpool") will need service, first see the "Troubleshooting" section of the Use & Care Guide. In the U.S.A., call 1-800-807-6777. 9/07 Keep this book and your major appliance, to replace or repair house fuses, or to repair or replace appliance light bulbs, air filters or water filters. Service must provide proof of purchase or installation date for repairs. This major appliance is designed to correct...


