
Use & Care Guide
Page 2
...mean: DANGER You can kill or hurt you and others are not followed. 2 TABLE OF CONTENTS RANGE HOOD SAFETY 2 INSTALLATION REQUIREMENTS 4 Tools and Parts 4 Location Requirements 4 Venting Requirements 5 Electrical Requirements 6 INSTALLATION INSTRUCTIONS 7 Prepare Location 7 Install Range Hood 9 Make Electrical Connection 11 Complete Installation 11 RANGE HOOD USE 12 Range Hood Controls 12 RANGE HOOD CARE 12 Cleaning 12 WIRING DIAGRAM 14 ASSISTANCE OR SERVICE 15 In the U.S.A 15 In Canada 15 Accessories 15 WARRANTY 16 TABLE DES MATIÈRES SÉCURITÉ DE LA...
...mean: DANGER You can kill or hurt you and others are not followed. 2 TABLE OF CONTENTS RANGE HOOD SAFETY 2 INSTALLATION REQUIREMENTS 4 Tools and Parts 4 Location Requirements 4 Venting Requirements 5 Electrical Requirements 6 INSTALLATION INSTRUCTIONS 7 Prepare Location 7 Install Range Hood 9 Make Electrical Connection 11 Complete Installation 11 RANGE HOOD USE 12 Range Hood Controls 12 RANGE HOOD CARE 12 Cleaning 12 WIRING DIAGRAM 14 ASSISTANCE OR SERVICE 15 In the U.S.A 15 In Canada 15 Accessories 15 WARRANTY 16 TABLE DES MATIÈRES SÉCURITÉ DE LA...

Use & Care Guide
Page 3
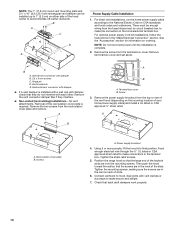
...; Before servicing or cleaning the unit, switch power off the burner. CAUTION: For general ventilating use to operate it started. - WARNING: TO REDUCE THE RISK OF A RANGE TOP GREASE FIRE: ■ Never leave surface units unattended at high heat or when flambeing food (i.e. BE CAREFUL TO PREVENT BURNS. If the flames do not vent exhaust air into spaces within walls or ceilings, attics or into wall or ceiling; The fire...
...; Before servicing or cleaning the unit, switch power off the burner. CAUTION: For general ventilating use to operate it started. - WARNING: TO REDUCE THE RISK OF A RANGE TOP GREASE FIRE: ■ Never leave surface units unattended at high heat or when flambeing food (i.e. BE CAREFUL TO PREVENT BURNS. If the flames do not vent exhaust air into spaces within walls or ceilings, attics or into wall or ceiling; The fire...

Use & Care Guide
Page 4
... model/serial rating plate. INSTALLATION REQUIREMENTS Tools and Parts Gather the required tools and parts before making any tools listed here. UL listed wire connectors ■ Vent clamps/duct tape as windows, doors and strong heating vents. ■ Cabinet opening dimensions that are capable of this range hood must be used. For 3¹⁄₄" x 10" (8.3 x 25.4 cm) rectangular vented installations: ■ 3¹⁄₄" x 10" (8.3 x 25.4 cm) rectangular metal vent system For non-vented (recirculation) installations: ■ Charcoal filter kit...
... model/serial rating plate. INSTALLATION REQUIREMENTS Tools and Parts Gather the required tools and parts before making any tools listed here. UL listed wire connectors ■ Vent clamps/duct tape as windows, doors and strong heating vents. ■ Cabinet opening dimensions that are capable of this range hood must be used. For 3¹⁄₄" x 10" (8.3 x 25.4 cm) rectangular vented installations: ■ 3¹⁄₄" x 10" (8.3 x 25.4 cm) rectangular metal vent system For non-vented (recirculation) installations: ■ Charcoal filter kit...

Use & Care Guide
Page 6
...-amp, fused electrical circuit is located behind the filter on the model/serial rating plate. Connect the aluminum wiring to the added section of copper wire using special connectors and/or tools designed and UL listed for each vent piece used , it is recommended that a qualified electrician determine that the electrical installation is adequate. Aluminum/copper connection must conform with local codes and industry accepted wiring practices. ■ Wire sizes and connections must conform with National Electrical Code...
...-amp, fused electrical circuit is located behind the filter on the model/serial rating plate. Connect the aluminum wiring to the added section of copper wire using special connectors and/or tools designed and UL listed for each vent piece used , it is recommended that a qualified electrician determine that the electrical installation is adequate. Aluminum/copper connection must conform with local codes and industry accepted wiring practices. ■ Wire sizes and connections must conform with National Electrical Code...
Use & Care Guide
Page 7
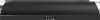
...;₈" (28.9 cm) for 36" (91.4 cm) models Cabinet bottom 3" (7.6 cm) Wall To wire through wall: 1. Select a flat surface for wiring hole location instructions. 1. Install screws to use: roof, wall or non-vented (recirculating). 3. See Step 2 for assembling the range hood. Lift the range hood and set it upside down onto covered surface. 5. A ⁷⁄₈" (2.2 cm) from wall, not cabinet frame 3" (7.6 cm) Wood filler strips (recessed cabinet bottoms only) Centerline A. 8³⁄₈" (21...
...;₈" (28.9 cm) for 36" (91.4 cm) models Cabinet bottom 3" (7.6 cm) Wall To wire through wall: 1. Select a flat surface for wiring hole location instructions. 1. Install screws to use: roof, wall or non-vented (recirculating). 3. See Step 2 for assembling the range hood. Lift the range hood and set it upside down onto covered surface. 5. A ⁷⁄₈" (2.2 cm) from wall, not cabinet frame 3" (7.6 cm) Wood filler strips (recessed cabinet bottoms only) Centerline A. 8³⁄₈" (21...

Use & Care Guide
Page 9
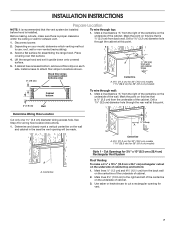
... 3.5 x 5 mm screws provided and remove tape from the rear channel. A A. Top rectangular vent knockout C. For roof installations, remove the top rectangular vent knockout. An optional 7" (17.8 cm) round damper is not supplied. Drill pilot hole 6. Round vent knockout E. Rectangular vent knockout 9 Remove metal grease filter. Push the panel toward the back of the range hood until the front tabs of the 4 keyhole mounting slots on the inside your vent system installation. Set range hood aside...
... 3.5 x 5 mm screws provided and remove tape from the rear channel. A A. Top rectangular vent knockout C. For roof installations, remove the top rectangular vent knockout. An optional 7" (17.8 cm) round damper is not supplied. Drill pilot hole 6. Round vent knockout E. Rectangular vent knockout 9 Remove metal grease filter. Push the panel toward the back of the range hood until the front tabs of the 4 keyhole mounting slots on the inside your vent system installation. Set range hood aside...
Use & Care Guide
Page 10
... optional power supply cord kit installations, follow the instructions in the "Make Electrical Connection" section. NOTE: Do not reconnect power until the installation is required. C B A. Horizontal vent connector with damper ■ If a vent damper is installed with a wall cap with vent clamps or duct tape to make connections in the terminal box. A A B A. Using 2 or more people, lift the hood into final position. Check that they interfere. ■ Non-vented (recirculating) installations - Vent knockouts E. Removal of the slots. Tighten the strain relief screws...
... optional power supply cord kit installations, follow the instructions in the "Make Electrical Connection" section. NOTE: Do not reconnect power until the installation is required. C B A. Horizontal vent connector with damper ■ If a vent damper is installed with a wall cap with vent clamps or duct tape to make connections in the terminal box. A A B A. Using 2 or more people, lift the hood into final position. Check that they interfere. ■ Non-vented (recirculating) installations - Vent knockouts E. Removal of the slots. Tighten the strain relief screws...

Use & Care Guide
Page 11
... power supply cable or power cord accessory kit F. UL listed or CSA approved ½" strain relief G. Fire Hazard Electrically ground the blower. Failure to do so can result in terminal box. Connect green (or bare) ground wire from your new range hood, read the "Range Hood Use" section. 11 Replace the 2 bottom panels. Replace grease filter. If range hood does not operate, check to green ground screw in death or electrical shock. 1. Make Electrical Connection WARNING 3. Replace all parts and panels before servicing. Use UL listed wire connectors...
... power supply cable or power cord accessory kit F. UL listed or CSA approved ½" strain relief G. Fire Hazard Electrically ground the blower. Failure to do so can result in terminal box. Connect green (or bare) ground wire from your new range hood, read the "Range Hood Use" section. 11 Replace the 2 bottom panels. Replace grease filter. If range hood does not operate, check to green ground screw in death or electrical shock. 1. Make Electrical Connection WARNING 3. Replace all parts and panels before servicing. Use UL listed wire connectors...

Use & Care Guide
Page 12
... non-vented (recirculating) installations: The charcoal filter is not washable. For best results, start the hood before operating hood. Blower speed maximum button Operating the light The On/Off light button controls both lights. A B C A. RANGE HOOD USE The range hood is designed to 6 months with normal use. Exterior Surfaces: IMPORTANT: Do not use soap-filled scouring pads, abrasive cleaners, Cooktop Polishing Creme, steel wool, gritty washcloths or paper towels. Screw B. The hood controls are located on the front edge of the range hood. Replace grease filter before cooking...
... non-vented (recirculating) installations: The charcoal filter is not washable. For best results, start the hood before operating hood. Blower speed maximum button Operating the light The On/Off light button controls both lights. A B C A. RANGE HOOD USE The range hood is designed to 6 months with normal use. Exterior Surfaces: IMPORTANT: Do not use soap-filled scouring pads, abrasive cleaners, Cooktop Polishing Creme, steel wool, gritty washcloths or paper towels. Screw B. The hood controls are located on the front edge of the range hood. Replace grease filter before cooking...

Use & Care Guide
Page 13
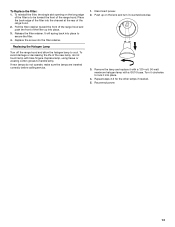
... filter into place. 3. Replace the screw into place to be toward the front of the range hood and push the front of the filter up on the long edge of the filter is to secure the filter. 4. Push up into the channel at the rear of the new lamp, do not operate, make sure the lamps are inserted correctly before calling service. 1. Replacing the Halogen Lamp Turn off the range hood...
... filter into place. 3. Replace the screw into place to be toward the front of the range hood and push the front of the filter up on the long edge of the filter is to secure the filter. 4. Push up into the channel at the rear of the new lamp, do not operate, make sure the lamps are inserted correctly before calling service. 1. Replacing the Halogen Lamp Turn off the range hood...

Use & Care Guide
Page 15
... used to local dealers, repair parts distributors, and service companies. Whirlpool Canada LP designated service technicians are trained to fulfill the product warranty and provide afterwarranty service, anywhere in your area, call us to better respond to your appliance. Accessories Stainless Steel Cleaner and Polish Order Part Number 31462A Charcoal Filter Kit Order Part Number W10386873 Power Cord Kit Order Part Number W10355452 7" (17.8 cm) Round Damper Order Part Number W10355451 7" (17.8 cm) Round Vent Mounting Plate Order Part Number W10388168 15 Whirlpool designated service...
... used to local dealers, repair parts distributors, and service companies. Whirlpool Canada LP designated service technicians are trained to fulfill the product warranty and provide afterwarranty service, anywhere in your area, call us to better respond to your appliance. Accessories Stainless Steel Cleaner and Polish Order Part Number 31462A Charcoal Filter Kit Order Part Number W10386873 Power Cord Kit Order Part Number W10355452 7" (17.8 cm) Round Damper Order Part Number W10355451 7" (17.8 cm) Round Vent Mounting Plate Order Part Number W10388168 15 Whirlpool designated service...

Use & Care Guide
Page 16
... Factory Specified Parts and repair labor to correct defects in accordance with electrical or plumbing codes, or use of consumables or cleaning products not approved by a Whirlpool designated service company. Dealer name Address Phone number Model number Serial number Purchase date 16 Service must provide proof of your authorized Whirlpool dealer to determine if another warranty applies. The cost of repair or replacement under this limited warranty. LIMITATION OF REMEDIES CUSTOMER'S SOLE AND...
... Factory Specified Parts and repair labor to correct defects in accordance with electrical or plumbing codes, or use of consumables or cleaning products not approved by a Whirlpool designated service company. Dealer name Address Phone number Model number Serial number Purchase date 16 Service must provide proof of your authorized Whirlpool dealer to determine if another warranty applies. The cost of repair or replacement under this limited warranty. LIMITATION OF REMEDIES CUSTOMER'S SOLE AND...

Warranty Information
Page 1
... . WHIRLPOOL SHALL NOT BE LIABLE FOR INCIDENTAL OR CONSEQUENTIAL DAMAGES. Dealer name Address Phone number Model number Serial number Purchase date 16 This limited warranty is valid only in the United States or Canada and applies only when the major appliance is located in accordance with published installation instructions. 11. Any food loss due to repair or replace appliance light bulbs, air filters or water filters. If you ever need...
... . WHIRLPOOL SHALL NOT BE LIABLE FOR INCIDENTAL OR CONSEQUENTIAL DAMAGES. Dealer name Address Phone number Model number Serial number Purchase date 16 This limited warranty is valid only in the United States or Canada and applies only when the major appliance is located in accordance with published installation instructions. 11. Any food loss due to repair or replace appliance light bulbs, air filters or water filters. If you ever need...
Installation Guide
Page 3
... service panel. ■ Installation work and electrical wiring must always be burned. ■ DO NOT USE WATER, including wet dishcloths or towels a violent steam explosion will result. ■ Use an extinguisher ONLY if: - The fire department is needed for proper combustion and exhausting of gases through the flue (chimney) of fire or electrical shock, do not vent exhaust air into spaces within walls or ceilings, attics or into wall...
... service panel. ■ Installation work and electrical wiring must always be burned. ■ DO NOT USE WATER, including wet dishcloths or towels a violent steam explosion will result. ■ Use an extinguisher ONLY if: - The fire department is needed for proper combustion and exhausting of gases through the flue (chimney) of fire or electrical shock, do not vent exhaust air into spaces within walls or ceilings, attics or into wall...

Installation Guide
Page 4
... template Parts supplied Remove parts from strong draft areas, such as windows, doors and strong heating vents. ■ Cabinet opening dimensions that all governing codes and ordinances. ■ It is required. For information on the model/serial rating plate. For Mobile Home Installations The installation of Saturn Fasteners, Inc. 4 See the "Accessories" section to attach filler strips). Tools needed ■ Wall or roof cap with installation clearances specified on ordering, see the "Accessories" section. Length and...
... template Parts supplied Remove parts from strong draft areas, such as windows, doors and strong heating vents. ■ Cabinet opening dimensions that all governing codes and ordinances. ■ It is required. For information on the model/serial rating plate. For Mobile Home Installations The installation of Saturn Fasteners, Inc. 4 See the "Accessories" section to attach filler strips). Tools needed ■ Wall or roof cap with installation clearances specified on ordering, see the "Accessories" section. Length and...

Installation Guide
Page 10
... cord kit installations, follow the instructions in the terminal box. Removal of your home power supply cable) and install a UL listed or CSA approved ¹⁄₂" strain relief. NOTE: The 7" (17.8 cm) round vent mounting plate and 3¹⁄₄" x 10" (8.3 x 25.4 cm) rectangular vent damper can be enough wiring from the fused disconnect (or circuit breaker) box to make the connection in the hood electrical terminal box. C B A. Hinge pin D. Horizontal vent connector with damper ■ If a vent damper...
... cord kit installations, follow the instructions in the terminal box. Removal of your home power supply cable) and install a UL listed or CSA approved ¹⁄₂" strain relief. NOTE: The 7" (17.8 cm) round vent mounting plate and 3¹⁄₄" x 10" (8.3 x 25.4 cm) rectangular vent damper can be enough wiring from the fused disconnect (or circuit breaker) box to make the connection in the hood electrical terminal box. C B A. Hinge pin D. Horizontal vent connector with damper ■ If a vent damper...

Installation Guide
Page 11
... electrical shock. 4. Disconnect power and check wiring connections. Failure to do so can result in terminal box and securely tighten. 5. Use UL listed wire connectors and connect white wires (A) together. Fire Hazard Electrically ground the blower. Failure to green ground screw in death or electrical shock. 1. Complete Installation 1. Replace grease filter. White wires B. Black wires C. Home power supply cable or power cord accessory kit F. Connect ground wire to see whether a circuit breaker has tripped or a household fuse has blown. Replace the 2 bottom panels...
... electrical shock. 4. Disconnect power and check wiring connections. Failure to do so can result in terminal box and securely tighten. 5. Use UL listed wire connectors and connect white wires (A) together. Fire Hazard Electrically ground the blower. Failure to green ground screw in death or electrical shock. 1. Complete Installation 1. Replace grease filter. White wires B. Black wires C. Home power supply cable or power cord accessory kit F. Connect ground wire to see whether a circuit breaker has tripped or a household fuse has blown. Replace the 2 bottom panels...

Installation Guide
Page 12
Metal or Charcoal Filter To Clean the Filter: 1. Blower speed maximum button Operating the light The On/Off light button controls both lights. Grease filter 3. For vented installations: Wash metal filters as needed in direction of the range hood. RANGE HOOD USE The range hood is designed to remove smoke, cooking vapors and odors from the filter retainer. 2. Halogen lights B. Grease filter C. Replace grease filter before cooking and allow it to the stainless steel, do not use soap-filled scouring pads, abrasive cleaners, Cooktop Polishing Creme, steel wool, gritty ...
Metal or Charcoal Filter To Clean the Filter: 1. Blower speed maximum button Operating the light The On/Off light button controls both lights. Grease filter 3. For vented installations: Wash metal filters as needed in direction of the range hood. RANGE HOOD USE The range hood is designed to remove smoke, cooking vapors and odors from the filter retainer. 2. Halogen lights B. Grease filter C. Replace grease filter before cooking and allow it to the stainless steel, do not use soap-filled scouring pads, abrasive cleaners, Cooktop Polishing Creme, steel wool, gritty ...
Installation Guide
Page 13
... lamp with a GU10 base. Reconnect power. 13 To avoid damage or decreasing the life of the range hood. It will spring back into place to cool. Replace lamp, using tissue or wearing cotton gloves to be toward the front of the new lamp, do not operate, make sure the lamps are inserted correctly before calling service. 1. Remove the lamp and replace it counterclockwise. 3. To reinstall the filter...
... lamp with a GU10 base. Reconnect power. 13 To avoid damage or decreasing the life of the range hood. It will spring back into place to cool. Replace lamp, using tissue or wearing cotton gloves to be toward the front of the new lamp, do not operate, make sure the lamps are inserted correctly before calling service. 1. Remove the lamp and replace it counterclockwise. 3. To reinstall the filter...

Installation Guide
Page 16
... electrical or plumbing codes, or use or when it is installed in an inaccessible location or is not installed in -home service is covered by the customer. The cost of repair or replacement under this limited warranty. ITEMS EXCLUDED FROM WARRANTY This limited warranty does not cover: 1. If you may find this information on the model and serial number label located on how to use your major appliance for in a remote...
... electrical or plumbing codes, or use or when it is installed in an inaccessible location or is not installed in -home service is covered by the customer. The cost of repair or replacement under this limited warranty. ITEMS EXCLUDED FROM WARRANTY This limited warranty does not cover: 1. If you may find this information on the model and serial number label located on how to use your major appliance for in a remote...


