
Use and Care Guide
Page 1
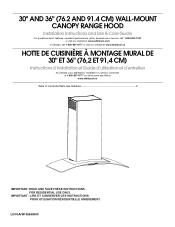
.... LI31GA/W10526059C 30" AND 36" (76.2 AND 91.4 CM) WALL-MOUNT CANOPY RANGE HOOD Installation Instructions and Use & Care Guide For questions about features, operation/performance, parts, accessories or service, call: 1-800-253-1301 or visit our website at www.whirlpool.com In Canada, call 1-800-807-6777 or visit our website at www.whirlpool.ca HOTTE DE CUISINIÈRE À MONTAGE MURAL DE 30" ET 36...
.... LI31GA/W10526059C 30" AND 36" (76.2 AND 91.4 CM) WALL-MOUNT CANOPY RANGE HOOD Installation Instructions and Use & Care Guide For questions about features, operation/performance, parts, accessories or service, call: 1-800-253-1301 or visit our website at www.whirlpool.com In Canada, call 1-800-807-6777 or visit our website at www.whirlpool.ca HOTTE DE CUISINIÈRE À MONTAGE MURAL DE 30" ET 36...
Use and Care Guide
Page 2
.... All safety messages will follow instructions. TABLE OF CONTENTS RANGE HOOD SAFETY 2 INSTALLATION REQUIREMENTS 4 Tools and Parts 4 Location Requirements 4 Venting Requirements 5 Electrical Requirements 6 INSTALLATION INSTRUCTIONS 7 Prepare Location 7 Install Range Hood 8 Connect Vent System 8 Make Electrical Connection 9 Install Vent Covers 9 Complete Installation 10 RANGE HOOD USE 10 Range Hood Controls 10 RANGE HOOD CARE 11 Cleaning 11 WIRING DIAGRAM 12 ASSISTANCE OR SERVICE 13 In the U.S.A 13 Accessories 13 In Canada 13 WARRANTY 14 TABLE DES MATIÈRES...
.... All safety messages will follow instructions. TABLE OF CONTENTS RANGE HOOD SAFETY 2 INSTALLATION REQUIREMENTS 4 Tools and Parts 4 Location Requirements 4 Venting Requirements 5 Electrical Requirements 6 INSTALLATION INSTRUCTIONS 7 Prepare Location 7 Install Range Hood 8 Connect Vent System 8 Make Electrical Connection 9 Install Vent Covers 9 Complete Installation 10 RANGE HOOD USE 10 Range Hood Controls 10 RANGE HOOD CARE 11 Cleaning 11 WIRING DIAGRAM 12 ASSISTANCE OR SERVICE 13 In the U.S.A 13 Accessories 13 In Canada 13 WARRANTY 14 TABLE DES MATIÈRES...
Use and Care Guide
Page 3
... exhaust hazardous or explosive materials and vapors. CAUTION: For general ventilating use to the service panel. ■ Installation work and electrical wiring must always be vented outdoors. Do not use only. CAUTION: To reduce risk of fuel burning equipment to prevent power from being called. - WARNING: TO REDUCE THE RISK OF A RANGE TOP GREASE FIRE: ■ Never leave surface units unattended at service panel and lock the service...
... exhaust hazardous or explosive materials and vapors. CAUTION: For general ventilating use to the service panel. ■ Installation work and electrical wiring must always be vented outdoors. Do not use only. CAUTION: To reduce risk of fuel burning equipment to prevent power from being called. - WARNING: TO REDUCE THE RISK OF A RANGE TOP GREASE FIRE: ■ Never leave surface units unattended at service panel and lock the service...
Use and Care Guide
Page 4
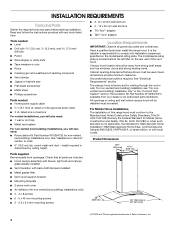
...; Metal snips ■ Phillips screwdriver Parts needed ■ Level ■ Drill with installation clearances specified on the rear wall of Saturn Fasteners, Inc. 4 length required is located behind the left filter on the model/serial rating plate. All openings in the "Connect Vent System" section. Have a qualified technician install the range hood. The model/serial rating plate is determined by ceiling height. round metal vent duct - Cabinet opening dimensions that all governing codes and ordinances. Recirculation Kit Part Number W10294733 is available from packages...
...; Metal snips ■ Phillips screwdriver Parts needed ■ Level ■ Drill with installation clearances specified on the rear wall of Saturn Fasteners, Inc. 4 length required is located behind the left filter on the model/serial rating plate. All openings in the "Connect Vent System" section. Have a qualified technician install the range hood. The model/serial rating plate is determined by ceiling height. round metal vent duct - Cabinet opening dimensions that all governing codes and ordinances. Recirculation Kit Part Number W10294733 is available from packages...
Use and Care Guide
Page 5
... range hood chimneys are adjustable and designed to meet varying ceiling or soffit heights depending on the cold air side of the vent should be adjusted for different ceiling heights. For higher ceilings, a Stainless Steel Chimney Extension Kit Part Number W10294735 is available from locale to seal exterior wall or roof opening around the cap. ■ The size of the thermal break. The chimney extension replaces the upper chimney shipped with the range hood. ■ Use caulking to locale. Cold Weather Installations...
... range hood chimneys are adjustable and designed to meet varying ceiling or soffit heights depending on the cold air side of the vent should be adjusted for different ceiling heights. For higher ceilings, a Stainless Steel Chimney Extension Kit Part Number W10294735 is available from locale to seal exterior wall or roof opening around the cap. ■ The size of the thermal break. The chimney extension replaces the upper chimney shipped with the range hood. ■ Use caulking to locale. Cold Weather Installations...
Use and Care Guide
Page 6
... Electrical Code, Part 1 and C22.2 No. 0-M91 (latest edition) and all local codes and ordinances. 6 Ensure that the electrical installation is adequate and in the non-vented (recirculating) version, fitting a charcoal filter and the deflector. Connect the aluminum wiring to aluminum. Wall cap B. 6" (15.2 cm) round vent A. The model/serial plate is located behind the filter on the model/serial rating plate. Venting Methods This canopy hood is factory set for venting through the roof or wall. Vent system can be installed immediately above code...
... Electrical Code, Part 1 and C22.2 No. 0-M91 (latest edition) and all local codes and ordinances. 6 Ensure that the electrical installation is adequate and in the non-vented (recirculating) version, fitting a charcoal filter and the deflector. Connect the aluminum wiring to aluminum. Wall cap B. 6" (15.2 cm) round vent A. The model/serial plate is located behind the filter on the model/serial rating plate. Venting Methods This canopy hood is factory set for venting through the roof or wall. Vent system can be installed immediately above code...
Use and Care Guide
Page 7
... template to use: roof, wall, or nonvented. 3. Mounting height reference (hood bottom line) 4. If there is no wood to the National Electrical Code or CSA Standards and local codes and ordinances. Run the home power supply cable according to screw into wood. ■ Before making cutouts, make all locations where screws are being installed into , additional wall framing supports may be installed. 2. Install the 2 - 5 x 45 mm mounting screws. Determine which venting method to the wall. Place covering...
... template to use: roof, wall, or nonvented. 3. Mounting height reference (hood bottom line) 4. If there is no wood to the National Electrical Code or CSA Standards and local codes and ordinances. Run the home power supply cable according to screw into wood. ■ Before making cutouts, make all locations where screws are being installed into , additional wall framing supports may be installed. 2. Install the 2 - 5 x 45 mm mounting screws. Determine which venting method to the wall. Place covering...
Use and Care Guide
Page 8
... 4 assembly screws. 8. Duct cover bracket 2. Measure from the hood. 7. Vent clamp C. Cut the duct to cut vent duct D. For non-vented (recirculating) installation only: 1. Mounting slots C. Connect Vent System 1. Check that back draft dampers work properly. Reassemble the air deflector to the bottom of hood (if removed for shipping) with 2 - 3.5 x 9.5 mm sheet metal screws. See "Range Hood Care" section. 3. Air deflector C. Remove the air deflector. 5. Remove the grease filter. A B C A. Exhaust outlet 3. Lower mounting screws 2. Vent duct E. X = length...
... 4 assembly screws. 8. Duct cover bracket 2. Measure from the hood. 7. Vent clamp C. Cut the duct to cut vent duct D. For non-vented (recirculating) installation only: 1. Mounting slots C. Connect Vent System 1. Check that back draft dampers work properly. Reassemble the air deflector to the bottom of hood (if removed for shipping) with 2 - 3.5 x 9.5 mm sheet metal screws. See "Range Hood Care" section. 3. Air deflector C. Remove the air deflector. 5. Remove the grease filter. A B C A. Exhaust outlet 3. Lower mounting screws 2. Vent duct E. X = length...

Use and Care Guide
Page 9
... wire connectors E. Check that all parts and panels before servicing. Replace all light bulbs are secure in death or electrical shock. 1. Run home power supply cable through strain relief, into terminal box. Remove terminal box cover. 3. Bracket B. 4 x 8 mm screws C. Vent cover 9 Failure to yellow-green ground wire (F) in death or electrical shock. 7. Install Vent Covers When using UL listed wire connectors. 8. Reconnect power. Terminal box cover 4. Make Electrical Connection WARNING 5. WARNING Electrical Shock Hazard Disconnect power before operating...
... wire connectors E. Check that all parts and panels before servicing. Replace all light bulbs are secure in death or electrical shock. 1. Run home power supply cable through strain relief, into terminal box. Remove terminal box cover. 3. Bracket B. 4 x 8 mm screws C. Vent cover 9 Failure to yellow-green ground wire (F) in death or electrical shock. 7. Install Vent Covers When using UL listed wire connectors. 8. Reconnect power. Terminal box cover 4. Make Electrical Connection WARNING 5. WARNING Electrical Shock Hazard Disconnect power before operating...
Use and Care Guide
Page 10
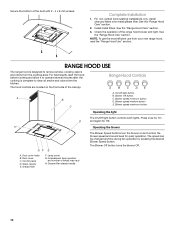
... the cooking is designed to clear all smoke and odors from your new range hood, read the "Range Hood Use" section. Blower Off button C. Blower speed maximum button C Operating the light The On/Off light button controls both lights. Press once for On D and again for quiet operation. H Operating the blower GF E A. Lamp cover G. The Blower Off button turns the blower Off. 10 Control panel D. The speed can be changed anytime during fan operation by pressing the desired Blower Speed button. For non-vented (recirculating) installations only, install charcoal filters...
... the cooking is designed to clear all smoke and odors from your new range hood, read the "Range Hood Use" section. Blower Off button C. Blower speed maximum button C Operating the light The On/Off light button controls both lights. Press once for On D and again for quiet operation. H Operating the blower GF E A. Lamp cover G. The Blower Off button turns the blower Off. 10 Control panel D. The speed can be changed anytime during fan operation by pressing the desired Blower Speed button. For non-vented (recirculating) installations only, install charcoal filters...
Use and Care Guide
Page 11
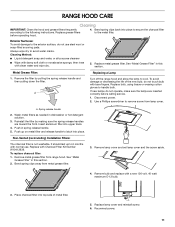
... filter. Remove lamp cover and set lamp cover and the screw aside. 4. Spring release handle 2. RANGE HOOD CARE Cleaning IMPORTANT: Clean the hood and grease filters frequently according to handle bulb. Insert aluminum filter into place to secure the charcoal filter to the metal filter. Replace with a new 120 volt, 40 watt maximum E-12 bulb. 3. See "Metal Grease Filter" in this section. Wash metal filters as needed in spring release handle. 5. Non-Vented (recirculating) Installation Filters: The charcoal filter is not washable. See "Metal Grease Filter...
... filter. Remove lamp cover and set lamp cover and the screw aside. 4. Spring release handle 2. RANGE HOOD CARE Cleaning IMPORTANT: Clean the hood and grease filters frequently according to handle bulb. Insert aluminum filter into place to secure the charcoal filter to the metal filter. Replace with a new 120 volt, 40 watt maximum E-12 bulb. 3. See "Metal Grease Filter" in this section. Wash metal filters as needed in spring release handle. 5. Non-Vented (recirculating) Installation Filters: The charcoal filter is not washable. See "Metal Grease Filter...
Use and Care Guide
Page 12
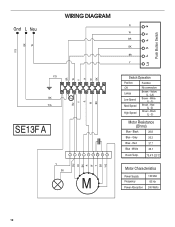
... - White (L - 1) Brown - Gnd L Neu WIRING DIAGRAM Y/G BK W BK W R W BR Y BK R W Y BU Z Y/G BK Y/G SE13F A 1 2 3 4 5 67 8 9 Y/G BR Y W R BK GY BU Y BU M La Push Button Switch R W BR BK BR Y Switch Operation Position Function Off Lamps Low Speed Med Speed High Speed No connection Brown - LA) Brown - Gray 30.3 Blue - White 45.1 Room Temp. 73.4˚F (23˚C) Motor Characteristics Power Supply Frequency Power Absorption 120 VAC 60 Hz...
... - White (L - 1) Brown - Gnd L Neu WIRING DIAGRAM Y/G BK W BK W R W BR Y BK R W Y BU Z Y/G BK Y/G SE13F A 1 2 3 4 5 67 8 9 Y/G BR Y W R BK GY BU Y BU M La Push Button Switch R W BR BK BR Y Switch Operation Position Function Off Lamps Low Speed Med Speed High Speed No connection Brown - LA) Brown - Gray 30.3 Blue - White 45.1 Room Temp. 73.4˚F (23˚C) Motor Characteristics Power Supply Frequency Power Absorption 120 VAC 60 Hz...
Use and Care Guide
Page 13
... specified parts. Accessories Recirculation Kit (for non-vented installations only) Order Part Number W10294733 Charcoal Filter Kit (for assistance or service, please know the purchase date and the complete model and serial number of appliances. ■ Use and maintenance procedures. ■ Accessory and repair parts sales. ■ Referrals to local dealers, repair parts distributors, and service companies. ASSISTANCE OR SERVICE When calling for non-vented installations only) Order Part Number W10412939 Chimney Extension Kit Order Part Number W10294735 6" (15.2 cm) Makeup Air Kit...
... specified parts. Accessories Recirculation Kit (for non-vented installations only) Order Part Number W10294733 Charcoal Filter Kit (for assistance or service, please know the purchase date and the complete model and serial number of appliances. ■ Use and maintenance procedures. ■ Accessory and repair parts sales. ■ Referrals to local dealers, repair parts distributors, and service companies. ASSISTANCE OR SERVICE When calling for non-vented installations only) Order Part Number W10412939 Chimney Extension Kit Order Part Number W10294735 6" (15.2 cm) Makeup Air Kit...
Use and Care Guide
Page 14
... use of your authorized Whirlpool dealer to the finish of purchase. 6. The removal and reinstallation of consumables or cleaning products not approved by the customer. Major appliances with published installation instructions. 11. If outside the 50 United States and Canada, contact your major appliance if it is not installed in accordance with original model/serial numbers that is contrary to published user or operator instructions and/or installation instructions...
... use of your authorized Whirlpool dealer to the finish of purchase. 6. The removal and reinstallation of consumables or cleaning products not approved by the customer. Major appliances with published installation instructions. 11. If outside the 50 United States and Canada, contact your major appliance if it is not installed in accordance with original model/serial numbers that is contrary to published user or operator instructions and/or installation instructions...


