
Installation Instructions
Page 1
..." or "WARNING." Always read and obey all safety messages. ® ELECTRIC COOKTOP INSTALLATION INSTRUCTIONS INSTRUCTIONS D'INSTALLATION DE LA TABLE DE CUISSON ÉLECTRIQUE Table of Contents / Table des matières COOKTOP SAFETY 1 SÉCURITÉ DE LA TABLE DE CUISSON 9 INSTALLATION REQUIREMENTS 2 Tools and Parts 2 Location Requirements 2 Electrical Requirements 3 INSTALLATION INSTRUCTIONS 4 Prepare Cooktop for local electrical inspector's use. These words mean: DANGER You can be killed or seriously...
..." or "WARNING." Always read and obey all safety messages. ® ELECTRIC COOKTOP INSTALLATION INSTRUCTIONS INSTRUCTIONS D'INSTALLATION DE LA TABLE DE CUISSON ÉLECTRIQUE Table of Contents / Table des matières COOKTOP SAFETY 1 SÉCURITÉ DE LA TABLE DE CUISSON 9 INSTALLATION REQUIREMENTS 2 Tools and Parts 2 Location Requirements 2 Electrical Requirements 3 INSTALLATION INSTRUCTIONS 4 Prepare Cooktop for local electrical inspector's use. These words mean: DANGER You can be killed or seriously...

Installation Instructions
Page 2
... "Electrical Requirements" section. Given dimensions are given with any tools listed here. See "Electrical Requirements" section. Check the cooktop base for ½" (1.3 cm) diameter conduit ■ UL listed wire connectors Check local codes. Tools needed ■ Tape measure ■ Marker or pencil ■ ¼" (6.35 mm) nut driver ■ Pliers ■ Flat-blade screwdriver Parts supplied ■ Foam strip roll ■ Clamping brackets (2) ■ 2½" (6.4 cm) clamping screws (2) Parts needed...
... "Electrical Requirements" section. Given dimensions are given with any tools listed here. See "Electrical Requirements" section. Check the cooktop base for ½" (1.3 cm) diameter conduit ■ UL listed wire connectors Check local codes. Tools needed ■ Tape measure ■ Marker or pencil ■ ¼" (6.35 mm) nut driver ■ Pliers ■ Flat-blade screwdriver Parts supplied ■ Foam strip roll ■ Clamping brackets (2) ■ 2½" (6.4 cm) clamping screws (2) Parts needed...

Installation Instructions
Page 3
.... Electrically ground cooktop. A D Electrical Requirements WARNING C B L F G E H I . Model/serial number plate ■ The cooktop is required on a separate, 40-amp circuit fused on 36" models B. Cabinet Dimensions IMPORTANT: If installing a range hood or microwave hood combination above the cooktop, follow the range hood or microwave hood combination installation instructions for it is located on 36" (91.4 cm) models K. 1" (2.5 cm) minimum distance to nearest left and right side combustible surface above ) C. 30" (76.2 cm) minimum clearance between back wall and countertop...
.... Electrically ground cooktop. A D Electrical Requirements WARNING C B L F G E H I . Model/serial number plate ■ The cooktop is required on a separate, 40-amp circuit fused on 36" models B. Cabinet Dimensions IMPORTANT: If installing a range hood or microwave hood combination above the cooktop, follow the range hood or microwave hood combination installation instructions for it is located on 36" (91.4 cm) models K. 1" (2.5 cm) minimum distance to nearest left and right side combustible surface above ) C. 30" (76.2 cm) minimum clearance between back wall and countertop...

Installation Instructions
Page 4
.... 2. Remove one strip at cooktop base ends. 30" (76.2 cm) traditional knob models B C A B C A. Determine whether your cabinet construction provides clearance for installing clamping brackets at a time and apply foam strip adhesive-side down on uneven counters. Clamping bracket B. Cooktop base bottom B. Attachment screw C. INSTALLATION INSTRUCTIONS Prepare Cooktop for the cooktop. Remove foam strip roll from the fuse box or circuit breaker box should be connected directly to the junction box through flexible, armored or nonmetallic sheathed, copper cable. Using...
.... 2. Remove one strip at cooktop base ends. 30" (76.2 cm) traditional knob models B C A B C A. Determine whether your cabinet construction provides clearance for installing clamping brackets at a time and apply foam strip adhesive-side down on uneven counters. Clamping bracket B. Cooktop base bottom B. Attachment screw C. INSTALLATION INSTRUCTIONS Prepare Cooktop for the cooktop. Remove foam strip roll from the fuse box or circuit breaker box should be connected directly to the junction box through flexible, armored or nonmetallic sheathed, copper cable. Using...

Installation Instructions
Page 5
... edge. If repositioning is parallel to Countertop") F. Rotate brackets so they are not resting on a covered surface using the bracket mounting holes selected in "Attach Cooktop to the front edge of the cooktop is needed , lift entire cooktop up from the packaging. NOTE: Make sure that the knobs are perpendicular to the edge of the cooktop base and extend beyond edge of clamping screws...
... edge. If repositioning is parallel to Countertop") F. Rotate brackets so they are not resting on a covered surface using the bracket mounting holes selected in "Attach Cooktop to the front edge of the cooktop is needed , lift entire cooktop up from the packaging. NOTE: Make sure that the knobs are perpendicular to the edge of the cooktop base and extend beyond edge of clamping screws...

Installation Instructions
Page 6
... wires together using the UL listed wire connectors. 9. Connect the two white wires together using a UL listed or CSA approved connector for ½" (1.3 cm) conduit. 4. Install junction box cover. 10. Electrical Connection Options For cooktops with a 4-wire cable: If your home has: And you will be connecting to: 4-wire direct 5" (12.7 cm) A fused disconnect or circuit breaker box Go to Section: 4-Wire Cable from Power Supply to 4-Wire Cable from Cooktop 3-wire direct 3¹⁄₂" (8.9 cm) A fused disconnect or circuit breaker box 3-Wire...
... wires together using the UL listed wire connectors. 9. Connect the two white wires together using a UL listed or CSA approved connector for ½" (1.3 cm) conduit. 4. Install junction box cover. 10. Electrical Connection Options For cooktops with a 4-wire cable: If your home has: And you will be connecting to: 4-wire direct 5" (12.7 cm) A fused disconnect or circuit breaker box Go to Section: 4-Wire Cable from Power Supply to 4-Wire Cable from Cooktop 3-wire direct 3¹⁄₂" (8.9 cm) A fused disconnect or circuit breaker box 3-Wire...

Installation Instructions
Page 8
.... 3. Glass cooktop B. Do not overtighten. Black wires I D A. 3-wire cable from power supply B. D C A. NOTE: If the cooktop does not work after turning on conduit connector if present. 5. Connect the two red wires together using the UL listed wire connectors. 6. Clamping bracket (extends far enough beyond cooktop base to the white (neutral) wire in the Use and Care Guide for further information. Connect the flexible cable conduit from the cooktop to clean cooktop before use. Red wires C. 3-Wire Cable from Power...
.... 3. Glass cooktop B. Do not overtighten. Black wires I D A. 3-wire cable from power supply B. D C A. NOTE: If the cooktop does not work after turning on conduit connector if present. 5. Connect the two red wires together using the UL listed wire connectors. 6. Clamping bracket (extends far enough beyond cooktop base to the white (neutral) wire in the Use and Care Guide for further information. Connect the flexible cable conduit from the cooktop to clean cooktop before use. Red wires C. 3-Wire Cable from Power...
Warranty Information
Page 1
... Use & Care Guide. Service calls to refrigerator or freezer product failures. 7. Cosmetic damage, including scratches, dents, chips or other than normal, single-family household use of consumables or cleaning products not approved by the customer. This major appliance is designed to be borne by Whirlpool. 5. Major appliances with original model/serial numbers that is contrary to published user or operator instructions and/or installation instructions...
... Use & Care Guide. Service calls to refrigerator or freezer product failures. 7. Cosmetic damage, including scratches, dents, chips or other than normal, single-family household use of consumables or cleaning products not approved by the customer. This major appliance is designed to be borne by Whirlpool. 5. Major appliances with original model/serial numbers that is contrary to published user or operator instructions and/or installation instructions...
Use & Care Guide
Page 2
... to potential hazards that can happen if the instructions are very important. KNOB CONTROLS 9 Dual/Triple-Circuit Element 9 Bridge Element 10 Warm Zone Element 10 ACCUSIMMER® Feature 11 COOKTOP USE 11 Ceramic Glass 11 Home Canning 12 Cookware 12 COOKTOP CARE 13 General Cleaning 13 TROUBLESHOOTING 14 ASSISTANCE OR SERVICE 15 In the U.S.A 15 Accessories 15 In Canada 15 WARRANTY 16 TABLE DES MATIÈRES SÉCURIT...
... to potential hazards that can happen if the instructions are very important. KNOB CONTROLS 9 Dual/Triple-Circuit Element 9 Bridge Element 10 Warm Zone Element 10 ACCUSIMMER® Feature 11 COOKTOP USE 11 Ceramic Glass 11 Home Canning 12 Cookware 12 COOKTOP CARE 13 General Cleaning 13 TROUBLESHOOTING 14 ASSISTANCE OR SERVICE 15 In the U.S.A 15 Accessories 15 In Canada 15 WARRANTY 16 TABLE DES MATIÈRES SÉCURIT...
Use & Care Guide
Page 3
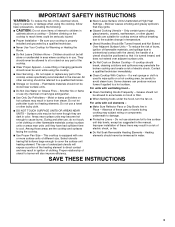
... INSTRUCTIONS WARNING: To reduce the risk of fire, electrical shock, injury to persons, or damage when using the cooktop. ■ User Servicing - Surface units may become hot enough to children in burns from steam. Contact a qualified technician immediately. ■ Clean Cooktop With Caution - Improper installation of undersized utensils will also improve efficiency. ■ Never Leave Surface Units Unattended at High Heat Settings - Do not repair or replace...
... INSTRUCTIONS WARNING: To reduce the risk of fire, electrical shock, injury to persons, or damage when using the cooktop. ■ User Servicing - Surface units may become hot enough to children in burns from steam. Contact a qualified technician immediately. ■ Clean Cooktop With Caution - Improper installation of undersized utensils will also improve efficiency. ■ Never Leave Surface Units Unattended at High Heat Settings - Do not repair or replace...

Use & Care Guide
Page 5
... maximum element operation, all controls when done cooking. Power level 1 light To Use: 1. When any surface cooking area is too hot to a fast and rapid boil. COOKTOP CONTROLS - Medium High Between 7-9 Med 6 ■ Hold a rapid boil. ■ Quickly brown or sear food. ■ Maintain a slow boil. ■ Fry or sauté foods. Hot Surface Indicator Light The Hot Surface Indicator Light is blinking. 4. The cooktop automatically reduces the power of the control panel, above the Power Level...
... maximum element operation, all controls when done cooking. Power level 1 light To Use: 1. When any surface cooking area is too hot to a fast and rapid boil. COOKTOP CONTROLS - Medium High Between 7-9 Med 6 ■ Hold a rapid boil. ■ Quickly brown or sear food. ■ Maintain a slow boil. ■ Fry or sauté foods. Hot Surface Indicator Light The Hot Surface Indicator Light is blinking. 4. The cooktop automatically reduces the power of the control panel, above the Power Level...

Use & Care Guide
Page 6
... the number of the surface cooking areas. C 2. Power level selector bar A beep will automatically shut off. 3. NOTE: If a power level setting is not selected within approximately 10 seconds, the element will sound each time a pad is touched. To change the burner zones being used, touch ON again. All Off/Lock The ALL OFF cooktop touch control turns off all lower temperatures, will glow red, indicating that...
... the number of the surface cooking areas. C 2. Power level selector bar A beep will automatically shut off. 3. NOTE: If a power level setting is not selected within approximately 10 seconds, the element will sound each time a pad is touched. To change the burner zones being used, touch ON again. All Off/Lock The ALL OFF cooktop touch control turns off all lower temperatures, will glow red, indicating that...
Use & Care Guide
Page 8
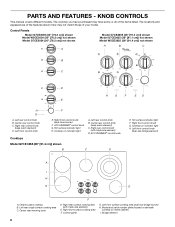
... Model and serial number plate (located underneath cooktop on metal cabinet) I H G E A. ACCUSIMMER® control knob G. Right rear control knob (with triple-size element) E. Left front control knob (dual-size bridge element) A I . Center rear control knob C. Cooktop on indicator light A. Control panel G. Right front control knob (dual-zone burner) F. Left front control knob Cooktops E. Left rear control knob B. Left rear single surface cooking area C. ACCUSIMMER® control knob Model G7CE 3655 (36" [91.4 cm]) shown B C D E. Ceramic glass cooktop B. KNOB...
... Model and serial number plate (located underneath cooktop on metal cabinet) I H G E A. ACCUSIMMER® control knob G. Right rear control knob (with triple-size element) E. Left front control knob (dual-size bridge element) A I . Center rear control knob C. Cooktop on indicator light A. Control panel G. Right front control knob (dual-zone burner) F. Left front control knob Cooktops E. Left rear control knob B. Left rear single surface cooking area C. ACCUSIMMER® control knob Model G7CE 3655 (36" [91.4 cm]) shown B C D E. Ceramic glass cooktop B. KNOB...
Use & Care Guide
Page 11
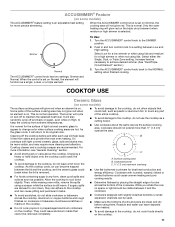
... control is an adjustable heat setting for a high simmer or when not using them. COOKTOP USE Ceramic Glass (on some models) The ACCUSIMMER® feature setting is set on . Dropping a heavy or hard object onto the cooktop could crack the cooktop. ■ To avoid damage to keep it will not glow red. When the ACCUSIMMER control knob is on the cooktop. To Use: 1. Increase heat as possible. Some parts of a ruler across the cooktop. Cleaning...
... control is an adjustable heat setting for a high simmer or when not using them. COOKTOP USE Ceramic Glass (on some models) The ACCUSIMMER® feature setting is set on . Dropping a heavy or hard object onto the cooktop could crack the cooktop. ■ To avoid damage to keep it will not glow red. When the ACCUSIMMER control knob is on the cooktop. To Use: 1. Increase heat as possible. Some parts of a ruler across the cooktop. Cleaning...
Use & Care Guide
Page 12
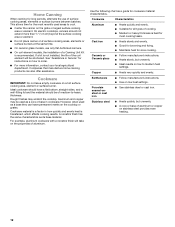
... "Assistance or Service" for instructions on 2 surface cooking areas, elements or surface burners at the same time. ■ On ceramic glass models, use of aluminum or copper on the cooktop or grates. Stainless steel ■ Heats quickly, but unevenly. ■ Ideal results on low to order. ■ For more than ½" (1.3 cm) beyond the surface cooking area or element. ■ Do not place canner on how to medium heat settings. Ideal cookware should...
... "Assistance or Service" for instructions on 2 surface cooking areas, elements or surface burners at the same time. ■ On ceramic glass models, use of aluminum or copper on the cooktop or grates. Stainless steel ■ Heats quickly, but unevenly. ■ Ideal results on low to order. ■ For more than ½" (1.3 cm) beyond the surface cooking area or element. ■ Do not place canner on how to medium heat settings. Ideal cookware should...

Use & Care Guide
Page 13
... Cooktop Scraper uses razor blades. Light to wear oven mitts while doing so. Metal marks from control panel to stainless steel surfaces, do not use steel wool, abrasive cleansers or oven cleaner. Continue rubbing until white film disappears. Always follow label instructions on surface and scrape. See "Control Lock" section. Cleaning Method: ■ Soap and water: Pull knobs straight away from aluminum and copper ■ affreshTM Cooktop Cleaner: Clean as soon as cooktop...
... Cooktop Scraper uses razor blades. Light to wear oven mitts while doing so. Metal marks from control panel to stainless steel surfaces, do not use steel wool, abrasive cleansers or oven cleaner. Continue rubbing until white film disappears. Always follow label instructions on surface and scrape. See "Control Lock" section. Cleaning Method: ■ Soap and water: Pull knobs straight away from aluminum and copper ■ affreshTM Cooktop Cleaner: Clean as soon as cooktop...

Use & Care Guide
Page 14
... the steps below. See "General Cleaning" section. 3. Cooktop cooking results not what expected ■ Is the proper cookware being used? Wipe debris from the control panel surface. ■ Has one or more keys are OFF. 2. Cookware should not extend more burners stopped working during use , the entire cooktop area may become hot? Level the appliance. Replace the fuse or reset the circuit breaker. Cooktop will operate ■ Has a household fuse blown...
... the steps below. See "General Cleaning" section. 3. Cooktop cooking results not what expected ■ Is the proper cookware being used? Wipe debris from the control panel surface. ■ Has one or more keys are OFF. 2. Cookware should not extend more burners stopped working during use , the entire cooktop area may become hot? Level the appliance. Replace the fuse or reset the circuit breaker. Cooktop will operate ■ Has a household fuse blown...
Use & Care Guide
Page 15
... and specifications on our full line of a service call the Whirlpool Customer eXperience Center toll free at : Customer eXperience Centre Whirlpool Canada LP 200 - 6750 Century Ave. Call the Whirlpool Customer eXperience Center toll free: 1-800-253-1301. Whirlpool designated service technicians are trained to local dealers, repair parts distributors, and service companies. Canning Unit Kit (coil element models) Order Part Number 242905 Cooktop Cleaner (ceramic glass models) Order Part Number 31464 Cooktop Protectant (ceramic glass models) Order Part Number 31463 Cooktop Care Kit...
... and specifications on our full line of a service call the Whirlpool Customer eXperience Center toll free at : Customer eXperience Centre Whirlpool Canada LP 200 - 6750 Century Ave. Call the Whirlpool Customer eXperience Center toll free: 1-800-253-1301. Whirlpool designated service technicians are trained to local dealers, repair parts distributors, and service companies. Canning Unit Kit (coil element models) Order Part Number 242905 Cooktop Cleaner (ceramic glass models) Order Part Number 31464 Cooktop Protectant (ceramic glass models) Order Part Number 31463 Cooktop Care Kit...

Use & Care Guide
Page 16
... the model and serial number label located on how to use or when it . ITEMS EXCLUDED FROM WARRANTY This limited warranty does not cover: 1. This major appliance is designed to be provided by calling Whirlpool. The removal and reinstallation of your authorized Whirlpool dealer to published user or operator instructions and/or installation instructions. 4. Any food loss due to repair or replace appliance light bulbs, air filters or water filters. Outside...
... the model and serial number label located on how to use or when it . ITEMS EXCLUDED FROM WARRANTY This limited warranty does not cover: 1. This major appliance is designed to be provided by calling Whirlpool. The removal and reinstallation of your authorized Whirlpool dealer to published user or operator instructions and/or installation instructions. 4. Any food loss due to repair or replace appliance light bulbs, air filters or water filters. Outside...

Dimension Guide
Page 1
... metal cabinet is required. Most models have a neutral (white) wire. q A 3-wire or 4-wire, single phase, 120/240 volt, 60-Hz., AC only electrical supply is rated 120/240 volt. q If the house has aluminum wiring, follow the instructions provided for dimensional clearances above the cooktop surface. Connect a section of conduit provided. To avoid this modification, use a base cabinet with product. Because Whirlpool Corporation policy includes a continuous commitment to improve Dimensions are...
... metal cabinet is required. Most models have a neutral (white) wire. q A 3-wire or 4-wire, single phase, 120/240 volt, 60-Hz., AC only electrical supply is rated 120/240 volt. q If the house has aluminum wiring, follow the instructions provided for dimensional clearances above the cooktop surface. Connect a section of conduit provided. To avoid this modification, use a base cabinet with product. Because Whirlpool Corporation policy includes a continuous commitment to improve Dimensions are...

