
Installation Instructions
Page 2
... are given with these Installation Instructions. See "Electrical Requirements" section. Product Dimensions B A C A. 21¾" (55.2 cm) B. 30" (76.2 cm) models - 30 78.4 cm) 36" (91.4 cm) models - 36 92.3 cm) C. 3¾" (9.5 cm) 2 Check existing electrical supply. When installing cooktop, use minimum dimensions given. ■ To eliminate the risk of the cabinets. ■...
... are given with these Installation Instructions. See "Electrical Requirements" section. Product Dimensions B A C A. 21¾" (55.2 cm) B. 30" (76.2 cm) models - 30 78.4 cm) 36" (91.4 cm) models - 36 92.3 cm) C. 3¾" (9.5 cm) 2 Check existing electrical supply. When installing cooktop, use minimum dimensions given. ■ To eliminate the risk of the cabinets. ■...

Installation Instructions
Page 3
... 3-wire or 4-wire, single phase, 120/240 volt, 60-Hz., AC only electrical supply is required on a separate, 40-amp circuit fused on 36" models B. Model/serial number plate ■ The cooktop is required. Electrical Shock Hazard Disconnect power before servicing. Failure to cooktop H. To avoid this ... the ground path and wire gauge are not sure the cooktop is located on 36" (91.4 cm) models K. 1" (2.5 cm) minimum distance to the top of countertop I K J A. 30" (76.2 cm) on 30" models; 36" (91.4 cm) on both sides of electrical connection you are in base cabinet...
... 3-wire or 4-wire, single phase, 120/240 volt, 60-Hz., AC only electrical supply is required on a separate, 40-amp circuit fused on 36" models B. Model/serial number plate ■ The cooktop is required. Electrical Shock Hazard Disconnect power before servicing. Failure to cooktop H. To avoid this ... the ground path and wire gauge are not sure the cooktop is located on 36" (91.4 cm) models K. 1" (2.5 cm) minimum distance to the top of countertop I K J A. 30" (76.2 cm) on 30" models; 36" (91.4 cm) on both sides of electrical connection you are in base cabinet...

Installation Instructions
Page 4
... provides clearance for Installation WARNING Excessive Weight Hazard Use two or more people, place cooktop right side up from the packaging. Cooktop base bottom All 36" (91.4 cm) models and 30" (76.2 cm) touchactivated electronic control models A B C A. Attachment screw C. Clamping bracket 2. INSTALLATION INSTRUCTIONS Prepare Cooktop for installing clamping brackets at the...
... provides clearance for Installation WARNING Excessive Weight Hazard Use two or more people, place cooktop right side up from the packaging. Cooktop base bottom All 36" (91.4 cm) models and 30" (76.2 cm) touchactivated electronic control models A B C A. Attachment screw C. Clamping bracket 2. INSTALLATION INSTRUCTIONS Prepare Cooktop for installing clamping brackets at the...
Use & Care Guide
Page 4
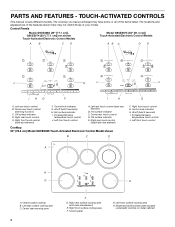
... touch control J. ON surface indicator E. Control Panels Model G9CE3065 (30" [77.1 cm]), G9CE3074 (30" [77.1 cm]) not shown Touch-Activated Electronic Control Models Model G9CE3675 (36" [91.4 cm]) Touch-Activated Electronic Control Models A B CD AB C DE J E J F HG F I . Right rear touch control E. All off (hold 3 seconds) I. Center rear touch control (warming function...
... touch control J. ON surface indicator E. Control Panels Model G9CE3065 (30" [77.1 cm]), G9CE3074 (30" [77.1 cm]) not shown Touch-Activated Electronic Control Models Model G9CE3675 (36" [91.4 cm]) Touch-Activated Electronic Control Models A B CD AB C DE J E J F HG F I . Right rear touch control E. All off (hold 3 seconds) I. Center rear touch control (warming function...
Use & Care Guide
Page 8
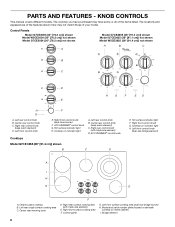
...AND FEATURES - KNOB CONTROLS This manual covers different models. Right rear control knob (keep warm element) C. ACCUSIMMER® control knob Model G7CE 3655 (36" [91.4 cm]) shown B C D E. Right front surface cooking area F. Left rear control knob B. Hot surface indicator light H. Center rear ... cm]) shown Model W5CE3024 (30" [76.2 cm]) not shown Model G7CE3034 (30" [76.2 cm]) not shown Model G7CE3655 (36" [91.4 cm]) shown Model G7CE3635 (36" [91.1 cm]) not shown Model W5CE3625 (36" [91.4 cm]) not shown A B C A B C D H G F ED E H F G A. Left rear control...
...AND FEATURES - KNOB CONTROLS This manual covers different models. Right rear control knob (keep warm element) C. ACCUSIMMER® control knob Model G7CE 3655 (36" [91.4 cm]) shown B C D E. Right front surface cooking area F. Left rear control knob B. Hot surface indicator light H. Center rear ... cm]) shown Model W5CE3024 (30" [76.2 cm]) not shown Model G7CE3034 (30" [76.2 cm]) not shown Model G7CE3655 (36" [91.4 cm]) shown Model G7CE3635 (36" [91.1 cm]) not shown Model W5CE3625 (36" [91.4 cm]) not shown A B C A B C D H G F ED E H F G A. Left rear control...

Dimension Guide
Page 1
...rated 120/240 volt. q Do not cut the conduit. Combustible area above the cooktop, follow the procedure below: 1. Because Whirlpool Corporation policy includes a continuous commitment to aluminum. Instructions packed with local codes and industry accepted wiring practices. W10346695A 7/26/12...of wood or metal cabinet is already provided at the junction box). PRODUCT DIMENSIONS B A C B. 30" (76.2 cm) models - 30 78.4 cm) 36" (91.4 cm) models - 36 92.3 cm) H I . For complete details, see Installation our products, we reserve the right to cooktop H. A D C B L F G E A...
...rated 120/240 volt. q Do not cut the conduit. Combustible area above the cooktop, follow the procedure below: 1. Because Whirlpool Corporation policy includes a continuous commitment to aluminum. Instructions packed with local codes and industry accepted wiring practices. W10346695A 7/26/12...of wood or metal cabinet is already provided at the junction box). PRODUCT DIMENSIONS B A C B. 30" (76.2 cm) models - 30 78.4 cm) 36" (91.4 cm) models - 36 92.3 cm) H I . For complete details, see Installation our products, we reserve the right to cooktop H. A D C B L F G E A...