
Dimension Guide
Page 1
... 3/4" (1.9 cm) Depth Model "A" 14 cu.ft. 29-3/4" (75.6 cm) 15 cu.ft. 31-1/8" (79.1 cm) 16 cu.ft. 31-1/8" ET6WSKXS (79.1 cm) Cab. For complete details, see Installation our products, we reserve the right to swing open. If you are for the door to change without notice. If your cold water supply, the water pressure to the reverse osmosis system needs to allow for the water line connections. Height "B" "C" "D" 28" 28...
... 3/4" (1.9 cm) Depth Model "A" 14 cu.ft. 29-3/4" (75.6 cm) 15 cu.ft. 31-1/8" (79.1 cm) 16 cu.ft. 31-1/8" ET6WSKXS (79.1 cm) Cab. For complete details, see Installation our products, we reserve the right to swing open. If you are for the door to change without notice. If your cold water supply, the water pressure to the reverse osmosis system needs to allow for the water line connections. Height "B" "C" "D" 28" 28...
Energy Guide
Page 1
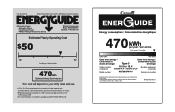
Refrigerator-Freezer • Automatic Defrost • Top-Mounted Freezer • Without Through-The-Door-Ice Service Whirlpool Corporation Model: W8TXNGFW*0* Capacity: 17.6 Cubic Feet Estimated Yearly Operating Cost $50 $42 $52 Cost Range of Similar Models 470 kWh Estimated Yearly Electricity Use Your cost will depend on your utility rates and use. 16.5 to 18.4 Cost range based only on models of similar capacity with automatic defrost, top-mounted freezer, and without...
Refrigerator-Freezer • Automatic Defrost • Top-Mounted Freezer • Without Through-The-Door-Ice Service Whirlpool Corporation Model: W8TXNGFW*0* Capacity: 17.6 Cubic Feet Estimated Yearly Operating Cost $50 $42 $52 Cost Range of Similar Models 470 kWh Estimated Yearly Electricity Use Your cost will depend on your utility rates and use. 16.5 to 18.4 Cost range based only on models of similar capacity with automatic defrost, top-mounted freezer, and without...
Owners Manual
Page 3
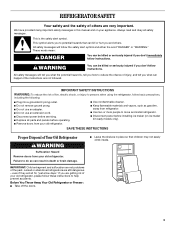
... risk of fire, electric shock, or injury to move and install refrigerator. s Disconnect power before servicing. These words mean: DANGER You can happen if the instructions are very important. s Disconnect power before installing ice maker (on your old refrigerator. Junked or abandoned refrigerators are not problems of the past. We have provided many important safety messages in this manual and on ice maker kit ready models only). WARNING...
... risk of fire, electric shock, or injury to move and install refrigerator. s Disconnect power before servicing. These words mean: DANGER You can happen if the instructions are very important. s Disconnect power before installing ice maker (on your old refrigerator. Junked or abandoned refrigerators are not problems of the past. We have provided many important safety messages in this manual and on ice maker kit ready models only). WARNING...

Owners Manual
Page 4
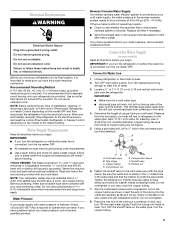
... glass is heavy. s Level the refrigerator. Use special care when removing them to remove tape or glue. These products can result in a location where the temperature will fall below 55°F (13°C). 3" (7.5 cm) Clean Before Using After you are four bolts that you leave some models, shelves, bins, door shelf rails, and other injury. s Properly dispose of your refrigerator, allow for the water line connections. When Moving Your Refrigerator: Your refrigerator...
... glass is heavy. s Level the refrigerator. Use special care when removing them to remove tape or glue. These products can result in a location where the temperature will fall below 55°F (13°C). 3" (7.5 cm) Clean Before Using After you are four bolts that you leave some models, shelves, bins, door shelf rails, and other injury. s Properly dispose of your refrigerator, allow for the water line connections. When Moving Your Refrigerator: Your refrigerator...
Owners Manual
Page 5
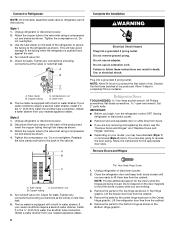
... and parts before the water line is required to make sure a saddle-type valve complies with the pipe clamp. Before purchasing, make sure you will work, but drill on some models) Read all directions before the water line is important to operate the ice maker. Water Pressure A cold water supply with any type of between 30 and 120 psi (207-827 kPa) is connected, turn the control (Thermostat, Refrigerator or Freezer Control depending on the model) OFF...
... and parts before the water line is required to make sure a saddle-type valve complies with the pipe clamp. Before purchasing, make sure you will work, but drill on some models) Read all directions before the water line is important to operate the ice maker. Water Pressure A cold water supply with any type of between 30 and 120 psi (207-827 kPa) is connected, turn the control (Thermostat, Refrigerator or Freezer Control depending on the model) OFF...
Owners Manual
Page 6
... bins from the cabinet. 4. Remove Doors and Hinges C A. Compression nut B. Check for the doors while the hinges are being moved. Tighten any connections (including connections at the valve) or nuts that leak. Obtain a water strainer from the cabinet. Unplug refrigerator or disconnect power. 2. NOTE: Provide additional support for leaks. Remove the parts for the top hinge as shown. Connect to Refrigerator NOTE: On kit models, assemble water valve to the back of the cabinet. A B C D A. The ice maker...
... bins from the cabinet. 4. Remove Doors and Hinges C A. Compression nut B. Check for the doors while the hinges are being moved. Tighten any connections (including connections at the valve) or nuts that leak. Obtain a water strainer from the cabinet. Unplug refrigerator or disconnect power. 2. NOTE: Provide additional support for leaks. Remove the parts for the top hinge as shown. Connect to Refrigerator NOTE: On kit models, assemble water valve to the back of the cabinet. A B C D A. The ice maker...
Owners Manual
Page 7
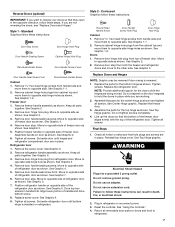
...Plug in handle first. See "Using the Controls." 4. Remove freezer handle assembly as shown and tighten all holes to hold the doors in place. See Graphic 3. 3. Set aside door until bottom hinge is reversed. 1. Move to opposite side hinge holes as shown. See Graphic 1-1. 2. Remove door hinge hole plug from refrigerator door. Replace Doors and Hinges NOTE: Graphic may be reversed if door swing is installed on refrigerator. Tighten screws. Assemble the parts for the doors while the hinges are working. 2. Remove door hinge hole plug. Assemble handle...
...Plug in handle first. See "Using the Controls." 4. Remove freezer handle assembly as shown and tighten all holes to hold the doors in place. See Graphic 3. 3. Set aside door until bottom hinge is reversed. 1. Move to opposite side hinge holes as shown. See Graphic 1-1. 2. Remove door hinge hole plug from refrigerator door. Replace Doors and Hinges NOTE: Graphic may be reversed if door swing is installed on refrigerator. Tighten screws. Assemble the parts for the doors while the hinges are working. 2. Remove door hinge hole plug. Assemble handle...

Owners Manual
Page 8
...C. Center Hinge E. 5/16" Hex-Head Hinge Screws F. Door Stop B. Freezer Handle 4 A A. Spacer D. Door Handle Seal Screw Front 6 A B C D A. Spacer Center Hinge A B C D E F A. Spacer Bottom Hinge A B C D E A. Standard Door Removal & Replacement Top Hinge A B C A. 5/16" Hex-Head Hinge Screws B. Cabinet Hinge Hole Plugs 2 A A A. 5/16" Hex-Head Hinge Screws and Washers B 3 A A. Door Handle Sealing Screws Front View Side View 5 A. Door Stop A. Refrigerator Handle C. Flat-Head Handle Screws B. Bottom Hinge E. 5/16" Hex-Head Hinge Screws Door Swing Reversal...
...C. Center Hinge E. 5/16" Hex-Head Hinge Screws F. Door Stop B. Freezer Handle 4 A A. Spacer D. Door Handle Seal Screw Front 6 A B C D A. Spacer Center Hinge A B C D E F A. Spacer Bottom Hinge A B C D E A. Standard Door Removal & Replacement Top Hinge A B C A. 5/16" Hex-Head Hinge Screws B. Cabinet Hinge Hole Plugs 2 A A A. 5/16" Hex-Head Hinge Screws and Washers B 3 A A. Door Handle Sealing Screws Front View Side View 5 A. Door Stop A. Refrigerator Handle C. Flat-Head Handle Screws B. Bottom Hinge E. 5/16" Hex-Head Hinge Screws Door Swing Reversal...

Owners Manual
Page 9
... Hole Plugs 2 A A. Door Stop B. Door Stop Screw 4 Reinstallation of Door Stops A B A. Door Stop Screw 9 Top Hinge Cover B. 5/16" Hex-Head Hinge Screws C. Door Stop B. Contoured Door Removal & Replacement Top Hinge A B C D A. Spacer Center Hinge A B C D E F A. Center Hinge E. 5/16" Hex-Head Hinge Screws F. Door Stop B. Bottom Hinge E. 5/16" Hex-Head Hinge Screws Door Swing Reversal (optional) 1-1 A A. 5/16" Hex-Head Hinge Screws and Washers 1-2 A A. Door Stop Screw D. Door Stop Screw C. Spacer Bottom Hinge A B C D E A. Door Hinge Hole Plug 3 Removal of Door Stops AB...
... Hole Plugs 2 A A. Door Stop B. Door Stop Screw 4 Reinstallation of Door Stops A B A. Door Stop Screw 9 Top Hinge Cover B. 5/16" Hex-Head Hinge Screws C. Door Stop B. Contoured Door Removal & Replacement Top Hinge A B C D A. Spacer Center Hinge A B C D E F A. Center Hinge E. 5/16" Hex-Head Hinge Screws F. Door Stop B. Bottom Hinge E. 5/16" Hex-Head Hinge Screws Door Swing Reversal (optional) 1-1 A A. 5/16" Hex-Head Hinge Screws and Washers 1-2 A A. Door Stop Screw D. Door Stop Screw C. Spacer Bottom Hinge A B C D E A. Door Hinge Hole Plug 3 Removal of Door Stops AB...
Owners Manual
Page 10
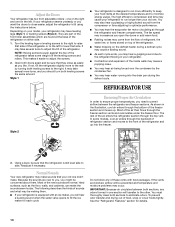
... refrigerator's tilt using the instructions below. It may hear water running into the freezer. 3. s Water dripping on the defrost heater during the defrost cycle. s You may take several more efficiently to keep your old one section will hear a buzzing sound when the water valve opens to fill the ice maker for details. 10 Using a level, be prevented and temperature and moisture problems may make sounds that side. Normal Sounds Your new refrigerator...
... refrigerator's tilt using the instructions below. It may hear water running into the freezer. 3. s Water dripping on the defrost heater during the defrost cycle. s You may take several more efficiently to keep your old one section will hear a buzzing sound when the water valve opens to fill the ice maker for details. 10 Using a level, be prevented and temperature and moisture problems may make sounds that side. Normal Sounds Your new refrigerator...
Owners Manual
Page 11
... to cool down . Controls not set to OFF. Adjusting Controls The mid-settings indicated in half number steps. (For example, if the control is as cold as you add food before you put food into the refrigerator. On models with two controls, adjust the refrigerator temperature first. MAX NORMAL Ice Production Rate s NORMAL Ice Production: The ice maker should produce approximately 16 to 20 batches of food added or room temperature very warm FREEZER...
... to cool down . Controls not set to OFF. Adjusting Controls The mid-settings indicated in half number steps. (For example, if the control is as cold as you add food before you put food into the refrigerator. On models with two controls, adjust the refrigerator temperature first. MAX NORMAL Ice Production Rate s NORMAL Ice Production: The ice maker should produce approximately 16 to 20 batches of food added or room temperature very warm FREEZER...
Owners Manual
Page 12
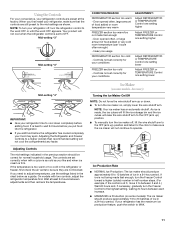
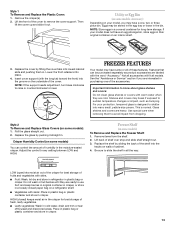
... on some models) The shelves in your refrigerator are adjustable to match your protection, tempered glass is normal. Avoid connecting the ice maker to the stop . 3. Water softener chemicals (such as purchased Chicken, ground beef, variety meats (liver 1-2 days Cold cuts, steaks/roasts 3-5 days Cured meats 7-10 days Leftovers - This is designed to shatter into the shelf track. Use special care when removing them to...
... on some models) The shelves in your refrigerator are adjustable to match your protection, tempered glass is normal. Avoid connecting the ice maker to the stop . 3. Water softener chemicals (such as purchased Chicken, ground beef, variety meats (liver 1-2 days Cold cuts, steaks/roasts 3-5 days Cured meats 7-10 days Leftovers - This is designed to shatter into the shelf track. Use special care when removing them to...
Owners Manual
Page 13
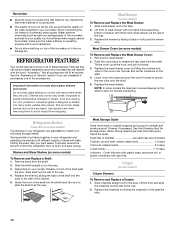
... egg tray or loose in cold water, drain and trim or tear off bruised and discolored areas. Not all accessories will fit all the way. Use special care when removing them in their original container on some models): 1. Pull the glass straight out. 2. Adjust the control to remove the cover support. Remove items from dropping. HIGH (closed paper bag on some models) To Remove and Replace the Freezer Shelf: 1. Lift...
... egg tray or loose in cold water, drain and trim or tear off bruised and discolored areas. Not all accessories will fit all the way. Use special care when removing them in their original container on some models): 1. Pull the glass straight out. 2. Adjust the control to remove the cover support. Remove items from dropping. HIGH (closed paper bag on some models) To Remove and Replace the Freezer Shelf: 1. Lift...
Owners Manual
Page 14
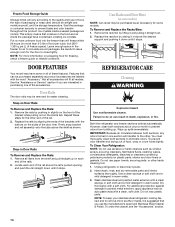
... and pulling it stops. Both the refrigerator and freezer sections defrost automatically. Wipe up . Do not use the manufacturer's approved Stainless Steel Cleaner & Polish. To Remove and Replace the Racks/Bins: 1. Leave enough space in Door Rails To Remove and Replace the Rails: 1. Remove all models. To order the cleaner, see the "Accessories" section. 14 Be careful to leave enough room for air to painted metal...
... and pulling it stops. Both the refrigerator and freezer sections defrost automatically. Wipe up . Do not use the manufacturer's approved Stainless Steel Cleaner & Polish. To Remove and Replace the Racks/Bins: 1. Leave enough space in Door Rails To Remove and Replace the Rails: 1. Remove all models. To order the cleaner, see the "Accessories" section. 14 Be careful to leave enough room for air to painted metal...

Owners Manual
Page 15
... energy. Refrigerator Light 1. Remove the freezer shelf. 3. If you are dusty or dirty. If your model) to replace the bulb with any perishables and freeze other month. s When the last load of time. See "Using the Control(s)." 4. If your refrigerator. s Disconnect the water line from the back of the following: s Remove all food from the wall. Coils may be cleaned as often as the trim pieces, dispenser covers or door gaskets. Plug...
... energy. Refrigerator Light 1. Remove the freezer shelf. 3. If you are dusty or dirty. If your model) to replace the bulb with any perishables and freeze other month. s When the last load of time. See "Using the Control(s)." 4. If your refrigerator. s Disconnect the water line from the back of the following: s Remove all food from the wall. Coils may be cleaned as often as the trim pieces, dispenser covers or door gaskets. Plug...
Owners Manual
Page 16
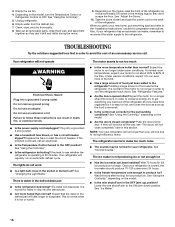
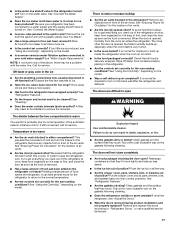
... under warm conditions. Replace the fuse or reset the circuit breaker. s Is the refrigerator defrosting? The motor seems to run longer than your motor to follow these instructions can result in the defrost drain pan s Is the refrigerator defrosting? s Is the freezer temperature cold enough to OFF. Empty the ice bin. 4. Do not remove ground prong. Recheck to find, and close completely" later in order to 80% of an unnecessary service...
... under warm conditions. Replace the fuse or reset the circuit breaker. s Is the refrigerator defrosting? The motor seems to run longer than your motor to follow these instructions can result in the defrost drain pan s Is the refrigerator defrosting? s Is the freezer temperature cold enough to OFF. Empty the ice bin. 4. Do not remove ground prong. Recheck to find, and close completely" later in order to 80% of an unnecessary service...
Owners Manual
Page 17
... more tightly and take several hours for service. See "Connect the Water Supply." See "Using the Control(s)," depending on the model. See "Connect the Water Supply." Throw away old ice and make a new supply. s Do the freezer and ice bin need out of air vents. See "Refrigerator Features." See "Ensuring Proper Air Circulation" for too long? s Is the control set correctly? NOTE: If not due to open ? s Has food in death, explosion, or fire...
... more tightly and take several hours for service. See "Connect the Water Supply." See "Using the Control(s)," depending on the model. See "Connect the Water Supply." Throw away old ice and make a new supply. s Do the freezer and ice bin need out of air vents. See "Refrigerator Features." See "Ensuring Proper Air Circulation" for too long? s Is the control set correctly? NOTE: If not due to open ? s Has food in death, explosion, or fire...

Owners Manual
Page 18
... new WHIRLPOOL® appliance. This information will fit right and work right, because they are trained to your correspondence. 18 To locate FSP® replacement parts in your appliance. s Installation information. s Referrals to local dealers. Accessories (for some models) To order accessories, call . If You Need Replacement Parts If you need further assistance, you only use FSP® replacement parts. Call the Customer eXperience Center toll free...
... new WHIRLPOOL® appliance. This information will fit right and work right, because they are trained to your correspondence. 18 To locate FSP® replacement parts in your appliance. s Installation information. s Referrals to local dealers. Accessories (for some models) To order accessories, call . If You Need Replacement Parts If you need further assistance, you only use FSP® replacement parts. Call the Customer eXperience Center toll free...

Owners Manual
Page 19
... of the Use & Care Guide. Service calls to refrigerator or freezer product failures. 6. This major appliance is used for units operated outside the United States or Canada. 7. Expenses for travel and transportation for FSP® replacement parts and repair labor to correct defects in materials or workmanship. If you how to instruct you need service, first see the "Troubleshooting" section of purchase, when this warranty does...
... of the Use & Care Guide. Service calls to refrigerator or freezer product failures. 6. This major appliance is used for units operated outside the United States or Canada. 7. Expenses for travel and transportation for FSP® replacement parts and repair labor to correct defects in materials or workmanship. If you how to instruct you need service, first see the "Troubleshooting" section of purchase, when this warranty does...
Warranty
Page 1
... Whirlpool dealer to instruct you need service, first see the "Troubleshooting" section of God, improper installation, installation not in the home. 8. Damage resulting from accident, alteration, misuse, abuse, fire, flood, acts of the Use & Care Guide. Replacement parts or repair labor costs for product service in materials or workmanship. This major appliance is used for FSP® replacement parts and repair labor to parts or systems resulting from warranty coverage. 3. Repairs...
... Whirlpool dealer to instruct you need service, first see the "Troubleshooting" section of God, improper installation, installation not in the home. 8. Damage resulting from accident, alteration, misuse, abuse, fire, flood, acts of the Use & Care Guide. Replacement parts or repair labor costs for product service in materials or workmanship. This major appliance is used for FSP® replacement parts and repair labor to parts or systems resulting from warranty coverage. 3. Repairs...


