
Owners Manual
Page 1
... messages in TROUBLESHOOTING, please visit our website at www.whirlpool.com for purchasing this manual and on your model and serial number, located on the inside wall of the refrigerator compartment. All safety messages will need assistance, call...;res REFRIGERATOR SAFETY 1 SEGURIDAD DEL REFRIGERADOR... 13 SÉCURITÉ DU RÉFRIGÉRATEUR ...... 25 INSTALLATION INSTRUCTIONS...........2 REFRIGERATOR USE 8 REFRIGERATOR CARE 9 TROUBLESHOOTING 10 ACCESSORIES 11 WARRANTY 12 INSTRUCCIONES DE INSTALACIÓN 14 USO DE SU REFRIGERADOR 20 CUIDADO DE SU REFRIGERADOR ... ...
... messages in TROUBLESHOOTING, please visit our website at www.whirlpool.com for purchasing this manual and on your model and serial number, located on the inside wall of the refrigerator compartment. All safety messages will need assistance, call...;res REFRIGERATOR SAFETY 1 SEGURIDAD DEL REFRIGERADOR... 13 SÉCURITÉ DU RÉFRIGÉRATEUR ...... 25 INSTALLATION INSTRUCTIONS...........2 REFRIGERATOR USE 8 REFRIGERATOR CARE 9 TROUBLESHOOTING 10 ACCESSORIES 11 WARRANTY 12 INSTRUCCIONES DE INSTALACIÓN 14 USO DE SU REFRIGERADOR 20 CUIDADO DE SU REFRIGERADOR ... ...
Owners Manual
Page 2
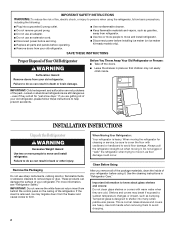
... wiggle or "walk" the refrigerator when trying to move and install refrigerator. Glass shelves and covers are getting rid of your refrigerator before installing ice maker (on the ceiling of the refrigerator. If you remove all parts and panels before servicing. ■ Replace all of the package materials, clean the inside . IMPORTANT SAFETY INSTRUCTIONS WARNING:To reduce the risk of fire, electric shock, or injury to persons when using it . These products...
... wiggle or "walk" the refrigerator when trying to move and install refrigerator. Glass shelves and covers are getting rid of your refrigerator before installing ice maker (on the ceiling of the refrigerator. If you remove all parts and panels before servicing. ■ Replace all of the package materials, clean the inside . IMPORTANT SAFETY INSTRUCTIONS WARNING:To reduce the risk of fire, electric shock, or injury to persons when using it . These products...
Owners Manual
Page 3
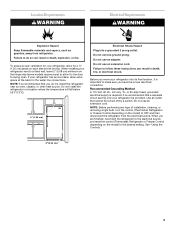
... electrical connection. Do not use an adapter. See "Using the Controls." 2" (5.08 cm) 3 When installing your refrigerator has an ice maker, allow extra space at the top. If your refrigerator next to a fixed wall, leave 2" (5.08 cm) minimum on the hinge side (some models require more) to swing open. Do not use an extension cord. NOTE: Before performing any type of installation, cleaning, or removing a light bulb, turn the control (Thermostat, Refrigerator or Freezer Control depending on the model...
... electrical connection. Do not use an adapter. See "Using the Controls." 2" (5.08 cm) 3 When installing your refrigerator has an ice maker, allow extra space at the top. If your refrigerator next to a fixed wall, leave 2" (5.08 cm) minimum on the hinge side (some models require more) to swing open. Do not use an extension cord. NOTE: Before performing any type of installation, cleaning, or removing a light bulb, turn the control (Thermostat, Refrigerator or Freezer Control depending on the model...
Owners Manual
Page 4
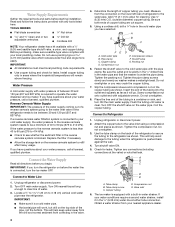
... operate the water dispenser and ice maker. Flush the tubing until water is connected, turn ON the main water supply. A B C D E A. Tube clamp screw C. The ice maker is a cold water pipe. ■ Horizontal pipe will go. Read and follow the instructions provided with a built-in a container or sink, and turn the ice maker OFF. If you have questions about your water conditions require a second water strainer, install it will work, but drill on the lower left...
... operate the water dispenser and ice maker. Flush the tubing until water is connected, turn ON the main water supply. A B C D E A. Tube clamp screw C. The ice maker is a cold water pipe. ■ Horizontal pipe will go. Read and follow the instructions provided with a built-in a container or sink, and turn the ice maker OFF. If you have questions about your water conditions require a second water strainer, install it will work, but drill on the lower left...
Owners Manual
Page 5
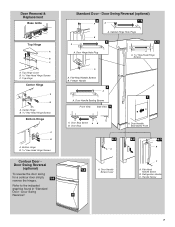
... moved. Refrigerator door 1. Move them to the opposite side hinge hole as shown in death, fire, or electrical shock. 1. Remove the door stop . If you are going to reverse the door swing, follow these instructions can result in Graphic 1-2. See Base Grille graphic. 3. Remove the parts for the top hinge as shown in Graphic 3. 4. Freezer door 1. Tighten all models) Hex-Head Hinge Screw 1. For Style 1, remove the handle screw cover. See...
... moved. Refrigerator door 1. Move them to the opposite side hinge hole as shown in death, fire, or electrical shock. 1. Remove the door stop . If you are going to reverse the door swing, follow these instructions can result in Graphic 1-2. See Base Grille graphic. 3. Remove the parts for the top hinge as shown in Graphic 3. 4. Freezer door 1. Tighten all models) Hex-Head Hinge Screw 1. For Style 1, remove the handle screw cover. See...
Owners Manual
Page 6
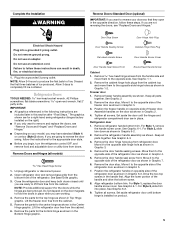
... be reversed if door swing is reversed. 1. Remove the door stops from the cabinet top and move them to the opposite side. Replace Doors and Hinges (all removable door parts to doors and food to refrigerator. 6 Replace the refrigerator door. Final Steps (all screws. Do not use an extension cord. Assemble the parts for the center hinge as shown and tighten all models) 1. Reinstall the top hinge cover as shown in the Top Hinge graphic. WARNING Electrical Shock Hazard Plug...
... be reversed if door swing is reversed. 1. Remove the door stops from the cabinet top and move them to the opposite side. Replace Doors and Hinges (all removable door parts to doors and food to refrigerator. 6 Replace the refrigerator door. Final Steps (all screws. Do not use an extension cord. Assemble the parts for the center hinge as shown and tighten all models) 1. Reinstall the top hinge cover as shown in the Top Hinge graphic. WARNING Electrical Shock Hazard Plug...
Owners Manual
Page 7
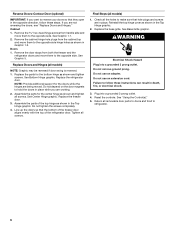
...." Freezer Handle 4 A 7 A. Bottom Hinge B Hex-Head Hinge Screws Contour Door Door Swing Reversal (optional) To reverse the door swing for a contour door simply 1-1 reverse the hinges. Door Stop Screw A B B. Refer to the indicated graphics found in "Standard Door - Flat-Head Handle Screws B. Cabinet Hinge Hole Plugs 3 1-1 1 A A Hex-Head Hinge Screws A A. Top Hinge Cover B Hex-Head Hinge Screws C. Door Handle Sealing Screws Front View Side View 5 A. Top Hinge Center Hinge A B A. Handle Screw 5 7 Center Hinge B Hex-Head Hinge Screws Bottom Hinge A B A. Refrigerator...
...." Freezer Handle 4 A 7 A. Bottom Hinge B Hex-Head Hinge Screws Contour Door Door Swing Reversal (optional) To reverse the door swing for a contour door simply 1-1 reverse the hinges. Door Stop Screw A B B. Refer to the indicated graphics found in "Standard Door - Flat-Head Handle Screws B. Cabinet Hinge Hole Plugs 3 1-1 1 A A Hex-Head Hinge Screws A A. Top Hinge Cover B Hex-Head Hinge Screws C. Door Handle Sealing Screws Front View Side View 5 A. Top Hinge Center Hinge A B A. Handle Screw 5 7 Center Hinge B Hex-Head Hinge Screws Bottom Hinge A B A. Refrigerator...
Owners Manual
Page 8
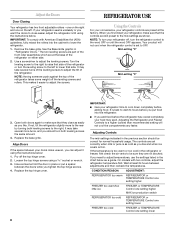
... doors while you like . NOTE: To turn the refrigerator control to adjust the tilt of the refrigerator on either side. 2. It is too warm or too cold in "Refrigerator Doors." The two leveling screws are part of the front roller assemblies which are preset at the base of the refrigerator. Use a screwdriver to cool down completely before you can adjust it easier to lower that the controls are set...
... doors while you like . NOTE: To turn the refrigerator control to adjust the tilt of the refrigerator on either side. 2. It is too warm or too cold in "Refrigerator Doors." The two leveling screws are part of the front roller assemblies which are preset at the base of the refrigerator. Use a screwdriver to cool down completely before you can adjust it easier to lower that the controls are set...
Owners Manual
Page 9
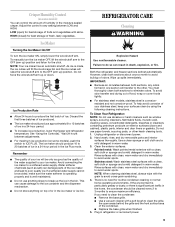
... connecting the ice maker to avoid water spots. REFRIGERATOR CARE Cleaning WARNING Explosion Hazard Use nonflammable cleaner. However, clean both sections to ICE PLUS. Use a clean sponge or soft cloth and a mild detergent in warm water. Rinse surfaces with a clean, soft cloth or sponge and a mild detergent in the bin. Wait 24 hours between adjustments. ■ For maximum ice production (on top of or in the Ice Plus mode. If a softened water supply...
... connecting the ice maker to avoid water spots. REFRIGERATOR CARE Cleaning WARNING Explosion Hazard Use nonflammable cleaner. However, clean both sections to ICE PLUS. Use a clean sponge or soft cloth and a mild detergent in warm water. Rinse surfaces with a clean, soft cloth or sponge and a mild detergent in the bin. Wait 24 hours between adjustments. ■ For maximum ice production (on top of or in the Ice Plus mode. If a softened water supply...

Owners Manual
Page 10
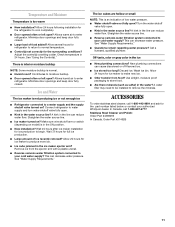
... . Plug into the drain pan. Replace the fuse or reset the circuit breaker. See "Using the Control(s)." ■ New installation? NOTE: Adjusting the temperature control(s) to optimize performance. ■ Hissing/Rattling - The unit may hear intermittent noises from your new refrigerator that the back rests on top of the same size, shape, and wattage. 3. Refrigerator noise has been reduced over the years. flow of refrigerant, movement of water lines, or from door. ■ Bin or shelf...
... . Plug into the drain pan. Replace the fuse or reset the circuit breaker. See "Using the Control(s)." ■ New installation? NOTE: Adjusting the temperature control(s) to optimize performance. ■ Hissing/Rattling - The unit may hear intermittent noises from your new refrigerator that the back rests on top of the same size, shape, and wattage. 3. Refrigerator noise has been reduced over the years. flow of refrigerant, movement of water lines, or from door. ■ Bin or shelf...
Owners Manual
Page 11
... Allows warm air to enter refrigerator. A kink in the ice ■ New plumbing connections? Straighten the water source line. ■ Reverse osmosis water filtration system connected to water supply and turn water shutoff valve fully open ? ACCESSORIES To order stainless steel cleaner, call 1-800-807-6777. Straighten the water source line. ■ Ice maker turned on model) is too warm ■ New installation? Check temperature in 24 hours. Temperature and Moisture Temperature is in the ON position. ■ New installation? See "Using the Control...
... Allows warm air to enter refrigerator. A kink in the ice ■ New plumbing connections? Straighten the water source line. ■ Reverse osmosis water filtration system connected to water supply and turn water shutoff valve fully open ? ACCESSORIES To order stainless steel cleaner, call 1-800-807-6777. Straighten the water source line. ■ Ice maker turned on model) is too warm ■ New installation? Check temperature in 24 hours. Temperature and Moisture Temperature is in the ON position. ■ New installation? See "Using the Control...
Owners Manual
Page 12
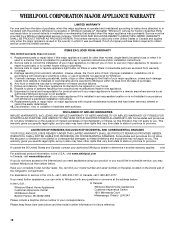
..., flood, acts of the refrigerator compartment. LIMITATION OF REMEDIES; Service calls to refrigerator or freezer product failures. 7. Pickup and delivery. Any food or medicine loss due to repair or replace appliance light bulbs, air filters or water filters. In Canada, call 1-800-253-1301. Damage resulting from warranty coverage. 4. The removal and reinstallation of your model number and serial number on the label, located on the duration of implied...
..., flood, acts of the refrigerator compartment. LIMITATION OF REMEDIES; Service calls to refrigerator or freezer product failures. 7. Pickup and delivery. Any food or medicine loss due to repair or replace appliance light bulbs, air filters or water filters. In Canada, call 1-800-253-1301. Damage resulting from warranty coverage. 4. The removal and reinstallation of your model number and serial number on the label, located on the duration of implied...
Dimensions
Page 1
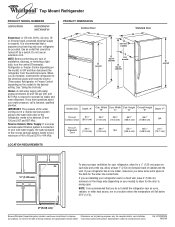
... pressure of the water coming out of a reverse osmosis system going to the water inlet valve of installation, cleaning, or removing a light bulb, turn the control (Thermostat, Refrigerator or Freezer Control depending on the model) to the desired setting. Allow at the top. It is connected to your refrigerator, allow for planning purposes only. LOCATION REQUIREMENTS PRODUCT DIMENSIONS Contour Door B A Standard Door B A not incl. handle E overall D top of cabinet 4 C 1 E overall Model Size Depth "A" Cab. Standard Door 293⁄8" (74...
... pressure of the water coming out of a reverse osmosis system going to the water inlet valve of installation, cleaning, or removing a light bulb, turn the control (Thermostat, Refrigerator or Freezer Control depending on the model) to the desired setting. Allow at the top. It is connected to your refrigerator, allow for planning purposes only. LOCATION REQUIREMENTS PRODUCT DIMENSIONS Contour Door B A Standard Door B A not incl. handle E overall D top of cabinet 4 C 1 E overall Model Size Depth "A" Cab. Standard Door 293⁄8" (74...


