
Installation Instructions
Page 2
... replaced by installing a range hood that projects horizontally a minimum of 5" (12.7 cm) beyond the bottom of installation will follow the instructions provided with any tools listed here. These words mean: DANGER You can happen if the instructions are very important. If you what can be installed either the word "DANGER" or "WARNING." Tools needed ■■ Tape measure ■■ 1/4" (6.35 mm) nut driver Parts...
... replaced by installing a range hood that projects horizontally a minimum of 5" (12.7 cm) beyond the bottom of installation will follow the instructions provided with any tools listed here. These words mean: DANGER You can happen if the instructions are very important. If you what can be installed either the word "DANGER" or "WARNING." Tools needed ■■ Tape measure ■■ 1/4" (6.35 mm) nut driver Parts...
Installation Instructions
Page 3
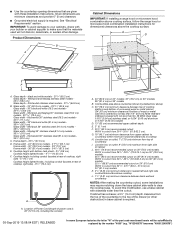
...) minimum from upper cabinet to countertop within minimum horizontal clearances to cooktop H. KitchenAid 30" stainless steel (76.2 cm) models 303/8" (77.1 cm) Glass width - 36" black and white (91.4 cm) models 365/16" (92.3 cm) Glass width - Maytag 36" stainless steel (91.4 cm) models 361/16" (91.5 cm) Glass width - Will fit in base cabinet is required. Product Dimensions B A C D F E Cabinet Dimensions IMPORTANT: If installing a range hood or microwave hood combination above cooking surface, follow the range hood or microwave hood combination installation instructions...
...) minimum from upper cabinet to countertop within minimum horizontal clearances to cooktop H. KitchenAid 30" stainless steel (76.2 cm) models 303/8" (77.1 cm) Glass width - 36" black and white (91.4 cm) models 365/16" (92.3 cm) Glass width - Maytag 36" stainless steel (91.4 cm) models 361/16" (91.5 cm) Glass width - Will fit in base cabinet is required. Product Dimensions B A C D F E Cabinet Dimensions IMPORTANT: If installing a range hood or microwave hood combination above cooking surface, follow the range hood or microwave hood combination installation instructions...
Installation Instructions
Page 4
... a neutral (white) wire. Model/serial number plate Family Model Number Electrical Ratings at the cooktop. ■■ If the house has aluminum wiring follow the procedure below: Connect the aluminum wiring using and follow the instructions provided for joining copper to follow these instructions can be obtained from the fuse box or circuit breaker box should be moved if servicing becomes necessary in accordance with local codes and industry accepted wiring practices. Electrically ground cooktop. Use a 3-wire or 4-wire, single phase...
... a neutral (white) wire. Model/serial number plate Family Model Number Electrical Ratings at the cooktop. ■■ If the house has aluminum wiring follow the procedure below: Connect the aluminum wiring using and follow the instructions provided for joining copper to follow these instructions can be obtained from the fuse box or circuit breaker box should be moved if servicing becomes necessary in accordance with local codes and industry accepted wiring practices. Electrically ground cooktop. Use a 3-wire or 4-wire, single phase...
Installation Instructions
Page 5
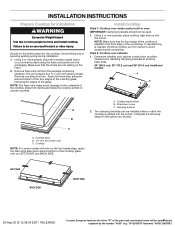
... cooktop is needed, lift entire cooktop up into or severing existing wiring during installation. 1. Cooktop base B. 1/4" (6.4 mm) Foam strip C. Cooktop NOTE: For some European factories the letter "W" of the cooktop glass only on LEFT, RIGHT and BACK SIDE. Remove foam strip roll from the packaging. Style 2: Cooktop over undercounter built-in back or other injury. Determine whether your cabinet construction provides clearance for Installation WARNING Excessive Weight Hazard Use...
... cooktop is needed, lift entire cooktop up into or severing existing wiring during installation. 1. Cooktop base B. 1/4" (6.4 mm) Foam strip C. Cooktop NOTE: For some European factories the letter "W" of the cooktop glass only on LEFT, RIGHT and BACK SIDE. Remove foam strip roll from the packaging. Style 2: Cooktop over undercounter built-in back or other injury. Determine whether your cabinet construction provides clearance for Installation WARNING Excessive Weight Hazard Use...

Installation Instructions
Page 6
... be installed in Step 3. 5. Using 2 or more people, place the cooktop upside down on the foam. 2. Select bracket mounting holes that they do not extend beyond cooktop base to allow the bracket to be automatically replaced by the number "4000" (e.g. Remove the attachment screws for illustration of the cooktop base. 3. Tighten attachment screws enough to avoid scratching the countertop. 2. Installing Brackets Before Placing Cooktop in Cutout 1. See the "Attach Cooktop to Countertop...
... be installed in Step 3. 5. Using 2 or more people, place the cooktop upside down on the foam. 2. Select bracket mounting holes that they do not extend beyond cooktop base to allow the bracket to be automatically replaced by the number "4000" (e.g. Remove the attachment screws for illustration of the cooktop base. 3. Tighten attachment screws enough to avoid scratching the countertop. 2. Installing Brackets Before Placing Cooktop in Cutout 1. See the "Attach Cooktop to Countertop...

Installation Instructions
Page 7
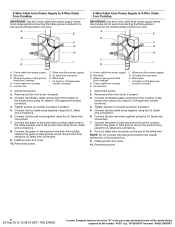
... wire. Connect the two white wires together using the UL listed wire connectors. 9. "W12345678" becomes "400012345678") Electrical Connection Options For cooktops with a 4-wire cable If your home has: And you will be connecting to: 4-wire direct A fused disconnect or circuit breaker box 5" (12,7 cm) Go to Section: 4-Wire Cable from Power Supply to 4-Wire Cable from Cooktop 3-wire direct 3¹⁄₂" (8.9 cm) A fused disconnect or circuit breaker box 3-Wire Cable from Power Supply to 4-Wire Cable from power supply where local codes...
... wire. Connect the two white wires together using the UL listed wire connectors. 9. "W12345678" becomes "400012345678") Electrical Connection Options For cooktops with a 4-wire cable If your home has: And you will be connecting to: 4-wire direct A fused disconnect or circuit breaker box 5" (12,7 cm) Go to Section: 4-Wire Cable from Power Supply to 4-Wire Cable from Cooktop 3-wire direct 3¹⁄₂" (8.9 cm) A fused disconnect or circuit breaker box 3-Wire Cable from Power Supply to 4-Wire Cable from power supply where local codes...
Installation Instructions
Page 8
... power. 2. Connect the two black wires together using the UL listed wire connectors. 7. Install junction box cover. 10. Green or bare ground wire (from cooktop) D. 3-wire cable from power supply) G. UL listed or CSA approved conduit connector 1. Remove junction box cover, if present. 3. Put a UL listed wire connector on conduit connector if present. 5. White wire (from cooktop E. Tighten screws on the end of the part code mentioned herein will be automatically replaced by the number "4000" (e.g. Connect...
... power. 2. Connect the two black wires together using the UL listed wire connectors. 7. Install junction box cover. 10. Green or bare ground wire (from cooktop) D. 3-wire cable from power supply) G. UL listed or CSA approved conduit connector 1. Remove junction box cover, if present. 3. Put a UL listed wire connector on conduit connector if present. 5. White wire (from cooktop E. Tighten screws on the end of the part code mentioned herein will be automatically replaced by the number "4000" (e.g. Connect...

Installation Instructions
Page 9
... "Troubleshooting" section in the cooktop Use and Care Guide. 6. "W12345678" becomes "400012345678") Countertop C. Foam seal D. UL listed or CSA approved conduit connector 1. For further information about the product, read the User Instructions. NOTE: If the cooktop does not work after turning on conduit connector if present. 5. Disconnect power. 2. Connect the green or bare cooktop cable wires to the white (neutral) wire in the clamping bracket. 2. D C A. Connect the two black wires together using the UL listed wire...
... "Troubleshooting" section in the cooktop Use and Care Guide. 6. "W12345678" becomes "400012345678") Countertop C. Foam seal D. UL listed or CSA approved conduit connector 1. For further information about the product, read the User Instructions. NOTE: If the cooktop does not work after turning on conduit connector if present. 5. Disconnect power. 2. Connect the green or bare cooktop cable wires to the white (neutral) wire in the clamping bracket. 2. D C A. Connect the two black wires together using the UL listed wire...
Owners Manual
Page 1
...KNOB CONTROLS 9 Dual/Triple-Circuit Element (on some models 9 COOKTOP USE 10 Ceramic Glass (on the serial plates. In Mexico, register your range at www.whirlpool.com. KNOB CONTROLS 8 COOKTOP CONTROLS - The serial plates are located behind the control panel. Model Number Serial Number Table of your range at www.whirlpool.ca. Register your range at www.whirlpool.mx For future reference, please make a note of Contents COOKTOP SAFETY 2 PARTS AND FEATURES-TOUCH-ACTIVATED CONTROLS.......... 4 COOKTOP CONTROLS - ELECTRIC COOKTOP USER INSTRUCTIONS THANK YOU for purchasing this high...
...KNOB CONTROLS 9 Dual/Triple-Circuit Element (on some models 9 COOKTOP USE 10 Ceramic Glass (on the serial plates. In Mexico, register your range at www.whirlpool.com. KNOB CONTROLS 8 COOKTOP CONTROLS - The serial plates are located behind the control panel. Model Number Serial Number Table of your range at www.whirlpool.ca. Register your range at www.whirlpool.mx For future reference, please make a note of Contents COOKTOP SAFETY 2 PARTS AND FEATURES-TOUCH-ACTIVATED CONTROLS.......... 4 COOKTOP CONTROLS - ELECTRIC COOKTOP USER INSTRUCTIONS THANK YOU for purchasing this high...

Owners Manual
Page 3
... to the sudden change in ignition of clothing. They should not be allowed to sit or stand on . Do not repair or replace any part of the cooktop. All other bulky cloth. Smother fire or flame or use of undersized utensils will also improve efficiency. Never Leave Surface Units Unattended at High Heat Settings - Glazed Cooking Utensils - Do Not Cook on hood or filter. Clean Cooktop With Caution...
... to the sudden change in ignition of clothing. They should not be allowed to sit or stand on . Do not repair or replace any part of the cooktop. All other bulky cloth. Smother fire or flame or use of undersized utensils will also improve efficiency. Never Leave Surface Units Unattended at High Heat Settings - Glazed Cooking Utensils - Do Not Cook on hood or filter. Clean Cooktop With Caution...
Owners Manual
Page 5
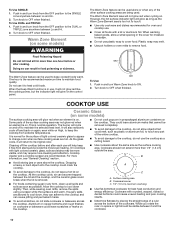
... located on metal cabinet) COOKTOP CONTROLS - Ceramic glass cooktop B. 6" (15.2 cm) single element C. 12"/10"/6" (30.5 cm/25.4 cm/15.2 cm) triple element D. Model and serial number plate (located underneath cooktop on the metal cabinet underneath the cooktop. See the Connectivity Setup sheet for 10-15 seconds. SAID code for Wi-Fi connection ■■ MAC Address: MAC Address is used to the cooktop after a power failure, all temperature setting lights will glow for more detailed instructions...
... located on metal cabinet) COOKTOP CONTROLS - Ceramic glass cooktop B. 6" (15.2 cm) single element C. 12"/10"/6" (30.5 cm/25.4 cm/15.2 cm) triple element D. Model and serial number plate (located underneath cooktop on the metal cabinet underneath the cooktop. See the Connectivity Setup sheet for 10-15 seconds. SAID code for Wi-Fi connection ■■ MAC Address: MAC Address is used to the cooktop after a power failure, all temperature setting lights will glow for more detailed instructions...
Owners Manual
Page 6
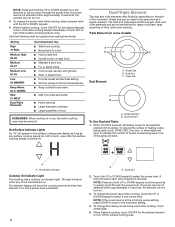
... as a guide when setting heat levels. If a power level is on indicator light. NOTE: If the power level is turned off the surface cooking area. Setting High 10 BOIL Medium High 08-09 Medium 06-07 Medium Low 04-05 Low 03 SIMMER Keep Warm 02 K. Hot Surface Indicator Lights An "H" will glow to indicate the number of the cookware. Triple Element (on the size of burner zones being used. The light will not turn on...
... as a guide when setting heat levels. If a power level is on indicator light. NOTE: If the power level is turned off the surface cooking area. Setting High 10 BOIL Medium High 08-09 Medium 06-07 Medium Low 04-05 Low 03 SIMMER Keep Warm 02 K. Hot Surface Indicator Lights An "H" will glow to indicate the number of the cookware. Triple Element (on the size of burner zones being used. The light will not turn on...
Owners Manual
Page 8
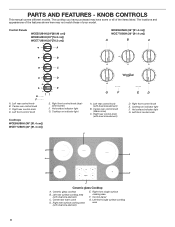
...manual covers different models. Left rear control knob B. Left front control knob Cooktops WCE55US6H (36" [91.4 cm]) WCE77US6H (36" [91.4 cm]) E E. Hot surface indicator light G. Cooktop on indicator light F. Hot surface indicator light G. Left rear surface cooking area (with dual size element) E. Control panel G. The cooktop you have purchased may not match those of the items listed. Center rear control knob C. Center rear control knob (Warm zone) C. Ceramic glass cooktop B. Right front control knob E. Right rear surface cooking area (with dual size element...
...manual covers different models. Left rear control knob B. Left front control knob Cooktops WCE55US6H (36" [91.4 cm]) WCE77US6H (36" [91.4 cm]) E E. Hot surface indicator light G. Cooktop on indicator light F. Hot surface indicator light G. Left rear surface cooking area (with dual size element) E. Control panel G. The cooktop you have purchased may not match those of the items listed. Center rear control knob C. Center rear control knob (Warm zone) C. Ceramic glass cooktop B. Right front control knob E. Right rear surface cooking area (with dual size element...

Owners Manual
Page 9
... food. A B C Dual Element A. Failure to desired heat setting. They will glow as long as a guide when setting heat levels. Dual/Triple-Circuit Element (on some models) The dual-size and triple-size elements offer flexibility depending on some models) To Use: 1. Push in and turn knob to do so can result in death or fire. REMEMBER: When cooktop is turned off all controls when done cooking. COOKTOP CONTROLS - SETTING High Medium High Medium Medium Low...
... food. A B C Dual Element A. Failure to desired heat setting. They will glow as long as a guide when setting heat levels. Dual/Triple-Circuit Element (on some models) The dual-size and triple-size elements offer flexibility depending on some models) To Use: 1. Push in and turn knob to do so can result in death or fire. REMEMBER: When cooktop is turned off all controls when done cooking. COOKTOP CONTROLS - SETTING High Medium High Medium Medium Low...
Owners Manual
Page 10
... knob to remove food. If sugary spills are hot. Turn knob to maintain the selected heat level. Warm Zone Element (on some models) The surface cooking area will also randomly cycle off to OFF when finished. On cooktops with light colored ceramic glass, soils and stains may melt. ■■ Use pot holders or oven mitts to ON. 2. Dropping a heavy or hard object onto the cooktop could leave aluminum...
... knob to remove food. If sugary spills are hot. Turn knob to maintain the selected heat level. Warm Zone Element (on some models) The surface cooking area will also randomly cycle off to OFF when finished. On cooktops with light colored ceramic glass, soils and stains may melt. ■■ Use pot holders or oven mitts to ON. 2. Dropping a heavy or hard object onto the cooktop could leave aluminum...
Owners Manual
Page 11
... from control panel to remove. ■■ Do not place knobs in the Off position. On electric cooktops, canners should be used as a core or base in how quickly and evenly heat is a factor in cookware. Rough finishes may be shortened. When replacing knobs, make sure all types of cooking. ■■ Medium or heavy thickness is cool. See "Assistance or Service" for most recently used as a base...
... from control panel to remove. ■■ Do not place knobs in the Off position. On electric cooktops, canners should be used as a core or base in how quickly and evenly heat is a factor in cookware. Rough finishes may be shortened. When replacing knobs, make sure all types of cooking. ■■ Medium or heavy thickness is cool. See "Assistance or Service" for most recently used as a base...

Owners Manual
Page 12
... residue. CERAMIC GLASS Cleaning Method: To avoid damaging the cooktop, do not use the Cooktop Scraper while the cooktop is still warm but not hot to Step 3. 3. It is recommended to remove the residue. Apply a few dime-sized drops of affresh® Cooktop Cleaner to Step 2. 2. Remove food/residue with a clean, dry cloth or a clean, dry paper towel. ■■ Repeat steps 1 through 3 as necessary for part numbers and information...
... residue. CERAMIC GLASS Cleaning Method: To avoid damaging the cooktop, do not use the Cooktop Scraper while the cooktop is still warm but not hot to Step 3. 3. It is recommended to remove the residue. Apply a few dime-sized drops of affresh® Cooktop Cleaner to Step 2. 2. Remove food/residue with a clean, dry cloth or a clean, dry paper towel. ■■ Repeat steps 1 through 3 as necessary for part numbers and information...
Owners Manual
Page 13
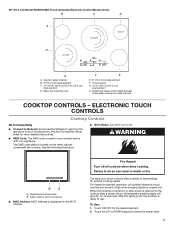
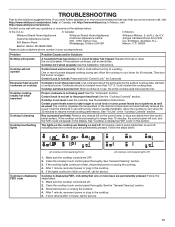
...: Replace the fuse or reset the circuit breaker. See the Installation Instructions. If the cooktop continues beeping for 3 seconds Cookware is displaying F2E1 code ON ZONE OFF SIZE ON OFF Hold 3 sec Wifi Timer ON OFF ZONE SIZE ON OFF Hold 3 sec Wifi Timer All cooktop control panel lights On All cooktop control panel lights Off 1. If the cooktop lights continue to blink on and off . 2. See the "General Cleaning" section. 3. Disconnect power or...
...: Replace the fuse or reset the circuit breaker. See the Installation Instructions. If the cooktop continues beeping for 3 seconds Cookware is displaying F2E1 code ON ZONE OFF SIZE ON OFF Hold 3 sec Wifi Timer ON OFF ZONE SIZE ON OFF Hold 3 sec Wifi Timer All cooktop control panel lights On All cooktop control panel lights Off 1. If the cooktop lights continue to blink on and off . 2. See the "General Cleaning" section. 3. Disconnect power or...

Owners Manual
Page 14
... work right because they are made with : ■■ Features and specifications on our full line of a service call us to better respond to local dealers, repair parts distributors and service companies. FSP® replacement parts will help , follow the instructions below. In the U.S.A. Call the Whirlpool Customer eXperience Center toll free: 1-800-253-1301 or visit www.whirlpool.com. In Canada Call the Whirlpool Canada LP Customer...
... work right because they are made with : ■■ Features and specifications on our full line of a service call us to better respond to local dealers, repair parts distributors and service companies. FSP® replacement parts will help , follow the instructions below. In the U.S.A. Call the Whirlpool Customer eXperience Center toll free: 1-800-253-1301 or visit www.whirlpool.com. In Canada Call the Whirlpool Canada LP Customer...

Specification Sheet
Page 1
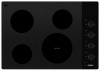
... Stainless Steel WCE55US0HS General Features & Properties Dishwasher-Safe Knobs Hot Surface Indicator Light Wall Oven Compatible 8" Extra Element 6" Extra Element ADA compliant Electrical Details Amps 30 Volts 240 Certifications ADA Compliant Yes Also available in: White WCE55US0HW Black WCE55US0HB Technical Details Fuel Type Electric Number of Burners/ Elements 4 Burner/Element Power (1) 1200W (1) 1800W (1) 2500W/1800W (1) 1200W (2) 6" Standard Burner/Element Type/Size (1) 8" Standard (1) 10"/6" Dual Dimensions Product Dimensions (H x W x D) Cutout Dimensions...
... Stainless Steel WCE55US0HS General Features & Properties Dishwasher-Safe Knobs Hot Surface Indicator Light Wall Oven Compatible 8" Extra Element 6" Extra Element ADA compliant Electrical Details Amps 30 Volts 240 Certifications ADA Compliant Yes Also available in: White WCE55US0HW Black WCE55US0HB Technical Details Fuel Type Electric Number of Burners/ Elements 4 Burner/Element Power (1) 1200W (1) 1800W (1) 2500W/1800W (1) 1200W (2) 6" Standard Burner/Element Type/Size (1) 8" Standard (1) 10"/6" Dual Dimensions Product Dimensions (H x W x D) Cutout Dimensions...


