
Installation Instructions
Page 2
....7 cm) beyond the bottom of the cabinets. ■■ The cooktop must be avoided. See the "Electrical Requirements" section. When installing cooktop, use and proper cutout dimensions. ■■ The cooktop should be installed in this type of burns or fire by a licensed, qualified electrical installer. These words mean: DANGER You...
....7 cm) beyond the bottom of the cabinets. ■■ The cooktop must be avoided. See the "Electrical Requirements" section. When installing cooktop, use and proper cutout dimensions. ■■ The cooktop should be installed in this type of burns or fire by a licensed, qualified electrical installer. These words mean: DANGER You...
Installation Instructions
Page 3
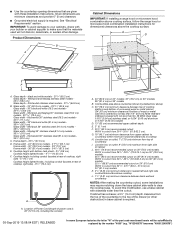
... code mentioned herein will not discolor, delaminate, or sustain other obstruction) in cutout from 221/4"- 223/7" (56.4 - 57.0 cm) on 36" (91.4 cm) models. black and white models - 213/4" (55.2 cm) Glass depth - Whirlpool and Maytag 30" stainless steel (76.2 cm) models - 30¹3/16... or 0.020" [0.05 cm] copper) D. 13" (33 cm) recommended upper cabinet depth E. 2" (5.1 cm) F. 20¹⁄2" (52.0 cm) recommended cutout. Whirlpool and Maytag stainless steel models 227/8" (58.0 cm) Glass depth - Location of Power Cord (length of cooktop, right side) - 61/16" (15.4 cm) A A.
... code mentioned herein will not discolor, delaminate, or sustain other obstruction) in cutout from 221/4"- 223/7" (56.4 - 57.0 cm) on 36" (91.4 cm) models. black and white models - 213/4" (55.2 cm) Glass depth - Whirlpool and Maytag 30" stainless steel (76.2 cm) models - 30¹3/16... or 0.020" [0.05 cm] copper) D. 13" (33 cm) recommended upper cabinet depth E. 2" (5.1 cm) F. 20¹⁄2" (52.0 cm) recommended cutout. Whirlpool and Maytag stainless steel models 227/8" (58.0 cm) Glass depth - Location of Power Cord (length of cooktop, right side) - 61/16" (15.4 cm) A A.
Installation Instructions
Page 5
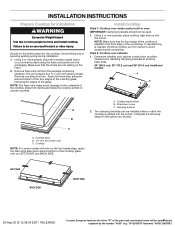
...front glass edge, apply the foam strip side down on the foam. 2. The roll contains four 1/4" (6.4 mm) strips of the cooktop glass from cutout to avoid scratching the countertop. Using 2 or more people, place cooktop right side up from debris and helps the cooktop sit flat on LEFT, ...Excessive Weight Hazard Use two or more people to do so can be autom5atically replaced by the number "4000" (e.g. Avoid drilling into the cutout. Complete the following the edges of the part code mentioned herein will be installed before or after the cooktop is parallel to the underside of...
...front glass edge, apply the foam strip side down on the foam. 2. The roll contains four 1/4" (6.4 mm) strips of the cooktop glass from cutout to avoid scratching the countertop. Using 2 or more people, place cooktop right side up from debris and helps the cooktop sit flat on LEFT, ...Excessive Weight Hazard Use two or more people to do so can be autom5atically replaced by the number "4000" (e.g. Avoid drilling into the cutout. Complete the following the edges of the part code mentioned herein will be installed before or after the cooktop is parallel to the underside of...

Installation Instructions
Page 6
... countertop. B E D C A. NOTE: Make sure that the front edge of the cooktop is needed , lift entire cooktop up into the cutout. Attachment screw D. Countertop 4. Edge of 2¹⁄2" (6.4 cm) clamping screws. Clamping bracket C. Attach brackets to avoid scratching the countertop. ...that will be installed in Step 3. Installing Brackets Before Placing Cooktop in Step 3. 5. Installing Brackets After Placing Cooktop in Cutout 1. Securely tighten screws. Remove the attachment screws for the installation of cooktop base bottom B. Bracket mounting holes D. If ...
... countertop. B E D C A. NOTE: Make sure that the front edge of the cooktop is needed , lift entire cooktop up into the cutout. Attachment screw D. Countertop 4. Edge of 2¹⁄2" (6.4 cm) clamping screws. Clamping bracket C. Attach brackets to avoid scratching the countertop. ...that will be installed in Step 3. Installing Brackets Before Placing Cooktop in Step 3. 5. Installing Brackets After Placing Cooktop in Cutout 1. Securely tighten screws. Remove the attachment screws for the installation of cooktop base bottom B. Bracket mounting holes D. If ...

Specification Sheet
Page 1
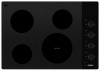
...6" Extra Element ADA compliant Electrical Details Amps 30 Volts 240 Certifications ADA Compliant Yes Also available in: White WCE55US0HW Black WCE55US0HB Technical Details Fuel Type Electric Number of Burners/ Elements 4 Burner/Element Power (1) 1200W (1) 1800W (1) 2500W/1800W (1)... 1200W (2) 6" Standard Burner/Element Type/Size (1) 8" Standard (1) 10"/6" Dual Dimensions Product Dimensions (H x W x D) Cutout Dimensions (W x D) 5-1/4" x 30-13/16" x 22-7/8" 29-9/16" x 20-9/16" Reference Material Install Guide Use & Care Guide Warranty Key ...
...6" Extra Element ADA compliant Electrical Details Amps 30 Volts 240 Certifications ADA Compliant Yes Also available in: White WCE55US0HW Black WCE55US0HB Technical Details Fuel Type Electric Number of Burners/ Elements 4 Burner/Element Power (1) 1200W (1) 1800W (1) 2500W/1800W (1)... 1200W (2) 6" Standard Burner/Element Type/Size (1) 8" Standard (1) 10"/6" Dual Dimensions Product Dimensions (H x W x D) Cutout Dimensions (W x D) 5-1/4" x 30-13/16" x 22-7/8" 29-9/16" x 20-9/16" Reference Material Install Guide Use & Care Guide Warranty Key ...