
Owners Manual
Page 1
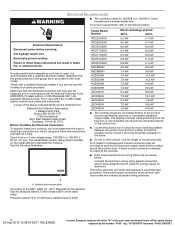
... COOKTOP SAFETY 2 PARTS AND FEATURES - Model Number Serial Number Para una versión de estas instrucciones en español, visite www.whirlpool.com. Table of your range at www.whirlpool.mx. KNOB CONTROLS 5 Dual/Triple-Circuit Element (on some models 5 Warm Zone Element (on some models 6 Home Canning 7 Cookware 7 COOKTOP CARE 7 General Cleaning 7 TROUBLESHOOTING 9 ASSISTANCE OR SERVICE 10 In the U.S.A 10 Accessories 10 In Canada 10 W11206695A KNOB CONTROLS 4 COOKTOP CONTROLS - These can be located on some models 6 COOKTOP USE 6 Ceramic Glass...
... COOKTOP SAFETY 2 PARTS AND FEATURES - Model Number Serial Number Para una versión de estas instrucciones en español, visite www.whirlpool.com. Table of your range at www.whirlpool.mx. KNOB CONTROLS 5 Dual/Triple-Circuit Element (on some models 5 Warm Zone Element (on some models 6 Home Canning 7 Cookware 7 COOKTOP CARE 7 General Cleaning 7 TROUBLESHOOTING 9 ASSISTANCE OR SERVICE 10 In the U.S.A 10 Accessories 10 In Canada 10 W11206695A KNOB CONTROLS 4 COOKTOP CONTROLS - These can be located on some models 6 COOKTOP USE 6 Ceramic Glass...

Owners Manual
Page 2
COOKTOP SAFETY Your safety and the safety of California to cause cancer. Always read and obey all safety messages. This is , tell you how to reduce ... very important. WARNING You can be killed or seriously injured if you what can kill or hurt you don't immediately follow instructions. We have provided many important safety messages in this manual and on your appliance. This symbol alerts you to the State of injury, and tell you what the potential hazard...
COOKTOP SAFETY Your safety and the safety of California to cause cancer. Always read and obey all safety messages. This is , tell you how to reduce ... very important. WARNING You can be killed or seriously injured if you what can kill or hurt you don't immediately follow instructions. We have provided many important safety messages in this manual and on your appliance. This symbol alerts you to the State of injury, and tell you what the potential hazard...

Owners Manual
Page 3
... in the manual. Do not repair or replace any part of the cooktop. Do Not Use Water on Cooktop - Use Only Dry Potholders - Use Proper Pan Size - This cooktop is properly installed and grounded by a qualified technician. Proper relationship of utensil to burner will expose a portion of the heating element to direct contact and may penetrate the broken cooktop and create a risk of electric shock. Short cooking periods require constant supervision...
... in the manual. Do not repair or replace any part of the cooktop. Do Not Use Water on Cooktop - Use Only Dry Potholders - Use Proper Pan Size - This cooktop is properly installed and grounded by a qualified technician. Proper relationship of utensil to burner will expose a portion of the heating element to direct contact and may penetrate the broken cooktop and create a risk of electric shock. Short cooking periods require constant supervision...

Owners Manual
Page 4
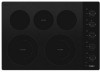
... rear control knob B. Right rear surface cooking area (with dual-size element) D. Right front single surface cooking area F. KNOB CONTROLS This manual covers different models. Hot surface indicator light G. Cooktop on indicator light A. Control panel G. Right rear control knob (with dual size element) E. Ceramic glass cooktop B. Hot surface indicator light E. Cooktop on indicator light G. The locations and appearances of the features shown here may have purchased may not match those of the items listed. Left front control knob (dual-size) Cooktops...
... rear control knob B. Right rear surface cooking area (with dual-size element) D. Right front single surface cooking area F. KNOB CONTROLS This manual covers different models. Hot surface indicator light G. Cooktop on indicator light A. Control panel G. Right rear control knob (with dual size element) E. Ceramic glass cooktop B. Hot surface indicator light E. Cooktop on indicator light G. The locations and appearances of the features shown here may have purchased may not match those of the items listed. Left front control knob (dual-size) Cooktops...
Owners Manual
Page 5
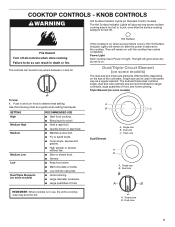
... food cooking. ■■ Bring liquid to do so can be used in death or fire. SETTING High Medium High Medium Medium Low Low Dual/Triple Elements (on until the cooktop has cooled completely. Dual size A B A. Single zone B. KNOB CONTROLS WARNING Hot Surface Indicator Lights (on Standard Control models) The Hot Surface Indicator Lights will remain on some models) To Use: 1. Failure to a boil. ■■ Hold a rapid boil. ■■ Quickly brown or...
... food cooking. ■■ Bring liquid to do so can be used in death or fire. SETTING High Medium High Medium Medium Low Low Dual/Triple Elements (on until the cooktop has cooled completely. Dual size A B A. Single zone B. KNOB CONTROLS WARNING Hot Surface Indicator Lights (on Standard Control models) The Hot Surface Indicator Lights will remain on some models) To Use: 1. Failure to a boil. ■■ Hold a rapid boil. ■■ Quickly brown or...

Owners Manual
Page 6
... cover for oven and cooktop use it and the cookware. 6 Push in any of light colored ceramic glass to appear to change color when surface cooking areas are allowed to ON. 2. However, the hot surface indicator light will return to the SINGLE zone anywhere between Lo and Hi. 2. One hour is removed. ■■ For foods containing sugar in and turn knob from extreme temperatures. To Use: 1. Some parts...
... cover for oven and cooktop use it and the cookware. 6 Push in any of light colored ceramic glass to appear to change color when surface cooking areas are allowed to ON. 2. However, the hot surface indicator light will return to the SINGLE zone anywhere between Lo and Hi. 2. One hour is removed. ■■ For foods containing sugar in and turn knob from extreme temperatures. To Use: 1. Some parts...

Owners Manual
Page 7
... aluminum or copper on stainless steel provides even heating. Cookware material is a factor in how quickly and evenly heat is recommended. Do not remove seals under knobs. On electric cooktops, canners should be used as a base they can leave permanent marks on 2 surface cooking areas, elements or surface burners at the same time. ■■ On ceramic glass models, use only flat-bottomed canners. ■■ On coil element models, the installation of a Canning Unit Kit...
... aluminum or copper on stainless steel provides even heating. Cookware material is a factor in how quickly and evenly heat is recommended. Do not remove seals under knobs. On electric cooktops, canners should be used as a base they can leave permanent marks on 2 surface cooking areas, elements or surface burners at the same time. ■■ On ceramic glass models, use only flat-bottomed canners. ■■ On coil element models, the installation of a Canning Unit Kit...
Owners Manual
Page 8
.... Continue rubbing until white film disappears. CERAMIC GLASS To avoid damage to the cooktop, do not affect cooking performance and after many cleanings become less noticeable. See "Assistance or Service" section to order. Scratches and abrasions do not use steel wool, abrasive powder cleansers, chlorine bleach, rust remover or ammonia because damage may want to wear oven mitts while doing so...
.... Continue rubbing until white film disappears. CERAMIC GLASS To avoid damage to the cooktop, do not affect cooking performance and after many cleanings become less noticeable. See "Assistance or Service" section to order. Scratches and abrasions do not use steel wool, abrasive powder cleansers, chlorine bleach, rust remover or ammonia because damage may want to wear oven mitts while doing so...

Owners Manual
Page 9
... Century Ave. Cooktop surfaces become hot. Key is displaying F2E1 code Possible Causes and/or Solutions A household fuse has blown or a circuit breaker has tripped: Replace the fuse or reset the circuit breaker. After 1 minute, reconnect power or plug in use, the entire cooktop area may help you need further assistance or more recommendations that one or more keys are off. 2. de C.V. Clean the cooktop touch control panel thoroughly. Problem Nothing will...
... Century Ave. Cooktop surfaces become hot. Key is displaying F2E1 code Possible Causes and/or Solutions A household fuse has blown or a circuit breaker has tripped: Replace the fuse or reset the circuit breaker. After 1 minute, reconnect power or plug in use, the entire cooktop area may help you need further assistance or more recommendations that one or more keys are off. 2. de C.V. Clean the cooktop touch control panel thoroughly. Problem Nothing will...

Owners Manual
Page 10
... complete model and serial number of appliances. ■■ Installation information. ■■ Use and maintenance procedures. ■■ Accessory and repair parts sales. ■■ Specialized customer assistance (Spanish speaking, hearing impaired, limited vision, etc.). ASSISTANCE OR SERVICE Before calling for assistance or service, please check "Troubleshooting." This information will fit right and work right because they are trained to Whirlpool Mé...
... complete model and serial number of appliances. ■■ Installation information. ■■ Use and maintenance procedures. ■■ Accessory and repair parts sales. ■■ Specialized customer assistance (Spanish speaking, hearing impaired, limited vision, etc.). ASSISTANCE OR SERVICE Before calling for assistance or service, please check "Troubleshooting." This information will fit right and work right because they are trained to Whirlpool Mé...

Installation Instructions
Page 2
..., doors, fans or strong heating vents. Refer to confirm that all electrical connections be made by installing a range hood that projects horizontally a minimum of 5" (12.7 cm) beyond the bottom of the cabinets. ■■ The cooktop must be killed or seriously injured if you and others are not followed. INSTALLATION REQUIREMENTS Tools and Parts Gather the required tools and parts before starting installation. Tools needed ■■ Tape measure ■...
..., doors, fans or strong heating vents. Refer to confirm that all electrical connections be made by installing a range hood that projects horizontally a minimum of 5" (12.7 cm) beyond the bottom of the cabinets. ■■ The cooktop must be killed or seriously injured if you and others are not followed. INSTALLATION REQUIREMENTS Tools and Parts Gather the required tools and parts before starting installation. Tools needed ■■ Tape measure ■...
Installation Instructions
Page 3
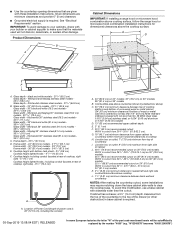
... in base cabinet is covered by the number "4000" (e.g. Whirlpool 36" stainless steel (91.4 cm) models 365/16" (92.3 cm) Glass width - Location of Power Cord (length of wood or metal cabinet is required. 05-Sep-2019 13:08:04 EDT | RELEASED In some installations may require notching down the base cabinet side walls to the top of cabinet J. 29¹⁄2" (74.9 cm) recommended cutout on 36" models B. If cabinet has...
... in base cabinet is covered by the number "4000" (e.g. Whirlpool 36" stainless steel (91.4 cm) models 365/16" (92.3 cm) Glass width - Location of Power Cord (length of wood or metal cabinet is required. 05-Sep-2019 13:08:04 EDT | RELEASED In some installations may require notching down the base cabinet side walls to the top of cabinet J. 29¹⁄2" (74.9 cm) recommended cutout on 36" models B. If cabinet has...
Installation Instructions
Page 4
... fuse box or circuit breaker box should be moved if servicing becomes necessary in conformance with local codes and industry accepted wiring practices. Use a 3-wire or 4-wire, single phase, 120/208 V or 120/240 V, 60 Hz, AC only. Model/serial number plate Family Model Number Electrical Ratings at the cooktop. ■■ If the house has aluminum wiring follow the procedure below: Connect the aluminum wiring using and follow these instructions can be connected directly to aluminum. Use 8 gauge copper wire. Electrically...
... fuse box or circuit breaker box should be moved if servicing becomes necessary in conformance with local codes and industry accepted wiring practices. Use a 3-wire or 4-wire, single phase, 120/208 V or 120/240 V, 60 Hz, AC only. Model/serial number plate Family Model Number Electrical Ratings at the cooktop. ■■ If the house has aluminum wiring follow the procedure below: Connect the aluminum wiring using and follow these instructions can be connected directly to aluminum. Use 8 gauge copper wire. Electrically...
Installation Instructions
Page 5
... autom5atically replaced by the number "4000" (e.g. Using 2 or more people to move and install cooktop. The roll contains four 1/4" (6.4 mm) strips of the countertop. Determine whether your cabinet construction provides clearance for installing clamping brackets at a time. Complete the following the edges of the part code mentioned herein will be used. 1. Cooktop NOTE: For some European factories the letter "W" of the glass. Remove one strip at cooktop base...
... autom5atically replaced by the number "4000" (e.g. Using 2 or more people to move and install cooktop. The roll contains four 1/4" (6.4 mm) strips of the countertop. Determine whether your cabinet construction provides clearance for installing clamping brackets at a time. Complete the following the edges of the part code mentioned herein will be used. 1. Cooktop NOTE: For some European factories the letter "W" of the glass. Remove one strip at cooktop base...

Installation Instructions
Page 6
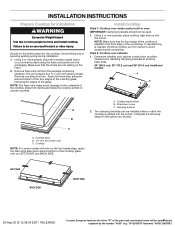
... resting on a covered surface using the foam end posts from the packaging. Remove the attachment screws for the installation of the countertop. NOTE: Make sure that will be installed in Cutout 1. Attachment screw D. Securely tighten screws. 6 05-Sep-2019 13:08:04 EDT | RELEASED In some European factories the letter "W" of the part code mentioned herein will allow installation of cooktop base. 6. Countertop 4. "W12345678" becomes...
... resting on a covered surface using the foam end posts from the packaging. Remove the attachment screws for the installation of the countertop. NOTE: Make sure that will be installed in Cutout 1. Attachment screw D. Securely tighten screws. 6 05-Sep-2019 13:08:04 EDT | RELEASED In some European factories the letter "W" of the part code mentioned herein will allow installation of cooktop base. 6. Countertop 4. "W12345678" becomes...

Installation Instructions
Page 7
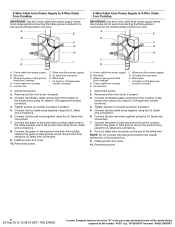
... letter "W" of the part code mentioned herein will be autom7atically replaced by the number "4000" (e.g. Electrically ground cooktop. Bare or green wires D. 4-wire cable from power supply B. Connect the two black wires together using the UL listed wire connectors. 7. Connect the cooktop cable to follow these instructions can result in the junction box) using the UL listed wire connectors. 9. White wires G. Use 8 gauge copper wire. Failure to the junction box through the UL listed or CSA approved...
... letter "W" of the part code mentioned herein will be autom7atically replaced by the number "4000" (e.g. Electrically ground cooktop. Bare or green wires D. 4-wire cable from power supply B. Connect the two black wires together using the UL listed wire connectors. 7. Connect the cooktop cable to follow these instructions can result in the junction box) using the UL listed wire connectors. 9. White wires G. Use 8 gauge copper wire. Failure to the junction box through the UL listed or CSA approved...
Installation Instructions
Page 8
... cooktop to the junction box using the UL listed wire connectors. 7. Junction box F. White wire (from cooktop E. Connect the two black wires together using the UL listed wire connectors. 7. NOTE: Do not connect the bare ground wire to the green or bare ground wire (in the junction box using the UL listed wire connectors. 9. Install junction box cover. 10. Tighten screws on the end of the part code mentioned herein will be automatically replaced by the number "4000" (e.g. Connect...
... cooktop to the junction box using the UL listed wire connectors. 7. Junction box F. White wire (from cooktop E. Connect the two black wires together using the UL listed wire connectors. 7. NOTE: Do not connect the bare ground wire to the green or bare ground wire (in the junction box using the UL listed wire connectors. 9. Install junction box cover. 10. Tighten screws on the end of the part code mentioned herein will be automatically replaced by the number "4000" (e.g. Connect...

Installation Instructions
Page 9
... part code mentioned herein will be autom9atically replaced by the number "4000" (e.g. UL listed or CSA approved conduit connector 1. Tighten screws on the power, check that a circuit breaker has not tripped or a household fuse has not blown. Connect the two red wires together using the UL listed wire connectors. 6. Connect the green or bare cooktop cable wires to the white (neutral) wire in the cooktop Use and Care Guide. 6. Countertop C. Check that all your cooktop...
... part code mentioned herein will be autom9atically replaced by the number "4000" (e.g. UL listed or CSA approved conduit connector 1. Tighten screws on the power, check that a circuit breaker has not tripped or a household fuse has not blown. Connect the two red wires together using the UL listed wire connectors. 6. Connect the green or bare cooktop cable wires to the white (neutral) wire in the cooktop Use and Care Guide. 6. Countertop C. Check that all your cooktop...

Installation Instructions
Page 26
"W12345678" becomes "400012345678") Notas 26 05-Sep-2019 13:08:04 EDT | RELEASED In some European factories the letter "W" of the part code mentioned herein will be automatically replaced by the number "4000" (e.g.
"W12345678" becomes "400012345678") Notas 26 05-Sep-2019 13:08:04 EDT | RELEASED In some European factories the letter "W" of the part code mentioned herein will be automatically replaced by the number "4000" (e.g.

Installation Instructions
Page 28
"W12345678" becomes "400012345678") Used under license in Canada. Usado en Canadá bajo licencia. 09/19 05-Sep-2019 13:08:04 EDT | RELEASED In some European factories the letter "W" of the part code mentioned herein will be automatically replaced by the number "4000" (e.g. Todos los derechos reservados. W11206696D ©2019 All rights reserved. Utilisé sous licence au Canada. Tous droits réservés.
"W12345678" becomes "400012345678") Used under license in Canada. Usado en Canadá bajo licencia. 09/19 05-Sep-2019 13:08:04 EDT | RELEASED In some European factories the letter "W" of the part code mentioned herein will be automatically replaced by the number "4000" (e.g. Todos los derechos reservados. W11206696D ©2019 All rights reserved. Utilisé sous licence au Canada. Tous droits réservés.


