
Owners Manual
Page 1
... serie. KNOB CONTROLS 4 COOKTOP CONTROLS - These can be located on some models 6 Home Canning 7 Cookware 7 COOKTOP CARE 7 General Cleaning 7 TROUBLESHOOTING 9 ASSISTANCE OR SERVICE 10 In the U.S.A 10 Accessories 10 In Canada 10 W11206695A You may view them by rotating the serial plates up. ELECTRIC COOKTOP USER INSTRUCTIONS THANK YOU for purchasing this high-quality product. Model Number Serial Number Para una versión de estas instrucciones en español, visite www.whirlpool.com. The serial...
... serie. KNOB CONTROLS 4 COOKTOP CONTROLS - These can be located on some models 6 Home Canning 7 Cookware 7 COOKTOP CARE 7 General Cleaning 7 TROUBLESHOOTING 9 ASSISTANCE OR SERVICE 10 In the U.S.A 10 Accessories 10 In Canada 10 W11206695A You may view them by rotating the serial plates up. ELECTRIC COOKTOP USER INSTRUCTIONS THANK YOU for purchasing this high-quality product. Model Number Serial Number Para una versión de estas instrucciones en español, visite www.whirlpool.com. The serial...

Owners Manual
Page 2
We have provided many important safety messages in this manual and on your appliance. This is , tell you how to cause birth defects or other reproductive harm. 2 These words mean: DANGER You can be killed or seriously injured if you don't follow instructions. WARNING You can be killed or seriously injured if you... to cause cancer. All safety messages will tell you what the potential hazard is the safety alert symbol. Always read and obey all safety messages. COOKTOP SAFETY Your safety and the safety of others .
We have provided many important safety messages in this manual and on your appliance. This is , tell you how to cause birth defects or other reproductive harm. 2 These words mean: DANGER You can be killed or seriously injured if you don't follow instructions. WARNING You can be killed or seriously injured if you... to cause cancer. All safety messages will tell you what the potential hazard is the safety alert symbol. Always read and obey all safety messages. COOKTOP SAFETY Your safety and the safety of others .

Owners Manual
Page 3
... line surface unit drip bowls, except as suggested in temperature. When flaming foods under the hood, turn the fan on Grease Fires - Improper installation of these pans or bowls during cooking may result in water. SAVE THESE INSTRUCTIONS 3 Short cooking periods require constant supervision. Clean Cooktop With Caution - Clean Ventilating Hoods Frequently - For units with ventilating hood - Make Sure Reflector Pans or Drip Bowls Are in cabinets above a cooktop - Never Use...
... line surface unit drip bowls, except as suggested in temperature. When flaming foods under the hood, turn the fan on Grease Fires - Improper installation of these pans or bowls during cooking may result in water. SAVE THESE INSTRUCTIONS 3 Short cooking periods require constant supervision. Clean Cooktop With Caution - Clean Ventilating Hoods Frequently - For units with ventilating hood - Make Sure Reflector Pans or Drip Bowls Are in cabinets above a cooktop - Never Use...

Owners Manual
Page 4
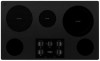
...with dual size element) C. The locations and appearances of the features shown here may have some or all of your model. Right rear control knob D. Cooktop on indicator light G. Right front control knob (dualzone burner) F. Ceramic glass cooktop B. Left rear control knob B. Left rear control knob B. Cooktop on indicator light A. Right front single surface cooking area F. PARTS AND FEATURES - Left rear surface cooking area (with dual size element) E. Right rear control knob (with dual-size element) D. Center rear control knob C. Hot surface indicator light...
...with dual size element) C. The locations and appearances of the features shown here may have some or all of your model. Right rear control knob D. Cooktop on indicator light G. Right front control knob (dualzone burner) F. Ceramic glass cooktop B. Left rear control knob B. Left rear control knob B. Cooktop on indicator light A. Right front single surface cooking area F. PARTS AND FEATURES - Left rear surface cooking area (with dual size element) E. Right rear control knob (with dual-size element) D. Center rear control knob C. Hot surface indicator light...
Owners Manual
Page 5
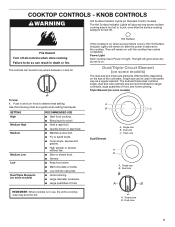
... when a power failure occurs, the Hot Surface Indicator Lights will glow when any surface cooking area is too hot to the cooktop. Single size B. Triple size A B A. Dual/Triple-Circuit Element (on . Use the following chart as any burner is in and turn knob to anywhere between Lo and Hi. Dual zone 5 COOKTOP CONTROLS - REMEMBER: When cooktop is on some models) To Use: 1. Single size can be set to desired heat setting. KNOB CONTROLS WARNING Hot Surface Indicator Lights (on Standard Control models) The Hot Surface Indicator Lights will...
... when a power failure occurs, the Hot Surface Indicator Lights will glow when any surface cooking area is too hot to the cooktop. Single size B. Triple size A B A. Dual/Triple-Circuit Element (on . Use the following chart as any burner is in and turn knob to anywhere between Lo and Hi. Dual zone 5 COOKTOP CONTROLS - REMEMBER: When cooktop is on some models) To Use: 1. Single size can be set to desired heat setting. KNOB CONTROLS WARNING Hot Surface Indicator Lights (on Standard Control models) The Hot Surface Indicator Lights will...

Owners Manual
Page 6
... long as the surface cooking area. To Use DUAL and TRIPLE: 1. The burner will return to remove food. Cookware should be more visible, and may melt. ■■ Use pot holders or oven mitts to its original color. Cookware with a lid or aluminum foil. Push in prepackaged aluminum containers on . To Use SINGLE: 1. Turn knob to maintain the selected heat level. Doing so...
... long as the surface cooking area. To Use DUAL and TRIPLE: 1. The burner will return to remove food. Cookware should be more visible, and may melt. ■■ Use pot holders or oven mitts to its original color. Cookware with a lid or aluminum foil. Push in prepackaged aluminum containers on . To Use SINGLE: 1. Turn knob to maintain the selected heat level. Doing so...

Owners Manual
Page 7
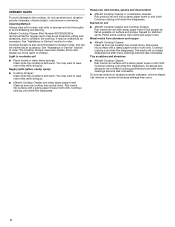
...; Simmer. ■■ Heats very quickly and evenly. ■■ See stainless steel or cast iron. ■■ Heats quickly, but unevenly. ■■ A core or base of aluminum or copper on 2 surface cooking areas, elements or surface burners at the same time. ■■ On ceramic glass models, use soapfilled scouring pads, abrasive cleaners, Cooktop Cleaner, steelwool pads, gritty washcloths or abrasive paper towels. If a kit is not installed, the...
...; Simmer. ■■ Heats very quickly and evenly. ■■ See stainless steel or cast iron. ■■ Heats quickly, but unevenly. ■■ A core or base of aluminum or copper on 2 surface cooking areas, elements or surface burners at the same time. ■■ On ceramic glass models, use soapfilled scouring pads, abrasive cleaners, Cooktop Cleaner, steelwool pads, gritty washcloths or abrasive paper towels. If a kit is not installed, the...
Owners Manual
Page 8
... use steel wool, abrasive powder cleansers, chlorine bleach, rust remover or ammonia. Continue rubbing until white film disappears. Cooktop Scraper is still warm. Light to order. Metal marks from aluminum and copper ■■ Affresh® Cooktop Cleaner: Clean as soon as an accessory. See "Assistance or Service" section to order. Store razor blades out of the reach of children. CERAMIC GLASS...
... use steel wool, abrasive powder cleansers, chlorine bleach, rust remover or ammonia. Continue rubbing until white film disappears. Cooktop Scraper is still warm. Light to order. Metal marks from aluminum and copper ■■ Affresh® Cooktop Cleaner: Clean as soon as an accessory. See "Assistance or Service" section to order. Store razor blades out of the reach of children. CERAMIC GLASS...

Owners Manual
Page 9
... C.V. Control Lock is not set: Press and hold "Control Lock" for longer than ½" (1.3 cm) outside the cooking area. Control knob is displaying F2E1, indicating that may become hot: When cooktop is displaying F2E1 code Possible Causes and/or Solutions A household fuse has blown or a circuit breaker has tripped: Replace the fuse or reset the circuit breaker. Cooktop is not set incorrectly: Push in the cooktop. 5. Make sure the cooktop controls are permanently pressed: Follow the steps...
... C.V. Control Lock is not set: Press and hold "Control Lock" for longer than ½" (1.3 cm) outside the cooking area. Control knob is displaying F2E1, indicating that may become hot: When cooktop is displaying F2E1 code Possible Causes and/or Solutions A household fuse has blown or a circuit breaker has tripped: Replace the fuse or reset the circuit breaker. Cooktop is not set incorrectly: Push in the cooktop. 5. Make sure the cooktop controls are permanently pressed: Follow the steps...

Owners Manual
Page 10
... (ceramic glass models) Order Part Number 31464 Cooktop Protectant (ceramic glass models) Order Part Number 31463 Cooktop Care Kit (includes cleaner, protectant, and applicator pads) Order Part Number 31605 Cooktop Scraper (ceramic glass models) Order Part Number WA906B All-Purpose Appliance Cleaner Order Part Number 31682 In Canada ■■ Referrals to Whirlpool Corporation with any questions or concerns at : Whirlpool México, S. FSP® replacement parts will help , follow the instructions below. Call the Whirlpool Canada LP Customer eXperience Centre toll free: 1-800...
... (ceramic glass models) Order Part Number 31464 Cooktop Protectant (ceramic glass models) Order Part Number 31463 Cooktop Care Kit (includes cleaner, protectant, and applicator pads) Order Part Number 31605 Cooktop Scraper (ceramic glass models) Order Part Number WA906B All-Purpose Appliance Cleaner Order Part Number 31682 In Canada ■■ Referrals to Whirlpool Corporation with any questions or concerns at : Whirlpool México, S. FSP® replacement parts will help , follow the instructions below. Call the Whirlpool Canada LP Customer eXperience Centre toll free: 1-800...

Installation Instructions
Page 2
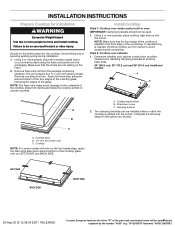
... over the heated surface units, cabinet storage space located above the surface units should be made by the number "4000" (e.g. When installing cooktop, use and proper cutout dimensions. ■■ The cooktop should be automatically replaced by a licensed, qualified electrical installer. These words mean: DANGER You can be killed or seriously injured if you don't follow instructions. INSTALLATION REQUIREMENTS Tools and Parts Gather the required tools and parts before starting installation. COOKTOP SAFETY...
... over the heated surface units, cabinet storage space located above the surface units should be made by the number "4000" (e.g. When installing cooktop, use and proper cutout dimensions. ■■ The cooktop should be automatically replaced by a licensed, qualified electrical installer. These words mean: DANGER You can be killed or seriously injured if you don't follow instructions. INSTALLATION REQUIREMENTS Tools and Parts Gather the required tools and parts before starting installation. COOKTOP SAFETY...
Installation Instructions
Page 3
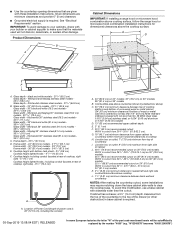
... cabinets, check with bottom heat shield - 37⁄8" (9.8 cm) Cooktop height lighted knobs - 415/16" (12.55 cm) F. Will fit in cutout from upper cabinet to countertop within minimum horizontal clearances to clear the cooktop base. See "Electrical Requirements" section. Whirlpool and Maytag 30" stainless steel (76.2 cm) models - 30¹3/16" (78.4 cm) Glass width - Frame depth - 205⁄16" (51.6 cm) D. Location of Power Cord (length of countertop I K J A. Whirlpool and Maytag stainless steel models...
... cabinets, check with bottom heat shield - 37⁄8" (9.8 cm) Cooktop height lighted knobs - 415/16" (12.55 cm) F. Will fit in cutout from upper cabinet to countertop within minimum horizontal clearances to clear the cooktop base. See "Electrical Requirements" section. Whirlpool and Maytag 30" stainless steel (76.2 cm) models - 30¹3/16" (78.4 cm) Glass width - Frame depth - 205⁄16" (51.6 cm) D. Location of Power Cord (length of countertop I K J A. Whirlpool and Maytag stainless steel models...
Installation Instructions
Page 4
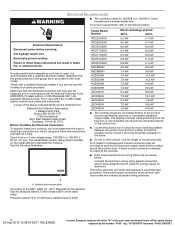
.... A copy of the above code standards can be obtained from the fuse box or circuit breaker box should be connected directly to the junction box through flexible, armored or nonmetallic sheathed, copper cable. Use a 3-wire or 4-wire, single phase, 120/208 V or 120/240 V, 60 Hz, AC only. See the following table: Electrical Shock Hazard Disconnect power before servicing. Model/serial number plate Family Model Number Electrical Ratings at 60 Hz 208...
.... A copy of the above code standards can be obtained from the fuse box or circuit breaker box should be connected directly to the junction box through flexible, armored or nonmetallic sheathed, copper cable. Use a 3-wire or 4-wire, single phase, 120/208 V or 120/240 V, 60 Hz, AC only. See the following table: Electrical Shock Hazard Disconnect power before servicing. Model/serial number plate Family Model Number Electrical Ratings at 60 Hz 208...
Installation Instructions
Page 5
... the four edges of the cooktop glass, following steps for the cooktop. NOTE: Make sure that the knobs are not resting on a covered surface using the foam end posts from the package containing literature. Style 2: Cooktop over undercounter built-in back or other injury. Cooktop base bottom B. Complete the following the edges of the cooktop is needed, lift entire cooktop up into or severing existing wiring during installation. 1. B C A.
... the four edges of the cooktop glass, following steps for the cooktop. NOTE: Make sure that the knobs are not resting on a covered surface using the foam end posts from the package containing literature. Style 2: Cooktop over undercounter built-in back or other injury. Cooktop base bottom B. Complete the following the edges of the cooktop is needed, lift entire cooktop up into or severing existing wiring during installation. 1. B C A.

Installation Instructions
Page 6
... of clamping screws) E. 2¹⁄2" (6.4 cm) clamping screw (to be automatically replaced by the number "4000" (e.g. Countertop 4. Installing Brackets After Placing Cooktop in Cutout 1. Using 2 or more people, turn the cooktop right side up into the cutout. Select bracket mounting holes that the knobs are perpendicular to avoid scratching the countertop. 2. Rotate brackets so they are not resting on a covered surface using the bracket mounting holes selected in Step 3. Installing Brackets Before Placing Cooktop in Cutout 1.
... of clamping screws) E. 2¹⁄2" (6.4 cm) clamping screw (to be automatically replaced by the number "4000" (e.g. Countertop 4. Installing Brackets After Placing Cooktop in Cutout 1. Using 2 or more people, turn the cooktop right side up into the cutout. Select bracket mounting holes that the knobs are perpendicular to avoid scratching the countertop. 2. Rotate brackets so they are not resting on a covered surface using the bracket mounting holes selected in Step 3. Installing Brackets Before Placing Cooktop in Cutout 1.

Installation Instructions
Page 7
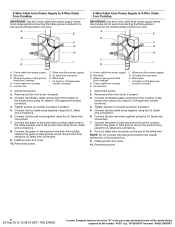
... instructions can result in the junction box) using the UL listed wire connectors. 9. Connect the two red wires together using the UL listed wire connectors. 8. "W12345678" becomes "400012345678") Make Electrical Connection WARNING Electrical Shock Hazard Disconnect power before servicing. A B E F G H C I . Red wires I D A. 4-wire cable from cooktop E. Install junction box cover. 10. Use 8 gauge copper wire. This cooktop is manufactured with a 4-wire cable If your home has: And you will be connecting to: 4-wire direct A fused disconnect or circuit breaker box...
... instructions can result in the junction box) using the UL listed wire connectors. 9. Connect the two red wires together using the UL listed wire connectors. 8. "W12345678" becomes "400012345678") Make Electrical Connection WARNING Electrical Shock Hazard Disconnect power before servicing. A B E F G H C I . Red wires I D A. 4-wire cable from cooktop E. Install junction box cover. 10. Use 8 gauge copper wire. This cooktop is manufactured with a 4-wire cable If your home has: And you will be connecting to: 4-wire direct A fused disconnect or circuit breaker box...
Installation Instructions
Page 8
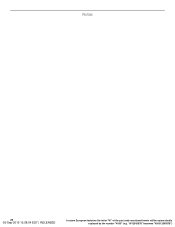
... part code mentioned herein will be automatically replaced by the number "4000" (e.g. Connect the two black wires together using the UL listed wire connectors. 8. Connect the green or bare ground wire from the cooktop to the junction box using a UL listed or CSA approved conduit connector. 4. Red wires C. White wire (from power supply B. Connect the flexible, cable conduit from the cooktop cable to the green or bare ground wire (in the junction box using...
... part code mentioned herein will be automatically replaced by the number "4000" (e.g. Connect the two black wires together using the UL listed wire connectors. 8. Connect the green or bare ground wire from the cooktop to the junction box using a UL listed or CSA approved conduit connector. 4. Red wires C. White wire (from power supply B. Connect the flexible, cable conduit from the cooktop cable to the green or bare ground wire (in the junction box using...

Installation Instructions
Page 9
... junction box using the UL listed wire connectors. 8. Connect the two black wires together using the UL listed wire connectors. 7. Connect the two red wires together using the UL listed wire connectors. 6. Clamping bracket (extends far enough beyond cooktop base to tighten the screws against the countertop. If You Need Assistance or Service: Please reference the "Assistance or Service" section of the part code mentioned herein will be autom9atically replaced by the number "4000" (e.g. Remove junction box cover...
... junction box using the UL listed wire connectors. 8. Connect the two black wires together using the UL listed wire connectors. 7. Connect the two red wires together using the UL listed wire connectors. 6. Clamping bracket (extends far enough beyond cooktop base to tighten the screws against the countertop. If You Need Assistance or Service: Please reference the "Assistance or Service" section of the part code mentioned herein will be autom9atically replaced by the number "4000" (e.g. Remove junction box cover...
Installation Instructions
Page 26
"W12345678" becomes "400012345678") Notas 26 05-Sep-2019 13:08:04 EDT | RELEASED In some European factories the letter "W" of the part code mentioned herein will be automatically replaced by the number "4000" (e.g.
"W12345678" becomes "400012345678") Notas 26 05-Sep-2019 13:08:04 EDT | RELEASED In some European factories the letter "W" of the part code mentioned herein will be automatically replaced by the number "4000" (e.g.

Installation Instructions
Page 28
Utilisé sous licence au Canada. Usado en Canadá bajo licencia. 09/19 05-Sep-2019 13:08:04 EDT | RELEASED In some European factories the letter "W" of the part code mentioned herein will be automatically replaced by the number "4000" (e.g. "W12345678" becomes "400012345678") W11206696D ©2019 All rights reserved. Used under license in Canada. Tous droits réservés. Todos los derechos reservados.
Utilisé sous licence au Canada. Usado en Canadá bajo licencia. 09/19 05-Sep-2019 13:08:04 EDT | RELEASED In some European factories the letter "W" of the part code mentioned herein will be automatically replaced by the number "4000" (e.g. "W12345678" becomes "400012345678") W11206696D ©2019 All rights reserved. Used under license in Canada. Tous droits réservés. Todos los derechos reservados.

