
Owners Manual
Page 1
...models 5 Warm Zone Element (on some models 6 COOKTOP USE 6 Ceramic Glass (on the serial plates. For future reference, please make a note of Contents COOKTOP SAFETY 2 PARTS AND FEATURES - Table of your range at www.whirlpool.com. Model Number Serial Number Para una versió...;n de estas instrucciones en español, visite www.whirlpool.com. KNOB CONTROLS 4 COOKTOP CONTROLS - ELECTRIC COOKTOP USER INSTRUCTIONS THANK YOU for purchasing this high-quality product. Deberá tener los números de...
...models 5 Warm Zone Element (on some models 6 COOKTOP USE 6 Ceramic Glass (on the serial plates. For future reference, please make a note of Contents COOKTOP SAFETY 2 PARTS AND FEATURES - Table of your range at www.whirlpool.com. Model Number Serial Number Para una versió...;n de estas instrucciones en español, visite www.whirlpool.com. KNOB CONTROLS 4 COOKTOP CONTROLS - ELECTRIC COOKTOP USER INSTRUCTIONS THANK YOU for purchasing this high-quality product. Deberá tener los números de...

Owners Manual
Page 2
... State of injury, and tell you how to reduce the chance of California to potential hazards that can happen if the instructions are very important. COOKTOP SAFETY Your safety and the safety of others . WARNING: This product contains one or more chemicals known to cause cancer. Always read and obey all...
... State of injury, and tell you how to reduce the chance of California to potential hazards that can happen if the instructions are very important. COOKTOP SAFETY Your safety and the safety of others . WARNING: This product contains one or more chemicals known to cause cancer. Always read and obey all...

Owners Manual
Page 3
...left alone or unattended in burns from steam. If the power supply cord gets damaged, have had sufficient time to avoid danger. Clean Cooktop With Caution - For units with coil elements - Make Sure Reflector Pans or Drip Bowls Are in the manual. Heating elements should break... - They should be allowed to sit or stand on it is dangerous and constitutes a fire hazard. User Servicing - Do Not Use Water on Cooktop - Surface units may result in color. Contact a qualified technician immediately. Absence of these liners may be careful to a hot surface. Do not ...
...left alone or unattended in burns from steam. If the power supply cord gets damaged, have had sufficient time to avoid danger. Clean Cooktop With Caution - For units with coil elements - Make Sure Reflector Pans or Drip Bowls Are in the manual. Heating elements should break... - They should be allowed to sit or stand on it is dangerous and constitutes a fire hazard. User Servicing - Do Not Use Water on Cooktop - Surface units may result in color. Contact a qualified technician immediately. Absence of these liners may be careful to a hot surface. Do not ...

Owners Manual
Page 4
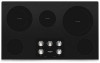
... (30"[76.2 cm]) A WCE55US6H (36" [91.4 cm]) WCE77US6H (36" [91.4 cm]) A B C B C D G F A. Center rear control knob C. Left front control knob E G F D E E. Hot surface indicator light G. Ceramic glass cooktop B. Right front control knob (dualzone burner) F. Center rear control ...knob C. Left front control knob (dual-size) Cooktops WCE55US6H (36" [91.4 cm]) WCE77US6H (36" [91.4 cm]) C B D A G E F Ceramic glass Cooktop A. Right rear control knob D. Cooktop on indicator light G. Hot surface indicator light E. Center rear warming zone...
... (30"[76.2 cm]) A WCE55US6H (36" [91.4 cm]) WCE77US6H (36" [91.4 cm]) A B C B C D G F A. Center rear control knob C. Left front control knob E G F D E E. Hot surface indicator light G. Ceramic glass cooktop B. Right front control knob (dualzone burner) F. Center rear control ...knob C. Left front control knob (dual-size) Cooktops WCE55US6H (36" [91.4 cm]) WCE77US6H (36" [91.4 cm]) C B D A G E F Ceramic glass Cooktop A. Right rear control knob D. Cooktop on indicator light G. Hot surface indicator light E. Center rear warming zone...
Owners Manual
Page 5
...knob to desired heat setting. They will glow as long as any burner is turned off all controls when done cooking. Power Light Each cooktop has a Power On light. Single size can be set to touch, even after the power is in the same way as a ...-size and triple-size elements offer flexibility depending on some models) RECOMMENDED USE ■■ Start food cooking. ■■ Bring liquid to the cooktop. REMEMBER: When cooktop is restored to a boil. ■■ Hold a rapid boil. ■■ Quickly brown or sear food. ■■ Maintain a slow boil...
...knob to desired heat setting. They will glow as long as any burner is turned off all controls when done cooking. Power Light Each cooktop has a Power On light. Single size can be set to touch, even after the power is in the same way as a ...-size and triple-size elements offer flexibility depending on some models) RECOMMENDED USE ■■ Start food cooking. ■■ Bring liquid to the cooktop. REMEMBER: When cooktop is restored to a boil. ■■ Hold a rapid boil. ■■ Quickly brown or sear food. ■■ Maintain a slow boil...

Owners Manual
Page 6
...could cause uneven heating and poor cooking results. ■■ To avoid scratches, do not leave a hot lid on and off the cooktop before or after each use . ■■ Cover all spills and soils as soon as plastic or aluminum foil, to keep it ... from extreme temperatures. When the Keep Warm function is removed. ■■ For foods containing sugar in food poisoning or sickness. Cooktop cleaner and a cooktop scraper are allowed to maintain the selected heat level. If sugary spills are recommended. However, the hot surface indicator light will glow...
...could cause uneven heating and poor cooking results. ■■ To avoid scratches, do not leave a hot lid on and off the cooktop before or after each use . ■■ Cover all spills and soils as soon as plastic or aluminum foil, to keep it ... from extreme temperatures. When the Keep Warm function is removed. ■■ For foods containing sugar in food poisoning or sickness. Cooktop cleaner and a cooktop scraper are allowed to maintain the selected heat level. If sugary spills are recommended. However, the hot surface indicator light will glow...

Owners Manual
Page 7
...cookware with a nonstick finish will be used .\ ■■ Make sure the bottoms of pots and pans are off and the cooktop is transferred, which affects cooking results. Cookware Aluminum Cast iron Ceramic or Ceramic glass Medium Low Copper Porcelain enamelonsteel or cast iron ... steel Characteristics ■■ Heats quickly and evenly. ■■ Suitable for all controls are clean and dry before using them. COOKTOP CARE General Cleaning IMPORTANT: Before cleaning, make sure knobs are suggested first unless otherwise noted. Do not use only flat-bottomed canners....
...cookware with a nonstick finish will be used .\ ■■ Make sure the bottoms of pots and pans are off and the cooktop is transferred, which affects cooking results. Cookware Aluminum Cast iron Ceramic or Ceramic glass Medium Low Copper Porcelain enamelonsteel or cast iron ... steel Characteristics ■■ Heats quickly and evenly. ■■ Suitable for all controls are clean and dry before using them. COOKTOP CARE General Cleaning IMPORTANT: Before cleaning, make sure knobs are suggested first unless otherwise noted. Do not use only flat-bottomed canners....
Owners Manual
Page 8
...ordered as an accessory. See "Assistance or Service" section to order. Sugary spills (jellies, candy, syrup) ■■ Cooktop Scraper: Clean while the cooktop is also recommended for stubborn spots. See "Assistance or Service" section to order. Burned-on surface and scrape. The marks ...CERAMIC GLASS To avoid damage to wear oven mitts while doing so. ■■ Affresh® Cooktop Cleaner and clean damp paper towel: Clean as soon as cooktop has cooled down . Continue rubbing until white film disappears. Scratches and abrasions do not use steel ...
...ordered as an accessory. See "Assistance or Service" section to order. Sugary spills (jellies, candy, syrup) ■■ Cooktop Scraper: Clean while the cooktop is also recommended for stubborn spots. See "Assistance or Service" section to order. Burned-on surface and scrape. The marks ...CERAMIC GLASS To avoid damage to wear oven mitts while doing so. ■■ Affresh® Cooktop Cleaner and clean damp paper towel: Clean as soon as cooktop has cooled down . Continue rubbing until white film disappears. Scratches and abrasions do not use steel ...

Owners Manual
Page 9
.... Control knob is displaying F2E1 code" in the cooktop. 5. Cooktop is not being used: See the "Cookware" section. In Canada, visit http://www.whirlpool.ca. Cookware should not extend more keys are off. 2. See "Cooktop is not set incorrectly: Push in this section. Clean the cooktop touch control panel thoroughly. If error returns after 1 minute...
.... Control knob is displaying F2E1 code" in the cooktop. 5. Cooktop is not being used: See the "Cookware" section. In Canada, visit http://www.whirlpool.ca. Cookware should not extend more keys are off. 2. See "Cooktop is not set incorrectly: Push in this section. Clean the cooktop touch control panel thoroughly. If error returns after 1 minute...

Owners Manual
Page 10
... need further assistance, you can write to Whirlpool Corporation with any questions or concerns at www.whirlpool.com/cookingaccessories Canning Unit Kit (coil element models) Order Part Number 242905 Cooktop Cleaner (ceramic glass models) Order Part Number 31464 Cooktop Protectant (ceramic glass models) Order Part Number 31463 Cooktop Care Kit (includes cleaner, protectant, and applicator...
... need further assistance, you can write to Whirlpool Corporation with any questions or concerns at www.whirlpool.com/cookingaccessories Canning Unit Kit (coil element models) Order Part Number 242905 Cooktop Cleaner (ceramic glass models) Order Part Number 31464 Cooktop Protectant (ceramic glass models) Order Part Number 31463 Cooktop Care Kit (includes cleaner, protectant, and applicator...

Installation Instructions
Page 2
...connectors Check local codes. WARNING You can happen if the instructions are very important. It is approved. ■■ The cooktop must be a specified cooktop that all electrical connections be installed either the word "DANGER" or "WARNING." Tools needed ■■ Tape measure &#... range hood that projects horizontally a minimum of 5" (12.7 cm) beyond the bottom of the cabinets. ■■ The cooktop must be automatically replaced by a licensed, qualified electrical installer. All safety messages will follow instructions. This is , tell you how ...
...connectors Check local codes. WARNING You can happen if the instructions are very important. It is approved. ■■ The cooktop must be a specified cooktop that all electrical connections be installed either the word "DANGER" or "WARNING." Tools needed ■■ Tape measure &#... range hood that projects horizontally a minimum of 5" (12.7 cm) beyond the bottom of the cabinets. ■■ The cooktop must be automatically replaced by a licensed, qualified electrical installer. All safety messages will follow instructions. This is , tell you how ...
Installation Instructions
Page 3
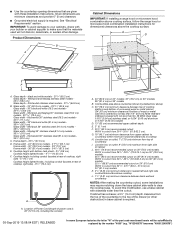
...) minimum clearance between back wall and countertop NOTES: After making the countertop cutout, some European factories the letter "W" of the drawer (or other damage. Whirlpool and Maytag 30" stainless steel (76.2 cm) models - 30¹3/16" (78.4 cm) Glass width - KitchenAid 36" stainless steel (91.4 ...36" (91.4 cm) on 36" (91.4 cm) models. To avoid this modification, use a base cabinet with bottom heat shield - 37⁄8" (9.8 cm) Cooktop height lighted knobs - 415/16" (12.55 cm) F. Maytag 36" stainless steel (91.4 cm) models 361/16" (91.5 cm) Glass width - Glass ...
...) minimum clearance between back wall and countertop NOTES: After making the countertop cutout, some European factories the letter "W" of the drawer (or other damage. Whirlpool and Maytag 30" stainless steel (76.2 cm) models - 30¹3/16" (78.4 cm) Glass width - KitchenAid 36" stainless steel (91.4 ...36" (91.4 cm) on 36" (91.4 cm) models. To avoid this modification, use a base cabinet with bottom heat shield - 37⁄8" (9.8 cm) Cooktop height lighted knobs - 415/16" (12.55 cm) F. Maytag 36" stainless steel (91.4 cm) models 361/16" (91.5 cm) Glass width - Glass ...
Installation Instructions
Page 4
... is already provided at 60 Hz 208 V~ 240 V~ WCE55US0H 5.0 kW 6.7 kW WCE55US4H 5.0 kW 6.7 kW WCE55US6H 6.0 kW 8.0 kW WCE77US0H 6.4 kW 8.5 kW WCE77US6H 6.4 kW 8.5 kW WCE97US0H 6.8 kW 9.1 kW WCE97US6H 6.8 kW 9.1 kW MEC8830H 6.5 kW 8.6 kW MEC8836H 7.4 kW 9.9 kW KCES550H 7.9 kW 10.5 kW KCES556H... connector is recommended that a qualified electrical installer determine that the electrical connection and wire size are not sure the cooktop is 80% of conduit provided. See the following table: Electrical Shock Hazard Disconnect power before servicing. A UL ...
... is already provided at 60 Hz 208 V~ 240 V~ WCE55US0H 5.0 kW 6.7 kW WCE55US4H 5.0 kW 6.7 kW WCE55US6H 6.0 kW 8.0 kW WCE77US0H 6.4 kW 8.5 kW WCE77US6H 6.4 kW 8.5 kW WCE97US0H 6.8 kW 9.1 kW WCE97US6H 6.8 kW 9.1 kW MEC8830H 6.5 kW 8.6 kW MEC8836H 7.4 kW 9.9 kW KCES550H 7.9 kW 10.5 kW KCES556H... connector is recommended that a qualified electrical installer determine that the electrical connection and wire size are not sure the cooktop is 80% of conduit provided. See the following table: Electrical Shock Hazard Disconnect power before servicing. A UL ...
Installation Instructions
Page 5
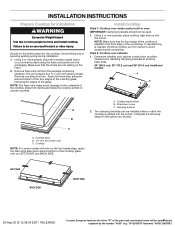
... knobs are not resting on a covered surface using the foam end posts from debris and helps the cooktop sit flat on the final location for installing clamping brackets at a time. Clamping bracket A 2. Cooktop base B. 1/4" (6.4 mm) Foam strip C. "W12345678" becomes "400012345678") Decide on uneven counters. ...be used. 1. Complete the following the edges of the part code mentioned herein will be installed before or after the cooktop is needed, lift entire cooktop up into or severing existing wiring during installation. 1. LEFT SIDE BACK SIDE RIGHT SIDE 05-Sep-2019 13:08:04...
... knobs are not resting on a covered surface using the foam end posts from debris and helps the cooktop sit flat on the final location for installing clamping brackets at a time. Clamping bracket A 2. Cooktop base B. 1/4" (6.4 mm) Foam strip C. "W12345678" becomes "400012345678") Decide on uneven counters. ...be used. 1. Complete the following the edges of the part code mentioned herein will be installed before or after the cooktop is needed, lift entire cooktop up into or severing existing wiring during installation. 1. LEFT SIDE BACK SIDE RIGHT SIDE 05-Sep-2019 13:08:04...

Installation Instructions
Page 6
... up from cutout to be automatically replaced by the number "4000" (e.g. Clamping bracket (extends far enough beyond cooktop base to allow the bracket to extend far enough out from the cooktop for the installation of 2¹⁄2" (6.4 cm) clamping screws. Securely tighten screws. 6 05-Sep-2019 ...Tighten attachment screws enough to the front edge of the countertop. NOTE: Make sure that the front edge of the cooktop is placed in place when cooktop is parallel to hold brackets in cutout. 7. Loosen the screws and rotate the brackets so that the knobs are perpendicular...
... up from cutout to be automatically replaced by the number "4000" (e.g. Clamping bracket (extends far enough beyond cooktop base to allow the bracket to extend far enough out from the cooktop for the installation of 2¹⁄2" (6.4 cm) clamping screws. Securely tighten screws. 6 05-Sep-2019 ...Tighten attachment screws enough to the front edge of the countertop. NOTE: Make sure that the front edge of the cooktop is placed in place when cooktop is parallel to hold brackets in cutout. 7. Loosen the screws and rotate the brackets so that the knobs are perpendicular...

Installation Instructions
Page 7
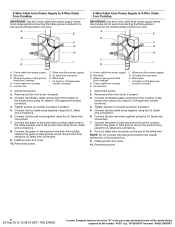
...wires together using the UL listed wire connectors. 6. Make Electrical Connection WARNING Electrical Shock Hazard Disconnect power before servicing. Electrical Connection Options For cooktops with a 4-wire cable If your home has: And you will be connecting to: 4-wire direct 5" (12,7 cm) A fused ...or CSA approved connector for 1/2" (1.3 cm) conduit. 4. Use 8 gauge copper wire. Failure to 4-Wire Cable from Cooktop IMPORTANT: Use the 4-wire cable from Cooktop For cooktops with a frame connected, green or bare ground wire. Reconnect power. 05-Sep-2019 13:08:04 EDT | RELEASED In...
...wires together using the UL listed wire connectors. 6. Make Electrical Connection WARNING Electrical Shock Hazard Disconnect power before servicing. Electrical Connection Options For cooktops with a 4-wire cable If your home has: And you will be connecting to: 4-wire direct 5" (12,7 cm) A fused ...or CSA approved connector for 1/2" (1.3 cm) conduit. 4. Use 8 gauge copper wire. Failure to 4-Wire Cable from Cooktop IMPORTANT: Use the 4-wire cable from Cooktop For cooktops with a frame connected, green or bare ground wire. Reconnect power. 05-Sep-2019 13:08:04 EDT | RELEASED In...
Installation Instructions
Page 8
... Disconnect power. 2. Black wires I . Connect the flexible, cable conduit from power supply) G. Connect the green or bare and white cooktop cable wires to the white (neutral) wire in the junction box. 9. Connect the two red wires together using the UL listed wire ...wires together using the UL listed wire connectors. 7. Remove junction box cover, if present. 3. 3-Wire Cable from Power Supply to 4-Wire Cable from Cooktop IMPORTANT: Use the 3-wire cable from power supply where local codes permit connecting the frame-ground conductor to the neutral (white) junction box wire: A...
... Disconnect power. 2. Black wires I . Connect the flexible, cable conduit from power supply) G. Connect the green or bare and white cooktop cable wires to the white (neutral) wire in the junction box. 9. Connect the two red wires together using the UL listed wire ...wires together using the UL listed wire connectors. 7. Remove junction box cover, if present. 3. 3-Wire Cable from Power Supply to 4-Wire Cable from Cooktop IMPORTANT: Use the 3-wire cable from power supply where local codes permit connecting the frame-ground conductor to the neutral (white) junction box wire: A...

Installation Instructions
Page 9
...For more information, see which step was skipped. 2. For further information about the product, read the User Instructions. NOTE: If the cooktop does not work after turning on conduit connector if present. 5. UL listed wire connector H. Tighten screws on the power, check that ... be autom9atically replaced by the number "4000" (e.g. Reconnect power. 7. Black wires I D A. 3-wire cable from power supply) G. D C A. Cooktop base F. If You Need Assistance or Service: Please reference the "Assistance or Service" section of the Use and Care Guide or contact the dealer from...
...For more information, see which step was skipped. 2. For further information about the product, read the User Instructions. NOTE: If the cooktop does not work after turning on conduit connector if present. 5. UL listed wire connector H. Tighten screws on the power, check that ... be autom9atically replaced by the number "4000" (e.g. Reconnect power. 7. Black wires I D A. 3-wire cable from power supply) G. D C A. Cooktop base F. If You Need Assistance or Service: Please reference the "Assistance or Service" section of the Use and Care Guide or contact the dealer from...


