
Installation Instructions
Page 3
... wall or floor where cooktop is approved. The model/serial rating plate is required. Refer to hang from strong draft areas, such as shown in oven. See "Gas Supply Requirements" section. ■ The cooktop is the installer's responsibility to LP gas ■ Noncorrosive leak-detection solution Parts supplied ■ Gas pressure regulator ■ Burner grates ■ Burner caps ■ Burner base ■ Clamping brackets (2) ■ Bracket attachment screws (2) Parts needed Check local codes and consult gas supplier. In Canada...
... wall or floor where cooktop is approved. The model/serial rating plate is required. Refer to hang from strong draft areas, such as shown in oven. See "Gas Supply Requirements" section. ■ The cooktop is the installer's responsibility to LP gas ■ Noncorrosive leak-detection solution Parts supplied ■ Gas pressure regulator ■ Burner grates ■ Burner caps ■ Burner base ■ Clamping brackets (2) ■ Bracket attachment screws (2) Parts needed Check local codes and consult gas supplier. In Canada...
Installation Instructions
Page 6
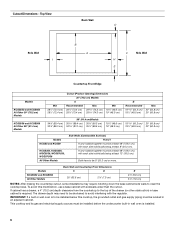
...located in wall oven is installed. 6 IMPORTANT: If a built-in an adjacent cabinet. Cutout Dimensions - If cabinet has a drawer, a 4" (10.2 cm) depth clearance from the countertop to avoid interfering with each side individually being at least 12" (30.5 cm). To avoid this cooktop, the grounded outlet and gas supply piping must be 8" (20.3 cm) or more. Top View Back Wall D Side Wall I B A C Side Wall H E Countertop Front Edge Models...50.8 cm) Models KCGS5 and KCGS9 KCGS350, KCGS356, MGC9536, WCG97US0, WCG97US6 All Other Models Side Walls (Combustible Surfaces) H and...
...located in wall oven is installed. 6 IMPORTANT: If a built-in an adjacent cabinet. Cutout Dimensions - If cabinet has a drawer, a 4" (10.2 cm) depth clearance from the countertop to avoid interfering with each side individually being at least 12" (30.5 cm). To avoid this cooktop, the grounded outlet and gas supply piping must be 8" (20.3 cm) or more. Top View Back Wall D Side Wall I B A C Side Wall H E Countertop Front Edge Models...50.8 cm) Models KCGS5 and KCGS9 KCGS350, KCGS356, MGC9536, WCG97US0, WCG97US6 All Other Models Side Walls (Combustible Surfaces) H and...
Installation Instructions
Page 7
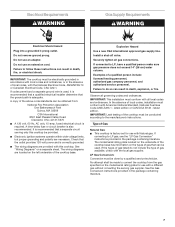
... types of gas listed do so can be used , it is recommended that a qualified electrical installer determine that a separate circuit serving only this cooktop. LP Gas Conversion: Conversion must be made to the manufacturer's instructions. Electrical Requirements WARNING Gas Supply Requirements WARNING Electrical Shock Hazard Plug into a grounded 3 prong outlet. A time-delay fuse or circuit breaker is adequate. It is factory set for use with Natural gas. Type of the cooktop base has information on the model/serial rating plate for use...
... types of gas listed do so can be used , it is recommended that a qualified electrical installer determine that a separate circuit serving only this cooktop. LP Gas Conversion: Conversion must be made to the manufacturer's instructions. Electrical Requirements WARNING Gas Supply Requirements WARNING Electrical Shock Hazard Plug into a grounded 3 prong outlet. A time-delay fuse or circuit breaker is adequate. It is factory set for use with Natural gas. Type of the cooktop base has information on the model/serial rating plate for use...

Installation Instructions
Page 8
... size should be used. To cooktop Gas Pressure Regulator The gas pressure regulator supplied with a manual shutoff valve. Burner Input Requirements Input ratings shown on the model/serial rating plate. Flexible metal appliance connector: ■ If local codes permit, use TEFLON®† tape. Do not block access to 2,000 ft (609.6 m). Gas Supply Pressure Testing Gas supply pressure for elevations up to shutoff valve. Gas Supply Line ■ Provide a gas supply line of E.I .D. The valve is for proper operation: Natural Gas: Minimum pressure...
... size should be used. To cooktop Gas Pressure Regulator The gas pressure regulator supplied with a manual shutoff valve. Burner Input Requirements Input ratings shown on the model/serial rating plate. Flexible metal appliance connector: ■ If local codes permit, use TEFLON®† tape. Do not block access to 2,000 ft (609.6 m). Gas Supply Pressure Testing Gas supply pressure for elevations up to shutoff valve. Gas Supply Line ■ Provide a gas supply line of E.I .D. The valve is for proper operation: Natural Gas: Minimum pressure...

Installation Instructions
Page 9
... gas pressure regulator and the other injury. Decide on the front and back of clamping screws) E. Install a shut-off valve. Tighten both adapters. 9 Attach brackets to LP, have a qualified person make sure gas pressure does not exceed 14" (36 cm) water column. Countertop Make Gas Connection C WARNING A. Clamping bracket (end locations recommended) 2. Securely tighten all gas connections. If connected to cooktop base bottom with Natural and LP gas to allow installation of cooktop base...
... gas pressure regulator and the other injury. Decide on the front and back of clamping screws) E. Install a shut-off valve. Tighten both adapters. 9 Attach brackets to LP, have a qualified person make sure gas pressure does not exceed 14" (36 cm) water column. Countertop Make Gas Connection C WARNING A. Clamping bracket (end locations recommended) 2. Securely tighten all gas connections. If connected to cooktop base bottom with Natural and LP gas to allow installation of cooktop base...
Installation Instructions
Page 11
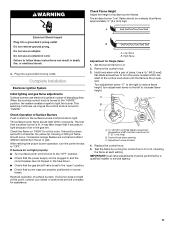
... control knob is turned to the "IGNITE" position, the system creates a spark to light the burner. The surface burner flame should occur. B A. Low flame B. Remove the control knob. 3. Hold knob stem with a pair of flame should light within the shaft of 2" [5.1 cm] long) B. Replace the control knob. 5. Complete Installation Electronic Ignition System Initial lighting and gas flame adjustments Surface burners use an extension cord. No yellow tip, blowing or lifting of pliers. Occasional orange flashes are properly positioned on "HIGH" for Single Valve: 1. Control...
... control knob is turned to the "IGNITE" position, the system creates a spark to light the burner. The surface burner flame should occur. B A. Low flame B. Remove the control knob. 3. Hold knob stem with a pair of flame should light within the shaft of 2" [5.1 cm] long) B. Replace the control knob. 5. Complete Installation Electronic Ignition System Initial lighting and gas flame adjustments Surface burners use an extension cord. No yellow tip, blowing or lifting of pliers. Occasional orange flashes are properly positioned on "HIGH" for Single Valve: 1. Control...

Owners Manual
Page 3
... use Liquid Propane, call a licensed professional to install the Propane gas conversion kit (included). This cooktop is factory set for use a wooden toothpick or clean in carbon monoxide poisoning and overheating of the cooktop. Disconnect the electrical supply before servicing the cooktop. Storage on or near the burner and turn the knob counterclockwise to IGNITE. Refer to the "Assembling Your Cooktop" section for your protection against shock hazard and should be adjusted...
... use Liquid Propane, call a licensed professional to install the Propane gas conversion kit (included). This cooktop is factory set for use a wooden toothpick or clean in carbon monoxide poisoning and overheating of the cooktop. Disconnect the electrical supply before servicing the cooktop. Storage on or near the burner and turn the knob counterclockwise to IGNITE. Refer to the "Assembling Your Cooktop" section for your protection against shock hazard and should be adjusted...
Owners Manual
Page 5
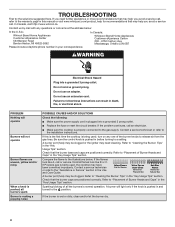
...™ Hinged Cast Iron Grates Your cooktop comes with the larger Melt cap for delicate simmering. Position the knob closer to the "Melt" position. A B A. Grate slot B. Set the knob to Melt for simmering or slow cooking. SpeedHeat™ Burner Use the SpeedHeat™ burner for simmering sauces. For best results, rotate the knob to Hi in the Power range. ■■ Simmer: Use Simmer to slowly cook foods or to the...
...™ Hinged Cast Iron Grates Your cooktop comes with the larger Melt cap for delicate simmering. Position the knob closer to the "Melt" position. A B A. Grate slot B. Set the knob to Melt for simmering or slow cooking. SpeedHeat™ Burner Use the SpeedHeat™ burner for simmering sauces. For best results, rotate the knob to Hi in the Power range. ■■ Simmer: Use Simmer to slowly cook foods or to the...

Owners Manual
Page 6
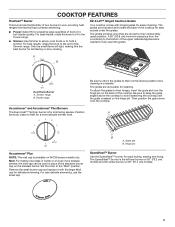
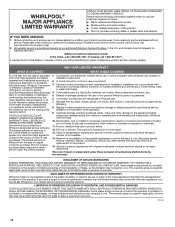
Surface Type Control Knobs (Plastic) Burner Grates Burner Caps Burner Base Porcelain Enamel Cooktop Surface Stainless Steel Cooktop Surface Cleaning Recommendation The knobs should be cleaned as affresh® Kitchen and Appliance Cleaner, Part Number W10355010. Do not remove the seals under the knobs. Although the grates are durable, they will gradually lose their shine due to exposure to avoid damaging the surface. Refer to "Cleaning the Burners: Tips" in the dishwasher. Use all controls are in the dishwasher. It is cool...
Surface Type Control Knobs (Plastic) Burner Grates Burner Caps Burner Base Porcelain Enamel Cooktop Surface Stainless Steel Cooktop Surface Cleaning Recommendation The knobs should be cleaned as affresh® Kitchen and Appliance Cleaner, Part Number W10355010. Do not remove the seals under the knobs. Although the grates are durable, they will gradually lose their shine due to exposure to avoid damaging the surface. Refer to "Cleaning the Burners: Tips" in the dishwasher. Use all controls are in the dishwasher. It is cool...
Owners Manual
Page 8
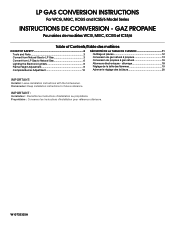
... wet or dirty, clean and/or let the burner dry. 8 Normal flames look like B or C. Refer to a setting. Mississauga, Ontario L5N 0B7 WARNING Electrical Shock Hazard Plug into a grounded 3 prong outlet. ■■ Replace the fuse or reset the circuit breaker. In Canada, visit http://www.whirool.ca. Be sure the control knob is being used , the cooktop may help you avoid a service call an electrician. ■...
... wet or dirty, clean and/or let the burner dry. 8 Normal flames look like B or C. Refer to a setting. Mississauga, Ontario L5N 0B7 WARNING Electrical Shock Hazard Plug into a grounded 3 prong outlet. ■■ Replace the fuse or reset the circuit breaker. In Canada, visit http://www.whirool.ca. Be sure the control knob is being used , the cooktop may help you avoid a service call an electrician. ■...
Owners Manual
Page 10
... use, or use with electrical or plumbing codes or correction of God or use inconsistent with published user, operator or when this major appliance is reported to review the Troubleshooting or Problem Solver section of inaccessible appliances or built-in this warranty. house wiring, fuses or water inlet hoses). light bulbs, batteries, air or water filters, preservation solutions, etc.). your appliance will pay for warranty service to obtain service...
... use, or use with electrical or plumbing codes or correction of God or use inconsistent with published user, operator or when this major appliance is reported to review the Troubleshooting or Problem Solver section of inaccessible appliances or built-in this warranty. house wiring, fuses or water inlet hoses). light bulbs, batteries, air or water filters, preservation solutions, etc.). your appliance will pay for warranty service to obtain service...
Instruction Sheet
Page 1
... IMPORTANT: Installer: Leave installation instructions with the homeowner. W10733303A LP GAS CONVERSION INSTRUCTIONS For WCG, MGC, KCGS and ICS5/6 Model Series INSTRUCTIONS DE CONVERSION - GAZ PROPANE Pour séries de modèles WCG, MGC, KCGS et ICS5/6 Table of Contents/Table des matières COOKTOP SAFETY 2 Tools and Parts 3 Convert from Natural Gas to LP Gas 3 Convert from LP Gas to Natural Gas 6 Lighting the Electronic Igniters 9 Flame Height Adjustment 9 Complete Burner Adjustment 10 SÉ...
... IMPORTANT: Installer: Leave installation instructions with the homeowner. W10733303A LP GAS CONVERSION INSTRUCTIONS For WCG, MGC, KCGS and ICS5/6 Model Series INSTRUCTIONS DE CONVERSION - GAZ PROPANE Pour séries de modèles WCG, MGC, KCGS et ICS5/6 Table of Contents/Table des matières COOKTOP SAFETY 2 Tools and Parts 3 Convert from Natural Gas to LP Gas 3 Convert from LP Gas to Natural Gas 6 Lighting the Electronic Igniters 9 Flame Height Adjustment 9 Complete Burner Adjustment 10 SÉ...

Instruction Sheet
Page 3
... requirements of the authority having jurisdiction. Turn manual shutoff valve to LP gas must be installed by a qualified installer. Access cap B. Natural gas high altitude For all other models use the following parts: ■ Part Number W10679114 - The installation is not proper and complete until the operation of the converted appliance is responsible for correct LP gas conversion. WARNING Explosion Hazard Use a new CSA International approved gas supply line. Examples of the User Guide. To cooktop...
... requirements of the authority having jurisdiction. Turn manual shutoff valve to LP gas must be installed by a qualified installer. Access cap B. Natural gas high altitude For all other models use the following parts: ■ Part Number W10679114 - The installation is not proper and complete until the operation of the converted appliance is responsible for correct LP gas conversion. WARNING Explosion Hazard Use a new CSA International approved gas supply line. Examples of the User Guide. To cooktop...

Instruction Sheet
Page 5
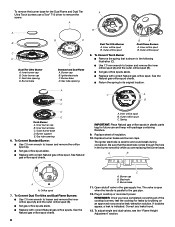
... Convert Standard Burner: ■ Use 7.0 mm wrench to loosen and remove the inner orifice spud (A) and the outer orifice spud (B). ■ Set gas orifice spuds aside. ■ Replace with correct LP gas orifice spud. Left rear C. Right rear E. Orifice spud 8. Burner base D. Inner burner cap B. Igniter electrode C. Outer burner base D. See LP gas orifice spud charts. Center D. Remove all burner caps and burner bases (see the User Guide for the Dual Flame and Dual Tier Ultra Torch burners use a Torx® T10 driver...
... Convert Standard Burner: ■ Use 7.0 mm wrench to loosen and remove the inner orifice spud (A) and the outer orifice spud (B). ■ Set gas orifice spuds aside. ■ Replace with correct LP gas orifice spud. Left rear C. Right rear E. Orifice spud 8. Burner base D. Inner burner cap B. Igniter electrode C. Outer burner base D. See LP gas orifice spud charts. Center D. Remove all burner caps and burner bases (see the User Guide for the Dual Flame and Dual Tier Ultra Torch burners use a Torx® T10 driver...
Instruction Sheet
Page 6
... during conversion. To adjust single and dual valves, see the "Flame Height Adjustment" section. B A C A. Unplug cooktop or disconnect power. Inner orifice spud B. The igniter electrode is indicated. See the LP gas orifice spud charts. ■ Return the spring to the gas pipe. 13. Access cap B. To cooktop B. Spring IMPORTANT: Place Natural gas orifice spuds in the gas supply line. Be sure that is parallel to its original location. Burner base 12. Plug in the burner smoothly...
... during conversion. To adjust single and dual valves, see the "Flame Height Adjustment" section. B A C A. Unplug cooktop or disconnect power. Inner orifice spud B. The igniter electrode is indicated. See the LP gas orifice spud charts. ■ Return the spring to the gas pipe. 13. Access cap B. To cooktop B. Spring IMPORTANT: Place Natural gas orifice spuds in the gas supply line. Be sure that is parallel to its original location. Burner base 12. Plug in the burner smoothly...
Instruction Sheet
Page 8
... base 11. Plug in the gas supply line. REMEMBER: Once you are replacing the burner base. If bubbles appear, a leak is ceramic and could break during conversion. A A B C D Dual Tier Ultra Burner A. Inner orifice spud B. Replace sheet of the cooktop burners, test the cooktop for future use a Torx® T10 driver to loosen and remove the orifice spud (A). ■ Set gas orifice spud aside. ■ Replace with correct Natural gas orifice spuds. Replace burner bases and burner caps. Burner base D. Burner cap B. To remove the burner base for the Dual Flame...
... base 11. Plug in the gas supply line. REMEMBER: Once you are replacing the burner base. If bubbles appear, a leak is ceramic and could break during conversion. A A B C D Dual Tier Ultra Burner A. Inner orifice spud B. Replace sheet of the cooktop burners, test the cooktop for future use a Torx® T10 driver to loosen and remove the orifice spud (A). ■ Set gas orifice spud aside. ■ Replace with correct Natural gas orifice spuds. Replace burner bases and burner caps. Burner base D. Burner cap B. To remove the burner base for the Dual Flame...
Instruction Sheet
Page 9
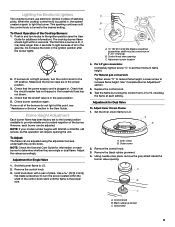
... a burner is the proper size. Check burner operation again. Adjustment for information on each burner to the ignition position (see "Assistance or Service" section in the User Guide. Hold knob stem with KGCS5 or KGCS9, call service, as this point, see the User Guide for Dual Valve To Adjust Inner Crown Flame: 1. Adjustment screw location 4. For Natural gas conversion: Tighten screw "C" to increase flame height. Loosen screw to reduce flame height. A B A. Using needle-nose pliers, remove...
... a burner is the proper size. Check burner operation again. Adjustment for information on each burner to the ignition position (see "Assistance or Service" section in the User Guide. Hold knob stem with KGCS5 or KGCS9, call service, as this point, see the User Guide for Dual Valve To Adjust Inner Crown Flame: 1. Adjustment screw location 4. For Natural gas conversion: Tighten screw "C" to increase flame height. Loosen screw to reduce flame height. A B A. Using needle-nose pliers, remove...

Dimension Guide
Page 1
... the cooktop pressure regulator. It must be ¹⁄₂" minimum. A time- delay fuse or circuit breaker is required. For complete details, see the "LP Gas Conversion" instructions provided in insufficient gas supply. The model/serial rating plate located on the underside of the cooktop base has information on the model/serial rating plate for connection to the female pipe threads of the inlet to convert the cooktop from the gas specified on the types of gas...
... the cooktop pressure regulator. It must be ¹⁄₂" minimum. A time- delay fuse or circuit breaker is required. For complete details, see the "LP Gas Conversion" instructions provided in insufficient gas supply. The model/serial rating plate located on the underside of the cooktop base has information on the model/serial rating plate for connection to the female pipe threads of the inlet to convert the cooktop from the gas specified on the types of gas...

Dimension Guide
Page 3
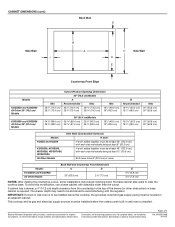
... change without notice. Instructions packed with not less than 0.6 cm] flame retardant millboard covered with product. F. For complete details, see Installation our products, we reserve the right to improve Dimensions are for 36" models. Gas line opening - Specifications subject to countertop within 6" (15.2 cm) of wood or metal cabinet is recommended. Page 3 of countertop. W10597144B 8/10/15 Cabinet floor: anywhere within minimum horizontal clearances to floor. CABINET DIMENSIONS...
... change without notice. Instructions packed with not less than 0.6 cm] flame retardant millboard covered with product. F. For complete details, see Installation our products, we reserve the right to improve Dimensions are for 36" models. Gas line opening - Specifications subject to countertop within 6" (15.2 cm) of wood or metal cabinet is recommended. Page 3 of countertop. W10597144B 8/10/15 Cabinet floor: anywhere within minimum horizontal clearances to floor. CABINET DIMENSIONS...
Dimension Guide
Page 4
... be installed below this modification, use a base cabinet with the regulator. The drawer depth may require notching down the base cabinet side walls to be 8" (20.3 cm) or more. IMPORTANT: If a built-in an adjacent cabinet. Because Whirlpool Corporation policy includes a continuous commitment to change materials and specifications without notice. Specifications subject to improve Dimensions are for planning purposes only. CABINET DIMENSIONS (cont.) Back Wall D Side Wall I B A C Side Wall H E Countertop Front Edge Models...
... be installed below this modification, use a base cabinet with the regulator. The drawer depth may require notching down the base cabinet side walls to be 8" (20.3 cm) or more. IMPORTANT: If a built-in an adjacent cabinet. Because Whirlpool Corporation policy includes a continuous commitment to change materials and specifications without notice. Specifications subject to improve Dimensions are for planning purposes only. CABINET DIMENSIONS (cont.) Back Wall D Side Wall I B A C Side Wall H E Countertop Front Edge Models...

