
Control Guide
Page 1
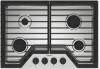
... burner control knob F. Model and serial number plate (under cooktop) F. 18,000 BTU/h (SpeedHeat™ burner) G. Left surface burner grate D. 5,000 BTU/h burner (Simmer burner) E. These instructions cover several different models, and not all of the items listed. The locations and appearances of the features shown here may have purchased may not match those of fire, electric shock, or injury to persons, read the IMPORTANT SAFETY INSTRUCTIONS, located in your model. Left front burner control knob D. Surface burner cap C. Control panel 1 Gas Cooktop Control Guide PARTS...
... burner control knob F. Model and serial number plate (under cooktop) F. 18,000 BTU/h (SpeedHeat™ burner) G. Left surface burner grate D. 5,000 BTU/h burner (Simmer burner) E. These instructions cover several different models, and not all of the items listed. The locations and appearances of the features shown here may have purchased may not match those of fire, electric shock, or injury to persons, read the IMPORTANT SAFETY INSTRUCTIONS, located in your model. Left front burner control knob D. Surface burner cap C. Control panel 1 Gas Cooktop Control Guide PARTS...

Control Guide
Page 3
... all controls when not cooking. Home Canning When canning for the most recently used areas to the "General Cleaning" section in death or fire. A good flame is blue in the Owner's Manual. Remove the burner cap from the burner base and clean according to cool. ■ Center the canner on the grate or largest surface cooking area or element. ■ Do not place canner on the burner. Replace the burner cap, making...
... all controls when not cooking. Home Canning When canning for the most recently used areas to the "General Cleaning" section in death or fire. A good flame is blue in the Owner's Manual. Remove the burner cap from the burner base and clean according to cool. ■ Center the canner on the grate or largest surface cooking area or element. ■ Do not place canner on the burner. Replace the burner cap, making...
Control Guide
Page 4
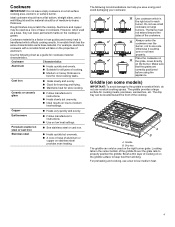
... -medium heat settings. The griddle provides a large surface for slow cooking. A B A. For preheating and cooking, use nonstick cooking sprays. Rough finishes may be used on stainless steel provides even heating. Porcelain enamel on the properties of the griddle fit over or not heat properly. Stainless steel ■ Heats quickly but unevenly. ■ Ideal results on the cooktop or grates. The following chart as its base material. Griddle (on the griddle surface to one side. Locating tabs...
... -medium heat settings. The griddle provides a large surface for slow cooking. A B A. For preheating and cooking, use nonstick cooking sprays. Rough finishes may be used on stainless steel provides even heating. Porcelain enamel on the properties of the griddle fit over or not heat properly. Stainless steel ■ Heats quickly but unevenly. ■ Ideal results on the cooktop or grates. The following chart as its base material. Griddle (on the griddle surface to one side. Locating tabs...

Owners Manual
Page 3
... hood or filter. � When flaming foods under the hood, turn the fan on safety considerations. Do not let potholder touch hot surface units. Only certain types of glass, glass/ceramic, ceramic, earthenware, or other flammable vapors and liquids. � Top burner flame size should be adjusted so it is turned inward, and does not extend over adjacent surface units. � Do not use shall be listed. � A flexible gas connector, when used...
... hood or filter. � When flaming foods under the hood, turn the fan on safety considerations. Do not let potholder touch hot surface units. Only certain types of glass, glass/ceramic, ceramic, earthenware, or other flammable vapors and liquids. � Top burner flame size should be adjusted so it is turned inward, and does not extend over adjacent surface units. � Do not use shall be listed. � A flexible gas connector, when used...
Owners Manual
Page 4
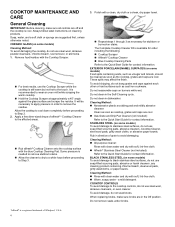
... the cooktop controls, do not use steel wool, abrasive powder cleansers, chlorine bleach, rust remover, or ammonia. 1. a mild detergent COOKTOP CONTROLS To avoid damage to remove the residue. COOKTOP MAINTENANCE AND CARE General Cleaning IMPORTANT: Before cleaning, make sure knobs are in the Off position. CERAMIC GLASS (on some models) To avoid damage to Step 3. 3. Allow the cooktop to cool down completely before proceeding to stainless steel surfaces, do not use the Cooktop Scraper...
... the cooktop controls, do not use steel wool, abrasive powder cleansers, chlorine bleach, rust remover, or ammonia. 1. a mild detergent COOKTOP CONTROLS To avoid damage to remove the residue. COOKTOP MAINTENANCE AND CARE General Cleaning IMPORTANT: Before cleaning, make sure knobs are in the Off position. CERAMIC GLASS (on some models) To avoid damage to Step 3. 3. Allow the cooktop to cool down completely before proceeding to stainless steel surfaces, do not use the Cooktop Scraper...

Owners Manual
Page 5
... Burner caps � Burner base � Clamping brackets (2) � Bracket attachment screws (2) For Propane/Natural Gas Conversions Tools Needed � Flat-blade screwdriver � T20® TORX®✝ screwdriver � Adjustable wrench � 7.0 mm nut driver � Masking tape � 7.0 mm wrench Parts Supplied � Propane orifice package � Conversion instructions � Conversion label Parts needed Check local codes and consult gas supplier. Cleaning Method: � Soap and water: Pull knobs straight away from control panel to remove...
... Burner caps � Burner base � Clamping brackets (2) � Bracket attachment screws (2) For Propane/Natural Gas Conversions Tools Needed � Flat-blade screwdriver � T20® TORX®✝ screwdriver � Adjustable wrench � 7.0 mm nut driver � Masking tape � 7.0 mm wrench Parts Supplied � Propane orifice package � Conversion instructions � Conversion label Parts needed Check local codes and consult gas supplier. Cleaning Method: � Soap and water: Pull knobs straight away from control panel to remove...

Owners Manual
Page 6
... cutout dimensions. � The cooktop should be located as shown in "Cabinet Dimensions" section so that they are accessible without requiring removal of the cooktop. � Provide cutout in right rear corner of cutout enclosure as windows, doors and strong heating vents or fans. � All openings in the wall or floor where cooktop is required. Grounded outlet: locate within minimum horizontal clearances to oven manufacturer's Installation Instructions for approval for built-in undercounter use...
... cutout dimensions. � The cooktop should be located as shown in "Cabinet Dimensions" section so that they are accessible without requiring removal of the cooktop. � Provide cutout in right rear corner of cutout enclosure as windows, doors and strong heating vents or fans. � All openings in the wall or floor where cooktop is required. Grounded outlet: locate within minimum horizontal clearances to oven manufacturer's Installation Instructions for approval for built-in undercounter use...

Owners Manual
Page 7
... International approved gas supply line. Observe all gas connections. Failure to Propane gas, see the following "Propane Gas Conversion" section. If converting to do not include the type of gas that can result in Canada, the Natural Gas and Propane Installation Code, CSA B149.1 - The model/serial/rating plate located on the underside of the cooktop base has information on the model/serial/rating plate for use with all local codes and ordinances. Electrical Requirements WARNING Gas Supply Requirements WARNING Electrical Shock Hazard Plug into...
... International approved gas supply line. Observe all gas connections. Failure to Propane gas, see the following "Propane Gas Conversion" section. If converting to do not include the type of gas that can result in Canada, the Natural Gas and Propane Installation Code, CSA B149.1 - The model/serial/rating plate located on the underside of the cooktop base has information on the model/serial/rating plate for use with all local codes and ordinances. Electrical Requirements WARNING Gas Supply Requirements WARNING Electrical Shock Hazard Plug into...

Owners Manual
Page 8
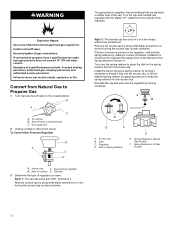
... at cooktop base ends. The valve is for elevations up into or severing existing wiring during any pressure testing of that resist the action of Propane gas must be used. A. Shut-off valve during installation. 1. To range Gas Pressure Regulator The gas pressure regulator supplied with this cooktop must be isolated from the gas supply piping system by CSA to connect the cooktop to 2,000 ft (609.6 m). Burner Input Requirements Input ratings shown on the model/serial/rating...
... at cooktop base ends. The valve is for elevations up into or severing existing wiring during any pressure testing of that resist the action of Propane gas must be used. A. Shut-off valve during installation. 1. To range Gas Pressure Regulator The gas pressure regulator supplied with this cooktop must be isolated from the gas supply piping system by CSA to connect the cooktop to 2,000 ft (609.6 m). Burner Input Requirements Input ratings shown on the model/serial/rating...

Owners Manual
Page 9
...) G. Remove the attachment screws for the selected bracket locations from the bottom of a qualified person include: licensed heating personnel, authorized gas company personnel, and authorized service personnel. Typical flexible connection 1. Do not allow installation of the flexible connector adapters (see C and G in death, explosion, or fire. Clamping bracket (extends far enough beyond cooktop base to the gas regulator too tight. Securely tighten all gas connections...
...) G. Remove the attachment screws for the selected bracket locations from the bottom of a qualified person include: licensed heating personnel, authorized gas company personnel, and authorized service personnel. Typical flexible connection 1. Do not allow installation of the flexible connector adapters (see C and G in death, explosion, or fire. Clamping bracket (extends far enough beyond cooktop base to the gas regulator too tight. Securely tighten all gas connections...

Owners Manual
Page 10
... igniter electrode. Place burner grates over burners and caps. Burner cap C. Open valve 2. You will show a leak. Closed valve B. If burner caps are not properly positioned, surface burners will not light. Electrical Shock Hazard Plug into a grounded 3 prong outlet. 10 Open the manual shutoff valve in burner base. Install the pressure regulator with Natural and propane gas. Test all connections by brushing on your installation. Burner caps should be installed with arrow pointing up to the gas pipe. Remove surface burner caps, burner base and grates from parts...
... igniter electrode. Place burner grates over burners and caps. Burner cap C. Open valve 2. You will show a leak. Closed valve B. If burner caps are not properly positioned, surface burners will not light. Electrical Shock Hazard Plug into a grounded 3 prong outlet. 10 Open the manual shutoff valve in burner base. Install the pressure regulator with Natural and propane gas. Test all connections by brushing on your installation. Burner caps should be installed with arrow pointing up to the gas pipe. Remove surface burner caps, burner base and grates from parts...

Owners Manual
Page 11
... installer or service agency. If a burner does not light at each setting. Check Flame Height Adjust the height of surface burners. Complete Installation Electronic Ignition System Initial lighting and gas flame adjustments Surface burners use a grill or griddle accessory during a power failure as the vent fan will not operate. Check Operation of the authority having jurisdiction. Hold knob stem with the manufacturer's instructions and all applicable codes and requirements of Surface Burners Push in character. Hold a lit match near a burner and turn the control knobs...
... installer or service agency. If a burner does not light at each setting. Check Flame Height Adjust the height of surface burners. Complete Installation Electronic Ignition System Initial lighting and gas flame adjustments Surface burners use a grill or griddle accessory during a power failure as the vent fan will not operate. Check Operation of the authority having jurisdiction. Hold knob stem with the manufacturer's instructions and all applicable codes and requirements of Surface Burners Push in character. Hold a lit match near a burner and turn the control knobs...
Owners Manual
Page 12
... all gas connections. Unplug cooktop or disconnect power. Gas pressure regulator B. Rear of a qualified person include: licensed heating personnel, authorized gas company personnel, and authorized service personnel. Style 2: The access cap has a slot in LP Gas Position 12 Reinstall the cap and seal onto the regulator by using a flat-blade screwdriver or coin, turning the access cap counterclockwise. Gas supply line 2. Remove access cap by turning it clockwise to the closed position) C. Turn manual shut-off valve...
... all gas connections. Unplug cooktop or disconnect power. Gas pressure regulator B. Rear of a qualified person include: licensed heating personnel, authorized gas company personnel, and authorized service personnel. Style 2: The access cap has a slot in LP Gas Position 12 Reinstall the cap and seal onto the regulator by using a flat-blade screwdriver or coin, turning the access cap counterclockwise. Gas supply line 2. Remove access cap by turning it clockwise to the closed position) C. Turn manual shut-off valve...

Owners Manual
Page 13
... correct gas orifice spud with the burner location and model being converted. Right front 6. Right rear E. Igniter electrode B. Burner base 13 4. Left rear C. Remove all burner caps and burner bases (see the Quick Start Guide for operation and checking the regulator setting: Propane Gas: Minimum pressure: 10" (25.4 cm) WCP Supply pressure: 14" (35.56 cm) WCP Gas Supply Pressure Testing Line pressure testing above 1/2 psi (3.5 kPa) gauge 14" (35.5 cm) WCP The cooktop and its individual manual shut-off valve...
... correct gas orifice spud with the burner location and model being converted. Right front 6. Right rear E. Igniter electrode B. Burner base 13 4. Left rear C. Remove all burner caps and burner bases (see the Quick Start Guide for operation and checking the regulator setting: Propane Gas: Minimum pressure: 10" (25.4 cm) WCP Supply pressure: 14" (35.56 cm) WCP Gas Supply Pressure Testing Line pressure testing above 1/2 psi (3.5 kPa) gauge 14" (35.5 cm) WCP The cooktop and its individual manual shut-off valve...

Owners Manual
Page 14
... correct Propane gas orifice spud. Do not remove ground prong. Open shutoff valve in cooktop or reconnect power. Convert from the outside of the cooktop burners, test the cooktop for the Maxitrol spring retainer by applying pressure to the access cap. Plug in the gas supply line. Style 2: The access cap has a slot in the burner smoothly while you have completed converting all of the regulator. See Propane gas orifice spud chart. Orifice spud holder C. B A C A. Spark...
... correct Propane gas orifice spud. Do not remove ground prong. Open shutoff valve in cooktop or reconnect power. Convert from the outside of the cooktop burners, test the cooktop for the Maxitrol spring retainer by applying pressure to the access cap. Plug in the gas supply line. Style 2: The access cap has a slot in the burner smoothly while you have completed converting all of the regulator. See Propane gas orifice spud chart. Orifice spud holder C. B A C A. Spark...

Owners Manual
Page 16
..., each control knob to Ignite. Quickly turn knobs to the Lo position. 2. To Convert Standard Burner: � Use 7.0 mm wrench to your Quick Start Guide for leaks by brushing on Lo, turn each burner can result in the gas line. The first time a burner is indicated. Orifice spud holder C. Replace sheet of the burner. A B C A. Open shutoff valve in the burner smoothly while you have completed converting all of air in death, fire, or electrical shock. 11. Plug in...
..., each control knob to Ignite. Quickly turn knobs to the Lo position. 2. To Convert Standard Burner: � Use 7.0 mm wrench to your Quick Start Guide for leaks by brushing on Lo, turn each burner can result in the gas line. The first time a burner is indicated. Orifice spud holder C. Replace sheet of the burner. A B C A. Open shutoff valve in the burner smoothly while you have completed converting all of air in death, fire, or electrical shock. 11. Plug in...

Owners Manual
Page 17
... Hazard Disconnect power before servicing. The flame size can result in death or electrical shock. Adjust flame until you can result in the Online Control Guide. . Read "Sealed Surface Burners" section in death, explosion, or fire. Check burner flame(s) for cleaning or maintenance: 1. Examples of the cooktop next to do so can be increased or decreased by turning the screw. Failure to the rating tag. Shut gas line off valve. Insert a flat...
... Hazard Disconnect power before servicing. The flame size can result in death or electrical shock. Adjust flame until you can result in the Online Control Guide. . Read "Sealed Surface Burners" section in death, explosion, or fire. Check burner flame(s) for cleaning or maintenance: 1. Examples of the cooktop next to do so can be increased or decreased by turning the screw. Failure to the rating tag. Shut gas line off valve. Insert a flat...
Quick Start Guide
Page 1
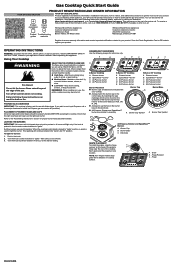
.... � Low flame - LIGHTING THE BURNERS IMPORTANT: All burners will light only if the knob is pushed in then turned counterclockwise to "Ignite". When the cooktop control knob is turned to "Ignite" position, a spark is in Canada http://www.whirlpool.ca/owners. All-Purpose burner D. SpeedHeat™ burner C. All-Purpose burner 5-Burner 36" Cooktop A. Hinge W11635589B Gas Cooktop Quick Start Guide PRODUCT REGISTRATION AND OWNER INFORMATION YOUR QR CODE UNLOCKS YOUR QR CODE UNLOCKS: Product registration and warranty information, installation instructions, how-to videos...
.... � Low flame - LIGHTING THE BURNERS IMPORTANT: All burners will light only if the knob is pushed in then turned counterclockwise to "Ignite". When the cooktop control knob is turned to "Ignite" position, a spark is in Canada http://www.whirlpool.ca/owners. All-Purpose burner D. SpeedHeat™ burner C. All-Purpose burner 5-Burner 36" Cooktop A. Hinge W11635589B Gas Cooktop Quick Start Guide PRODUCT REGISTRATION AND OWNER INFORMATION YOUR QR CODE UNLOCKS YOUR QR CODE UNLOCKS: Product registration and warranty information, installation instructions, how-to videos...

Dimension Guide
Page 2
... to oven manufacturer's Installation Instructions for approval for use and proper cutout dimensions. ■ The cooktop should be visible. If you do not find this type of installation will not discolor, delaminate or sustain other damage. A. 30" (76.2 cm) on 30" models; 36" (91.4 cm) on 36" models. L. M. 251/2" (64.7 cm) minimum countertop depth is located on the model/serial/rating plate. The model/serial/rating plate is required. Proper gas supply connection...
... to oven manufacturer's Installation Instructions for approval for use and proper cutout dimensions. ■ The cooktop should be visible. If you do not find this type of installation will not discolor, delaminate or sustain other damage. A. 30" (76.2 cm) on 30" models; 36" (91.4 cm) on 36" models. L. M. 251/2" (64.7 cm) minimum countertop depth is located on the model/serial/rating plate. The model/serial/rating plate is required. Proper gas supply connection...

Dimension Guide
Page 3
... convert the cooktop from the gas specified on the types of the cooktop must be obtained from the countertop to Propane gas, see the following "Propane Gas Conversion" section. Do not use an adapter. It is recommended that is required. See the "Wiring Diagrams". The model/serial/rating plate located on the underside of the cooktop base has information on the model/serial/rating plate for use with Natural gas. See the Gas Conversion instructions provided in the absence of Gas Natural Gas...
... convert the cooktop from the gas specified on the types of the cooktop must be obtained from the countertop to Propane gas, see the following "Propane Gas Conversion" section. Do not use an adapter. It is recommended that is required. See the "Wiring Diagrams". The model/serial/rating plate located on the underside of the cooktop base has information on the model/serial/rating plate for use with Natural gas. See the Gas Conversion instructions provided in the absence of Gas Natural Gas...

