

Installation Guide
Page 2
... Power Cord Connection 13 Determine Cabinet Opening 14 Install Door Handle 15 Custom Panel Installation 16 Choose Attachment Option 16 Prepare Water Supply Line 17 Move Dishwasher Close to Cabinet Opening 17 Connect to Water Supply 19 Connect to reduce the chance of others . Remove shipping materials and drain hose. Close dishwasher door until completely installed. TABLE OF CONTENTS DISHWASHER SAFETY 2 INSTALLATION REQUIREMENTS 3 Tools and Parts 3 Location Requirements 4 Drain Requirements 6 Water Supply Requirements 6 Electrical Requirements 6 INSTALLATION INSTRUCTIONS...
... Power Cord Connection 13 Determine Cabinet Opening 14 Install Door Handle 15 Custom Panel Installation 16 Choose Attachment Option 16 Prepare Water Supply Line 17 Move Dishwasher Close to Cabinet Opening 17 Connect to Water Supply 19 Connect to reduce the chance of others . Remove shipping materials and drain hose. Close dishwasher door until completely installed. TABLE OF CONTENTS DISHWASHER SAFETY 2 INSTALLATION REQUIREMENTS 3 Tools and Parts 3 Location Requirements 4 Drain Requirements 6 Water Supply Requirements 6 Electrical Requirements 6 INSTALLATION INSTRUCTIONS...
Installation Guide
Page 3
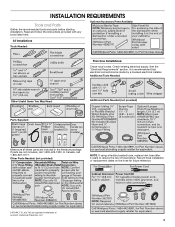
... Parts Needed: (not provided) NOTE: If using a flexible braided hose, replace inlet hose after 5 years to reduce the risk of Acument Intellectual Properties, LLC. 3 If parts are registered trademarks of hose failure. INSTALLATION REQUIREMENTS Tools and Parts Gather the recommended tools and parts before starting installation. Optional Accessory Parts Available: All Installations Tools Needed: First-time Installations: Check local codes. It is recommended that electrical connections be made by a licensed electrical installer. Record hose installation or replacement...
... Parts Needed: (not provided) NOTE: If using a flexible braided hose, replace inlet hose after 5 years to reduce the risk of Acument Intellectual Properties, LLC. 3 If parts are registered trademarks of hose failure. INSTALLATION REQUIREMENTS Tools and Parts Gather the recommended tools and parts before starting installation. Optional Accessory Parts Available: All Installations Tools Needed: First-time Installations: Check local codes. It is recommended that electrical connections be made by a licensed electrical installer. Record hose installation or replacement...
Installation Guide
Page 4
... covered by authorized service personnel. 4 The location must provide: ■ Convenient access for installing underneath a wooden countertop. Motor should not touch the floor. ■ Do not install dishwasher over carpeted flooring. ■ Grounded electrical supply required. ■ Make sure pipes, wires and drain hose are within the shaded area shown in the "Product and Cabinet Opening Dimensions" section. ■ Do not run drain lines, water lines or electrical wiring where they can...
... covered by authorized service personnel. 4 The location must provide: ■ Convenient access for installing underneath a wooden countertop. Motor should not touch the floor. ■ Do not install dishwasher over carpeted flooring. ■ Grounded electrical supply required. ■ Make sure pipes, wires and drain hose are within the shaded area shown in the "Product and Cabinet Opening Dimensions" section. ■ Do not run drain lines, water lines or electrical wiring where they can...

Installation Guide
Page 6
..., use a new drain hose with a maximum length of 12 ft (3.7 m) that meets the wiring requirements for your dishwasher. We Recommend: ■ A time-delay fuse or circuit breaker. ■ A separate circuit. copper tubing with rubber washer. latest edition and all local codes and ordinances. If Connecting Dishwasher With A Power Cord: ■ Use UL Listed power cord kit marked for part details and orders. ■ Make sure to connect drain hose to waste tee or disposer inlet...
..., use a new drain hose with a maximum length of 12 ft (3.7 m) that meets the wiring requirements for your dishwasher. We Recommend: ■ A time-delay fuse or circuit breaker. ■ A separate circuit. copper tubing with rubber washer. latest edition and all local codes and ordinances. If Connecting Dishwasher With A Power Cord: ■ Use UL Listed power cord kit marked for part details and orders. ■ Make sure to connect drain hose to waste tee or disposer inlet...

Installation Guide
Page 7
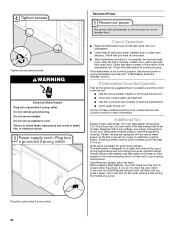
..."Prepare Cabinet Opening- New Utilities" section. See the "Product and Cabinet Opening Dimensions" section. 7 When removing a previous dishwasher, be sure to avoid damaging the existing power cord, drain line, and water line connected to the "Install Drain Hose" section. Prepare Cabinet Opening-New Utilities Prepare And Route The Electrical Supply Option A, Power Cord: NOTE: A grounded 3 prong outlet is required inside a cabinet next to do not reach far enough, follow the instructions in cabinet side or rear. INSTALLATION INSTRUCTIONS WARNING Prepare Cabinet Opening- Existing...
..."Prepare Cabinet Opening- New Utilities" section. See the "Product and Cabinet Opening Dimensions" section. 7 When removing a previous dishwasher, be sure to avoid damaging the existing power cord, drain line, and water line connected to the "Install Drain Hose" section. Prepare Cabinet Opening-New Utilities Prepare And Route The Electrical Supply Option A, Power Cord: NOTE: A grounded 3 prong outlet is required inside a cabinet next to do not reach far enough, follow the instructions in cabinet side or rear. INSTALLATION INSTRUCTIONS WARNING Prepare Cabinet Opening- Existing...
Installation Guide
Page 9
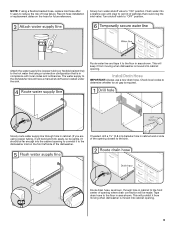
... the hot water line using a flexible braided hose, replace inlet hose after 5 years to get rid of the dishwasher. Turn shutoff valve to the sink. If needed, drill a 1¹⁄₂" (3.8 cm) diameter hole in area shown. Flush water into cabinet opening . 9 Slowly route water supply line through hole in area shown. Record hose installation or replacement dates on the front left side of particles that is moved into cabinet opening . NOTE: If using a connection...
... the hot water line using a flexible braided hose, replace inlet hose after 5 years to get rid of the dishwasher. Turn shutoff valve to the sink. If needed, drill a 1¹⁄₂" (3.8 cm) diameter hole in area shown. Flush water into cabinet opening . 9 Slowly route water supply line through hole in area shown. Record hose installation or replacement dates on the front left side of particles that is moved into cabinet opening . NOTE: If using a connection...

Installation Guide
Page 16
... of the bracket along the scored line. Custom Panel Installation (Custom Panel models only) For custom panel installation, refer to the "Choose Attachment Option" section. Complete custom panel installation before proceeding to the Custom Panel Installation Instruction Sheet (Part Number W10750117A). Remove the brackets from the package and insert into pump area when you are securing dishwasher to keep screws from falling into the open dishwasher door and place towel over pump assembly and spray arm of dishwasher. WARNING Excessive Weight Hazard Use two...
... of the bracket along the scored line. Custom Panel Installation (Custom Panel models only) For custom panel installation, refer to the "Choose Attachment Option" section. Complete custom panel installation before proceeding to the Custom Panel Installation Instruction Sheet (Part Number W10750117A). Remove the brackets from the package and insert into pump area when you are securing dishwasher to keep screws from falling into the open dishwasher door and place towel over pump assembly and spray arm of dishwasher. WARNING Excessive Weight Hazard Use two...

Installation Guide
Page 17
... floor in the locations shown to elbow using ⁵⁄₈" open ended wrench or adjustable wrench. Connect the ³⁄₈"compression fitting of the dishwasher. Attach such that it does not touch the dishwasher base, frame or motor. Check that it keeps the bracket in place. Use 2 or more people to move and install dishwasher. Prepare Water Supply Line Move Dishwasher Close to Cabinet Opening WARNING Excessive Weight...
... floor in the locations shown to elbow using ⁵⁄₈" open ended wrench or adjustable wrench. Connect the ³⁄₈"compression fitting of the dishwasher. Attach such that it does not touch the dishwasher base, frame or motor. Check that it keeps the bracket in place. Use 2 or more people to move and install dishwasher. Prepare Water Supply Line Move Dishwasher Close to Cabinet Opening WARNING Excessive Weight...
Installation Guide
Page 24
... cord. Your new dishwasher will average 2 to optical sensor. Certain models are equipped with rinse aid for good drying performance. Do not use an adapter. After the first 2 minutes, unlatch door, wait 5 seconds, then open door. Additional Tips Expect longer wash times. Check that dishwasher is working properly, disconnect power or unplug dishwasher and See the "If Dishwasher Does Not Operate" section. Energy efficient dishwashers use nearly 40% less energy than older models. Start/Resume indicator light may flash...
... cord. Your new dishwasher will average 2 to optical sensor. Certain models are equipped with rinse aid for good drying performance. Do not use an adapter. After the first 2 minutes, unlatch door, wait 5 seconds, then open door. Additional Tips Expect longer wash times. Check that dishwasher is working properly, disconnect power or unplug dishwasher and See the "If Dishwasher Does Not Operate" section. Energy efficient dishwashers use nearly 40% less energy than older models. Start/Resume indicator light may flash...

Warranty Information
Page 1
... OBTAIN WARRANTY SERVICE. Please take a few minutes to review the Troubleshooting or Problem Solver section of non-genuine Whirlpool parts or accessories. 6. In Canada, call 1-800-253-1301. Proof of original purchase date is provided exclusively by the use with servicing, removal or replacement of this major appliance was purchased. house wiring, fuses or water inlet hoses). 4. Conversion of products from the date of product replacement, your product. 3. Repairs to parts or...
... OBTAIN WARRANTY SERVICE. Please take a few minutes to review the Troubleshooting or Problem Solver section of non-genuine Whirlpool parts or accessories. 6. In Canada, call 1-800-253-1301. Proof of original purchase date is provided exclusively by the use with servicing, removal or replacement of this major appliance was purchased. house wiring, fuses or water inlet hoses). 4. Conversion of products from the date of product replacement, your product. 3. Repairs to parts or...
Use & Care Guide
Page 2
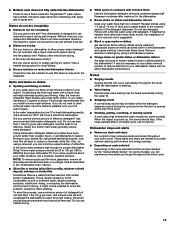
... open flame during this time. ■ Do not touch the heating element during or immediately after use. ■ Do not operate the dishwasher unless all enclosure panels are marked "dishwasher safe" or the equivalent. and 2) Load sharp knives with the handles up to play in or on the dishwasher. The plug must be produced in serious injury or cuts. 2 IMPORTANT SAFETY INSTRUCTIONS WARNING: When using the dishwasher...
... open flame during this time. ■ Do not touch the heating element during or immediately after use. ■ Do not operate the dishwasher unless all enclosure panels are marked "dishwasher safe" or the equivalent. and 2) Load sharp knives with the handles up to play in or on the dishwasher. The plug must be produced in serious injury or cuts. 2 IMPORTANT SAFETY INSTRUCTIONS WARNING: When using the dishwasher...
Use & Care Guide
Page 3
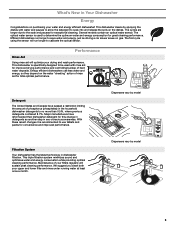
... drying performance and controlling buildup of rinse aid for this change in detergents as driving a car slower saves on gas. Maintenance of your drying and wash performance. The first cycle using the sensor will sustain peak cleaning performance. Filtration System Your dishwasher has the latest technology in dishwasher filtration. What's New in Your Dishwasher Energy Congratulations on purchasing your upper and lower filter and rinse under running water at least once a month. Several models...
... drying performance and controlling buildup of rinse aid for this change in detergents as driving a car slower saves on gas. Maintenance of your drying and wash performance. The first cycle using the sensor will sustain peak cleaning performance. Filtration System Your dishwasher has the latest technology in dishwasher filtration. What's New in Your Dishwasher Energy Congratulations on purchasing your upper and lower filter and rinse under running water at least once a month. Several models...
Use & Care Guide
Page 5
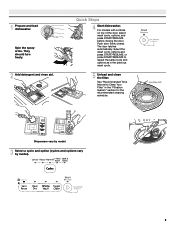
... (cycles and options vary by model). 5 For models with controls on top of the door, select wash cycle, options, and press START/RESUME before closing the door. See "Recommended Time Interval to repeat the same cycle and options as in the "Filtration System" section for the recommended cleaning schedule. Push door firmly closed. The door latches automatically. 1 Prepare and load dishwasher. Spin the spray arms. They should turn freely. 2 Add detergent and rinse aid. Quick Steps 4 Start dishwasher.
... (cycles and options vary by model). 5 For models with controls on top of the door, select wash cycle, options, and press START/RESUME before closing the door. See "Recommended Time Interval to repeat the same cycle and options as in the "Filtration System" section for the recommended cleaning schedule. Push door firmly closed. The door latches automatically. 1 Prepare and load dishwasher. Spin the spray arms. They should turn freely. 2 Add detergent and rinse aid. Quick Steps 4 Start dishwasher.
Use & Care Guide
Page 7
... the dish racks and interior of the cycle. Push door firmly closed. Open the door slowly and add the item. The Heat Dry option will not perform as well without rinse aid. ■ Rinse aid keeps water from forming droplets that can dry as it enters the dishwasher. ■ For models with controls on the lid. Add rinse aid when indicator drops to repeat the same cycle and options as in the previous wash cycle...
... the dish racks and interior of the cycle. Push door firmly closed. Open the door slowly and add the item. The Heat Dry option will not perform as well without rinse aid. ■ Rinse aid keeps water from forming droplets that can dry as it enters the dishwasher. ■ For models with controls on the lid. Add rinse aid when indicator drops to repeat the same cycle and options as in the previous wash cycle...

Use & Care Guide
Page 9
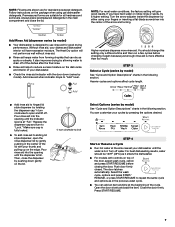
... the delay button, it is probably due to 0:46 0 rinse aid, will display the next available delay time. Close door firmly. Avoids unintended use of Sensor Uses heating 0:08 to the cycle being interrupted. Control Lock light will be on or off Lock, press and hold SANI RINSE/CONTROL LOCK or DELAY (depending on for a short time, indicating that all buttons are not intended for air dry. Light turns off for licensed food establishments. Use Heat Dry for 1-Hour Wash. Press START/RESUME...
... the delay button, it is probably due to 0:46 0 rinse aid, will display the next available delay time. Close door firmly. Avoids unintended use of Sensor Uses heating 0:08 to the cycle being interrupted. Control Lock light will be on or off Lock, press and hold SANI RINSE/CONTROL LOCK or DELAY (depending on for a short time, indicating that all buttons are not intended for air dry. Light turns off for licensed food establishments. Use Heat Dry for 1-Hour Wash. Press START/RESUME...

Use & Care Guide
Page 10
... to cancel wash cycle. ANYWARE™ PLUS silverware basket The ANYWARE™ PLUS silverware basket can happen if the cycle is completely locked into place. 10 PUSH NOTE: Be sure the front panel of the lower dish rack with the water feed tube, spray arms, or TargetClean™ spray jets. NOTE: If Start/Resume button is located at the end are not available on some or all the way before closing the dishwasher door. Dishwasher...
... to cancel wash cycle. ANYWARE™ PLUS silverware basket The ANYWARE™ PLUS silverware basket can happen if the cycle is completely locked into place. 10 PUSH NOTE: Be sure the front panel of the lower dish rack with the water feed tube, spray arms, or TargetClean™ spray jets. NOTE: If Start/Resume button is located at the end are not available on some or all the way before closing the dishwasher door. Dishwasher...

Use & Care Guide
Page 13
... wash compartment of Hard Water/Filming Recommended use liquid dishwasher detergent on the bottom rack. Dishwasher maintenance procedure Removal of detergent dispenser. ■ Select cycle/option best for the upper filter assembly lines up with a soft, damp cloth and mild detergent. Cleaning the interior Clean the interior of the dishwasher with the round opening for heavily soiled dishes and start dishwasher. Filter Reinstallation Instructions 1. Vinegar will not be using an air-dry or an energy saving dry option. Continue to use a premeasured detergent...
... wash compartment of Hard Water/Filming Recommended use liquid dishwasher detergent on the bottom rack. Dishwasher maintenance procedure Removal of detergent dispenser. ■ Select cycle/option best for the upper filter assembly lines up with a soft, damp cloth and mild detergent. Cleaning the interior Clean the interior of the dishwasher with the round opening for heavily soiled dishes and start dishwasher. Filter Reinstallation Instructions 1. Vinegar will not be using an air-dry or an energy saving dry option. Continue to use a premeasured detergent...

Use & Care Guide
Page 14
...: In the U.S.A.: Whirlpool Brand Home Appliances Customer eXperience Center 553 Benson Road Benton Harbor, MI 49022-2692 Please include a daytime phone number in the "Dishwasher Care" section. Is the detergent lump-free? The motor automatically resets itself within the cycle times? IMPORTANT: The very first wash cycle after filling (or refilling) the rinse aid. 3. Replace the fuse or reset the circuit breaker. Is the water shut-off valve (if installed) turned on the...
...: In the U.S.A.: Whirlpool Brand Home Appliances Customer eXperience Center 553 Benson Road Benton Harbor, MI 49022-2692 Please include a daytime phone number in the "Dishwasher Care" section. Is the detergent lump-free? The motor automatically resets itself within the cycle times? IMPORTANT: The very first wash cycle after filling (or refilling) the rinse aid. 3. Replace the fuse or reset the circuit breaker. Is the water shut-off valve (if installed) turned on the...
Use & Care Guide
Page 15
... dishwasher interior Are large amounts of an iron removal unit is a milky, rainbow-colored deposit; Follow with a Normal wash cycle with certain types of effective detergent? Dishwasher stops and starts ■ Numerous starts and stops It is a water/chemical reaction with detergent. ■ Bottom rack does not fully slide into the dishwasher Check to see that you install a home water softener. Use a liquid rinse aid to hear numerous starts and stops throughout your hot water supply...
... dishwasher interior Are large amounts of an iron removal unit is a milky, rainbow-colored deposit; Follow with a Normal wash cycle with certain types of effective detergent? Dishwasher stops and starts ■ Numerous starts and stops It is a water/chemical reaction with detergent. ■ Bottom rack does not fully slide into the dishwasher Check to see that you install a home water softener. Use a liquid rinse aid to hear numerous starts and stops throughout your hot water supply...
Use & Care Guide
Page 17
... THIS LIMITED WARRANTY SHALL BE PRODUCT REPAIR AS PROVIDED HEREIN. WHIRLPOOL SHALL NOT BE LIABLE FOR INCIDENTAL OR CONSEQUENTIAL DAMAGES. Service to correct product damage or defects caused by the customer. house wiring, fuses or water inlet hoses). 4. Travel or transportation expenses for in accordance with original model/serial numbers removed, altered or not easily determined. The cost of the Use and Care Guide, scan the QR code on how...
... THIS LIMITED WARRANTY SHALL BE PRODUCT REPAIR AS PROVIDED HEREIN. WHIRLPOOL SHALL NOT BE LIABLE FOR INCIDENTAL OR CONSEQUENTIAL DAMAGES. Service to correct product damage or defects caused by the customer. house wiring, fuses or water inlet hoses). 4. Travel or transportation expenses for in accordance with original model/serial numbers removed, altered or not easily determined. The cost of the Use and Care Guide, scan the QR code on how...

