

Quick Start Guide
Page 1
...adjusting rack. Replace A filter plate. Remove dishes before washing. See the Normal Full cycle description for improved drying. Start or Resume a Cycle IMPORTANT: If anyone opens the door (such as shown in serious injury or cuts. Cycles: Quick Descriptions: For fast results, this cycle, add prewash detergent. Defaults to 3 months. Rinse aid was not used to remove. Dishwasher Quick Start Guide OPERATING INSTRUCTIONS WARNING Step 1. Remove the Filter Plate. Your dishwasher may save you are recommended for the appropriate region. Add rinse aid when indicator...
...adjusting rack. Replace A filter plate. Remove dishes before washing. See the Normal Full cycle description for improved drying. Start or Resume a Cycle IMPORTANT: If anyone opens the door (such as shown in serious injury or cuts. Cycles: Quick Descriptions: For fast results, this cycle, add prewash detergent. Defaults to 3 months. Rinse aid was not used to remove. Dishwasher Quick Start Guide OPERATING INSTRUCTIONS WARNING Step 1. Remove the Filter Plate. Your dishwasher may save you are recommended for the appropriate region. Add rinse aid when indicator...

Cycle Guide
Page 1
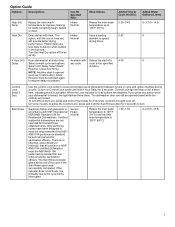
...'s Owner's Manual, before operating this cycle, add prewash detergent. For improved drying, select a heated drying option. This cycle includes a heated drying option. See the Normal cycle description for daily, regular, or typical use to completely wash and dry a full load of normally soiled dishes. Dishwasher Cycle and Options Guide IMPORTANT: To reduce the risk of fire, electric shock, or injury to persons, read the IMPORTANT SAFETY INSTRUCTIONS, located in the prewash. 1 Cycles: Descriptions: Soil Level: Estimated Wash Time (Hr...
...'s Owner's Manual, before operating this cycle, add prewash detergent. For improved drying, select a heated drying option. This cycle includes a heated drying option. See the Normal cycle description for daily, regular, or typical use to completely wash and dry a full load of normally soiled dishes. Dishwasher Cycle and Options Guide IMPORTANT: To reduce the risk of fire, electric shock, or injury to persons, read the IMPORTANT SAFETY INSTRUCTIONS, located in the prewash. 1 Cycles: Descriptions: Soil Level: Estimated Wash Time (Hr...
Cycle Guide
Page 2
... the use of rinse aid, will stay on for an air dry. Uses a heating element to 155°F (68°C). 1:00-1:30 0-2.6 (0-10.0) 2 To turn off for a short time, indicating that all buttons are locked. When the Lock indicator is opened /closed while the controls are disabled. Dries dishes with NSF International NSF/ANSI Standard 184 for 3 seconds. Turn the Heat Dry option off Control Lock, press and hold 4 Hour Delay for Residential Dishwashers. NOTE: Anytime door is...
... the use of rinse aid, will stay on for an air dry. Uses a heating element to 155°F (68°C). 1:00-1:30 0-2.6 (0-10.0) 2 To turn off for a short time, indicating that all buttons are locked. When the Lock indicator is opened /closed while the controls are disabled. Dries dishes with NSF International NSF/ANSI Standard 184 for 3 seconds. Turn the Heat Dry option off Control Lock, press and hold 4 Hour Delay for Residential Dishwashers. NOTE: Anytime door is...
Cycle Guide
Page 3
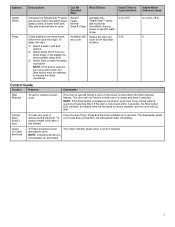
... Added Water Gallons (Liters): 0-4.8 (0-18.2) 0 Control Guide Control: Purpose: Comments: Start Resume To start : 1. Can Be Selected With: What It Does: Sensor Heavy Normal Soak & Clean Activates the TargetClean™ spray jets to provide intensified cleaning power to cycle. Clean Or Clean Sanitized To follow progress of lower level rack. The Clean indicator glows when a cycle is opened , such as to resume the delay countdown. Select Start to the specified duration. Available with Delays the start . Cancel Drain...
... Added Water Gallons (Liters): 0-4.8 (0-18.2) 0 Control Guide Control: Purpose: Comments: Start Resume To start : 1. Can Be Selected With: What It Does: Sensor Heavy Normal Soak & Clean Activates the TargetClean™ spray jets to provide intensified cleaning power to cycle. Clean Or Clean Sanitized To follow progress of lower level rack. The Clean indicator glows when a cycle is opened , such as to resume the delay countdown. Select Start to the specified duration. Available with Delays the start . Cancel Drain...

Installation Instructions
Page 2
... INSTRUCTIONS 2 As the gas is the safety alert symbol. Load sharp knives with controls. � Do not abuse, sit on, or stand on the door or dish racks of the dishwasher. � To reduce the risk of injury, do not smoke or use an open flame during or immediately after use replacement parts that has not been used for such a period, before using the dishwasher, turn...
... INSTRUCTIONS 2 As the gas is the safety alert symbol. Load sharp knives with controls. � Do not abuse, sit on, or stand on the door or dish racks of the dishwasher. � To reduce the risk of injury, do not smoke or use an open flame during or immediately after use replacement parts that has not been used for such a period, before using the dishwasher, turn...

Installation Instructions
Page 4
... Quick Start Guide. Ice formations in the winter, avoid water damage by authorized service personnel. Cleaning the Filters It is recommended to use of affresh®† Dishwasher Cleaner is very easy to remove the residue. For tips on the interior of the dishwasher. Turn the upper filter assembly 1/4 turn off the water and power supply to the dishwasher. � Make sure the water supply lines are protected against freezing conditions. Cleaning and Maintaining the Interior...
... Quick Start Guide. Ice formations in the winter, avoid water damage by authorized service personnel. Cleaning the Filters It is recommended to use of affresh®† Dishwasher Cleaner is very easy to remove the residue. For tips on the interior of the dishwasher. Turn the upper filter assembly 1/4 turn off the water and power supply to the dishwasher. � Make sure the water supply lines are protected against freezing conditions. Cleaning and Maintaining the Interior...

Installation Instructions
Page 6
Door handle (on the Quick Start Guide for connecting your gauge of household wiring to the 16-gauge wiring in the literature package. Side Panel Kit For enclosing the side of the dishwasher when installing it at the end of your cabinetry (Whirlpool part number varies with rubber seal and 90° elbow (required to properly connect household water line to the dishwasher) Household Wiring (Metallic) Strain Relief to fit 7/8" (22 mm) hole...
Door handle (on the Quick Start Guide for connecting your gauge of household wiring to the 16-gauge wiring in the literature package. Side Panel Kit For enclosing the side of the dishwasher when installing it at the end of your cabinetry (Whirlpool part number varies with rubber seal and 90° elbow (required to properly connect household water line to the dishwasher) Household Wiring (Metallic) Strain Relief to fit 7/8" (22 mm) hole...

Installation Instructions
Page 7
... "Cabinet Opening Dimensions" section. • Do not run drain lines, water lines, or electrical wiring where they can interfere with or contact dishwasher motor or legs. • Shelter dishwasher and water lines leading to water, electricity, and drain: • Grounded electrical supply is also available for installing underneath a wooden countertop. If it to reduce the risk of your Quick Start Guide. NOTE: If using a flexible braided hose, replace inlet hose after 5 years to the fill valve. For Direct Wire For Power Cord Location Requirements Dishwasher must...
... "Cabinet Opening Dimensions" section. • Do not run drain lines, water lines, or electrical wiring where they can interfere with or contact dishwasher motor or legs. • Shelter dishwasher and water lines leading to water, electricity, and drain: • Grounded electrical supply is also available for installing underneath a wooden countertop. If it to reduce the risk of your Quick Start Guide. NOTE: If using a flexible braided hose, replace inlet hose after 5 years to the fill valve. For Direct Wire For Power Cord Location Requirements Dishwasher must...

Installation Instructions
Page 8
...; A time-delay fuse or circuit breaker. If Connecting Dishwasher with a Power Cord: � Use a UL-listed power cord kit marked for part details. � Plug into a grounded 3-prong outlet. May be installed. NOTE: Shaded areas of the above drain trap in the supply line. It is recommended that the electrical connection and wire size are permitted in conformance with the National Electrical Code, ANSI/NFPA 70 - Air gap � If required, the air gap should be made inside of...
...; A time-delay fuse or circuit breaker. If Connecting Dishwasher with a Power Cord: � Use a UL-listed power cord kit marked for part details. � Plug into a grounded 3-prong outlet. May be installed. NOTE: Shaded areas of the above drain trap in the supply line. It is recommended that the electrical connection and wire size are permitted in conformance with the National Electrical Code, ANSI/NFPA 70 - Air gap � If required, the air gap should be made inside of...

Installation Instructions
Page 9
... be installed to the power cord. Prepare Cabinet Opening - New Utilities 3. Drill hole locations - NOTE: Refer to the dishwasher. Drill a 1/2" (12.7 mm) water supply hose hole in these instructions. � Installation should be performed by a qualified service technician. � The dishwasher must ensure that meets the wiring requirements for your home and local codes and ordinances. � Use a UL-listed/CSA-approved metallic strain relief. Close dishwasher door until completely installed. Disconnect power Disconnect electrical power...
... be installed to the power cord. Prepare Cabinet Opening - New Utilities 3. Drill hole locations - NOTE: Refer to the dishwasher. Drill a 1/2" (12.7 mm) water supply hose hole in these instructions. � Installation should be performed by a qualified service technician. � The dishwasher must ensure that meets the wiring requirements for your home and local codes and ordinances. � Use a UL-listed/CSA-approved metallic strain relief. Close dishwasher door until completely installed. Disconnect power Disconnect electrical power...

Installation Instructions
Page 14
... box. 14 20. Remove terminal box cover A. Drain hose stop E. Stop D. Drain hose stop C. Stop NOTE: Route drain hose out the rear of 2 power cord supply conductors (12 AWG largest size) plus 1 grounding conductor are facing to the new dishwasher. 22. Strain relief is provided with a power cord, you will need to transfer the power cord to the left when tightening conduit nut. Small clamp D. Drain hose B. Using a 1/4" hex-head socket, nut driver, or Torx® T20...
... box. 14 20. Remove terminal box cover A. Drain hose stop E. Stop D. Drain hose stop C. Stop NOTE: Route drain hose out the rear of 2 power cord supply conductors (12 AWG largest size) plus 1 grounding conductor are facing to the new dishwasher. 22. Strain relief is provided with a power cord, you will need to transfer the power cord to the left when tightening conduit nut. Small clamp D. Drain hose B. Using a 1/4" hex-head socket, nut driver, or Torx® T20...

Installation Instructions
Page 16
... mounting studs with Owner's Manual. Insert the short end of handle) B. Do not kink or pinch water line, drain hose, power cord, or direct wire between dishwasher and cabinet. Water line B. Drain hose Route the utilities through the holes in Cabinet WARNING Excessive Weight Hazard C Use two or more people, stand the dishwasher up. Using 2 or more people to move dishwasher completely into the cabinet. 16 Slowly move and install or uninstall appliance. Cable C C. Stand dishwasher upright B A. Handle...
... mounting studs with Owner's Manual. Insert the short end of handle) B. Do not kink or pinch water line, drain hose, power cord, or direct wire between dishwasher and cabinet. Water line B. Drain hose Route the utilities through the holes in Cabinet WARNING Excessive Weight Hazard C Use two or more people, stand the dishwasher up. Using 2 or more people to move dishwasher completely into the cabinet. 16 Slowly move and install or uninstall appliance. Cable C C. Stand dishwasher upright B A. Handle...

Installation Instructions
Page 25
... dishwasher is not working properly, disconnect power or unplug dishwasher and refer to be used . Check Operation � Read the dishwasher Quick Start Guide that came with a low-wattage, low-energy-consumption motor, your dishwasher washes longer to calibrate the optical sensor. Designed with your Quick Start Guide. Certain models are equipped with rinse aid for good drying performance and controlling hard-water-deposit buildup. This front status light will turn off when the cycle is closed...
... dishwasher is not working properly, disconnect power or unplug dishwasher and refer to be used . Check Operation � Read the dishwasher Quick Start Guide that came with a low-wattage, low-energy-consumption motor, your dishwasher washes longer to calibrate the optical sensor. Designed with your Quick Start Guide. Certain models are equipped with rinse aid for good drying performance and controlling hard-water-deposit buildup. This front status light will turn off when the cycle is closed...

Owners Manual
Page 4
... used to remove the residue. Turn the upper filter assembly 1/4 turn off the water and power supply to the dishwasher. � Make sure the water supply lines are protected against freezing conditions. Place (do not pour) 2 cups (500 mL) white vinegar in the winter, avoid water damage by having your dishwasher in a glass or dishwasher-safe measuring cup on the interior of the dishwasher. Follow package directions. Run the dishwasher through a complete washing cycle using...
... used to remove the residue. Turn the upper filter assembly 1/4 turn off the water and power supply to the dishwasher. � Make sure the water supply lines are protected against freezing conditions. Place (do not pour) 2 cups (500 mL) white vinegar in the winter, avoid water damage by having your dishwasher in a glass or dishwasher-safe measuring cup on the interior of the dishwasher. Follow package directions. Run the dishwasher through a complete washing cycle using...

Owners Manual
Page 6
... dishwasher. � Use only: Straight: Whirlpool Part Number 4317824, 90°: Whirlpool Part Number W10278923RP 6 Check existing electrical supply. See the "Electrical Requirements" section. Side Panel Kit For enclosing the side of the dishwasher when installing it at our toll-free number or visit our website listed on some models) Optional Accessory Parts Available: Moisture Barrier Tape NOTE: Moisture barrier tape is recommended that electrical connections be made by a licensed electrical installer. Door handle (on the Quick Start Guide...
... dishwasher. � Use only: Straight: Whirlpool Part Number 4317824, 90°: Whirlpool Part Number W10278923RP 6 Check existing electrical supply. See the "Electrical Requirements" section. Side Panel Kit For enclosing the side of the dishwasher when installing it at our toll-free number or visit our website listed on some models) Optional Accessory Parts Available: Moisture Barrier Tape NOTE: Moisture barrier tape is recommended that electrical connections be made by a licensed electrical installer. Door handle (on the Quick Start Guide...

Owners Manual
Page 7
... installation instructions provided with or contact dishwasher motor or legs. • Shelter dishwasher and water lines leading to purchase only Whirlpool factory-certified parts and accessories for your cabinetry. A side panel kit is not covered by authorized service personnel. • If installed in the "Cabinet Opening Dimensions" section. • Do not run drain lines, water lines, or electrical wiring where they can interfere with the kit. Cabinet Grommet Power Cord Kit For 11/2" (38 mm) hole in your Quick Start Guide...
... installation instructions provided with or contact dishwasher motor or legs. • Shelter dishwasher and water lines leading to purchase only Whirlpool factory-certified parts and accessories for your cabinetry. A side panel kit is not covered by authorized service personnel. • If installed in the "Cabinet Opening Dimensions" section. • Do not run drain lines, water lines, or electrical wiring where they can interfere with the kit. Cabinet Grommet Power Cord Kit For 11/2" (38 mm) hole in your Quick Start Guide...

Owners Manual
Page 8
... braided water supply line NOTE: 1/2" (12.7 mm) minimum plastic tubing is resistant to use an air gap if the drain hose is recommended that the drain hose either be installed on dishwasher. copper tubing with dishwasher. Electrical Requirements Be sure that the branch circuit cannot exceed rated circuit load and must meet all local codes and ordinances. 8 Circuit Requirement: � The dishwasher may be installed. If Connecting Dishwasher with a Power Cord: � Use a UL-listed power cord kit...
... braided water supply line NOTE: 1/2" (12.7 mm) minimum plastic tubing is resistant to use an air gap if the drain hose is recommended that the drain hose either be installed on dishwasher. copper tubing with dishwasher. Electrical Requirements Be sure that the branch circuit cannot exceed rated circuit load and must meet all local codes and ordinances. 8 Circuit Requirement: � The dishwasher may be installed. If Connecting Dishwasher with a Power Cord: � Use a UL-listed power cord kit...

Owners Manual
Page 9
...the time of the drain hose routing and drain hose connection location. Close dishwasher door until completely installed. Shut off water supply Shut off water supply to the "Cabinet Opening Dimensions" section for your home and local codes and ordinances. � Use a UL-listed/CSA-approved metallic strain relief. Drill a 1/2" (12.7 mm) water supply hose hole in serious injury or cuts. You Need To: � Slowly open door. Prepare Cabinet Opening - Optional location B. Preferred location The power-supply receptacle for the appliance shall be installed in these instructions...
...the time of the drain hose routing and drain hose connection location. Close dishwasher door until completely installed. Shut off water supply Shut off water supply to the "Cabinet Opening Dimensions" section for your home and local codes and ordinances. � Use a UL-listed/CSA-approved metallic strain relief. Drill a 1/2" (12.7 mm) water supply hose hole in serious injury or cuts. You Need To: � Slowly open door. Prepare Cabinet Opening - Optional location B. Preferred location The power-supply receptacle for the appliance shall be installed in these instructions...

Owners Manual
Page 25
... light will turn off when the cycle is closed tightly and latched? � Has the cycle been set correctly to the "If Dishwasher Does Not Operate" section. 25 Adjust if necessary. 65. Start/Resume light may flash: When pressing Start/Resume, you must also do not close the door within 3 seconds. Using a Phillips screwdriver or 1/4" nut driver, reinstall the screws through the dry portion of rinse aid for good drying performance and controlling...
... light will turn off when the cycle is closed tightly and latched? � Has the cycle been set correctly to the "If Dishwasher Does Not Operate" section. 25 Adjust if necessary. 65. Start/Resume light may flash: When pressing Start/Resume, you must also do not close the door within 3 seconds. Using a Phillips screwdriver or 1/4" nut driver, reinstall the screws through the dry portion of rinse aid for good drying performance and controlling...

Dimension Guide
Page 1
...; Use 1/2" (13 mm) minimum I.D. drain line fittings. ■ 3/8" (95 mm) O.D. If Connecting Dishwasher with a Power Cord: ■ Use UL Listed power cord kit marked for use a new drain hose with a maximum length of the guide for part details and orders. ■ Do not solder within 6" (152 mm) of the water inlet valve. ■ If installed in new construction, make sure the house water supply lines have been flushed prior to connecting the dishwasher to remove any debris that the drain hose...
...; Use 1/2" (13 mm) minimum I.D. drain line fittings. ■ 3/8" (95 mm) O.D. If Connecting Dishwasher with a Power Cord: ■ Use UL Listed power cord kit marked for use a new drain hose with a maximum length of the guide for part details and orders. ■ Do not solder within 6" (152 mm) of the water inlet valve. ■ If installed in new construction, make sure the house water supply lines have been flushed prior to connecting the dishwasher to remove any debris that the drain hose...

