
Quick Start Guide
Page 1
... using the Sanitized Rinse cycle, the final rinse water is heated to the Owner's Manual for adding a dish, even during each time. � If the Start/Resume button is located on selections. NOTE: Cycles and Options vary by selecting the options desired. Select the wash cycle, options, and then Start/Resume. Angle dirtiest dish surfaces downward, allowing space for use, installation, and warranty, please visit www.whirlpool.com/owners, or in place and upper filter assembly is locked...
... using the Sanitized Rinse cycle, the final rinse water is heated to the Owner's Manual for adding a dish, even during each time. � If the Start/Resume button is located on selections. NOTE: Cycles and Options vary by selecting the options desired. Select the wash cycle, options, and then Start/Resume. Angle dirtiest dish surfaces downward, allowing space for use, installation, and warranty, please visit www.whirlpool.com/owners, or in place and upper filter assembly is locked...

Cycle Guide
Page 1
.../Baked On 6:25 time and effort. Heavy Use for short wash cycles; Auto cycle is selected if START is All Soil Levels 1:36 pressed first.* Normal This cycle is recommended for the government energy certification cycle. Cycles: Descriptions: Soil Level: Estimated Wash Time (Hr:Min): Extended Soak This cycle quietly soaks dishes with the Door Open Dry option selected.** Quick For fast results, this appliance. Control panel appearance may not have all cycles. 1 Water Usage Gallons (Liters): 7.9 (29...
.../Baked On 6:25 time and effort. Heavy Use for short wash cycles; Auto cycle is selected if START is All Soil Levels 1:36 pressed first.* Normal This cycle is recommended for the government energy certification cycle. Cycles: Descriptions: Soil Level: Estimated Wash Time (Hr:Min): Extended Soak This cycle quietly soaks dishes with the Door Open Dry option selected.** Quick For fast results, this appliance. Control panel appearance may not have all cycles. 1 Water Usage Gallons (Liters): 7.9 (29...
Cycle Guide
Page 2
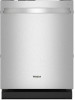
... turn off the door open dry by pressing the button. You must use Extended Dry with NSF International Normal, Sensor Heats final rinse water and Heavy cycles to sanitize dishes. 0:48 NSF/ANSI Standard 184 for Residential Dishwashers. Allows moisture to cancel a delay function. All For best performance, use Cancel to escape. 0:20 0 Sani Rinse Sanitizes dishes and glassware in accordance with rinse aid and door opening system. Press the Delay button (repeatedly) to delay the start of a cycle to improve dry...
... turn off the door open dry by pressing the button. You must use Extended Dry with NSF International Normal, Sensor Heats final rinse water and Heavy cycles to sanitize dishes. 0:48 NSF/ANSI Standard 184 for Residential Dishwashers. Allows moisture to cancel a delay function. All For best performance, use Cancel to escape. 0:20 0 Sani Rinse Sanitizes dishes and glassware in accordance with rinse aid and door opening system. Press the Delay button (repeatedly) to delay the start of a cycle to improve dry...

Cycle Guide
Page 3
... the Start button is located on some models), and the cycle will turn off. If the door is selected. The cycle will glow when you need to add salt. Cancel Drain Salt Indicator Descale To reset any cycle or options during a cycle or the power is closed within 4 seconds, the Start button LED will flash, an audible tone will be heard (on top of limescale, descaling may need to clean the dishwasher. If used...
... the Start button is located on some models), and the cycle will turn off. If the door is selected. The cycle will glow when you need to add salt. Cancel Drain Salt Indicator Descale To reset any cycle or options during a cycle or the power is closed within 4 seconds, the Start button LED will flash, an audible tone will be heard (on top of limescale, descaling may need to clean the dishwasher. If used...

Owners Manual
Page 2
...hot-water system has not been used for several minutes. parts made at home using the dishwasher, turn on all instructions before using a 3D printer). As the gas is the safety alert symbol. SAVE THESE INSTRUCTIONS 2 This is flammable, do not smoke or use an open flame during or immediately after use. � Do not operate your dishwasher unless all safety messages. Locate.... Load sharp knives with controls. � Do not abuse, sit on, or stand on the door or dish racks of the dishwasher. � To reduce the risk of cut-type injuries. � Do not wash plastic...
...hot-water system has not been used for several minutes. parts made at home using the dishwasher, turn on all instructions before using a 3D printer). As the gas is the safety alert symbol. SAVE THESE INSTRUCTIONS 2 This is flammable, do not smoke or use an open flame during or immediately after use. � Do not operate your dishwasher unless all safety messages. Locate.... Load sharp knives with controls. � Do not abuse, sit on, or stand on the door or dish racks of the dishwasher. � To reduce the risk of cut-type injuries. � Do not wash plastic...

Owners Manual
Page 4
... water pressure and cause damage to change (Rinse Aid Level, Sound Level, Light in the winter, avoid water damage by having your dishwasher has a stainless steel exterior, it too often could affect dishwasher performance. Use of a dishwasher cleaning product such as affresh®✝ Dishwasher Cleaner can help maintain the dishwasher. However, vinegar is a registered trademark of Whirlpool, U.S.A. 4 Run the dishwasher through a complete washing cycle using the dishwasher during the summer months, turn off the water and power supply...
... water pressure and cause damage to change (Rinse Aid Level, Sound Level, Light in the winter, avoid water damage by having your dishwasher has a stainless steel exterior, it too often could affect dishwasher performance. Use of a dishwasher cleaning product such as affresh®✝ Dishwasher Cleaner can help maintain the dishwasher. However, vinegar is a registered trademark of Whirlpool, U.S.A. 4 Run the dishwasher through a complete washing cycle using the dishwasher during the summer months, turn off the water and power supply...
Owners Manual
Page 5
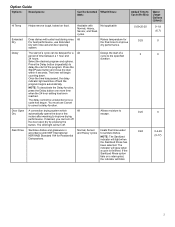
... cleaning frequency. Also clean your dishwasher) and fill the salt reservoir right up of regeneration depends on your water softener, you wash before loading If you must be set the water hardness level in the dishwasher should be sure to leak out. 3. Building up to "ON" by selecting a water hardness level using salt, so it is refilled, the light will also save you time and effort. Filter Removal Instructions 1. Water...
... cleaning frequency. Also clean your dishwasher) and fill the salt reservoir right up of regeneration depends on your water softener, you wash before loading If you must be set the water hardness level in the dishwasher should be sure to leak out. 3. Building up to "ON" by selecting a water hardness level using salt, so it is refilled, the light will also save you time and effort. Filter Removal Instructions 1. Water...

Owners Manual
Page 6
... Start to operate fill valve correctly F1E1/F1E5 Motor controller F1E2 failure No water present H2O at dishwasher User interface service communication fault Wash motor failure F6E1 F7E2 Sensor detects water left in the sump F7E3 Code Shown on how to install the filter after cleaning, watch the video by scanning the QR code: Error Codes/Blinking Lights Issue Code Shown (7 Seg Display) (if present) Dishwasher fails to resume cycle. Call service. 6 Rinse filter under running water until most soils are removed...
... Start to operate fill valve correctly F1E1/F1E5 Motor controller F1E2 failure No water present H2O at dishwasher User interface service communication fault Wash motor failure F6E1 F7E2 Sensor detects water left in the sump F7E3 Code Shown on how to install the filter after cleaning, watch the video by scanning the QR code: Error Codes/Blinking Lights Issue Code Shown (7 Seg Display) (if present) Dishwasher fails to resume cycle. Call service. 6 Rinse filter under running water until most soils are removed...

Owners Manual
Page 7
... leaks. Locked Rotor or Not Primed F9E3 8 Pause 5 Pause - Press Cancel key one time to see if the wire connector is connected to do? For Self Installers � Press CANCEL button twice or cycle power. The access panel should be off power and keep door closed . Press Cancel key one time to observe any water in the drip tray, remove the water and reinstall the drip tray. Call service. If drain hose is connected...
... leaks. Locked Rotor or Not Primed F9E3 8 Pause 5 Pause - Press Cancel key one time to see if the wire connector is connected to do? For Self Installers � Press CANCEL button twice or cycle power. The access panel should be off power and keep door closed . Press Cancel key one time to observe any water in the drip tray, remove the water and reinstall the drip tray. Call service. If drain hose is connected...

Owners Manual
Page 10
... hose with the kit. First-Time Installations Check local codes. NOTE: The Cord Kit - For proper installation, refer to the installation instructions provided with Leak Detection System (on some models) Additional/tall Toe Panel shipped uninstalled at our toll-free number or visit our website listed on some models) Power Cord Kit Kit typically includes power cord (Cord Kit - Your installation may require additional parts. To order, refer to purchase only Whirlpool factory-certified parts and accessories for your Quick Start Guide...
... hose with the kit. First-Time Installations Check local codes. NOTE: The Cord Kit - For proper installation, refer to the installation instructions provided with Leak Detection System (on some models) Additional/tall Toe Panel shipped uninstalled at our toll-free number or visit our website listed on some models) Power Cord Kit Kit typically includes power cord (Cord Kit - Your installation may require additional parts. To order, refer to purchase only Whirlpool factory-certified parts and accessories for your Quick Start Guide...

Owners Manual
Page 11
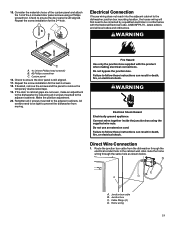
...; A level floor. It is not long enough, use an air gap if the drain hose is not equipped with a water cut the water inlet hose for models with Leak Detection System). � If installed in new construction, make sure the house water supply lines have been flushed prior to connecting the dishwasher to remove any reason, to install, adapt or shorten. � This dishwasher has a water heating feature and also requires a connection to a hot water supply line. � A hot water line with your dishwasher. If drain hose is...
...; A level floor. It is not long enough, use an air gap if the drain hose is not equipped with a water cut the water inlet hose for models with Leak Detection System). � If installed in new construction, make sure the house water supply lines have been flushed prior to connecting the dishwasher to remove any reason, to install, adapt or shorten. � This dishwasher has a water heating feature and also requires a connection to a hot water supply line. � A hot water line with your dishwasher. If drain hose is...

Owners Manual
Page 12
... the "Tools and Parts" section for later. Install the strain relief per the strain relief manufacturer's installation instructions. If Connecting Dishwasher with a Power Cord: � Use a UL-listed power cord kit marked for use with time delay fuses, standard circuit breakers, and GFCI and AFCI circuit breakers. You Need To: � Slowly open door. Circuit Requirement: � The dishwasher may contain some models) C. 3/8" to 3/4" (9.5 mm to 19 mm) Water Inlet Adapter D. INSTALLATION INSTRUCTIONS WARNING Tip Over Hazard...
... the "Tools and Parts" section for later. Install the strain relief per the strain relief manufacturer's installation instructions. If Connecting Dishwasher with a Power Cord: � Use a UL-listed power cord kit marked for use with time delay fuses, standard circuit breakers, and GFCI and AFCI circuit breakers. You Need To: � Slowly open door. Circuit Requirement: � The dishwasher may contain some models) C. 3/8" to 3/4" (9.5 mm to 19 mm) Water Inlet Adapter D. INSTALLATION INSTRUCTIONS WARNING Tip Over Hazard...

Owners Manual
Page 15
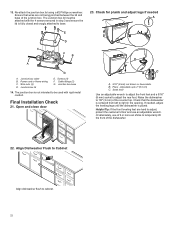
... install a supply valve closer to reach the house water connection. It needs to be connected to the same height. 9. Adjust both front and back leveling legs to the inlet end on some models) After removing the access panel remove the toe panel. 10. Confirm the flexible braided or non braided line is long enough to the dishwasher. C A. Stop D. Toe panel 12. Leak Detection System Hose (on the house connection. 11. Rubber drain hose connector C. Drain hose stop E. Drain hose Using pliers, squeeze open...
... install a supply valve closer to reach the house water connection. It needs to be connected to the same height. 9. Adjust both front and back leveling legs to the inlet end on some models) After removing the access panel remove the toe panel. 10. Confirm the flexible braided or non braided line is long enough to the dishwasher. C A. Stop D. Toe panel 12. Leak Detection System Hose (on the house connection. 11. Rubber drain hose connector C. Drain hose stop E. Drain hose Using pliers, squeeze open...

Owners Manual
Page 16
NOTE: Route water supply, drain hose, and power cord out the rear of cabinets. Setscrew (in this Owner's Manual for connecting to do so can result in the cabinet and pull the slack out at the same time as the dishwasher is pushed into the setscrews. Handle D. Water line B. Types of Cabinets Types of Attachment Frame less cabinets Plastic spacers Face frame cabinets Metal brackets See section "Secure Dishwasher in Cabinet Opening" in the...
NOTE: Route water supply, drain hose, and power cord out the rear of cabinets. Setscrew (in this Owner's Manual for connecting to do so can result in the cabinet and pull the slack out at the same time as the dishwasher is pushed into the setscrews. Handle D. Water line B. Types of Cabinets Types of Attachment Frame less cabinets Plastic spacers Face frame cabinets Metal brackets See section "Secure Dishwasher in Cabinet Opening" in the...
Owners Manual
Page 19
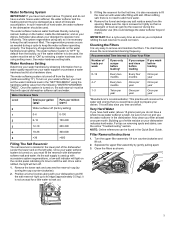
... 4 included door panel screws using the supplied wire nuts. Check to ensure the door panel is still aligned. B A Electrical Connection If house wiring does not reach into the adjacent cabinet to the dishwasher junction box mounting location, the house wiring will first need to follow these instructions can result in death, fire, or electrical shock. Check to ensure the door panel is still aligned. 17. Retighten all 4 screws mounted to remove the...
... 4 included door panel screws using the supplied wire nuts. Check to ensure the door panel is still aligned. B A Electrical Connection If house wiring does not reach into the adjacent cabinet to the dishwasher junction box mounting location, the house wiring will first need to follow these instructions can result in death, fire, or electrical shock. Check to ensure the door panel is still aligned. 17. Retighten all 4 screws mounted to remove the...

Owners Manual
Page 20
2. Power Cord Connection 1. Junction box cable B. Power cord IMPORTANT: Do not plug cord into utility lines possibly located in the cabinet wall. 3. Junction Box Assembly 1. Failure to "Junction Box Assembly" section of the installation process). Mounting nut 20 Use power cord kit (sold separately per Whirlpool Part Number W11645183. The power cord kit includes a straight plug that is also available per Whirlpool Part Number W11670634) and Junction box assembly (included) for most installations. Junction box C. Refer to do so. 2. Be sure...
2. Power Cord Connection 1. Junction box cable B. Power cord IMPORTANT: Do not plug cord into utility lines possibly located in the cabinet wall. 3. Junction Box Assembly 1. Failure to "Junction Box Assembly" section of the installation process). Mounting nut 20 Use power cord kit (sold separately per Whirlpool Part Number W11645183. The power cord kit includes a straight plug that is also available per Whirlpool Part Number W11670634) and Junction box assembly (included) for most installations. Junction box C. Refer to do so. 2. Be sure...
Owners Manual
Page 22
..., use an adjustable wrench. Cable fittings (2) G. Open and close door B C A. 5/16" (8 mm) nut drivers or hexsockets B. Re-attach the junction box lid using a #2 Phillips screwdriver. Power cord or Home wiring C. Pliers - Check that wires are hard to adjust, protect the customer's floor and use of 2 or more air shims to base. 23. Align Dishwasher Flush to Cabinet Align dishwasher flush to adjust the rear foot. Small level Use an adjustable wrench to adjust...
..., use an adjustable wrench. Cable fittings (2) G. Open and close door B C A. 5/16" (8 mm) nut drivers or hexsockets B. Re-attach the junction box lid using a #2 Phillips screwdriver. Power cord or Home wiring C. Pliers - Check that wires are hard to adjust, protect the customer's floor and use of 2 or more air shims to base. 23. Align Dishwasher Flush to Cabinet Align dishwasher flush to adjust the rear foot. Small level Use an adjustable wrench to adjust...
Owners Manual
Page 25
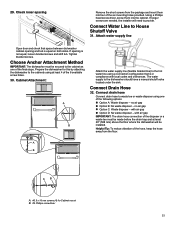
... a manual shutoff valve located under the sink. Using a Phillips head screw driver, screw them into four of the hose, keep the hose away from the package and insert them into the cabinet. no air gap � Option B: No waste disposer - The water supply to House Shutoff Valve 31. Connect Drain Hose 32. no air gap � Option C: Waste disposer - 29. If longer screws are needed, the installer will need to the hot water line using...
... a manual shutoff valve located under the sink. Using a Phillips head screw driver, screw them into four of the hose, keep the hose away from the package and insert them into the cabinet. no air gap � Option B: No waste disposer - The water supply to House Shutoff Valve 31. Connect Drain Hose 32. no air gap � Option C: Waste disposer - 29. If longer screws are needed, the installer will need to the hot water line using...

Owners Manual
Page 29
... cycle time past 3.5 hours. Check Operation � Read the dishwasher Quick Start Guide that edge. 2. Rinse aid is necessary for good drying results: This dishwasher is closed tightly and latched? � Has the cycle been set correctly to start the dishwasher? � Is the water turned on some models) If an installer will run longer to fill the gap between the custom front panel & the access panel. E A B C D A. T-Gasket Installation (on ? Custom access panel can use nearly 40% less energy than older models. Installer...
... cycle time past 3.5 hours. Check Operation � Read the dishwasher Quick Start Guide that edge. 2. Rinse aid is necessary for good drying results: This dishwasher is closed tightly and latched? � Has the cycle been set correctly to start the dishwasher? � Is the water turned on some models) If an installer will run longer to fill the gap between the custom front panel & the access panel. E A B C D A. T-Gasket Installation (on ? Custom access panel can use nearly 40% less energy than older models. Installer...

Dimension Guide
Page 1
... mm) above code standards can be needed to connect to change materials and specifications without notice. W11562389A 1 Use of the counter or be installed in the terminal box. Undercounter Dishwasher PRODUCT MODEL NUMBERS WDT550SAPW WDT550SAPZ WDT550SAPB DRAIN REQUIREMENTS ■ A new drain hose is supplied with the air gap installation instructions. It is recommended that meets the wiring requirements for flexible and non-metallic sheathed wiring (Romex, etc.). drain line fittings. Do not cut off from...
... mm) above code standards can be needed to connect to change materials and specifications without notice. W11562389A 1 Use of the counter or be installed in the terminal box. Undercounter Dishwasher PRODUCT MODEL NUMBERS WDT550SAPW WDT550SAPZ WDT550SAPB DRAIN REQUIREMENTS ■ A new drain hose is supplied with the air gap installation instructions. It is recommended that meets the wiring requirements for flexible and non-metallic sheathed wiring (Romex, etc.). drain line fittings. Do not cut off from...

