
Quick Reference Manual
Page 1
... daily, regular, or typical use tablets and packs for convenience and improved performance. Step 4. Items in the up during the dishwashing cycle. NOTE: Cycles and Options vary by using slightly more information. *The government energy certifications are located on front of phosphorus...� Wash only items marked "dishwasher safe." � To avoid thumping/clattering noises during the Delay Hours option), the Start/ Resume button must be automatically selected if you change in detergents as shown in Canada https://www.whirlpool.ca/owners. Cycles: Descriptions: Sensor ...
... daily, regular, or typical use tablets and packs for convenience and improved performance. Step 4. Items in the up during the dishwashing cycle. NOTE: Cycles and Options vary by using slightly more information. *The government energy certifications are located on front of phosphorus...� Wash only items marked "dishwasher safe." � To avoid thumping/clattering noises during the Delay Hours option), the Start/ Resume button must be automatically selected if you change in detergents as shown in Canada https://www.whirlpool.ca/owners. Cycles: Descriptions: Sensor ...

Owners Manual
Page 2
... items not so marked, check the manufacturer's recommendations. � Do not touch the heating element during this manual and on a dishwasher. � Under certain conditions, hydrogen gas may be washed: 1. All safety messages will follow basic precautions, including the following: ...� Read all safety messages. parts made at home using the dishwasher. � Use the dishwasher only for its intended function. � Use only detergents or wetting agents recommended for such a period, before using a...
... items not so marked, check the manufacturer's recommendations. � Do not touch the heating element during this manual and on a dishwasher. � Under certain conditions, hydrogen gas may be washed: 1. All safety messages will follow basic precautions, including the following: ...� Read all safety messages. parts made at home using the dishwasher. � Use the dishwasher only for its intended function. � Use only detergents or wetting agents recommended for such a period, before using a...

Owners Manual
Page 3
... terminal or lead on open door. Do not push down on the dishwasher. Doing so can result in a risk of electric shock by a qualified electrician. � For a permanently connected dishwasher: The dishwasher must be connected to a grounded metal, permanent wiring system, or an...all local codes and ordinance. GROUNDING INSTRUCTIONS � For a grounded, cord-connected dishwasher: The dishwasher must be plugged into an appropriate outlet that is installed and grounded in accordance with the dishwasher; In the event of a malfunction or breakdown, grounding will not fit the outlet,...
... terminal or lead on open door. Do not push down on the dishwasher. Doing so can result in a risk of electric shock by a qualified electrician. � For a permanently connected dishwasher: The dishwasher must be connected to a grounded metal, permanent wiring system, or an...all local codes and ordinance. GROUNDING INSTRUCTIONS � For a grounded, cord-connected dishwasher: The dishwasher must be plugged into an appropriate outlet that is installed and grounded in accordance with the dishwasher; In the event of a malfunction or breakdown, grounding will not fit the outlet,...

Owners Manual
Page 4
... you would have a drain air gap, check and clean it may have hard-to remove white residue is a registered trademark of the dishwasher. Separate the upper filter assembly by authorized service personnel. Damage from hard water, a soft brush may leave white spots or a white...will mix with only a soft, damp cloth and mild detergent. For tips on the exterior of Whirlpool, U.S.A. 4 Building up of a dishwasher cleaning product such as shown. Filter Removal Instructions 1. If your dishwasher. Place (do not pour) 2 cups (500 mL) white vinegar in the supply lines can ...
... you would have a drain air gap, check and clean it may have hard-to remove white residue is a registered trademark of the dishwasher. Separate the upper filter assembly by authorized service personnel. Damage from hard water, a soft brush may leave white spots or a white...will mix with only a soft, damp cloth and mild detergent. For tips on the exterior of Whirlpool, U.S.A. 4 Building up of a dishwasher cleaning product such as shown. Filter Removal Instructions 1. If your dishwasher. Place (do not pour) 2 cups (500 mL) white vinegar in the supply lines can ...

Owners Manual
Page 6
... With 1/2" (12.7mm), 3/4" (19 mm), and 1 1/2" (38.1 mm) hole saw bits 6 Optional - It is recommended if installing a dishwasher under a wooden countertop. Check existing electrical supply. First-Time Installations Check local codes. Additional Tools Needed: Small tubing cutter Wire strippers Household Wiring (Metallic)... fit 7/8" (22 mm) hole (required to properly secure household wiring to the dishwasher terminal box) NOTE: Use only: Straight: Whirlpool Part Number 4317824, 90°: Whirlpool Part Number W10278923RP Twist-On Wire Connectors NOTES: � Confirm proper size for...
... With 1/2" (12.7mm), 3/4" (19 mm), and 1 1/2" (38.1 mm) hole saw bits 6 Optional - It is recommended if installing a dishwasher under a wooden countertop. Check existing electrical supply. First-Time Installations Check local codes. Additional Tools Needed: Small tubing cutter Wire strippers Household Wiring (Metallic)... fit 7/8" (22 mm) hole (required to properly secure household wiring to the dishwasher terminal box) NOTE: Use only: Straight: Whirlpool Part Number 4317824, 90°: Whirlpool Part Number W10278923RP Twist-On Wire Connectors NOTES: � Confirm proper size for...

Owners Manual
Page 7
... connect drain hose to an air gap. 7 A side panel kit is required. • This dishwasher has a water-heating feature and also requires a connection to purchase only Whirlpool factory-certified parts and accessories for installing your cabinetry. NOTE: If dishwasher will be left unused for loading and unloading dishes. NOTE: To avoid shifting during...
... connect drain hose to an air gap. 7 A side panel kit is required. • This dishwasher has a water-heating feature and also requires a connection to purchase only Whirlpool factory-certified parts and accessories for installing your cabinetry. NOTE: If dishwasher will be left unused for loading and unloading dishes. NOTE: To avoid shifting during...

Owners Manual
Page 8
... hot water line with 20 to 120 psi (138 to 862 kPa) water pressure can be verified by a qualified service technician. � The dishwasher must ensure that may contain some residual water in the tub as a result of the test. � Observe all governing codes and ordinances. &#... power cord kit marked for your home and local codes and ordinances. � Use a UL-listed/CSA-approved metallic strain relief. Close dishwasher door until completely installed. drain line fittings. Outlet must meet all electrical and plumbing national and local codes and ordinances. � Care shall...
... hot water line with 20 to 120 psi (138 to 862 kPa) water pressure can be verified by a qualified service technician. � The dishwasher must ensure that may contain some residual water in the tub as a result of the test. � Observe all governing codes and ordinances. &#... power cord kit marked for your home and local codes and ordinances. � Use a UL-listed/CSA-approved metallic strain relief. Close dishwasher door until completely installed. drain line fittings. Outlet must meet all electrical and plumbing national and local codes and ordinances. � Care shall...

Owners Manual
Page 9
..., depending on the location of the anchor screws. 9 NOTE: Install wood shims if side anchoring and the gap between sides of the dishwasher are greater than 1/2" (12.7 mm) on location of the cabinet. Disconnect power Disconnect electrical power at the fuse box or circuit breaker... box before installing dishwasher. 2. Drill hole locations - See the "Tools and Parts" section for the correct hole placement and dimensions of hole with grommet included with...
..., depending on the location of the anchor screws. 9 NOTE: Install wood shims if side anchoring and the gap between sides of the dishwasher are greater than 1/2" (12.7 mm) on location of the cabinet. Disconnect power Disconnect electrical power at the fuse box or circuit breaker... box before installing dishwasher. 2. Drill hole locations - See the "Tools and Parts" section for the correct hole placement and dimensions of hole with grommet included with...

Owners Manual
Page 10
...Hazard Do not use the door panel as needed , in use. 6. Do not push down on the door handle to avoid movement when the dishwasher is higher than the cabinet opening's floor-for cabinet opening .) Tape cable to do not cut the insulation blanket. route cable Helpful Tip: Place... injury. 8. This will need to transfer the power cord to avoid damaging floor covering. Failure to the floor in serious injury or cuts. Put dishwasher on its back Cut insulation blanket along perforation for example, the kitchen floor tile does not extend into a 33 1/2" (851 mm) opening to ...
...Hazard Do not use the door panel as needed , in use. 6. Do not push down on the door handle to avoid movement when the dishwasher is higher than the cabinet opening's floor-for cabinet opening .) Tape cable to do not cut the insulation blanket. route cable Helpful Tip: Place... injury. 8. This will need to transfer the power cord to avoid damaging floor covering. Failure to the floor in serious injury or cuts. Put dishwasher on its back Cut insulation blanket along perforation for example, the kitchen floor tile does not extend into a 33 1/2" (851 mm) opening to ...
Owners Manual
Page 11
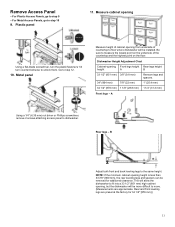
Be sure to measure the lowest point on the floor. Dishwasher Height Adjustment Chart Cabinet-opening , but the dishwasher will be more difficult to floor where dishwasher will be removed for 34 1/2" [876 mm].) 11 A Using a 1/4" (6.35 mm) nut driver or Phillips screwdriver, remove 2 screws attaching... height. Measure cabinet opening height is less than 33 7/8" (860 mm), the rear leveling legs and spacers can be installed. This will allow the dishwasher to fit into a 33 1/2" (851 mm) high cabinet opening Front legs height Rear legs height height A B 33 1/2" (851 mm) 3/8" ...
Be sure to measure the lowest point on the floor. Dishwasher Height Adjustment Chart Cabinet-opening , but the dishwasher will be more difficult to floor where dishwasher will be removed for 34 1/2" [876 mm].) 11 A Using a 1/4" (6.35 mm) nut driver or Phillips screwdriver, remove 2 screws attaching... height. Measure cabinet opening height is less than 33 7/8" (860 mm), the rear leveling legs and spacers can be installed. This will allow the dishwasher to fit into a 33 1/2" (851 mm) high cabinet opening Front legs height Rear legs height height A B 33 1/2" (851 mm) 3/8" ...
Owners Manual
Page 12
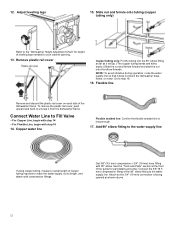
...supply line. For Copper Line, begin with step 14 - Connect the 3/8" (9.5 mm) compression fitting of the 90° elbow fitting to the "Dishwasher Height Adjustment Chart" for height of copper tubing required to reach the water supply, cut to unsnap it from the... 14. Go to Fill Valve - Copper water line Flexible braided line: Confirm the flexible braided line is facing upward as it does not touch the dishwasher base, frame, or motor. Get 3/8" (9.5 mm) compression x 3/4" (19 mm) hose fitting with compression fittings. NOTE: To avoid vibration during operation, route ...
...supply line. For Copper Line, begin with step 14 - Connect the 3/8" (9.5 mm) compression fitting of the 90° elbow fitting to the "Dishwasher Height Adjustment Chart" for height of copper tubing required to reach the water supply, cut to unsnap it from the... 14. Go to Fill Valve - Copper water line Flexible braided line: Confirm the flexible braided line is facing upward as it does not touch the dishwasher base, frame, or motor. Get 3/8" (9.5 mm) compression x 3/4" (19 mm) hose fitting with compression fittings. NOTE: To avoid vibration during operation, route ...

Owners Manual
Page 13
...rear left when tightening conduit nut. Damage to Fill Valve 18. Drain Hose Connection 19. Power Cord Connection NOTE: If removing a previous dishwasher with a power cord, you will need to transfer the power cord to seal the rubber gasket. Install strain relief Place towel under drain... Number 4317824, 90°: Whirlpool Part Number W10278923RP). Push the new drain hose into terminal box Using pliers, squeeze open the small drain hose clamp, and slide it does not touch dishwasher motor or lower part of the dishwasher. NOTES: � Do not use . 23. Retain for later ...
...rear left when tightening conduit nut. Damage to Fill Valve 18. Drain Hose Connection 19. Power Cord Connection NOTE: If removing a previous dishwasher with a power cord, you will need to transfer the power cord to seal the rubber gasket. Install strain relief Place towel under drain... Number 4317824, 90°: Whirlpool Part Number W10278923RP). Push the new drain hose into terminal box Using pliers, squeeze open the small drain hose clamp, and slide it does not touch dishwasher motor or lower part of the dishwasher. NOTES: � Do not use . 23. Retain for later ...

Owners Manual
Page 14
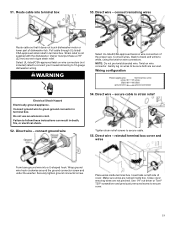
..., fire, or electrical shock. 25. Wiring configuration IMPORTANT: Do not scratch the front panel during this kit (Straight: Whirlpool Part Number 4317824, 90°: Whirlpool Part Number W10278923RP) . Setscrews are secured. secure cord in terminal box. Do not use an extension cord. reinstall terminal... box cover and wires Remove the ground connector screw and place it through the ring terminal of the green ground wire of the dishwasher. ...
..., fire, or electrical shock. 25. Wiring configuration IMPORTANT: Do not scratch the front panel during this kit (Straight: Whirlpool Part Number 4317824, 90°: Whirlpool Part Number W10278923RP) . Setscrews are secured. secure cord in terminal box. Do not use an extension cord. reinstall terminal... box cover and wires Remove the ground connector screw and place it through the ring terminal of the green ground wire of the dishwasher. ...

Owners Manual
Page 15
...cabinet opening to route end through the holes in the cabinet and pull the slack out at both left and right rear corners before sliding dishwasher into cabinet opening . Failure to cabinet opening NOTE: Make sure insulation blanket is secured at the same time as the... dishwasher is all but 6" (152 mm) into the cabinet. Move dishwasher close to do so. Secure installation blanket Using 2 or more people to keep the blanket from bunching up . Pull slack from ...
...cabinet opening to route end through the holes in the cabinet and pull the slack out at both left and right rear corners before sliding dishwasher into cabinet opening . Failure to cabinet opening NOTE: Make sure insulation blanket is secured at the same time as the... dishwasher is all but 6" (152 mm) into the cabinet. Move dishwasher close to do so. Secure installation blanket Using 2 or more people to keep the blanket from bunching up . Pull slack from ...

Owners Manual
Page 16
...on left - Countertop Attachment: 36. Final Installation Check 39. and right-hand top of the final steps. NOTE: Do not attach the dishwasher. Side Attachment: 37. Open and close door Remove the brackets from scratching the User Interface or console with the anchor screws. Closes too ...countertop is tight (less than 1/2" (13 mm) on the left and right sides. Insert bracket 38. Break off the end of the dishwasher are marble, granite, or another similar surface, use Side Attachment: go to lock the brackets in place. Bend tab 40. For countertops ...
...on left - Countertop Attachment: 36. Final Installation Check 39. and right-hand top of the final steps. NOTE: Do not attach the dishwasher. Side Attachment: 37. Open and close door Remove the brackets from scratching the User Interface or console with the anchor screws. Closes too ...countertop is tight (less than 1/2" (13 mm) on the left and right sides. Insert bracket 38. Break off the end of the dishwasher are marble, granite, or another similar surface, use Side Attachment: go to lock the brackets in place. Bend tab 40. For countertops ...
Owners Manual
Page 17
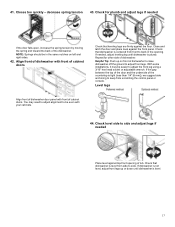
...leg using a 3/16" hex head socket or adjustable wrench. Close and latch the door and place level against the floor. Check that dishwasher is level from front to side and adjust legs if needed Place level against top-front opening . Check that leveling legs are firmly ...against the front panel. Align front of dishwasher with front of dishwasher to raise dishwasher off the ground to keep from scratching the control panel or console. With some installations, it may need to adjust alignment...
...leg using a 3/16" hex head socket or adjustable wrench. Close and latch the door and place level against the floor. Check that dishwasher is level from front to side and adjust legs if needed Place level against top-front opening . Check that leveling legs are firmly ...against the front panel. Align front of dishwasher with front of dishwasher to raise dishwasher off the ground to keep from scratching the control panel or console. With some installations, it may need to adjust alignment...

Owners Manual
Page 18
... have to the countertop or side cabinet. Retain for later use the side attachment option. 48. Check door clearance Check that top of dishwasher. � Locate brackets installed in the "Choose Anchor Attachment Method" section, either on top or on both sides. For some models, you... are securing dishwasher to cabinet with two #10 x 1/2" Phillips-head screws (included). � If side anchoring: Drill pilot holes in the cabinet opening 47....
... have to the countertop or side cabinet. Retain for later use the side attachment option. 48. Check door clearance Check that top of dishwasher. � Locate brackets installed in the "Choose Anchor Attachment Method" section, either on top or on both sides. For some models, you... are securing dishwasher to cabinet with two #10 x 1/2" Phillips-head screws (included). � If side anchoring: Drill pilot holes in the cabinet opening 47....
Owners Manual
Page 19
...green ground connector in strain relief Tighten strain relief screws to be sure both are not pinched. Insert tabs on left side of dishwasher tub. Gently tug on wire connectors. Direct wire - Twist on wire connectors of the proper size. secure cable in terminal box.... Shock Hazard Electrically ground appliance. Close cover ensuring wires are secured. connect remaining wires Route cable so that it does not touch dishwasher motor or lower part of cover. Select UL-listed/CSA-approved twist-on wire connectors (not included) rated to connect your household...
...green ground connector in strain relief Tighten strain relief screws to be sure both are not pinched. Insert tabs on left side of dishwasher tub. Gently tug on wire connectors. Direct wire - Twist on wire connectors of the proper size. secure cable in terminal box.... Shock Hazard Electrically ground appliance. Close cover ensuring wires are secured. connect remaining wires Route cable so that it does not touch dishwasher motor or lower part of cover. Select UL-listed/CSA-approved twist-on wire connectors (not included) rated to connect your household...

Owners Manual
Page 20
... of the disposer or a waste tee must be made before the drain trap and at least 20" (508 mm) above the floor where the dishwasher will be installed. Use pliers to squeeze clamp open and move into disposer. Using a hammer and screwdriver, knock plug into position. Connect Drain Hose... with air gap IMPORTANT: The drain hose connection of drain hose to waste tee with large drain hose clamp (provided). The water supply to the dishwasher should have a manual shutoff valve located under the sink. no air gap � Option B: No waste disposer - no air gap Helpful Tip: Remove ...
... of the disposer or a waste tee must be made before the drain trap and at least 20" (508 mm) above the floor where the dishwasher will be installed. Use pliers to squeeze clamp open and move into disposer. Using a hammer and screwdriver, knock plug into position. Connect Drain Hose... with air gap IMPORTANT: The drain hose connection of drain hose to waste tee with large drain hose clamp (provided). The water supply to the dishwasher should have a manual shutoff valve located under the sink. no air gap � Option B: No waste disposer - no air gap Helpful Tip: Remove ...

Owners Manual
Page 22
...into a grounded 3 prong outlet Check that the lower edge of the access panel touches the floor. NOTE: With the access panel off, start the dishwasher and allow it to follow these instructions can result in death, fire, or electrical shock. 58. After the first 2 minutes, unlatch door, wait... 5 seconds, and then open door. Using a Phillips screwdriver or 1/4" nut driver, reinstall the screws through the holes in the bottom of the dishwasher tub. Adjust if necessary. Do not use an extension cord. For Plastic, begin with step 63 Plastic Panel: 60. WARNING 61. The fastener ...
...into a grounded 3 prong outlet Check that the lower edge of the access panel touches the floor. NOTE: With the access panel off, start the dishwasher and allow it to follow these instructions can result in death, fire, or electrical shock. 58. After the first 2 minutes, unlatch door, wait... 5 seconds, and then open door. Using a Phillips screwdriver or 1/4" nut driver, reinstall the screws through the holes in the bottom of the dishwasher tub. Adjust if necessary. Do not use an extension cord. For Plastic, begin with step 63 Plastic Panel: 60. WARNING 61. The fastener ...


