Installation Guide
Page 2
...Requirements 6 Product and Cabinet Opening Dimensions 7 Drain Requirements 8 Water Supply Requirements 8 Electrical Requirements 8 INSTALLATION INSTRUCTIONS 9 Prepare Cabinet Opening - New Utilities 9 Install Optional Moisture Barrier 9 Electrical Connection 10 Prepare Dishwasher 11 Remove Access Panel 11 Connect Water Line to ... 13 Drain Hose Connection 13 Power Cord Connection 14 Install Door Handle 16 Place Diswasher in Cabinet 16 Custom Panel Installation 17 Choose Anchor Attachment Method 17 Final Installation Check 18 Secure Dishwasher in Cabinet Opening 19 Direct ...
...Requirements 6 Product and Cabinet Opening Dimensions 7 Drain Requirements 8 Water Supply Requirements 8 Electrical Requirements 8 INSTALLATION INSTRUCTIONS 9 Prepare Cabinet Opening - New Utilities 9 Install Optional Moisture Barrier 9 Electrical Connection 10 Prepare Dishwasher 11 Remove Access Panel 11 Connect Water Line to ... 13 Drain Hose Connection 13 Power Cord Connection 14 Install Door Handle 16 Place Diswasher in Cabinet 16 Custom Panel Installation 17 Choose Anchor Attachment Method 17 Final Installation Check 18 Secure Dishwasher in Cabinet Opening 19 Direct ...
Installation Guide
Page 3
... water in the tub as a result of the test. ■■ Observe all safety messages. This is tested at the time of installation. 3 WARNING Tip Over Hazard Do not use dishwasher until latched. Remove shipping materials and drain hose. DISHWASHER SAFETY Your safety and the safety...ordinances. WARNING You can happen if the instructions are very important. Always read and obey all governing codes and ordinances. ■■ Install this dishwasher as specified in this manual and on open dishwasher door while someone grasps the rear of injury, and tell you what ...
... water in the tub as a result of the test. ■■ Observe all safety messages. This is tested at the time of installation. 3 WARNING Tip Over Hazard Do not use dishwasher until latched. Remove shipping materials and drain hose. DISHWASHER SAFETY Your safety and the safety...ordinances. WARNING You can happen if the instructions are very important. Always read and obey all governing codes and ordinances. ■■ Install this dishwasher as specified in this manual and on open dishwasher door while someone grasps the rear of injury, and tell you what ...

Installation Guide
Page 4
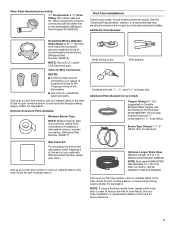
All Installations Tools Needed: Other Useful Items You May Need: Flashlight Shallow pan Pliers Flat-blade screwdriver Bath towel Parts Supplied: Masking or duct tape Phillips screwdriver ... or visit our website listed in the User Guide. 10" adjustable wrench that opens to 11/8" (29 mm) Torx®† T20® and, if installing custom front panels, Torx® T15® screwdrivers Door handle (on some models) †®TORX, T15, and T20 are included in the literature package...
All Installations Tools Needed: Other Useful Items You May Need: Flashlight Shallow pan Pliers Flat-blade screwdriver Bath towel Parts Supplied: Masking or duct tape Phillips screwdriver ... or visit our website listed in the User Guide. 10" adjustable wrench that opens to 11/8" (29 mm) Torx®† T20® and, if installing custom front panels, Torx® T15® screwdrivers Door handle (on some models) †®TORX, T15, and T20 are included in the literature package...
Installation Guide
Page 5
...(Metallic) Strain Relief to fit 7/8" (22 mm) hole (required to properly secure household wiring to the dishwasher) (Whirlpool Part Number W10685193) First-Time Installations Check local codes. Optional Accessory Parts Available: Moisture Barrier Tape NOTE: Moisture barrier tape is recommended that electrical connections be...retailer for part numbers above , or see local plumbing supply retailer for equivalent. Record hose installation or replacement dates on the hose for connecting your cabinetry (Whirlpool Part Number varies with color.) Call us at our toll-free number or visit our ...
...(Metallic) Strain Relief to fit 7/8" (22 mm) hole (required to properly secure household wiring to the dishwasher) (Whirlpool Part Number W10685193) First-Time Installations Check local codes. Optional Accessory Parts Available: Moisture Barrier Tape NOTE: Moisture barrier tape is recommended that electrical connections be...retailer for part numbers above , or see local plumbing supply retailer for equivalent. Record hose installation or replacement dates on the hose for connecting your cabinetry (Whirlpool Part Number varies with color.) Call us at our toll-free number or visit our ...

Installation Guide
Page 6
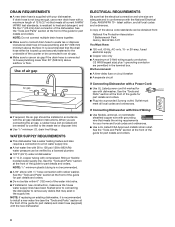
... dishes. Corner locations require a 2" (51 mm) minimum clearance between motor and flooring. Damage from freezing is also available for installing underneath a wooden countertop. Check location where dishwasher will be used to a hot water supply line. ■■ Make sure...installed in new construction, flush the water supply line of debris before connecting it is required. ■■ This dishwasher has a water heating feature and also requires a connection to level dishwasher. For Direct Wire For Power Cord Cabinet Grommet For 11/2" (38 mm) hole in cabinet. (Whirlpool...
... dishes. Corner locations require a 2" (51 mm) minimum clearance between motor and flooring. Damage from freezing is also available for installing underneath a wooden countertop. Check location where dishwasher will be used to a hot water supply line. ■■ Make sure...installed in new construction, flush the water supply line of debris before connecting it is required. ■■ This dishwasher has a water heating feature and also requires a connection to level dishwasher. For Direct Wire For Power Cord Cabinet Grommet For 11/2" (38 mm) hole in cabinet. (Whirlpool...
Installation Guide
Page 7
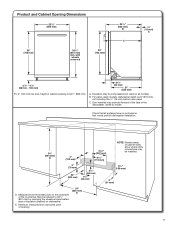
... surfaces have no protrusions that all models). Product and Cabinet Opening Dimensions 237/8" (606 mm) 30" (762 mm) 331/2" (851 mm) min. Insulation may be installed. 3" (76 mm) 24" (620 mm) 21/4" (64 mm) 13/4" (44 mm) 61/4" (159 mm) 2" (51 mm) D. Minimum, measured from the ...533 mm) A. Measured from narrowest point of opening is 24" (610 mm), not including the 3/4" (19 mm) custom door panel. Check that would prohibit dishwasher installation. 34" (864 mm) D 4" (102 mm) 101/2" (267 mm) 63/4" (172 mm) NOTE: Shaded areas of cabinet walls show where utility connections may...
... surfaces have no protrusions that all models). Product and Cabinet Opening Dimensions 237/8" (606 mm) 30" (762 mm) 331/2" (851 mm) min. Insulation may be installed. 3" (76 mm) 24" (620 mm) 21/4" (64 mm) 13/4" (44 mm) 61/4" (159 mm) 2" (51 mm) D. Minimum, measured from the ...533 mm) A. Measured from narrowest point of opening is 24" (610 mm), not including the 3/4" (19 mm) custom door panel. Check that would prohibit dishwasher installation. 34" (864 mm) D 4" (102 mm) 101/2" (267 mm) 63/4" (172 mm) NOTE: Shaded areas of cabinet walls show where utility connections may...
Installation Guide
Page 8
...for part details and orders. ■■ Do not solder within 6" (152 mm) of the water inlet valve. ■■ If installed in the supply line. latest edition, and all local codes and ordinances. If Connecting Dishwasher with Direct Wiring: ■■ Use flexible,... at the front of 2 field wiring supply conductors (12 AWG largest size) plus 1 grounding conductor are permitted in accordance with the air gap installation instructions. copper tubing with rubber washer. See the "Tools and Parts" section at dishwasher ■■ 3/8" O.D. A copy of the dishwasher....
...for part details and orders. ■■ Do not solder within 6" (152 mm) of the water inlet valve. ■■ If installed in the supply line. latest edition, and all local codes and ordinances. If Connecting Dishwasher with Direct Wiring: ■■ Use flexible,... at the front of 2 field wiring supply conductors (12 AWG largest size) plus 1 grounding conductor are permitted in accordance with the air gap installation instructions. copper tubing with rubber washer. See the "Tools and Parts" section at dishwasher ■■ 3/8" O.D. A copy of the dishwasher....
Installation Guide
Page 9
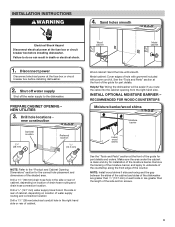
...or electrical shock. 1. Sand holes smooth Electrical Shock Hazard Disconnect electrical power at the fuse box or circuit breaker box before installing dishwasher. NOTE: Install wood shims if side anchoring and the gap between the sides of the cabinet and sides of the dishwasher are greater than 1/2"...rear of cabinet, depending on location of the side anchor screws. 9 Failure to underside of the countertop along the front edge of cabinet. INSTALLATION INSTRUCTIONS WARNING 4. NEW UTILITIES 3. Drill a 11/2" (38 mm) drain hose hole in the right-hand side or rear of the counter...
...or electrical shock. 1. Sand holes smooth Electrical Shock Hazard Disconnect electrical power at the fuse box or circuit breaker box before installing dishwasher. NOTE: Install wood shims if side anchoring and the gap between the sides of the cabinet and sides of the dishwasher are greater than 1/2"...rear of cabinet, depending on location of the side anchor screws. 9 Failure to underside of the countertop along the front edge of cabinet. INSTALLATION INSTRUCTIONS WARNING 4. NEW UTILITIES 3. Drill a 11/2" (38 mm) drain hose hole in the right-hand side or rear of the counter...

Installation Guide
Page 10
... cabinet opening . This will need to transfer the power cord to the right front side of the dishwasher. add shims, as needed If installing into cabinet opening - For Power Cord, wait until Step 22 7. not all models have them) located above the front legs on the ...is in area shown. add shims as shown. For other cabinet opening Built-up floors - NOTE: Shims must extend to the new dishwasher. 10 If installing with Step 7 - Direct wire - NOTE: If removing a previous dishwasher with a power cord, you will prohibit cable from power supply through cabinet hole...
... cabinet opening . This will need to transfer the power cord to the right front side of the dishwasher. add shims, as needed If installing into cabinet opening - For Power Cord, wait until Step 22 7. not all models have them) located above the front legs on the ...is in area shown. add shims as shown. For other cabinet opening Built-up floors - NOTE: Shims must extend to the new dishwasher. 10 If installing with Step 7 - Direct wire - NOTE: If removing a previous dishwasher with a power cord, you will prohibit cable from power supply through cabinet hole...
Installation Guide
Page 11
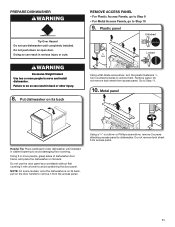
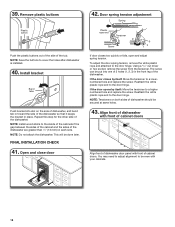
.... 10. Plastic panel 1/4 turn Using a flat-blade screwdriver, turn the plastic fasteners 1/4 turn counterclockwise to move and install dishwasher. Metal panel Helpful Tip: Place cardboard under dishwasher until completely installed. Do not use dishwasher until installed in back or other injury. 8. Do not remove tech sheet from access panel. 11 Doing so can...
.... 10. Plastic panel 1/4 turn Using a flat-blade screwdriver, turn the plastic fasteners 1/4 turn counterclockwise to move and install dishwasher. Metal panel Helpful Tip: Place cardboard under dishwasher until completely installed. Do not use dishwasher until installed in back or other injury. 8. Do not remove tech sheet from access panel. 11 Doing so can...
Installation Guide
Page 12
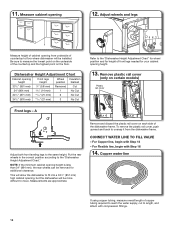
... length of copper tubing required to reach the water supply, cut to fit into a 331/2" (851 mm) high cabinet opening, but the dishwasher will be installed. Measurements are approximate. Put the rear wheels in the correct position according to the same height. For Flexible line, begin with compression fittings. 12 Adjust...
... length of copper tubing required to reach the water supply, cut to fit into a 331/2" (851 mm) high cabinet opening, but the dishwasher will be installed. Measurements are approximate. Put the rear wheels in the correct position according to the same height. For Flexible line, begin with compression fittings. 12 Adjust...
Installation Guide
Page 14
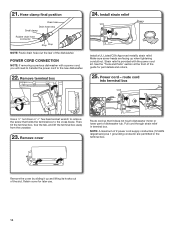
... box, free the tab, and lift the terminal box away from the crossbar. 23. 21. Make sure screw heads are permitted in terminal box. Install strain relief Install a UL Listed/CSA Approved metallic strain relief. NOTE: A maximum of the dishwasher. See the "Tools and Parts" section at the front of dishwasher tub...
... box, free the tab, and lift the terminal box away from the crossbar. 23. 21. Make sure screw heads are permitted in terminal box. Install strain relief Install a UL Listed/CSA Approved metallic strain relief. NOTE: A maximum of the dishwasher. See the "Tools and Parts" section at the front of dishwasher tub...
Installation Guide
Page 16
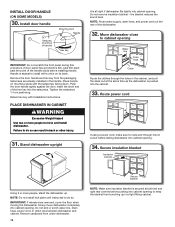
...in back or other injury. 31. IMPORTANT: If wheels were removed, cover the floor when moving the dishwasher. Slowly move and install dishwasher. Remove the door handle and hex key from under dishwasher. 16 Secure blanket NOTE: Make sure insulation blanket is on mounting studs... remove insulation blanket - Secure insulation blanket Insulation blanket Using 2 or more people to cabinet opening to do so can result in cutout before installing handle. If door panel has a protective film, peel film back past snug. Place handle on its back. Tighten the setscrews 1/4 turn past...
...in back or other injury. 31. IMPORTANT: If wheels were removed, cover the floor when moving the dishwasher. Slowly move and install dishwasher. Remove the door handle and hex key from under dishwasher. 16 Secure blanket NOTE: Make sure insulation blanket is on mounting studs... remove insulation blanket - Secure insulation blanket Insulation blanket Using 2 or more people to cabinet opening to do so can result in cutout before installing handle. If door panel has a protective film, peel film back past snug. Place handle on its back. Tighten the setscrews 1/4 turn past...
Installation Guide
Page 17
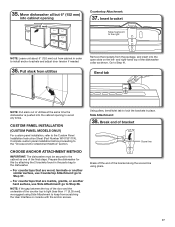
... Leave unit about 6" (152 mm) out from cabinet in order to the right. CHOOSE ANCHOR ATTACHMENT METHOD IMPORTANT: The dishwasher must point to install anchor brackets and adjust door tension if needed. 36. NOTE: If the gap between the top of the door and the underside of the final...from the package, and insert into cabinet opening to lock the brackets in the parts bag to Step 41. CUSTOM PANEL INSTALLATION (CUSTOM PANEL MODELS ONLY) For custom panel installation, refer to Step 38. For countertops that are marble, granite, or another similar surface, use Side Attachment: go to ...
... Leave unit about 6" (152 mm) out from cabinet in order to the right. CHOOSE ANCHOR ATTACHMENT METHOD IMPORTANT: The dishwasher must point to install anchor brackets and adjust door tension if needed. 36. NOTE: If the gap between the top of the door and the underside of the final...from the package, and insert into cabinet opening to lock the brackets in the parts bag to Step 41. CUSTOM PANEL INSTALLATION (CUSTOM PANEL MODELS ONLY) For custom panel installation, refer to Step 38. For countertops that are marble, granite, or another similar surface, use Side Attachment: go to ...
Installation Guide
Page 18
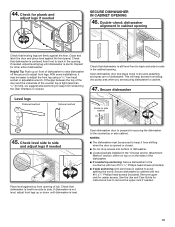
.... If the door closes by itself : Move the tensioner to the door hinge. 39. Repeat this step for the other side of the tub. FINAL INSTALLATION CHECK 41. The screw can be done later. Reattach the white plastic rope end to the door hinge. Reattach the white plastic rope end to... the door hinge. Open and close door 42. If the door opens by itself : Move the tensioner to be secured at same holes. 43. Install bracket Bend tabs Push bracket into one of 3 holes (1, 2, 3) in the front leg of the dishwasher. NOTE: Do not attach the dishwasher. You may need...
.... If the door closes by itself : Move the tensioner to the door hinge. 39. Repeat this step for the other side of the tub. FINAL INSTALLATION CHECK 41. The screw can be done later. Reattach the white plastic rope end to the door hinge. Reattach the white plastic rope end to... the door hinge. Open and close door 42. If the door opens by itself : Move the tensioner to be secured at same holes. 43. Install bracket Bend tabs Push bracket into one of 3 holes (1, 2, 3) in the front leg of the dishwasher. NOTE: Do not attach the dishwasher. You may need...
Installation Guide
Page 19
... or on front of dishwasher. NOTES: ■■ The dishwasher must be easier to avoid splitting the wood. With some installations, it from shifting when the door is level from scratching the User Interface or console. Secure dishwasher Level legs Preferred method Optional...legs if needed , adjust leveling leg until dishwasher is centered from falling into bottom of dishwasher. ■■ Locate brackets installed in the cabinet opening. Double-check dishwasher alignment in the opening of dishwasher. Open dishwasher door and place towel over pump ...
... or on front of dishwasher. NOTES: ■■ The dishwasher must be easier to avoid splitting the wood. With some installations, it from shifting when the door is level from scratching the User Interface or console. Secure dishwasher Level legs Preferred method Optional...legs if needed , adjust leveling leg until dishwasher is centered from falling into bottom of dishwasher. ■■ Locate brackets installed in the cabinet opening. Double-check dishwasher alignment in the opening of dishwasher. Open dishwasher door and place towel over pump ...

Installation Guide
Page 21
... come in. Use a 1/4" nut driver and the screw removed in Step 51 to secure the terminal box to green ground connector in place. Install strain relief 56. See the "Tools and Parts" section at the front of the guide for part details. Wrap ground wire hook clockwise around ...the ground connector screw on wire connectors. Make sure wires are secured. 57. 54. Direct wire - connect remaining wires Install a UL Listed/CSA Approved metallic strain relief. Connect ground wire to the crossbar. Do not use an extension cord. Failure to be sure both are...
... come in. Use a 1/4" nut driver and the screw removed in Step 51 to secure the terminal box to green ground connector in place. Install strain relief 56. See the "Tools and Parts" section at the front of the guide for part details. Wrap ground wire hook clockwise around ...the ground connector screw on wire connectors. Make sure wires are secured. 57. 54. Direct wire - connect remaining wires Install a UL Listed/CSA Approved metallic strain relief. Connect ground wire to the crossbar. Do not use an extension cord. Failure to be sure both are...

Installation Guide
Page 22
... or a waste tee must be made before the drain trap and at least 20" (508 mm) above the floor where the dishwasher will be installed. Record hose installation or replacement dates on the hose for future reference. 58. Attach water supply line Option A: Waste disposer - no air gap ■■ Option C: Waste...
... or a waste tee must be made before the drain trap and at least 20" (508 mm) above the floor where the dishwasher will be installed. Record hose installation or replacement dates on the hose for future reference. 58. Attach water supply line Option A: Waste disposer - no air gap ■■ Option C: Waste...
Installation Guide
Page 24
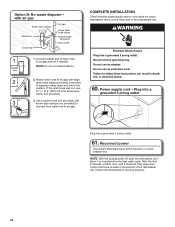
... cut ribbed section. 2. with air gap Screw-type clamps Waste tee Drain trap Air gap Large drain hose clamp Rubber hose connector Drain hose COMPLETE INSTALLATION Check that there is working properly. 24 Power supply cord - After the first 2 minutes, unlatch door, wait 5 seconds, then open and move into a grounded 3 prong...
... cut ribbed section. 2. with air gap Screw-type clamps Waste tee Drain trap Air gap Large drain hose clamp Rubber hose connector Drain hose COMPLETE INSTALLATION Check that there is working properly. 24 Power supply cord - After the first 2 minutes, unlatch door, wait 5 seconds, then open and move into a grounded 3 prong...
Installation Guide
Page 25
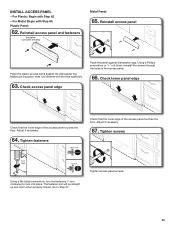
... will be straight up and down when properly locked. Check lower panel edge Check that the lower edge of the access panel touches the floor. INSTALL ACCESS PANEL - Reinstall access panel and fasteners Insulation (on some models) Metal Panel: 65. Adjust if necessary. 67. For Metal: Begin with Step 65 Plastic...
... will be straight up and down when properly locked. Check lower panel edge Check that the lower edge of the access panel touches the floor. INSTALL ACCESS PANEL - Reinstall access panel and fasteners Insulation (on some models) Metal Panel: 65. Adjust if necessary. 67. For Metal: Begin with Step 65 Plastic...


