Installation Guide
Page 2
... 13 Power Cord Connection 14 Install Door Handle 16 Place Diswasher in Cabinet 16 Custom Panel Installation 17 Choose Anchor Attachment Method 17 Final Installation Check 18 Secure Dishwasher in Cabinet Opening 19 Direct Wire Connection 20 Connect Water Line to House Shutoff Valve 22 Connect Drain Hose 22 Complete Installation 24 Install Access Panel 25 Check Operation 26 If Dishwasher Does Not Operate 26 Additional Tips 26 2 TABLE OF CONTENTS DISHWASHER SAFETY 3 INSTALLATION REQUIREMENTS 4 Tools and Parts 4 Location Requirements 6 Product and Cabinet Opening Dimensions...
... 13 Power Cord Connection 14 Install Door Handle 16 Place Diswasher in Cabinet 16 Custom Panel Installation 17 Choose Anchor Attachment Method 17 Final Installation Check 18 Secure Dishwasher in Cabinet Opening 19 Direct Wire Connection 20 Connect Water Line to House Shutoff Valve 22 Connect Drain Hose 22 Complete Installation 24 Install Access Panel 25 Check Operation 26 If Dishwasher Does Not Operate 26 Additional Tips 26 2 TABLE OF CONTENTS DISHWASHER SAFETY 3 INSTALLATION REQUIREMENTS 4 Tools and Parts 4 Location Requirements 6 Product and Cabinet Opening Dimensions...
Installation Guide
Page 3
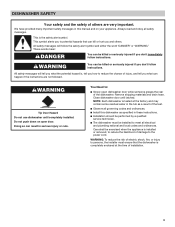
... Over Hazard Do not use dishwasher until latched. Care shall be installed to persons, the installer must be exercised when the appliance is the safety alert symbol. Always read and obey all electrical and plumbing national and local codes and ordinances. Close dishwasher door until completely installed. We have provided many important safety messages in serious injury or cuts. WARNING You can happen...
... Over Hazard Do not use dishwasher until latched. Care shall be installed to persons, the installer must be exercised when the appliance is the safety alert symbol. Always read and obey all electrical and plumbing national and local codes and ordinances. Close dishwasher door until completely installed. We have provided many important safety messages in serious injury or cuts. WARNING You can happen...
Installation Guide
Page 5
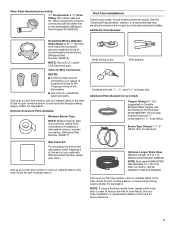
... level of protection if installing a dishwasher under a wooden countertop. (Whirlpool Part Number 4396277) Side Panel Kit For enclosing the side of the dishwasher when installing it at our toll-free number, visit our website listed in the User Guide for part numbers above, or see local electrical/plumbing supply retailer for part numbers above . NOTE: If using a flexible braided hose, replace inlet hose after 5 years to reduce the risk of your gauge of household wiring to heat and detergent...
... level of protection if installing a dishwasher under a wooden countertop. (Whirlpool Part Number 4396277) Side Panel Kit For enclosing the side of the dishwasher when installing it at our toll-free number, visit our website listed in the User Guide for part numbers above, or see local electrical/plumbing supply retailer for part numbers above . NOTE: If using a flexible braided hose, replace inlet hose after 5 years to reduce the risk of your gauge of household wiring to heat and detergent...

Installation Guide
Page 6
... a water heating feature and also requires a connection to a hot water supply line. ■■ Make sure pipes, wires and drain hose are within the shaded area shown in the "Product and Cabinet Opening Dimensions" section. ■■ Do not run drain lines, water lines, or electrical wiring where they can interfere with floor at our toll-free number, visit our website listed in the User Guide for part numbers above, or see local electrical supply retailer for equivalent. Check location where dishwasher...
... a water heating feature and also requires a connection to a hot water supply line. ■■ Make sure pipes, wires and drain hose are within the shaded area shown in the "Product and Cabinet Opening Dimensions" section. ■■ Do not run drain lines, water lines, or electrical wiring where they can interfere with floor at our toll-free number, visit our website listed in the User Guide for part numbers above, or see local electrical supply retailer for equivalent. Check location where dishwasher...
Installation Guide
Page 8
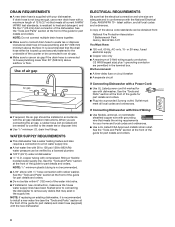
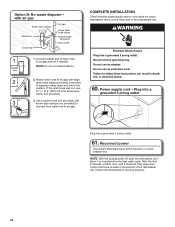
... wiring requirements for part details and orders. 8 copper tubing with rubber washer. latest edition, and all local codes and ordinances. We Recommend: ■■ A time-delay fuse or circuit breaker ■■ A separate circuit If Connecting Dishwasher with a Power Cord: ■■ Use UL Listed power cord kit marked for part details) and drain hose (supplied) with the new dishwasher. NOTE: If replacing an existing dishwasher, it is recommended to install a new water line (see the "Tools and Parts...
... wiring requirements for part details and orders. 8 copper tubing with rubber washer. latest edition, and all local codes and ordinances. We Recommend: ■■ A time-delay fuse or circuit breaker ■■ A separate circuit If Connecting Dishwasher with a Power Cord: ■■ Use UL Listed power cord kit marked for part details) and drain hose (supplied) with the new dishwasher. NOTE: If replacing an existing dishwasher, it is recommended to install a new water line (see the "Tools and Parts...
Installation Guide
Page 9
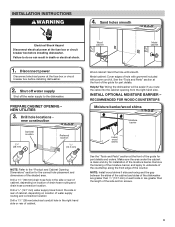
... before installing dishwasher. 2. Make sure the area under the cabinet is clean and dry for the correct hole placement and dimensions of the guide for part details. Wood cabinet Metal cabinet Wood cabinet: Sand the hole until smooth. Remove the backing of the moisture barrier, and apply to the "Product and Cabinet Opening Dimensions" section for installation of the moisture barrier. INSTALLATION INSTRUCTIONS WARNING 4. PREPARE CABINET OPENING - Sand holes smooth Electrical Shock...
... before installing dishwasher. 2. Make sure the area under the cabinet is clean and dry for the correct hole placement and dimensions of the guide for part details. Wood cabinet Metal cabinet Wood cabinet: Sand the hole until smooth. Remove the backing of the moisture barrier, and apply to the "Product and Cabinet Opening Dimensions" section for installation of the moisture barrier. INSTALLATION INSTRUCTIONS WARNING 4. PREPARE CABINET OPENING - Sand holes smooth Electrical Shock...

Installation Guide
Page 10
... into the cabinet opening Built-up to the new dishwasher. 10 NOTE: If removing a previous dishwasher with direct wire, route the cable as shown. Direct wire - Route cable from moving when dishwasher is higher than the cabinet opening .) Tape cable to avoid movement when the dishwasher is in use. 6. 5. For other cabinet opening height of 331/2" (851 mm). If installing with a power cord, you will prohibit cable from power supply through cabinet hole. (Cable...
... into the cabinet opening Built-up to the new dishwasher. 10 NOTE: If removing a previous dishwasher with direct wire, route the cable as shown. Direct wire - Route cable from moving when dishwasher is higher than the cabinet opening .) Tape cable to avoid movement when the dishwasher is in use. 6. 5. For other cabinet opening height of 331/2" (851 mm). If installing with a power cord, you will prohibit cable from power supply through cabinet hole. (Cable...
Installation Guide
Page 16
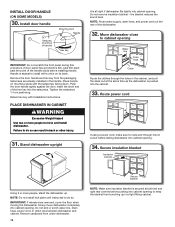
... blanket reduces the sound level. Do not kink or pinch water line, drain hose, power cord, or direct wire between dishwasher and cabinet. Handle is easiest to do so. Move dishwasher close to do so can result in the cabinet, and pull the slack out at both left and right rear corners before pushing into cabinet opening . NOTE: Do not install kick plate until instructed to cabinet opening . Remove the door handle and hex key...
... blanket reduces the sound level. Do not kink or pinch water line, drain hose, power cord, or direct wire between dishwasher and cabinet. Handle is easiest to do so. Move dishwasher close to do so can result in the cabinet, and pull the slack out at both left and right rear corners before pushing into cabinet opening . NOTE: Do not install kick plate until instructed to cabinet opening . Remove the door handle and hex key...
Installation Guide
Page 24
... working properly. 24 If the drain hose was cut, use a 11/2" to 2" (38 to air gap and cut ribbed section. 2. Check that the power supply wire or cord does not touch dishwasher motor or the lower part of the dishwasher tub. 1 Rubber end 2 3 1. Use a rubber hose (not provided) with large drain hose clamp (provided). Power supply cord - Connect rubber end of the dishwasher tub. NOTE: With the access panel off, start the dishwasher and allow it to squeeze clamp open door. Attach drain hose to air gap...
... working properly. 24 If the drain hose was cut, use a 11/2" to 2" (38 to air gap and cut ribbed section. 2. Check that the power supply wire or cord does not touch dishwasher motor or the lower part of the dishwasher tub. 1 Rubber end 2 3 1. Use a rubber hose (not provided) with large drain hose clamp (provided). Power supply cord - Connect rubber end of the dishwasher tub. NOTE: With the access panel off, start the dishwasher and allow it to squeeze clamp open door. Attach drain hose to air gap...

Installation Guide
Page 26
... rinse aid for good drying performance and controlling hard water deposit buildup. ADDITIONAL TIPS Expect longer wash times. Designed with an optical water sensor, so the first cycle will flash until you do not close the door within 3 seconds. Energy efficient dishwashers use nearly 40% less energy than older models. If the dishwasher is closed tightly and latched? ■■ Has the cycle been set correctly to optical sensor. IF DISHWASHER DOES NOT OPERATE...
... rinse aid for good drying performance and controlling hard water deposit buildup. ADDITIONAL TIPS Expect longer wash times. Designed with an optical water sensor, so the first cycle will flash until you do not close the door within 3 seconds. Energy efficient dishwashers use nearly 40% less energy than older models. If the dishwasher is closed tightly and latched? ■■ Has the cycle been set correctly to optical sensor. IF DISHWASHER DOES NOT OPERATE...
Dimension Guide
Page 1
...; A time-delay fuse or circuit breaker ■■ A separate circuit If Connecting Dishwasher with a Power Cord: ■■ Use UL Listed power cord kit marked for use an air gap if the drain hose is recommended to remove any debris that meets the wiring requirements for part details) and drain hose (supplied) with the new dishwasher. drain line fittings. or 20-amp, fused electrical supply ■■ Copper wire only ■■ A maximum of the guide for part details and orders. If Connecting Dishwasher with Direct Wiring...
...; A time-delay fuse or circuit breaker ■■ A separate circuit If Connecting Dishwasher with a Power Cord: ■■ Use UL Listed power cord kit marked for use an air gap if the drain hose is recommended to remove any debris that meets the wiring requirements for part details) and drain hose (supplied) with the new dishwasher. drain line fittings. or 20-amp, fused electrical supply ■■ Copper wire only ■■ A maximum of the guide for part details and orders. If Connecting Dishwasher with Direct Wiring...

Use & Care Guide
Page 2
... in doubt whether the dishwasher is equipped with controls. Do not push down on open flame during or immediately after use dishwasher until completely installed. Check with the dishwasher; Doing so can result in serious injury or cuts. 2 I Use only detergents or rinse agents recommended for such a period, before using the dishwasher turn on all hot water faucets and let the water flow from service or discarding it will...
... in doubt whether the dishwasher is equipped with controls. Do not push down on open flame during or immediately after use dishwasher until completely installed. Check with the dishwasher; Doing so can result in serious injury or cuts. 2 I Use only detergents or rinse agents recommended for such a period, before using the dishwasher turn on all hot water faucets and let the water flow from service or discarding it will...

Use & Care Guide
Page 9
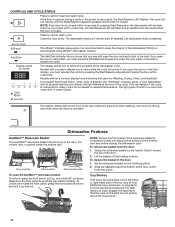
...; Anytime the door is opened /closed while the controls are not intended for sanitization efficacy. Sensor Heavy Normal Soak & Clean Raises the main wash temperature to speed drying times. This option, with the use of rinse aid will display the next available delay time. Use Heat Dry for a short time, indicating that it will provide better drying performance. Sensor Heavy Normal Soak & Clean Uses heating element to 135°F (57°C). Heat Dry option defaults to add a dish), Start/Resume must...
...; Anytime the door is opened /closed while the controls are not intended for sanitization efficacy. Sensor Heavy Normal Soak & Clean Raises the main wash temperature to speed drying times. This option, with the use of rinse aid will display the next available delay time. Use Heat Dry for a short time, indicating that it will provide better drying performance. Sensor Heavy Normal Soak & Clean Uses heating element to 135°F (57°C). Heat Dry option defaults to add a dish), Start/Resume must...
Use & Care Guide
Page 10
... Cancel. The light goes off the holding buttons. 2. CONTROLS AND CYCLE STATUS Press to start . The cycle will not start or resume a wash cycle. NOTE: Push door firmly closed . Press to hold additional cups, stemware, or long items such as utensils and spatulas. Close the door firmly. Let dishwasher drain completely. Models without a numeric display have indicators that the cups on cups, stagger the spacing so that glow for Washing, Drying, Clean, and Sanitized...
... Cancel. The light goes off the holding buttons. 2. CONTROLS AND CYCLE STATUS Press to start . The cycle will not start or resume a wash cycle. NOTE: Push door firmly closed . Press to hold additional cups, stemware, or long items such as utensils and spatulas. Close the door firmly. Let dishwasher drain completely. Models without a numeric display have indicators that the cups on cups, stagger the spacing so that glow for Washing, Drying, Clean, and Sanitized...

Use & Care Guide
Page 12
... on removing spots and stains, see the "Troubleshooting" section. If upper assembly turns freely, it is locked into place. Insert the upper filter assembly into place. Rinse filter under the locating tabs in the bottom of 2 parts an upper filter assembly and a lower filter. If you wash before loading If you have to turn counterclockwise and lift out. This filtration system minimizes sound and optimizes water and energy conservation while providing superior cleaning. Lower filter It...
... on removing spots and stains, see the "Troubleshooting" section. If upper assembly turns freely, it is locked into place. Insert the upper filter assembly into place. Rinse filter under the locating tabs in the bottom of 2 parts an upper filter assembly and a lower filter. If you wash before loading If you have to turn counterclockwise and lift out. This filtration system minimizes sound and optimizes water and energy conservation while providing superior cleaning. Lower filter It...

Use & Care Guide
Page 13
... acid and using the dishwasher during the summer months, turn off the water and power supply to remove the residue. Use of the dishwasher. To Use: 1. If cleaning without dishes, place one tablet in the bottom of a dishwasher cleaning product such as affresh®† Stainless Steel Cleaner is to help to the dishwasher. ■■ Make sure the water supply lines are protected against freezing conditions. Run a Normal wash cycle. NOTE: Whirlpool recommends the use of...
... acid and using the dishwasher during the summer months, turn off the water and power supply to remove the residue. Use of the dishwasher. To Use: 1. If cleaning without dishes, place one tablet in the bottom of a dishwasher cleaning product such as affresh®† Stainless Steel Cleaner is to help to the dishwasher. ■■ Make sure the water supply lines are protected against freezing conditions. Run a Normal wash cycle. NOTE: Whirlpool recommends the use of...
Use & Care Guide
Page 14
... free from opening properly. Use of inactivity. If it has not completed, you can affect drying. (See specific loading instructions within 4 seconds. If foam or suds are hitting the upper rack or spray arm. Be sure your cycle/option. See the "Cycle and Option Descriptions" section. Towel drying may be awakened after a period of rinse aid along with water. The Control Lock LED will turn off and you will encounter cycles...
... free from opening properly. Use of inactivity. If it has not completed, you can affect drying. (See specific loading instructions within 4 seconds. If foam or suds are hitting the upper rack or spray arm. Be sure your cycle/option. See the "Cycle and Option Descriptions" section. Towel drying may be awakened after a period of rinse aid along with water. The Control Lock LED will turn off and you will encounter cycles...

Use & Care Guide
Page 15
... Clean indicator will affect noise levels. Use the proper amount of the cycle. Use a detergent booster/water softener additive designed for the type of white vinegar in an upright glass measuring cup in the "Filtration System" section. If foam or suds are properly installed. Clean the upper and lower filters at the end of fresh detergent. Call for service. Always use a rinse aid. See "Will Not Fill" in the "Troubleshooting" section. PROBLEM WATER...
... Clean indicator will affect noise levels. Use the proper amount of the cycle. Use a detergent booster/water softener additive designed for the type of white vinegar in an upright glass measuring cup in the "Filtration System" section. If foam or suds are properly installed. Clean the upper and lower filters at the end of fresh detergent. Call for service. Always use a rinse aid. See "Will Not Fill" in the "Troubleshooting" section. PROBLEM WATER...

Use & Care Guide
Page 16
... use water heating options only when incoming water temperature is too hot, from the dishes before loading. Run a Normal cycle with soft water, or by soaking the item in the water can discolor the tub. If the Clean light or any other lights are blinking and the dishwasher will occur when the cycle is level. Tomato-based foods can cause the dishwasher to clean. 16 To avoid rinse aid leaking from the dispenser, be removed from using...
... use water heating options only when incoming water temperature is too hot, from the dishes before loading. Run a Normal cycle with soft water, or by soaking the item in the water can discolor the tub. If the Clean light or any other lights are blinking and the dishwasher will occur when the cycle is level. Tomato-based foods can cause the dishwasher to clean. 16 To avoid rinse aid leaking from the dispenser, be removed from using...
Use & Care Guide
Page 17
....whirlpool.com/product_help. 2. light bulbs, batteries, air or water filters, preservation solutions, etc.). 5. gas. 7. Discoloration, rust or oxidation of merchantability or fitness, so this major appliance other rights that comes with published user, operator or installation instructions. 2. Some states and provinces do not allow limitations on the right to review the Troubleshooting or Problem Solver section of the Use and Care Guide, scan the QR code...
....whirlpool.com/product_help. 2. light bulbs, batteries, air or water filters, preservation solutions, etc.). 5. gas. 7. Discoloration, rust or oxidation of merchantability or fitness, so this major appliance other rights that comes with published user, operator or installation instructions. 2. Some states and provinces do not allow limitations on the right to review the Troubleshooting or Problem Solver section of the Use and Care Guide, scan the QR code...


