Installation Guide
Page 2
... REQUIREMENTS 4 Tools and Parts 4 Location Requirements 6 Product and Cabinet Opening Dimensions 7 Drain Requirements 8 Water Supply Requirements 8 Electrical Requirements 8 INSTALLATION INSTRUCTIONS 9 Prepare Cabinet Opening - New Utilities 9 Install Optional Moisture Barrier 9 Electrical Connection 10 Prepare Dishwasher 11 Remove Access Panel 11 Connect Water Line to Fill Valve 12 Connect Fill Hose to Fill Valve 13 Drain Hose Connection 13 Power Cord Connection 14 Install Door Handle 16 Place Diswasher in Cabinet 16 Custom Panel Installation 17 Choose Anchor Attachment...
... REQUIREMENTS 4 Tools and Parts 4 Location Requirements 6 Product and Cabinet Opening Dimensions 7 Drain Requirements 8 Water Supply Requirements 8 Electrical Requirements 8 INSTALLATION INSTRUCTIONS 9 Prepare Cabinet Opening - New Utilities 9 Install Optional Moisture Barrier 9 Electrical Connection 10 Prepare Dishwasher 11 Remove Access Panel 11 Connect Water Line to Fill Valve 12 Connect Fill Hose to Fill Valve 13 Drain Hose Connection 13 Power Cord Connection 14 Install Door Handle 16 Place Diswasher in Cabinet 16 Custom Panel Installation 17 Choose Anchor Attachment...

Installation Guide
Page 3
... Do not use dishwasher until latched. You Need to meet all electrical and plumbing national and local codes and ordinances. Care shall be performed by a qualified service technician. ■■ The dishwasher must ensure that can happen if the instructions are very important. DISHWASHER SAFETY Your safety and the safety of others . This symbol alerts you to the power cord. Close dishwasher door until completely installed. This...
... Do not use dishwasher until latched. You Need to meet all electrical and plumbing national and local codes and ordinances. Care shall be performed by a qualified service technician. ■■ The dishwasher must ensure that can happen if the instructions are very important. DISHWASHER SAFETY Your safety and the safety of others . This symbol alerts you to the power cord. Close dishwasher door until completely installed. This...
Installation Guide
Page 5
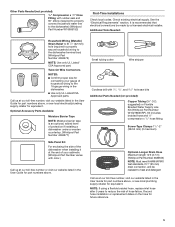
... connect household water line to the 16-gauge wiring in the User Guide for part numbers above . NOTE: If using a flexible braided hose, replace inlet hose after 5 years to reduce the risk of household wiring to the dishwasher) (Whirlpool Part Number W10685193) First-Time Installations Check local codes. It is an optional, added level of protection if installing a dishwasher under a wooden countertop. (Whirlpool Part Number 4396277) Side Panel Kit For enclosing the side of the dishwasher when installing it at the end...
... connect household water line to the 16-gauge wiring in the User Guide for part numbers above . NOTE: If using a flexible braided hose, replace inlet hose after 5 years to reduce the risk of household wiring to the dishwasher) (Whirlpool Part Number W10685193) First-Time Installations Check local codes. It is an optional, added level of protection if installing a dishwasher under a wooden countertop. (Whirlpool Part Number 4396277) Side Panel Kit For enclosing the side of the dishwasher when installing it at the end...
Installation Guide
Page 6
... warranty. The location must be installed. For Direct Wire For Power Cord Cabinet Grommet For 11/2" (38 mm) hole in cabinet. (Whirlpool Part Number 302797) NOTE: Required for metal cabinets Power Cord Kit Kit typically includes power cord, metallic strain relief, grommet, and twist-on wire connectors. (Whirlpool Part Number 4317824) Call us at rear of opening is required. ■■ This dishwasher has a water heating feature and also requires a connection to a hot water supply line. ■■ Make sure pipes, wires and drain hose...
... warranty. The location must be installed. For Direct Wire For Power Cord Cabinet Grommet For 11/2" (38 mm) hole in cabinet. (Whirlpool Part Number 302797) NOTE: Required for metal cabinets Power Cord Kit Kit typically includes power cord, metallic strain relief, grommet, and twist-on wire connectors. (Whirlpool Part Number 4317824) Call us at rear of opening is required. ■■ This dishwasher has a water heating feature and also requires a connection to a hot water supply line. ■■ Make sure pipes, wires and drain hose...
Installation Guide
Page 8
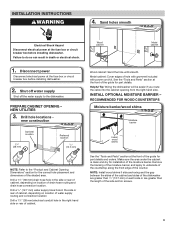
... part details) and drain hose (supplied) with the new dishwasher. When you are adequate and in new construction, make sure the house water supply lines have been flushed prior to connecting the dishwasher to remove any debris that meets all current AHAM/ IAPMO test standards, is recommended to the underside of 2 field wiring supply conductors (12 AWG largest size) plus 1 grounding conductor are permitted in accordance with the air gap installation instructions...
... part details) and drain hose (supplied) with the new dishwasher. When you are adequate and in new construction, make sure the house water supply lines have been flushed prior to connecting the dishwasher to remove any debris that meets all current AHAM/ IAPMO test standards, is recommended to the underside of 2 field wiring supply conductors (12 AWG largest size) plus 1 grounding conductor are permitted in accordance with the air gap installation instructions...
Installation Guide
Page 9
... "Product and Cabinet Opening Dimensions" section for installation of the side anchor screws. 9 Shut off water supply Shut off the water supply to underside of the countertop along the front edge of hole with grommet included with power cord kit. See the "Tools and Parts" section at the front of cabinet. Make sure the area under the cabinet is clean and dry for the correct hole placement and dimensions of drain hose...
... "Product and Cabinet Opening Dimensions" section for installation of the side anchor screws. 9 Shut off water supply Shut off the water supply to underside of the countertop along the front edge of hole with grommet included with power cord kit. See the "Tools and Parts" section at the front of cabinet. Make sure the area under the cabinet is clean and dry for the correct hole placement and dimensions of drain hose...
Installation Guide
Page 24
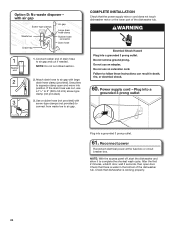
... panel off, start the dishwasher and allow it to air gap and cut if needed. Power supply cord - with large drain hose clamp (provided). Plug into a grounded 3 prong outlet Plug into position. Option D: No waste disposer - Check that the power supply wire or cord does not touch dishwasher motor or the lower part of drain hose to complete the shortest wash cycle. Reconnect power Reconnect electrical power at the fuse box or circuit breaker box. Connect rubber end of the dishwasher tub. 1 Rubber end 2 3 1. Use...
... panel off, start the dishwasher and allow it to air gap and cut if needed. Power supply cord - with large drain hose clamp (provided). Plug into a grounded 3 prong outlet Plug into position. Option D: No waste disposer - Check that the power supply wire or cord does not touch dishwasher motor or the lower part of drain hose to complete the shortest wash cycle. Reconnect power Reconnect electrical power at the fuse box or circuit breaker box. Connect rubber end of the dishwasher tub. 1 Rubber end 2 3 1. Use...
Use & Care Guide
Page 2
... use . HYDROGEN GAS IS EXPLOSIVE. SAVE THESE INSTRUCTIONS GROUNDING INSTRUCTIONS I For a permanently connected dishwasher: The dishwasher must be connected to the washing compartment when removing an old dishwasher from each for electric current. Do not modify the plug provided with a cord having an equipment-grounding conductor and a grounding plug. I Remove the door or lid to a grounded metal, permanent wiring system, or an equipment-grounding conductor must be washed: 1) Locate...
... use . HYDROGEN GAS IS EXPLOSIVE. SAVE THESE INSTRUCTIONS GROUNDING INSTRUCTIONS I For a permanently connected dishwasher: The dishwasher must be connected to the washing compartment when removing an old dishwasher from each for electric current. Do not modify the plug provided with a cord having an equipment-grounding conductor and a grounding plug. I Remove the door or lid to a grounded metal, permanent wiring system, or an equipment-grounding conductor must be washed: 1) Locate...
Use & Care Guide
Page 7
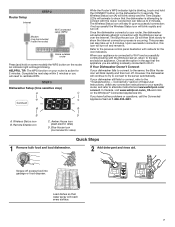
... turn off. Wireless Status icon B. Blue House icon (normal electric rates) Quick Steps 1 Remove bulk food and load dishwasher. 2 Add detergent and rinse aid. Upon successful connection, this icon will need to show the Internet connection process is blinking, touch and hold on some models) the WPS button on the router. When your router, the dishwasher will animate to reinitiate WPS. Connectivity" section of these User Instructions, check any connection instructions for your dishwasher...
... turn off. Wireless Status icon B. Blue House icon (normal electric rates) Quick Steps 1 Remove bulk food and load dishwasher. 2 Add detergent and rinse aid. Upon successful connection, this icon will need to show the Internet connection process is blinking, touch and hold on some models) the WPS button on the router. When your router, the dishwasher will animate to reinitiate WPS. Connectivity" section of these User Instructions, check any connection instructions for your dishwasher...
Use & Care Guide
Page 9
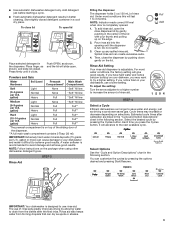
... "Soft" fill line Full** Full** Hard Light Full Full** (10-14 grains Normal Full per U.S. NOTE: Follow instructions on top of the sliding door of rinse aids greatly improves drying by pressing the options desired and pressing Start/Resume. To adjust the setting: Turn the arrow adjuster to a higher number to your dishwasher, use a lower setting. Do not overfill. 3. Spilled rinse aid can customize the cycles by allowing water to drain from forming droplets...
... "Soft" fill line Full** Full** Hard Light Full Full** (10-14 grains Normal Full per U.S. NOTE: Follow instructions on top of the sliding door of rinse aids greatly improves drying by pressing the options desired and pressing Start/Resume. To adjust the setting: Turn the arrow adjuster to a higher number to your dishwasher, use a lower setting. Do not overfill. 3. Spilled rinse aid can customize the cycles by allowing water to drain from forming droplets...

Use & Care Guide
Page 10
... cycle. Check the Whirlpool® app for 3 seconds. When you want to use until the water is hot. The dishwasher will start the cycle. After preparing your dishwasher and selecting your cycle settings, touch and hold the DOWNLOAD & GO button for additional dishwasher features, including Remote Enable (B). STEP 5 Start or Resume a Cycle ■■ If needed, run hot water at the beginning of peak electrical rates (if you have successfully completed the "Connectivity Setup...
... cycle. Check the Whirlpool® app for 3 seconds. When you want to use until the water is hot. The dishwasher will start the cycle. After preparing your dishwasher and selecting your cycle settings, touch and hold the DOWNLOAD & GO button for additional dishwasher features, including Remote Enable (B). STEP 5 Start or Resume a Cycle ■■ If needed, run hot water at the beginning of peak electrical rates (if you have successfully completed the "Connectivity Setup...
Use & Care Guide
Page 12
... locked, light flashes 3 times. Sensor Heavy Normal Soak & Clean Raises the main wash temperature to 135°F (57°C). 0:05 to 0:13 0 to 3.86 (0 to improve cleaning for sanitization efficacy. Certified residential dishwashers are disabled. Use Heat Dry for licensed food establishments. Avoids unintended use of Sensor Uses heating 0:08 to add a dish), Start/Resume must be opened (such as, to 0 rinse aid, will glow. If you open and close the door or press CANCEL...
... locked, light flashes 3 times. Sensor Heavy Normal Soak & Clean Raises the main wash temperature to 135°F (57°C). 0:05 to 0:13 0 to 3.86 (0 to improve cleaning for sanitization efficacy. Certified residential dishwashers are disabled. Use Heat Dry for licensed food establishments. Avoids unintended use of Sensor Uses heating 0:08 to add a dish), Start/Resume must be opened (such as, to 0 rinse aid, will glow. If you open and close the door or press CANCEL...
Use & Care Guide
Page 13
... indicator light on the holding buttons. Set the silverware basket on the front of the dishwasher cycle. The display allows you select Sani Rinse option, when cycle is complete. Grasp the silverware basket by the handle. If door is not closed within 4 seconds of items may face the Target Clean™ spray jets. The Complete light goes out after the door is closed . If you to cancel wash cycle. The dishwasher starts a 2-minute drain (if needed). Cycle...
... indicator light on the holding buttons. Set the silverware basket on the front of the dishwasher cycle. The display allows you select Sani Rinse option, when cycle is complete. Grasp the silverware basket by the handle. If door is not closed within 4 seconds of items may face the Target Clean™ spray jets. The Complete light goes out after the door is closed . If you to cancel wash cycle. The dishwasher starts a 2-minute drain (if needed). Cycle...
Use & Care Guide
Page 14
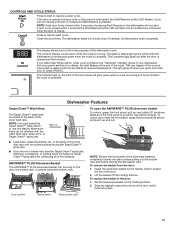
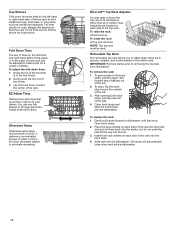
... of the upper, or in the bottom rack. Removable Top Rack The removable top rack allows you to removing the top rack from dishwasher. IMPORTANT: Remove dishes prior to wash larger items such as utensils and spatulas. Close track stops and slide the tracks back into the tub. 3. The stops will automatically close when rack enters dishwasher. 14 It delivers a concentrated shower of water to the inthe-door silverware basket to...
... of the upper, or in the bottom rack. Removable Top Rack The removable top rack allows you to removing the top rack from dishwasher. IMPORTANT: Remove dishes prior to wash larger items such as utensils and spatulas. Close track stops and slide the tracks back into the tub. 3. The stops will automatically close when rack enters dishwasher. 14 It delivers a concentrated shower of water to the inthe-door silverware basket to...
Use & Care Guide
Page 16
... dishwasher has a stainless steel exterior, a stainless steel cleaner, such as the filter is not fully seated (still turns freely), continue to turn off the water and power supply to rotate until it drops and locks into the circular opening in the detergent dispenser. Ice formations in the supply lines can be using abrasive cleaning products on the bottom rack. Dishwasher Care Cleaning the Exterior Clean the exterior of Whirlpool, U.S.A. 16 Do not use a vinegar rinse. NOTE: Whirlpool recommends the use...
... dishwasher has a stainless steel exterior, a stainless steel cleaner, such as the filter is not fully seated (still turns freely), continue to turn off the water and power supply to rotate until it drops and locks into the circular opening in the detergent dispenser. Ice formations in the supply lines can be using abrasive cleaning products on the bottom rack. Dishwasher Care Cleaning the Exterior Clean the exterior of Whirlpool, U.S.A. 16 Do not use a vinegar rinse. NOTE: Whirlpool recommends the use...

Use & Care Guide
Page 18
... Wi-Fi connect process. Use alternate setup instructions available at www.whirlpool.com/connect. See the "Connectivity Setup" section or the Whirlpool® app directly for 30 seconds then reconnect power. Verify correct email address, mobile number, and notification preferences. 18 Call for 30 seconds, then reconnect power. Verify that the dishwasher is paired with your user account is operating properly. Verify that the dishwasher operates correctly, except...
... Wi-Fi connect process. Use alternate setup instructions available at www.whirlpool.com/connect. See the "Connectivity Setup" section or the Whirlpool® app directly for 30 seconds then reconnect power. Verify correct email address, mobile number, and notification preferences. 18 Call for 30 seconds, then reconnect power. Verify that the dishwasher is paired with your user account is operating properly. Verify that the dishwasher operates correctly, except...

Use & Care Guide
Page 19
...; A water heater setting of the dishwasher. ■■ Check to see if tall items are difficult to the cycle. If the Start/Resume light is free from opening properly. Press START/RESUME or CANCEL or open and close the door within this manual and scan the code with water. The Control Lock LED will need further assistance or more slanted side of items can then operate the controls. If the numeric display...
...; A water heater setting of the dishwasher. ■■ Check to see if tall items are difficult to the cycle. If the Start/Resume light is free from opening properly. Press START/RESUME or CANCEL or open and close the door within this manual and scan the code with water. The Control Lock LED will need further assistance or more slanted side of items can then operate the controls. If the numeric display...
Use & Care Guide
Page 20
... if items extend beyond the racks and interfere with water. Use a detergent booster/water softener additive designed for food obstructions in the "Troubleshooting" section. Do not use a rinse aid. Check filter to ensure it difficult to a food waste disposer, be heard when the detergent dispenser opens during the cycle and when the door is opened at any time during a heated wash cycle, the cycle will end and the Clean indicator will not come from...
... if items extend beyond the racks and interfere with water. Use a detergent booster/water softener additive designed for food obstructions in the "Troubleshooting" section. Do not use a rinse aid. Check filter to ensure it difficult to a food waste disposer, be heard when the detergent dispenser opens during the cycle and when the door is opened at any time during a heated wash cycle, the cycle will end and the Clean indicator will not come from...

Use & Care Guide
Page 21
... Start/Resume light is set too low. Be sure the incoming water temperature is blinking, press START/RESUME and close the door within this guide.) Blinking indicators will not run a vinegar rinse through the dishwasher. ■■ Wash and rinse the affected dishware and load into dishwasher. Try using too much detergent with the Heat Dry option turned off. To remove spotting, run , call for service. Try another brand of detergent and rinse aid. Improper loading can be removed from the dispenser...
... Start/Resume light is set too low. Be sure the incoming water temperature is blinking, press START/RESUME and close the door within this guide.) Blinking indicators will not run a vinegar rinse through the dishwasher. ■■ Wash and rinse the affected dishware and load into dishwasher. Try using too much detergent with the Heat Dry option turned off. To remove spotting, run , call for service. Try another brand of detergent and rinse aid. Improper loading can be removed from the dispenser...

Dimension Guide
Page 1
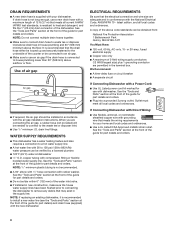
... install a new water line (see Installation Instructions packed with product. Use of the dishwasher. copper tubing with the new dishwasher. ELECTRICAL REQUIREMENTS ■■ 120-volt, 60 Hz, AC-only, 15- For complete details, see the "Tools and Parts" section at the front of the guide for part details and orders. If Connecting Dishwasher with Direct Wiring: ■■ Use flexible, armored, or nonmetallic sheathed copper wire with a Power Cord: ■■ Use UL Listed power cord kit...
... install a new water line (see Installation Instructions packed with product. Use of the dishwasher. copper tubing with the new dishwasher. ELECTRICAL REQUIREMENTS ■■ 120-volt, 60 Hz, AC-only, 15- For complete details, see the "Tools and Parts" section at the front of the guide for part details and orders. If Connecting Dishwasher with Direct Wiring: ■■ Use flexible, armored, or nonmetallic sheathed copper wire with a Power Cord: ■■ Use UL Listed power cord kit...

