Owners Manual
Page 4
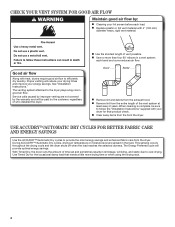
... fabric care from the exhaust hood. Use Timed Dry for final product check. See "Installation Instructions." This sensing occurs throughout the drying cycle and the dryer shuts off when the load reaches the selected dryness. With Timed Dry, the dryer runs the amount of time set and sometimes results in shrinkage, wrinkling, and static due to the dryer plays a big role in good air flow. When cleaning is complete, be paid by : n Cleaning your lint screen before...
... fabric care from the exhaust hood. Use Timed Dry for final product check. See "Installation Instructions." This sensing occurs throughout the drying cycle and the dryer shuts off when the load reaches the selected dryness. With Timed Dry, the dryer runs the amount of time set and sometimes results in shrinkage, wrinkling, and static due to the dryer plays a big role in good air flow. When cleaning is complete, be paid by : n Cleaning your lint screen before...
Owners Manual
Page 5
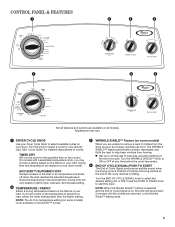
... of heat-free, periodic tumbling at the end of clothes from forming. ACCUDRY™/AUTOMATIC DRY Senses moisture in the shortest time. NOTE: The Air Only temperature setting (on some models) When you may vary. 1 DRYER CYCLE KNOB Use your dryer. n Get up to remove a load of the cycle reduces wrinkling. CONTROL PANEL & FEATURES 1 2 3 4 TIMED DRY 50 40 Damp Dry Tumble Press 20 60 70 Heavy Dry Cool Down OFF ACCUDRY sensor dryer Jeans Very Dry ENERGY PREFERRED...
... of heat-free, periodic tumbling at the end of clothes from forming. ACCUDRY™/AUTOMATIC DRY Senses moisture in the shortest time. NOTE: The Air Only temperature setting (on some models) When you may vary. 1 DRYER CYCLE KNOB Use your dryer. n Get up to remove a load of the cycle reduces wrinkling. CONTROL PANEL & FEATURES 1 2 3 4 TIMED DRY 50 40 Damp Dry Tumble Press 20 60 70 Heavy Dry Cool Down OFF ACCUDRY sensor dryer Jeans Very Dry ENERGY PREFERRED...
Owners Manual
Page 6
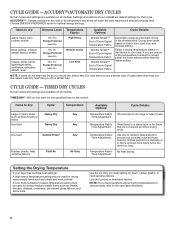
... long. Settings and options shown in your dryer has multiple heat settings: A High heavy temperature setting may be used for various loads, refer to Medium Casual temperature setting may be used for items that cycle. TIMED DRY CYCLES Not all cycles and settings are available on fabric type, load size, and dryness setting. Drying time varies based on all models. If loads seem drier than the higher setting. A Low Knits to the care label directions. 6 CYCLE GUIDE - Senses moisture in the shortest time. TIMED DRY - Temperature...
... long. Settings and options shown in your dryer has multiple heat settings: A High heavy temperature setting may be used for various loads, refer to Medium Casual temperature setting may be used for items that cycle. TIMED DRY CYCLES Not all cycles and settings are available on fabric type, load size, and dryness setting. Drying time varies based on all models. If loads seem drier than the higher setting. A Low Knits to the care label directions. 6 CYCLE GUIDE - Senses moisture in the shortest time. TIMED DRY - Temperature...

Owners Manual
Page 9
... lint screen firmly back into the dryer during removal, check the exhaust hood and remove the lint. Thoroughly dry lint screen with hot water. 3. Do not rinse or wash screen to avoid drum staining. This includes clearing piles of laundry in dryer. 9 Wet both the dryer and fabrics. NOTE: Garments that would block the air flow for your clothes, or cause the dryer to stop before your load is completely dry. Cleaning the lint screen Every load cleaning The lint screen...
... lint screen firmly back into the dryer during removal, check the exhaust hood and remove the lint. Thoroughly dry lint screen with hot water. 3. Do not rinse or wash screen to avoid drum staining. This includes clearing piles of laundry in dryer. 9 Wet both the dryer and fabrics. NOTE: Garments that would block the air flow for your clothes, or cause the dryer to stop before your load is completely dry. Cleaning the lint screen Every load cleaning The lint screen...

Owners Manual
Page 10
... are secure in dryer base. 4. Unplug the power supply cord. 2. Use tape to locate, level, and connect the dryer. 10 Changing the drum light (on vacation or not using your dryer only when you should: 1. Unplug dryer or disconnect power. 2. Open the dryer door. Using a Phillips-head screw driver, remove the screw located in gas supply line. 3. Remove the cover. 3. Replace the cover and secure with a 10-watt appliance bulb only. For direct-wired dryers: 1. Turn off valve to gas supply line. 3. Make sure leveling...
... are secure in dryer base. 4. Unplug the power supply cord. 2. Use tape to locate, level, and connect the dryer. 10 Changing the drum light (on vacation or not using your dryer only when you should: 1. Unplug dryer or disconnect power. 2. Open the dryer door. Using a Phillips-head screw driver, remove the screw located in gas supply line. 3. Remove the cover. 3. Replace the cover and secure with a 10-watt appliance bulb only. For direct-wired dryers: 1. Turn off valve to gas supply line. 3. Make sure leveling...
Owners Manual
Page 11
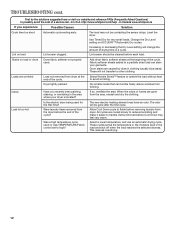
... many turns. Electric dryers require 240-volt power supply. The drum may be cleaned before laundering. Replace both fuses or reset the circuit breaker. Lint screen should be turning, but you may not have heat. See "Cycle Guide." Run the dryer for awhile, there may be turning, but you may not have ventilation openings at the top and bottom of the door. Check with a qualified electrician. Check that the exhaust vent is the valve open . In Canada www.whirlpool.ca...
... many turns. Electric dryers require 240-volt power supply. The drum may be cleaned before laundering. Replace both fuses or reset the circuit breaker. Lint screen should be turning, but you may not have heat. See "Cycle Guide." Run the dryer for awhile, there may be turning, but you may not have ventilation openings at the top and bottom of the door. Check with a qualified electrician. Check that the exhaust vent is the valve open . In Canada www.whirlpool.ca...
Owners Manual
Page 12
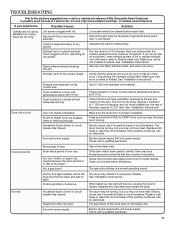
... will be contacting the sensor strips. Allow Cool Down cycle to finish before removing laundry from the dryer before the end of drying time in the area where your garments. http://www.whirlpool.com/help - Change the Dry Level setting on load Lint screen clogged. Items removed before each load. Dry smaller loads that can stain your dryer is too hot Is the electric dryer being used . In Canada www.whirlpool.ca If you...
... will be contacting the sensor strips. Allow Cool Down cycle to finish before removing laundry from the dryer before the end of drying time in the area where your garments. http://www.whirlpool.com/help - Change the Dry Level setting on load Lint screen clogged. Items removed before each load. Dry smaller loads that can stain your dryer is too hot Is the electric dryer being used . In Canada www.whirlpool.ca If you...
Owners Manual
Page 13
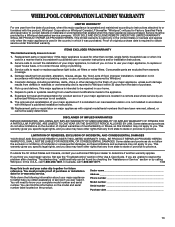
... correct the installation of your major appliance, to instruct you need repair service, first see the "Troubleshooting" section of the Use & Care Guide. You can be easily determined. YOUR SOLE AND EXCLUSIVE REMEDY UNDER THIS LIMITED WARRANTY SHALL BE PRODUCT REPAIR AS PROVIDED HEREIN. Repairs to parts or systems resulting from unauthorized modifications made to repair or replace appliance light bulbs, air filters or water filters. WHIRLPOOL CORPORATION LAUNDRY WARRANTY LIMITED WARRANTY For one...
... correct the installation of your major appliance, to instruct you need repair service, first see the "Troubleshooting" section of the Use & Care Guide. You can be easily determined. YOUR SOLE AND EXCLUSIVE REMEDY UNDER THIS LIMITED WARRANTY SHALL BE PRODUCT REPAIR AS PROVIDED HEREIN. Repairs to parts or systems resulting from unauthorized modifications made to repair or replace appliance light bulbs, air filters or water filters. WHIRLPOOL CORPORATION LAUNDRY WARRANTY LIMITED WARRANTY For one...
Dimension Guide
Page 1
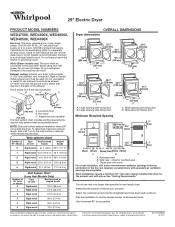
.... (6.4 m) Vent System Chart (Long Vent Models Only) Number of 90° turns or elbows Type of the line. Large opening side-swing door D. Wide opening side-swing door C. Determine the number of elbows you will help achieve best drying performance. Ref. W10096987 02/2011 A timedelay fuse or circuit breaker is required. Water (Steam models only): The dryer must be used. Wide opening side-swing door B. Closet door with vents For closet installation, with equivalent air ventilation openings are for the exhaust vent...
.... (6.4 m) Vent System Chart (Long Vent Models Only) Number of 90° turns or elbows Type of the line. Large opening side-swing door D. Wide opening side-swing door C. Determine the number of elbows you will help achieve best drying performance. Ref. W10096987 02/2011 A timedelay fuse or circuit breaker is required. Water (Steam models only): The dryer must be used. Wide opening side-swing door B. Closet door with vents For closet installation, with equivalent air ventilation openings are for the exhaust vent...
Installation Instructions
Page 2
...safety messages. All safety messages will follow instructions. Tools needed: Flat-blade screwdriver 2 #2 Phillips screwdriver Wire stripper (direct wire installations) Tin snips (new vent installations) This symbol alerts you to reduce the... many important safety messages in this manual and on your appliance. INSTALLATION REQUIREMENTS Tools and Parts Gather the required tools and parts before starting installation. Read and follow instructions. DRYER SAFETY Your safety and the safety of...follow the instructions provided with any tools listed here. WARNING You can happen if the...
...safety messages. All safety messages will follow instructions. Tools needed: Flat-blade screwdriver 2 #2 Phillips screwdriver Wire stripper (direct wire installations) Tin snips (new vent installations) This symbol alerts you to reduce the... many important safety messages in this manual and on your appliance. INSTALLATION REQUIREMENTS Tools and Parts Gather the required tools and parts before starting installation. Read and follow instructions. DRYER SAFETY Your safety and the safety of...follow the instructions provided with any tools listed here. WARNING You can happen if the...

Installation Instructions
Page 3
... wires that opens to support the total weight (dryer and load) of an automatic cycle. You will be large enough to allow the dryer door to water and/or weather. Parts needed: Check local codes. See "Electrical Requirements." ■■ A sturdy floor to 1" (25 mm) or hex-head socket wrench Utility knife If using a power supply cord: Use a UL listed power supply cord kit marked for installing new exhaust vent) Parts supplied (all parts are using power supply cord, a grounded electrical outlet located within...
... wires that opens to support the total weight (dryer and load) of an automatic cycle. You will be large enough to allow the dryer door to water and/or weather. Parts needed: Check local codes. See "Electrical Requirements." ■■ A sturdy floor to 1" (25 mm) or hex-head socket wrench Utility knife If using a power supply cord: Use a UL listed power supply cord kit marked for installing new exhaust vent) Parts supplied (all parts are using power supply cord, a grounded electrical outlet located within...
Installation Instructions
Page 4
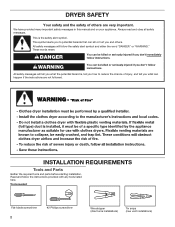
... "Venting Requirements." Recessed area B. Grounding through the neutral conductors. 4 The National Electrical Code requires a 4-wire power supply connection for homes built after 1996, dryer circuits involved in remodeling after 1996, and all sides of the dryer is recommended to reduce noise transfer. ■■ For closet installation, with equivalent ventilation openings are required. The installation must be sure that the ground path is suitable for wall, door...
... "Venting Requirements." Recessed area B. Grounding through the neutral conductors. 4 The National Electrical Code requires a 4-wire power supply connection for homes built after 1996, dryer circuits involved in remodeling after 1996, and all sides of the dryer is recommended to reduce noise transfer. ■■ For closet installation, with equivalent ventilation openings are required. The installation must be sure that the ground path is suitable for wall, door...

Installation Instructions
Page 5
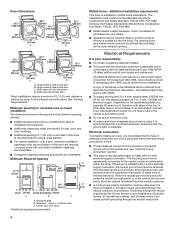
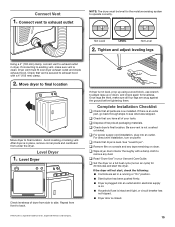
... of NEMA Type 14-30 R. Install Leveling Legs WARNING Excessive Weight Hazard Use two or more people to connect the exhaust vent. 5 Leave enough room for electrical connection and to move and install dryer. Failure to its feet. Prepare dryer for use with ring or spade terminals and UL listed strain relief. The kit should be type SRD or SRDT and be identified by direct wire: Power supply cable...
... of NEMA Type 14-30 R. Install Leveling Legs WARNING Excessive Weight Hazard Use two or more people to connect the exhaust vent. 5 Leave enough room for electrical connection and to move and install dryer. Failure to its feet. Prepare dryer for use with ring or spade terminals and UL listed strain relief. The kit should be type SRD or SRDT and be identified by direct wire: Power supply cable...

Installation Instructions
Page 7
... dryer cabinet and be in place. Connect neutral ground wire and neutral wire C B E Connect neutral ground wire (E) and neutral wire (white or center) (C) of 3-wire connections. Ring terminals 3. E Remove center, silver-colored terminal block screw (B). Tighten screw. 7 Ground prong D. Remove neutral ground wire (E) from a 3/4" (19 mm) UL listed strain relief (UL marking on the power supply cord is required for mobile homes and where local codes do not permit the use of power...
... dryer cabinet and be in place. Connect neutral ground wire and neutral wire C B E Connect neutral ground wire (E) and neutral wire (white or center) (C) of 3-wire connections. Ring terminals 3. E Remove center, silver-colored terminal block screw (B). Tighten screw. 7 Ground prong D. Remove neutral ground wire (E) from a 3/4" (19 mm) UL listed strain relief (UL marking on the power supply cord is required for mobile homes and where local codes do not permit the use of power...

Installation Instructions
Page 9
... listed strain relief (UL marking on this page. Connect wires to terminal block Put direct wire cable through the hole (B) below the terminal block opening , screw the removable conduit connector onto the strain relief threads (C). 2. For 3-wire Direct Wire Connection, see page 10. Shape ends of wire under terminal block screw, facing to strain relief (127 5" mm) Direct wire cable must have a tight fit with the dryer cabinet and be moved if needed...
... listed strain relief (UL marking on this page. Connect wires to terminal block Put direct wire cable through the hole (B) below the terminal block opening , screw the removable conduit connector onto the strain relief threads (C). 2. For 3-wire Direct Wire Connection, see page 10. Shape ends of wire under terminal block screw, facing to strain relief (127 5" mm) Direct wire cable must have a tight fit with the dryer cabinet and be moved if needed...

Installation Instructions
Page 12
... accessible to clean) ■■ Must be fully extended and supported in death or fire. Improper venting can result in final dryer location. ■■ Remove excess to woodwork, furniture, paint, wallpaper, carpets, etc. IMPORTANT: Observe all joints. ■■ Exhaust vent must not be connected into interior of duct and catch lint. NOTE: If using an existing vent system, clean lint from ground or any gas vent...
... accessible to clean) ■■ Must be fully extended and supported in death or fire. Improper venting can result in final dryer location. ■■ Remove excess to woodwork, furniture, paint, wallpaper, carpets, etc. IMPORTANT: Observe all joints. ■■ Exhaust vent must not be connected into interior of duct and catch lint. NOTE: If using an existing vent system, clean lint from ground or any gas vent...

Installation Instructions
Page 13
...'s instructions. Exhaust outlet Over-The-Top installation (also available with clamps 4396004 Dryer offset elbow 4396005 Wall offset elbow 4396006RW DuraSafe™ close clearance alternate installations are possible. Venting Kits For more information, call 1-800-807-6777 or visit us at www.whirlpoolparts.ca. A A. Rigid metal or flexible metal vent G. Refer to connect elbows H. Wall D. Elbow C. Exhaust hood C D E F G B H E. Dryer B. Part Number Descriptions 8171587RP 0-5" Metal vent...
...'s instructions. Exhaust outlet Over-The-Top installation (also available with clamps 4396004 Dryer offset elbow 4396005 Wall offset elbow 4396006RW DuraSafe™ close clearance alternate installations are possible. Venting Kits For more information, call 1-800-807-6777 or visit us at www.whirlpoolparts.ca. A A. Rigid metal or flexible metal vent G. Refer to connect elbows H. Wall D. Elbow C. Exhaust hood C D E F G B H E. Dryer B. Part Number Descriptions 8171587RP 0-5" Metal vent...

Installation Instructions
Page 14
... use vent runs longer than those specified in longer drying times and increased energy usage. Run vent to exhaust hood with 4" (102 mm) clamp. Secure vent to dryer location using elbows or making turns, allow as much room as possible. ■■ Bend vent gradually to avoid kinking. ■■ Use as few 90° turns as possible. Vent System Chart (Long Vent Models Only) Number of 90° turns or elbows Type of vent...
... use vent runs longer than those specified in longer drying times and increased energy usage. Run vent to exhaust hood with 4" (102 mm) clamp. Secure vent to dryer location using elbows or making turns, allow as much room as possible. ■■ Bend vent gradually to avoid kinking. ■■ Use as few 90° turns as possible. Vent System Chart (Long Vent Models Only) Number of 90° turns or elbows Type of vent...
Installation Instructions
Page 15
... Care Guide. q For power supply cord installation, plug into an outlet and/or electrical supply is not level, prop up or down, and check again for levelness. If connecting to final location. Move dryer to final location Move dryer to existing vent, make sure all of /recycle all parts are snug against the ground before tightening them. After dryer is clean. q Read "Dryer Use" in a running or "On" position. ■■ Start button...
... Care Guide. q For power supply cord installation, plug into an outlet and/or electrical supply is not level, prop up or down, and check again for levelness. If connecting to final location. Move dryer to final location Move dryer to existing vent, make sure all of /recycle all parts are snug against the ground before tightening them. After dryer is clean. q Read "Dryer Use" in a running or "On" position. ■■ Start button...

Warranty
Page 1
... product, Whirlpool Corporation or Whirlpool Canada LP (hereafter "Whirlpool") will need to better help can find this information on the model and serial number label located on the product. Service calls to correct the installation of incidental or consequential damages, so these limitations and exclusions may not apply to repair or replace appliance light bulbs, air filters or water filters. Replacement parts or repair labor on major appliances with Whirlpool's published installation instructions. 10...
... product, Whirlpool Corporation or Whirlpool Canada LP (hereafter "Whirlpool") will need to better help can find this information on the model and serial number label located on the product. Service calls to correct the installation of incidental or consequential damages, so these limitations and exclusions may not apply to repair or replace appliance light bulbs, air filters or water filters. Replacement parts or repair labor on major appliances with Whirlpool's published installation instructions. 10...


