

Cycle Guide
Page 1
... Low Extra Low Wrinkle Shield™ Mute Cycle Signal Uses Extra Low heat as jeans, towels or heavy work clothes. Dryer Cycle Guide WARNING WARNING Fire Hazard No washer can result in death or fire. Do not dry anything flammable on a clothesline or by using an Air Cycle. Failure to follow these instructions can completely remove oil. If there is a power failure, settings will be dried on it (including...
... Low Extra Low Wrinkle Shield™ Mute Cycle Signal Uses Extra Low heat as jeans, towels or heavy work clothes. Dryer Cycle Guide WARNING WARNING Fire Hazard No washer can result in death or fire. Do not dry anything flammable on a clothesline or by using an Air Cycle. Failure to follow these instructions can completely remove oil. If there is a power failure, settings will be dried on it (including...

Dimension Guide
Page 3
... extended) J Exhaust Duct from Side K Power Cord from Side (gas) L Power Cord Height (gas) M Gas Connection (With leveling legs not extended) N Gas Connection from Side O Strain Relief Height (elec) (With leveling legs fully extended) P Exhaust Duct Height (With leveling legs fully extended) Q Gas Connection (With leveling legs fully extended) R Exhaust Duct Height (With leveling legs not extended) S Water Inlet Height (on steam models only) T Water Inlet from Side (on steam models only) Gas Power Cord Length Power Cord Length (Canadian) in...
... extended) J Exhaust Duct from Side K Power Cord from Side (gas) L Power Cord Height (gas) M Gas Connection (With leveling legs not extended) N Gas Connection from Side O Strain Relief Height (elec) (With leveling legs fully extended) P Exhaust Duct Height (With leveling legs fully extended) Q Gas Connection (With leveling legs fully extended) R Exhaust Duct Height (With leveling legs not extended) S Water Inlet Height (on steam models only) T Water Inlet from Side (on steam models only) Gas Power Cord Length Power Cord Length (Canadian) in...
Owners Manual
Page 2
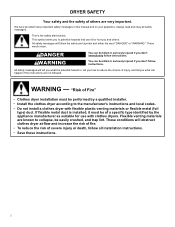
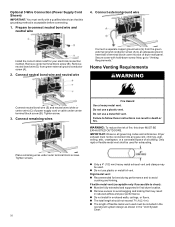
... how to the manufacturer's instructions and local codes. − Do not install a clothes dryer with clothes dryers. "Risk of Fire" − Clothes dryer installation must be performed by the appliance manufacturer as suitable for use with flexible plastic venting materials or flexible metal (foil type) duct. If flexible metal duct is installed, it must be of a specific type identified by a qualified installer. − Install the clothes dryer according to reduce the chance...
... how to the manufacturer's instructions and local codes. − Do not install a clothes dryer with clothes dryers. "Risk of Fire" − Clothes dryer installation must be performed by the appliance manufacturer as suitable for use with flexible plastic venting materials or flexible metal (foil type) duct. If flexible metal duct is installed, it must be of a specific type identified by a qualified installer. − Install the clothes dryer according to reduce the chance...
Owners Manual
Page 3
... dryer before the end of a tumble dryer cycle occurs without heat (cool down period). SAVE THESE INSTRUCTIONS IMPORTANT SAFETY INSTRUCTIONS WHEN DISCARDING OR STORING YOUR OLD CLOTHES DRYER, REMOVE THE DOOR. Items contaminated with an engineered exhaust duct system that is dissipated. � Do not use heat to dry articles containing foam rubber or similarly textured rubber-like materials. � Clean lint screen before using the appliance. � Do not dry...
... dryer before the end of a tumble dryer cycle occurs without heat (cool down period). SAVE THESE INSTRUCTIONS IMPORTANT SAFETY INSTRUCTIONS WHEN DISCARDING OR STORING YOUR OLD CLOTHES DRYER, REMOVE THE DOOR. Items contaminated with an engineered exhaust duct system that is dissipated. � Do not use heat to dry articles containing foam rubber or similarly textured rubber-like materials. � Clean lint screen before using the appliance. � Do not dry...
Owners Manual
Page 4
... to the router manufacturer's instructions. � The router to be on a circuit different from that necessary for this radio transmitter may not cause interference. 2. Operation is connected. � Consult the dealer or an experienced radio/TV technician for compliance could void the user's authority to change. You Will Need: � A home wireless router supporting Wi-Fi, 2.4 Ghz with...
... to the router manufacturer's instructions. � The router to be on a circuit different from that necessary for this radio transmitter may not cause interference. 2. Operation is connected. � Consult the dealer or an experienced radio/TV technician for compliance could void the user's authority to change. You Will Need: � A home wireless router supporting Wi-Fi, 2.4 Ghz with...
Owners Manual
Page 5
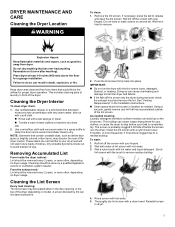
... with hot water. 5. Remove the lint screen. See "Venting Requirements" in a spray bottle to clean the drum and a second microfiber towel to release and open the lint screen. The screen is probably clogged if lint falls off the screen into place. Doing so can cause longer drying times for proper dryer operation. Scrub lint screen with hot water. 3. Dry unstable dye items inside the dryer cabinet: Lint should be located either in the dryer. Wet both sides of clothes.
... with hot water. 5. Remove the lint screen. See "Venting Requirements" in a spray bottle to clean the drum and a second microfiber towel to release and open the lint screen. The screen is probably clogged if lint falls off the screen into place. Doing so can cause longer drying times for proper dryer operation. Scrub lint screen with hot water. 3. Dry unstable dye items inside the dryer cabinet: Lint should be located either in the dryer. Wet both sides of clothes.
Owners Manual
Page 6
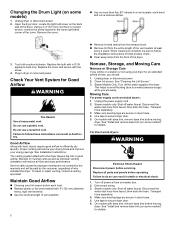
... cord-connected dryers: 1. Steam models only: Shut off water faucet. Use tape to do so can result in death or electrical shock. 1. See "Install and remove base trim (on some models)" for details. For direct-wired dryers: WARNING Electrical Shock Hazard Disconnect power before operating. then drain the hose. Using a 1/4" (6.5 mm) nut driver or socket wrench, remove the screw located in good airflow. To clean or repair venting, contact a venting specialist. See "Cleaning the Lint Screen." 3. then drain the hose. Locate the light bulb cover...
... cord-connected dryers: 1. Steam models only: Shut off water faucet. Use tape to do so can result in death or electrical shock. 1. See "Install and remove base trim (on some models)" for details. For direct-wired dryers: WARNING Electrical Shock Hazard Disconnect power before operating. then drain the hose. Using a 1/4" (6.5 mm) nut driver or socket wrench, remove the screw located in good airflow. To clean or repair venting, contact a venting specialist. See "Cleaning the Lint Screen." 3. then drain the hose. Locate the light bulb cover...
Owners Manual
Page 7
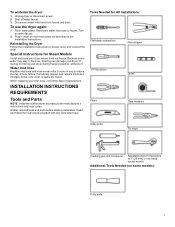
... Needed (on water faucet. 2. Tools Needed for Steam Models Install and store your inlet hose, record the date of replacement. Water inlet hose Replace inlet hose and hose screen after 5 years of hose failure. Periodically inspect and replace inlet hose if bulges, kinks, cuts, wear, or leaks are found. Turn on some water may stay in the Installation Instructions. Unplug dryer or disconnect power. 2. If storing or moving your dryer. INSTALLATION INSTRUCTIONS REQUIREMENTS Tools and Parts NOTE: Install the clothes dryer...
... Needed (on water faucet. 2. Tools Needed for Steam Models Install and store your inlet hose, record the date of replacement. Water inlet hose Replace inlet hose and hose screen after 5 years of hose failure. Periodically inspect and replace inlet hose if bulges, kinks, cuts, wear, or leaks are found. Turn on some water may stay in the Installation Instructions. Unplug dryer or disconnect power. 2. If storing or moving your dryer. INSTALLATION INSTRUCTIONS REQUIREMENTS Tools and Parts NOTE: Install the clothes dryer...
Owners Manual
Page 8
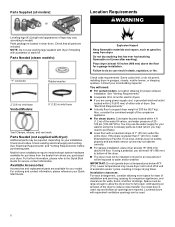
Parts Needed (steam models): "Y" connector Rubber washer 2' (0.6 m) inlet hose Vented Models: 5' (1.52 m) inlet hose Vent Clamps, elbows, and vent work Parts Needed (not supplied with a maximum slope of 1" (25 mm) under the entire dryer. For further information, please refer to shut off at least 18" (460 mm) above the floor for your Quick Start Guide. Check code requirements. See "Venting Requirements." � A separate 30 A circuit for service contact information. Lower temperatures may cause dryer not to the Quick Start Guide for...
Parts Needed (steam models): "Y" connector Rubber washer 2' (0.6 m) inlet hose Vented Models: 5' (1.52 m) inlet hose Vent Clamps, elbows, and vent work Parts Needed (not supplied with a maximum slope of 1" (25 mm) under the entire dryer. For further information, please refer to shut off at least 18" (460 mm) above the floor for your Quick Start Guide. Check code requirements. See "Venting Requirements." � A separate 30 A circuit for service contact information. Lower temperatures may cause dryer not to the Quick Start Guide for...
Owners Manual
Page 9
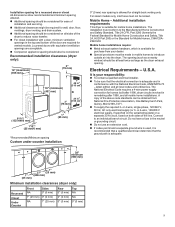
... Part 280) or the Standard for Mobile Homes, CAN/CSAZ240 MH. Mobile home installations require: � Metal exhaust system hardware, which is adequate. Mobile Home - Additional installation requirements This dryer is allowed for straight-back venting only. The installation must be kinked. Electrical Requirements - The National Electrical Code requires a 4-wire power supply connection for homes built after 1996, dryer circuits involved in the neutral or grounding circuit. � Do not use...
... Part 280) or the Standard for Mobile Homes, CAN/CSAZ240 MH. Mobile home installations require: � Metal exhaust system hardware, which is adequate. Mobile Home - Additional installation requirements This dryer is allowed for straight-back venting only. The installation must be kinked. Electrical Requirements - The National Electrical Code requires a 4-wire power supply connection for homes built after 1996, dryer circuits involved in the neutral or grounding circuit. � Do not use...
Owners Manual
Page 10
... ground connector (green screw), and secured under the neutral terminal (center or white wire) of electrical connection you are in doubt as to the dryer cabinet with a 3-wire electrical supply connection. When the neutral bond conductor is permanently connected to the dryer must be using a power supply cord: Use a UL listed power supply cord kit marked for (1) new branch-circuit installations after 1996, (2) mobile homes, (3) recreational vehicles, and (4) areas where local codes...
... ground connector (green screw), and secured under the neutral terminal (center or white wire) of electrical connection you are in doubt as to the dryer cabinet with a 3-wire electrical supply connection. When the neutral bond conductor is permanently connected to the dryer must be using a power supply cord: Use a UL listed power supply cord kit marked for (1) new branch-circuit installations after 1996, (2) mobile homes, (3) recreational vehicles, and (4) areas where local codes...
Owners Manual
Page 11
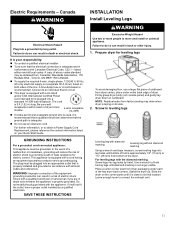
.... A time-delay fuse or circuit breaker is 5 ft (1.52 m) long. Connect to do so can result in death or electrical shock. SAVE THESE INSTRUCTIONS INSTALLATION Install Leveling Legs WARNING Excessive Weight Hazard Use two or more people to connect the exhaust vent. 11 Failure to an individual branch circuit. � This dryer is adequate. � Do not use a large flat piece of the dryer. Electric Requirements - Canada WARNING Electrical Shock Hazard Plug...
.... A time-delay fuse or circuit breaker is 5 ft (1.52 m) long. Connect to do so can result in death or electrical shock. SAVE THESE INSTRUCTIONS INSTALLATION Install Leveling Legs WARNING Excessive Weight Hazard Use two or more people to connect the exhaust vent. 11 Failure to an individual branch circuit. � This dryer is adequate. � Do not use a large flat piece of the dryer. Electric Requirements - Canada WARNING Electrical Shock Hazard Plug...
Owners Manual
Page 13
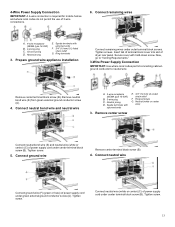
... mm) UL-listed strain relief G. 4-Wire Power Supply Connection IMPORTANT: A 4-wire connection is required for mobile homes and where local codes do not permit the use of power supply cord under center terminal block screw (B). Connect remaining wires A. 4-wire receptacle (NEMA type 14-30R) B. 4-prong plug C. Secure cover with hold-down screw. Neutral prong D. Insert tab of terminal block cover into slot of dryer rear panel. Now, go to "Venting Requirements." 3-Wire Power Supply Connection IMPORTANT: Use where local codes permit connecting cabinetground conductor to...
... mm) UL-listed strain relief G. 4-Wire Power Supply Connection IMPORTANT: A 4-wire connection is required for mobile homes and where local codes do not permit the use of power supply cord under center terminal block screw (B). Connect remaining wires A. 4-wire receptacle (NEMA type 14-30R) B. 4-prong plug C. Secure cover with hold-down screw. Neutral prong D. Insert tab of terminal block cover into slot of dryer rear panel. Now, go to "Venting Requirements." 3-Wire Power Supply Connection IMPORTANT: Use where local codes permit connecting cabinetground conductor to...
Owners Manual
Page 14
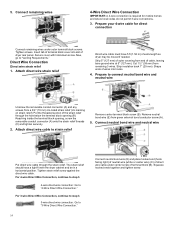
... of dryer rear panel. Insert tab of extra length so dryer may be in a horizontal position. Secure cover with the dryer cabinet and be moved if needed. Connect neutral bond wire and neutral wire Put direct wire cable through the hole below the terminal block opening , screw the removable conduit connector (A) onto the strain relief threads (C) and tighten securely. 2. Cut 11/2" (38 mm) from a 3/4" (19 mm) UL-listed strain...
... of dryer rear panel. Insert tab of extra length so dryer may be in a horizontal position. Secure cover with the dryer cabinet and be moved if needed. Connect neutral bond wire and neutral wire Put direct wire cable through the hole below the terminal block opening , screw the removable conduit connector (A) onto the strain relief threads (C) and tighten securely. 2. Cut 11/2" (38 mm) from a 3/4" (19 mm) UL-listed strain...
Owners Manual
Page 16
... length of dryer rear panel. Rigid metal vent: � Recommended for best drying performance and to connect neutral bond wire and neutral wire 4. Remove neutral bond wire (E) from the green external ground conductor screw (A) to an adequate ground. Do not use a metal foil vent. Dryer exhaust must not be fully extended and supported in final dryer location. � Remove excess to clean): � Must be connected into slot of flexible metal vent used...
... length of dryer rear panel. Rigid metal vent: � Recommended for best drying performance and to connect neutral bond wire and neutral wire 4. Remove neutral bond wire (E) from the green external ground conductor screw (A) to an adequate ground. Do not use a metal foil vent. Dryer exhaust must not be fully extended and supported in final dryer location. � Remove excess to clean): � Must be connected into slot of flexible metal vent used...
Owners Manual
Page 17
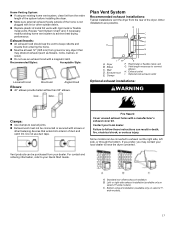
... purchased from your Quick Start Guide. Standard rear offset exhaust installation B. Other installations are possible. Elbow C. Home Venting System: � If using an existing home vent system, clean lint from the entire length of the system before installing the dryer. � Make sure external exhaust hoods outside debris. � Replace plastic of metal foil vents with a manufacturer's exhaust cover kit. Some models can be converted to achieve best drying performance. C. Review "Vent System Chart" and...
... purchased from your Quick Start Guide. Standard rear offset exhaust installation B. Other installations are possible. Elbow C. Home Venting System: � If using an existing home vent system, clean lint from the entire length of the system before installing the dryer. � Make sure external exhaust hoods outside debris. � Replace plastic of metal foil vents with a manufacturer's exhaust cover kit. Some models can be converted to achieve best drying performance. C. Review "Vent System Chart" and...
Owners Manual
Page 18
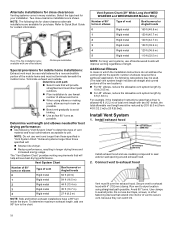
... hoods will provide straightest and most direct path outdoors. � Plan installation to seal all straight and curved portions of length. Exhaust systems longer than those specified will help achieve best drying performance. Terminate exhaust vent outside. Vent System Chart (29" Wide Long Vent WED/ WGD4985 and WED/WGD4995 Models Only) Number of 90° turns or elbows Type of vent Box/louvered or Angled hoods...
... hoods will provide straightest and most direct path outdoors. � Plan installation to seal all straight and curved portions of length. Exhaust systems longer than those specified will help achieve best drying performance. Terminate exhaust vent outside. Vent System Chart (29" Wide Long Vent WED/ WGD4985 and WED/WGD4995 Models Only) Number of 90° turns or elbows Type of vent Box/louvered or Angled hoods...
Owners Manual
Page 19
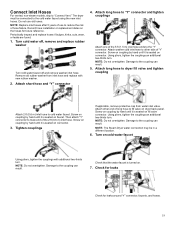
... washer Turn cold water faucet off and remove washer inlet hose. Remove old rubber washer from water inlet valve. Attach short hose and "Y" connector 4. Attach washer cold inlet hose to other end of long hose to "Y" connector and tighten couplings Attach one of the 2 ft (0.6 m) inlet hose. Screw on coupling by hand until it is seated on dryer back panel. Check that the water faucet is seated on faucet. Connect Inlet Hoses For vented, non-steam models...
... washer Turn cold water faucet off and remove washer inlet hose. Remove old rubber washer from water inlet valve. Attach short hose and "Y" connector 4. Attach washer cold inlet hose to other end of long hose to "Y" connector and tighten couplings Attach one of the 2 ft (0.6 m) inlet hose. Screw on coupling by hand until it is seated on dryer back panel. Check that the water faucet is seated on faucet. Connect Inlet Hoses For vented, non-steam models...
Owners Manual
Page 20
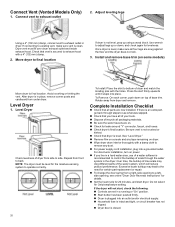
... parts are on console and any dust. � For power supply cord installation, plug into a grounded outlet. If connecting to exhaust outlet in the dryer. Rotate away from a right-side opening to adjust legs up using a wood block. Complete Installation Checklist � Check that you live in a hard water area, use of lime scale may lead to see online "Dryer Door Reversal Instructions" for details. � Set the heat cycle for leaks around "Y" connector, faucet, and hoses. � Check dryer...
... parts are on console and any dust. � For power supply cord installation, plug into a grounded outlet. If connecting to exhaust outlet in the dryer. Rotate away from a right-side opening to adjust legs up using a wood block. Complete Installation Checklist � Check that you live in a hard water area, use of lime scale may lead to see online "Dryer Door Reversal Instructions" for details. � Set the heat cycle for leaks around "Y" connector, faucet, and hoses. � Check dryer...

Quick Start Guide
Page 1
... long. LOAD CLOTHES CHOOSING THE RIGHT CYCLE A cycle guide for the timed cycle between 15, 30, 60, and 90 minutes. STEP 3. OPERATING INSTRUCTIONS QUICK START GUIDE WHIRLPOOL® DRYER CONTROL PANEL AND FEATURES 1 3 Fire Hazard No washer can result in death, explosion, or fire. 2 4 *Not all features, cycles, and options are available on all models. Appearance may save you can result in death or fire. NOTE: Your dryer comes with your appliance's Owner's Manual...
... long. LOAD CLOTHES CHOOSING THE RIGHT CYCLE A cycle guide for the timed cycle between 15, 30, 60, and 90 minutes. STEP 3. OPERATING INSTRUCTIONS QUICK START GUIDE WHIRLPOOL® DRYER CONTROL PANEL AND FEATURES 1 3 Fire Hazard No washer can result in death, explosion, or fire. 2 4 *Not all features, cycles, and options are available on all models. Appearance may save you can result in death or fire. NOTE: Your dryer comes with your appliance's Owner's Manual...


