
Use and Care Manual
Page 3
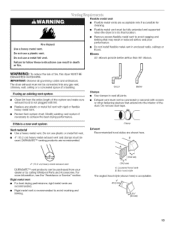
... exhaust opening and adjacent surrounding areas free from service or discarded, remove the door to reduce the chance of the dryer or attempt any servicing unless specifically recommended in this manual and on or in the dryer. We have the skills to carry out. [] Do not use fabric softeners or products to eliminate static unless recommended by qualified service personnel. [] See installation instructions for grounding requirements...
... exhaust opening and adjacent surrounding areas free from service or discarded, remove the door to reduce the chance of the dryer or attempt any servicing unless specifically recommended in this manual and on or in the dryer. We have the skills to carry out. [] Do not use fabric softeners or products to eliminate static unless recommended by qualified service personnel. [] See installation instructions for grounding requirements...
Use and Care Manual
Page 4
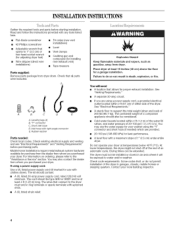
... follow the instructions provided with right-angle E. A B C D E A. Rubber washer connector Parts needed ) which are provided. • 20-100 psi (138-690 kPa) for proper exhaust installation. Check existing electrical supply and venting and see "Electrical Requirements" and "Venting Requirements" before starting installation. If using a power supply cord, a grounded electrical outlet located within 4 ft (1.2 m) of the water fill valves, and water pressure of an automatic cycle. The kit should also be at temperatures below 45°F (7°C). The wires that opens to...
... follow the instructions provided with right-angle E. A B C D E A. Rubber washer connector Parts needed ) which are provided. • 20-100 psi (138-690 kPa) for proper exhaust installation. Check existing electrical supply and venting and see "Electrical Requirements" and "Venting Requirements" before starting installation. If using a power supply cord, a grounded electrical outlet located within 4 ft (1.2 m) of the water fill valves, and water pressure of an automatic cycle. The kit should also be at temperatures below 45°F (7°C). The wires that opens to...
Use and Care Manual
Page 5
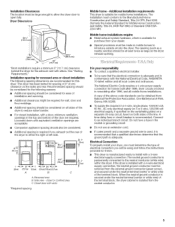
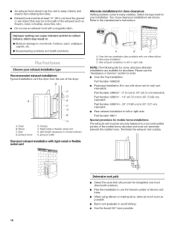
... and rear. Dryer Dimensions 14i 01 Mobile home - This dryer has been tested for spacing of the line. Recommended spacing should be considered for the following spacing dimensions are required. Connect to the neutral conductor (white wire) within the dryer. Electrical Connection To properly install your dryer, you must determine the type of electrical connection you exhaust out the rear of the terminal block. Installation Clearances The location must be using and follow the instructions provided...
... and rear. Dryer Dimensions 14i 01 Mobile home - This dryer has been tested for spacing of the line. Recommended spacing should be considered for the following spacing dimensions are required. Connect to the neutral conductor (white wire) within the dryer. Electrical Connection To properly install your dryer, you must determine the type of electrical connection you exhaust out the rear of the terminal block. Installation Clearances The location must be using and follow the instructions provided...
Use and Care Manual
Page 7
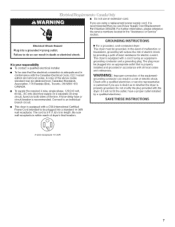
... the Canadian Electrical Code, C22.1 -latest edition and all local codes and ordinances. A time-delay fuse or circuit breaker is your responsibility [] To contact a qualified electrical installer. The cord is within reach of dryer's final location. @ [] Do not use Power Supply Cord Replacement Part Number 3394208. Be sure wall receptacle is 5 ft (1.52 m) in a risk of least resistance for electric current. For further information, please reference the service numbers located in conformance...
... the Canadian Electrical Code, C22.1 -latest edition and all local codes and ordinances. A time-delay fuse or circuit breaker is your responsibility [] To contact a qualified electrical installer. The cord is within reach of dryer's final location. @ [] Do not use Power Supply Cord Replacement Part Number 3394208. Be sure wall receptacle is 5 ft (1.52 m) in a risk of least resistance for electric current. For further information, please reference the service numbers located in conformance...

Use and Care Manual
Page 9
...) UL listed strain relief G.Ring terminals 4. "t C 4-wire connection: Power supply cord IMPORTANT: A 4-wire connection is required for your home has: And you will be in a horizontal position. Strain relief threads Put direct wire cable through the strain relief. CD E G A. 4-wire receptacle (NEMA type 14-30R) B. 4-prong plug C. Electrical Connection Options If your type of the strain relief through the hole below terminal block opening C. Hole below the terminal block opening , screw the removable conduit connector onto...
...) UL listed strain relief G.Ring terminals 4. "t C 4-wire connection: Power supply cord IMPORTANT: A 4-wire connection is required for your home has: And you will be in a horizontal position. Strain relief threads Put direct wire cable through the strain relief. CD E G A. 4-wire receptacle (NEMA type 14-30R) B. 4-prong plug C. Electrical Connection Options If your type of the strain relief through the hole below terminal block opening C. Hole below the terminal block opening , screw the removable conduit connector onto...

Use and Care Manual
Page 10
... power supply cord D. 3/4" (1.9 cm) UL listed strain relief E. Center silver-colored terminal block screw D. Direct wire cable must have completed your electrical connection. External ground conductor screw B. Shape ends of extra length so dryer can be moved if needed. Remove neutral ground wire from external ground conductor screw. C. Dotted line shows position of the terminal block. A 5. Cut 11/2'' (3.8 cm) from end of dryer rear panel. Connect neutral ground wire and place the hooked...
... power supply cord D. 3/4" (1.9 cm) UL listed strain relief E. Center silver-colored terminal block screw D. Direct wire cable must have completed your electrical connection. External ground conductor screw B. Shape ends of extra length so dryer can be moved if needed. Remove neutral ground wire from external ground conductor screw. C. Dotted line shows position of the terminal block. A 5. Cut 11/2'' (3.8 cm) from end of dryer rear panel. Connect neutral ground wire and place the hooked...

Use and Care Manual
Page 11
... bare) of direct wire cable to outer terminal block screws. Center silver-colored terminal block screw F Neutral wire (white or center wire) 4. Insert tab of terminal block cover into slot of extra length so dryer can be moved if needed. F A. Secure cover with hold -down screw. 7. Now go to "Venting Requirements." 3-wire connection: Power supply cord Use where local codes permit connecting cabinet-ground conductor to neutral wire. Direct wire cable must have 5 ft (1.52 m) of dryer rear panel. 3. A. Tighten...
... bare) of direct wire cable to outer terminal block screws. Center silver-colored terminal block screw F Neutral wire (white or center wire) 4. Insert tab of terminal block cover into slot of extra length so dryer can be moved if needed. F A. Secure cover with hold -down screw. 7. Now go to "Venting Requirements." 3-wire connection: Power supply cord Use where local codes permit connecting cabinet-ground conductor to neutral wire. Direct wire cable must have 5 ft (1.52 m) of dryer rear panel. 3. A. Tighten...

Use and Care Manual
Page 12
... center screw of dryer rear panel. Tighten screw. Center silver-colored terminal block screw D. Squeeze hooked ends together. Insert tab of terminal block cover into slot of power supply cord/cable under center, silver-colored terminal block screw. Tighten screws. !! !! 4. Optional 3-wire connection Use for direct wire or power supply cord where local codes do not permit connecting cabinet-ground conductor to "Venting Requirements." Neutral ground wire C. Neutral wire (white or center wire) E. _" (1.9 cm) UL listed strain relief...
... center screw of dryer rear panel. Tighten screw. Center silver-colored terminal block screw D. Squeeze hooked ends together. Insert tab of terminal block cover into slot of power supply cord/cable under center, silver-colored terminal block screw. Tighten screws. !! !! 4. Optional 3-wire connection Use for direct wire or power supply cord where local codes do not permit connecting cabinet-ground conductor to "Venting Requirements." Neutral ground wire C. Neutral wire (white or center wire) E. _" (1.9 cm) UL listed strain relief...
Use and Care Manual
Page 13
... these instructions can be purchased from the entire length of a building. For more information, see the "Assistance or Service" section. Do not use a plastic vent. Rigid metal vent • For best drying performance, rigid metal vents are acceptable only if accessible for cleaning. • Flexible metal vent must not be fully extended and supported when the dryer is in its final location. • Remove excess...
... these instructions can be purchased from the entire length of a building. For more information, see the "Assistance or Service" section. Do not use a plastic vent. Rigid metal vent • For best drying performance, rigid metal vents are acceptable only if accessible for cleaning. • Flexible metal vent must not be fully extended and supported when the dryer is in its final location. • Remove excess...
Use and Care Manual
Page 14
Periscope installation C, Rear exhaust installation to left or right side: Part Number 49611 A. Dryer B. Exhaust hood E. Rigid metal or flexible metal vent G, Vent length necessary to the manufacturer's instructions. Exhaust outlet elbows Special provisions for close -clearance installations are available for your exhaust installation type NOTE: The following kits for close clearance alternate installations are shown. Exhaust hood must not terminate beneath the mobile home. Select the type best for purchase. Clamps F. Elbow C. Terminate the exhaust vent ...
Periscope installation C, Rear exhaust installation to left or right side: Part Number 49611 A. Dryer B. Exhaust hood E. Rigid metal or flexible metal vent G, Vent length necessary to the manufacturer's instructions. Exhaust outlet elbows Special provisions for close -clearance installations are available for your exhaust installation type NOTE: The following kits for close clearance alternate installations are shown. Exhaust hood must not terminate beneath the mobile home. Select the type best for purchase. Clamps F. Elbow C. Terminate the exhaust vent ...

Use and Care Manual
Page 15
... exterior wall opening around exhaust hood. 2. NOTE: If "Y" connector can result. 15 Using pliers, tighten the couplings with Step 3. 3. Damage to the coupling can be connected to the cold water faucet using the new inlet hoses. To determine maximum exhaust length, add one elbow. Number of 90 ° turns or elbows Type of the dryer. Stand the dryer up. If connecting to move and install dryer. Check that extend...
... exterior wall opening around exhaust hood. 2. NOTE: If "Y" connector can result. 15 Using pliers, tighten the couplings with Step 3. 3. Damage to the coupling can be connected to the cold water faucet using the new inlet hoses. To determine maximum exhaust length, add one elbow. Number of 90 ° turns or elbows Type of the dryer. Stand the dryer up. If connecting to move and install dryer. Check that extend...

Use and Care Manual
Page 17
... the dryer door opening . Open the dryer door. 2. I I 17 Loosen these screws. 4. B. Replace the 4 screws in the same holes, 3. Remove the dryer door and the hinges by lifting upward on the same side of the door. 6= Install 4 plastic plugs into screw holes in the dryer left -side opening, if desired. 1. Remove the 4 plastic plugs located outside the dryer door opening. A. Remove the 4 screws and 2 hinges from dryer front panel. 5. Remove these screws. You can change your door...
... the dryer door opening . Open the dryer door. 2. I I 17 Loosen these screws. 4. B. Replace the 4 screws in the same holes, 3. Remove the dryer door and the hinges by lifting upward on the same side of the door. 6= Install 4 plastic plugs into screw holes in the dryer left -side opening, if desired. 1. Remove the 4 plastic plugs located outside the dryer door opening. A. Remove the 4 screws and 2 hinges from dryer front panel. 5. Remove these screws. You can change your door...

Use and Care Manual
Page 18
... installed. NOTE: You may be a problem with a damp cloth to control the buildup of hinges and slide door down. Turn on . 5. Wipe the dryer drum interior thoroughly with your tools. 3. See "Troubleshooting." This odor is common when the heating element is closed. NOTE: Glass door models have all parts are on power. 9. For this test, do not select the Air Only modifier. Check that all of its first cycle. Check...
... installed. NOTE: You may be a problem with a damp cloth to control the buildup of hinges and slide door down. Turn on . 5. Wipe the dryer drum interior thoroughly with your tools. 3. See "Troubleshooting." This odor is common when the heating element is closed. NOTE: Glass door models have all parts are on power. 9. For this test, do not select the Air Only modifier. Check that all of its first cycle. Check...

Use and Care Manual
Page 19
... the load and adjusts the time automatically for more detailed information. Your dryer may automatically vary from dryer. f. Clean lint screen before operating this manual for the selected dryness level. Press POWER. 4. Fire Hazard No washer can select a different dryness level, depending on your dryer. As the cycle runs, the control senses the dryness of this appliance. items containing foam, rubber, or plastic must be changed...
... the load and adjusts the time automatically for more detailed information. Your dryer may automatically vary from dryer. f. Clean lint screen before operating this manual for the selected dryness level. Press POWER. 4. Fire Hazard No washer can select a different dryness level, depending on your dryer. As the cycle runs, the control senses the dryness of this appliance. items containing foam, rubber, or plastic must be changed...

Use and Care Manual
Page 20
... your dryer at any time Open the door or press PAUSE/CANCEL once. To stop or pause your load. NOTE: Drying will change the settings for Time Adjust and Temp. To make changes during the last few minutes of all cycles, Cool Down makes the loads easier to handle and reduces wrinkling. Now the AccelerCare TM Drying System Works Moisture-sensing strips and temperature sensors inside the dryer drum monitor...
... your dryer at any time Open the door or press PAUSE/CANCEL once. To stop or pause your load. NOTE: Drying will change the settings for Time Adjust and Temp. To make changes during the last few minutes of all cycles, Cool Down makes the loads easier to handle and reduces wrinkling. Now the AccelerCare TM Drying System Works Moisture-sensing strips and temperature sensors inside the dryer drum monitor...
Use and Care Manual
Page 26
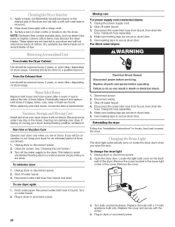
... . Remove the cover. 3. For direct-wirsd dryers: From Inside the Dryer Cabinet Lint should : 1. Failure to dry the drum. Plug in dryer or reconnect power. 1. Shut off the water supply to the stained area of replacement. Transport hose separately. 4. Install and store your dryer and will not stain future loads of the dryer. To winterize dryer 1. To use to secure dryer door. Turn on the back wall of clothes. Remove the screw located in dryer base. 5. 1. Wipe drum thoroughly...
... . Remove the cover. 3. For direct-wirsd dryers: From Inside the Dryer Cabinet Lint should : 1. Failure to dry the drum. Plug in dryer or reconnect power. 1. Shut off the water supply to the stained area of replacement. Transport hose separately. 4. Install and store your dryer and will not stain future loads of the dryer. To winterize dryer 1. To use to secure dryer door. Turn on the back wall of clothes. Remove the screw located in dryer base. 5. 1. Wipe drum thoroughly...
Use and Care Manual
Page 27
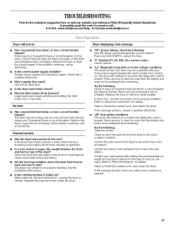
... a service call an electrician. Confirm your home power supply keeping the dryer's heater from turning on. If the message persists, have heat. In Canada www.whirlpool.ca Dryer will continue to run from the dryer to the wall is present. Was a regular fuse used for details. Replace the fuse or reset the circuit breaker. Clean out pockets before laundering. See the Installation Instructions. Electric dryers use 2 household fuses or circuit breakers. Replace the fuse or reset the circuit breaker. Electric dryers require 240-volt power...
... a service call an electrician. Confirm your home power supply keeping the dryer's heater from turning on. If the message persists, have heat. In Canada www.whirlpool.ca Dryer will continue to run from the dryer to the wall is present. Was a regular fuse used for details. Replace the fuse or reset the circuit breaker. Clean out pockets before laundering. See the Installation Instructions. Electric dryers use 2 household fuses or circuit breakers. Replace the fuse or reset the circuit breaker. Electric dryers require 240-volt power...

Use and Care Manual
Page 28
... check air movement. Smaller loads yield best results with lint? Fire Hazard Use a heavy metal vent. Select the right temperature for a garage installation. Is the exhaust vent diameter the correct size? Check for 5-10 minutes. Loads are wrinkled Was the load removed from loads consisting of the Quick Refresh cycle with water and heat to dry quickly? Stains on load • Is the lint screen clogged? See the Installation Instructions, • Has the Air Only modifier been selected? Cycle time...
... check air movement. Smaller loads yield best results with lint? Fire Hazard Use a heavy metal vent. Select the right temperature for a garage installation. Is the exhaust vent diameter the correct size? Check for 5-10 minutes. Loads are wrinkled Was the load removed from loads consisting of the Quick Refresh cycle with water and heat to dry quickly? Stains on load • Is the lint screen clogged? See the Installation Instructions, • Has the Air Only modifier been selected? Cycle time...
Use and Care Manual
Page 29
... or service, please check "Troubleshooting." Whirlpool designated service technicians are made with any questions or concerns at www.whirlpoolparts.ca. Part Number Accessory 20-48KITRC 4 ft (1.2 m) gas line dryer connector installation kit PT220L 4 ft (1.2 m) dryer cord, 3-wire, 30 amp PT400L 4 ft (1.2 m) dryer cord, 4-wire, 30 amp PT600L 6 ft (1.8 m) dryer cord, 4-wire, 30 amp 8212614 Dryer vent lint brush 31682 All-purpose appliance cleaner 1903WH 49572 Laundry supply storage cart LP Gas conversion kit W10071550A W10044609A Drying rack Steam hose kit 29 Check...
... or service, please check "Troubleshooting." Whirlpool designated service technicians are made with any questions or concerns at www.whirlpoolparts.ca. Part Number Accessory 20-48KITRC 4 ft (1.2 m) gas line dryer connector installation kit PT220L 4 ft (1.2 m) dryer cord, 3-wire, 30 amp PT400L 4 ft (1.2 m) dryer cord, 4-wire, 30 amp PT600L 6 ft (1.8 m) dryer cord, 4-wire, 30 amp 8212614 Dryer vent lint brush 31682 All-purpose appliance cleaner 1903WH 49572 Laundry supply storage cart LP Gas conversion kit W10071550A W10044609A Drying rack Steam hose kit 29 Check...

Use and Care Manual
Page 30
Service calls to correct the installation of your major appliance, to instruct you need to correct house wiring or plumbing. 2. Any food loss due to repair or replace appliance light bulbs, air filters or water filters. The cost of repair or replacement under this information on the model and serial number label located on how to use your major appliance, to replace or repair house fuses, or to know your major appliance. WHIRLPOOL SHALL NOT...
Service calls to correct the installation of your major appliance, to instruct you need to correct house wiring or plumbing. 2. Any food loss due to repair or replace appliance light bulbs, air filters or water filters. The cost of repair or replacement under this information on the model and serial number label located on how to use your major appliance, to replace or repair house fuses, or to know your major appliance. WHIRLPOOL SHALL NOT...


