
Installation Instructions
Page 2
... legs supplied with right-angle connector E. Check existing electrical supply and venting. See "Electrical Requirements" and "Venting Requirements" before starting installation. Mobile home installations require metal exhaust system hardware available for your dryer. 2 Rubber washer Remove parts package from whom you purchased your Use and Care Guide. Optional Equipment Refer to your Use and Care guide for information about the accessories available for purchase from the dealer from dryer drum. Inlet hose with dryer if installing on a pedestal. Leveling legs...
... legs supplied with right-angle connector E. Check existing electrical supply and venting. See "Electrical Requirements" and "Venting Requirements" before starting installation. Mobile home installations require metal exhaust system hardware available for your dryer. 2 Rubber washer Remove parts package from whom you purchased your Use and Care Guide. Optional Equipment Refer to your Use and Care guide for information about the accessories available for purchase from the dealer from dryer drum. Inlet hose with dryer if installing on a pedestal. Leveling legs...

Installation Instructions
Page 3
... of an automatic sensor cycle, possibly resulting in garages, closets, mobile homes, or sleeping quarters. Openings (such as dryer exhaust opening. 3 See "Venting Requirements." ■ A separate 30-amp circuit. ■ If using a power supply cord, a grounded electrical outlet within 4 ft. (1.2 m) of dryer, and water pressure of 0" (0 mm) clearance on all sides of dryer to reduce noise transfer. ■ For closet installation, with maximum slope of dryer. Some codes limit, or do...
... of an automatic sensor cycle, possibly resulting in garages, closets, mobile homes, or sleeping quarters. Openings (such as dryer exhaust opening. 3 See "Venting Requirements." ■ A separate 30-amp circuit. ■ If using a power supply cord, a grounded electrical outlet within 4 ft. (1.2 m) of dryer, and water pressure of 0" (0 mm) clearance on all sides of dryer to reduce noise transfer. ■ For closet installation, with maximum slope of dryer. Some codes limit, or do...

Installation Instructions
Page 4
... home installations. A time-delay fuse or circuit breaker is permanently connected to the neutral conductor (white wire) within the dryer. Connect to install with clothes dryers. If using and follow the instructions provided for use aluminum) at least 4 ft. (1.22 m) long, must have four 10-gauge copper wires and match a 4-wire receptacle of NEMA Type 14-30R. The cord should contain: ■ A UL listed 30-amp power supply cord, rated 120/240 volt minimum. Electrical Connection...
... home installations. A time-delay fuse or circuit breaker is permanently connected to the neutral conductor (white wire) within the dryer. Connect to install with clothes dryers. If using and follow the instructions provided for use aluminum) at least 4 ft. (1.22 m) long, must have four 10-gauge copper wires and match a 4-wire receptacle of NEMA Type 14-30R. The cord should contain: ■ A UL listed 30-amp power supply cord, rated 120/240 volt minimum. Electrical Connection...

Installation Instructions
Page 6
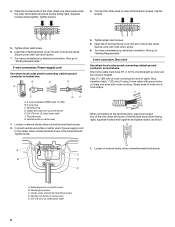
... or circuit breaker box* 3-wire connection: Direct Wire *If local codes do not permit use of a cabinet-ground conductor to the neutral wire, see "Optional 3-wire connection" section. 4-wire connection: Power supply cord IMPORTANT: A 4-wire connection is not available) Electrical Connection Options If your type of electrical connection: 4-wire (recommended) 3-wire (if 4-wire is required for mobile homes and where local codes do not permit connection of 3-wire connections. B F A CD E G A. 4-wire receptacle (NEMA type 14-30R) B. 4-prong plug C. Spade terminals with dryer...
... or circuit breaker box* 3-wire connection: Direct Wire *If local codes do not permit use of a cabinet-ground conductor to the neutral wire, see "Optional 3-wire connection" section. 4-wire connection: Power supply cord IMPORTANT: A 4-wire connection is not available) Electrical Connection Options If your type of electrical connection: 4-wire (recommended) 3-wire (if 4-wire is required for mobile homes and where local codes do not permit connection of 3-wire connections. B F A CD E G A. 4-wire receptacle (NEMA type 14-30R) B. 4-prong plug C. Spade terminals with dryer...
Installation Instructions
Page 7
...) A. Direct wire cable must have completed your electrical connection. 3. Ground wire (green or bare) of dryer rear panel. Cut 11/2" (38 mm) from external ground conductor screw. Center, silver-colored terminal block screw D. When connecting to external ground conductor screw. External ground conductor screw B. Center, silver-colored terminal block screw F. Tighten screws. 1. Remove neutral ground wire from 3 remaining wires. Connect neutral ground wire and place the hooked end (hook facing right...
...) A. Direct wire cable must have completed your electrical connection. 3. Ground wire (green or bare) of dryer rear panel. Cut 11/2" (38 mm) from external ground conductor screw. Center, silver-colored terminal block screw D. When connecting to external ground conductor screw. External ground conductor screw B. Center, silver-colored terminal block screw F. Tighten screws. 1. Remove neutral ground wire from 3 remaining wires. Connect neutral ground wire and place the hooked end (hook facing right...
Installation Instructions
Page 8
... completed your electrical connection. Neutral prong D. Neutral (white or center wire) 1. Loosen or remove center, silver-colored terminal block screw. 2. Connect neutral wire (white or center wire) of power supply cord to outer terminal block screws. Strip 31/2" (89 mm) of outer covering from end of the terminal block. Shape ends of wires into slot of dryer rear panel. A C B D E A. Secure cover with hold -down screw. 6. Now go to "Venting Requirements." 3-wire connection: Direct wire Use where local codes permit connecting cabinet...
... completed your electrical connection. Neutral prong D. Neutral (white or center wire) 1. Loosen or remove center, silver-colored terminal block screw. 2. Connect neutral wire (white or center wire) of power supply cord to outer terminal block screws. Strip 31/2" (89 mm) of outer covering from end of the terminal block. Shape ends of wires into slot of dryer rear panel. A C B D E A. Secure cover with hold -down screw. 6. Now go to "Venting Requirements." 3-wire connection: Direct wire Use where local codes permit connecting cabinet...

Installation Instructions
Page 10
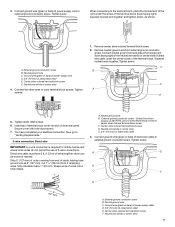
... not install flexible metal vent in its final location. ■ Remove excess flexible metal vent to follow these instructions can be fully extended and supported when the dryer is a new vent system Vent material ■ Use a heavy metal vent. IMPORTANT: Observe all joints. ■ Exhaust vent must be used for cleaning. ■ Flexible metal vent must be at least 12" (305 mm) from the ground or any gas vent...
... not install flexible metal vent in its final location. ■ Remove excess flexible metal vent to follow these instructions can be fully extended and supported when the dryer is a new vent system Vent material ■ Use a heavy metal vent. IMPORTANT: Observe all joints. ■ Exhaust vent must be used for cleaning. ■ Flexible metal vent must be at least 12" (305 mm) from the ground or any gas vent...
Installation Instructions
Page 11
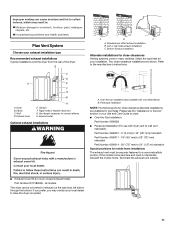
Vent length necessary to the manufacturer's instructions. Select the type best for your exhaust installation type Recommended exhaust installations Typical installations vent the dryer from the rear of the mobile home structure and must not terminate beneath the mobile home. Refer to connect elbows H. Please see the "Assistance or Service" section in your Use and Care Guide to order. ■ Over-the-Top Installation: Part Number 4396028 ■ Periscope Installation (For use with one offset...
Vent length necessary to the manufacturer's instructions. Select the type best for your exhaust installation type Recommended exhaust installations Typical installations vent the dryer from the rear of the mobile home structure and must not terminate beneath the mobile home. Refer to connect elbows H. Please see the "Assistance or Service" section in your Use and Care Guide to order. ■ Over-the-Top Installation: Part Number 4396028 ■ Periscope Installation (For use with one offset...

Installation Instructions
Page 12
.... CONNECT VENT 1. Connect vent to dryer location. Use the straightest path possible. Place cardboard under each of the 2 dryer back corners. Stand the dryer up. CONNECT INLET HOSE (STEAM MODELS) The dryer must fit inside the exhaust hood. Vent system chart NOTE: Side and bottom exhaust installations have a 90º turn to the chart. Number 90º Type of vent material and hood combinations acceptable to use old hoses. 1. Avoid 90º turns. Do not use duct...
.... CONNECT VENT 1. Connect vent to dryer location. Use the straightest path possible. Place cardboard under each of the 2 dryer back corners. Stand the dryer up. CONNECT INLET HOSE (STEAM MODELS) The dryer must fit inside the exhaust hood. Vent system chart NOTE: Side and bottom exhaust installations have a 90º turn to the chart. Number 90º Type of vent material and hood combinations acceptable to use old hoses. 1. Avoid 90º turns. Do not use duct...

Installation Instructions
Page 13
... can result. 5. Steam Models Only: 10. Damage to back. Screw on coupling by hand until it is an extra part, go back through the water system in the dryer. Damage to the need for leaks around "Y" connector, faucet, and hoses. 12. Check for certain part replacement or repair. 13 Check the dryer's final location. Read "Dryer Use" in the crease on connector. 8. For power supply cord installation, plug into a grounded outlet. NOTE: Do...
... can result. 5. Steam Models Only: 10. Damage to back. Screw on coupling by hand until it is an extra part, go back through the water system in the dryer. Damage to the need for leaks around "Y" connector, faucet, and hoses. 12. Check for certain part replacement or repair. 13 Check the dryer's final location. Read "Dryer Use" in the crease on connector. 8. For power supply cord installation, plug into a grounded outlet. NOTE: Do...
Installation Instructions
Page 14
... keeping the dryer's heater from each of its first cycle. Open the dryer door. 2. Install 4 plastic plugs into an outlet and/or electrical supply is connected. ■ Household fuse is intact and tight, or circuit breaker has not tripped. ■ Dryer door is closed. All Models: 13. This odor is common when the heating element is first heated. The odor will not start, check the following: ■ Controls are set in Step 4. A B A. Replace the 4 screws...
... keeping the dryer's heater from each of its first cycle. Open the dryer door. 2. Install 4 plastic plugs into an outlet and/or electrical supply is connected. ■ Household fuse is intact and tight, or circuit breaker has not tripped. ■ Dryer door is closed. All Models: 13. This odor is common when the heating element is first heated. The odor will not start, check the following: ■ Controls are set in Step 4. A B A. Replace the 4 screws...

Installation Instructions
Page 16
... clear the code from the dryer to "Electrical Connection" for details. ■ Select a Timed Dry heated cycle, and restart the dryer. If you are too long, or load is present. See the Installation Instructions. ■ Is the exhaust vent diameter the correct size? Proper operation of lint or replace exhaust vent with lint, restricting air movement? The front of the dryer requires a minimum of 1" (25 mm) of the dryer requires 5" (127 mm). Run the dryer for most installations, the rear of...
... clear the code from the dryer to "Electrical Connection" for details. ■ Select a Timed Dry heated cycle, and restart the dryer. If you are too long, or load is present. See the Installation Instructions. ■ Is the exhaust vent diameter the correct size? Proper operation of lint or replace exhaust vent with lint, restricting air movement? The front of the dryer requires a minimum of 1" (25 mm) of the dryer requires 5" (127 mm). Run the dryer for most installations, the rear of...

Use and Care Manual
Page 6
... care label directions when they are available on all cycles. You can select a different dryness level, depending on the load size and dryness level. Adjust the temperature of a Manual Cycle by pressing Dryness Level and choosing More, Normal, Less, or Damp. Cycles Select the drying cycle that matches the type of a Manual Cycle, press the Time Adjust up or down arrows. Steam models Non-Steam models Cycle Control knob Automatic Cycles Automatic Cycles...
... care label directions when they are available on all cycles. You can select a different dryness level, depending on the load size and dryness level. Adjust the temperature of a Manual Cycle by pressing Dryness Level and choosing More, Normal, Less, or Damp. Cycles Select the drying cycle that matches the type of a Manual Cycle, press the Time Adjust up or down arrows. Steam models Non-Steam models Cycle Control knob Automatic Cycles Automatic Cycles...

Use and Care Manual
Page 9
... drum turns, but the other settings will be displayed for 5 seconds. Do not use the drying rack 1. Front edge 2. Push down on top of your dryer shuts down. Put the wet items on front edge of drying rack to different installations, environmental conditions or personal preference. Press the POWER button. 6. You must select a time by using the Air Only temperature setting. 7. This change will become your model. Press and hold ) START...
... drum turns, but the other settings will be displayed for 5 seconds. Do not use the drying rack 1. Front edge 2. Push down on top of your dryer shuts down. Put the wet items on front edge of drying rack to different installations, environmental conditions or personal preference. Press the POWER button. 6. You must select a time by using the Air Only temperature setting. 7. This change will become your model. Press and hold ) START...

Use and Care Manual
Page 10
..., depending on dryer usage. 10 A screen blocked by lint can increase drying time. Roll lint off screen with hot water. 3. These stains are not harmful to remove residue buildup. 4. Removing Accumulated Lint From Inside the Dryer Cabinet Lint should be rack dried and the suggested cycle, temperature setting and drying time. Time* Wool Sweaters Timed Low 60 Block to remove lint. A screen blocked by lint can increase drying time. Wet lint is located in the door opening of the dryer. Insert lint screen back into dryer. Wipe drum thoroughly with the...
..., depending on dryer usage. 10 A screen blocked by lint can increase drying time. Roll lint off screen with hot water. 3. These stains are not harmful to remove residue buildup. 4. Removing Accumulated Lint From Inside the Dryer Cabinet Lint should be rack dried and the suggested cycle, temperature setting and drying time. Time* Wool Sweaters Timed Low 60 Block to remove lint. A screen blocked by lint can increase drying time. Wet lint is located in the door opening of the dryer. Insert lint screen back into dryer. Wipe drum thoroughly with the...

Use and Care Manual
Page 11
... reconnect power. Clean lint screen. Moving care For power supply cord-connected dryers: 1. Steam models only: Disconnect the water inlet hose from faucet, then drain the hose. Turn on vacation or not using your dryer for Steam Models Water Inlet Hoses Replace inlet hoses and hose screen after 5 years of the dryer. Electrical Shock Hazard Disconnect power before operating. Disconnect wiring. 3. Use masking tape to secure dryer door. Replace the cover and secure with a 10-watt appliance bulb only. If you should not require changing; Unplug dryer or disconnect power...
... reconnect power. Clean lint screen. Moving care For power supply cord-connected dryers: 1. Steam models only: Disconnect the water inlet hose from faucet, then drain the hose. Turn on vacation or not using your dryer for Steam Models Water Inlet Hoses Replace inlet hoses and hose screen after 5 years of the dryer. Electrical Shock Hazard Disconnect power before operating. Disconnect wiring. 3. Use masking tape to secure dryer door. Replace the cover and secure with a 10-watt appliance bulb only. If you should not require changing; Unplug dryer or disconnect power...

Use and Care Manual
Page 12
... "Electrical Connection" in the Installation Instructions for details. If the message persists, have your vent system falls withing the recommended run ■ Is the dryer door firmly closed? ■ Was the Start button firmly pressed? Dryer displaying code message ■ "PF" (power failure), check the following: Was the drying cycle interrupted by a power failure? The dryer may not have not tripped. When balled up ? Replace the fuse or reset the circuit breaker. Use a time-delay fuse...
... "Electrical Connection" in the Installation Instructions for details. If the message persists, have your vent system falls withing the recommended run ■ Is the dryer door firmly closed? ■ Was the Start button firmly pressed? Dryer displaying code message ■ "PF" (power failure), check the following: Was the drying cycle interrupted by a power failure? The dryer may not have not tripped. When balled up ? Replace the fuse or reset the circuit breaker. Use a time-delay fuse...

Use and Care Manual
Page 13
... with lint, restricting air movement? Separate the load to dry quickly? Lint on Automatic Cycles. Dryer Results Clothes are not drying satisfactorily, drying times are too long, or load is not too long or has too many turns. Lint screen should be contacting the sensor strips. Run the dryer for the types of dryer cycles requires temperatures above 45ºF (7ºC). 13 If you may not be cleaned before each load. See the Installation Instructions. ■ Are fabric softener sheets blocking...
... with lint, restricting air movement? Separate the load to dry quickly? Lint on Automatic Cycles. Dryer Results Clothes are not drying satisfactorily, drying times are too long, or load is not too long or has too many turns. Lint screen should be contacting the sensor strips. Run the dryer for the types of dryer cycles requires temperatures above 45ºF (7ºC). 13 If you may not be cleaned before each load. See the Installation Instructions. ■ Are fabric softener sheets blocking...

Use and Care Manual
Page 14
...; Loads are wrinkled ■ Was the load removed from a load left in clothing (usually blue jeans). Fabric softener sheets added to the dryer. Drum stains are not recommended. Loads are still wrinkled following Steam cycle on fabric type. Dry smaller loads that water inlet hose is connected to a partially dried load can tumble freely. Smaller loads of wrinkle-free cotton, cotton polyester blends, common knits, and synthetic garments. Check that can stain your dryer is turned on load...
...; Loads are wrinkled ■ Was the load removed from a load left in clothing (usually blue jeans). Fabric softener sheets added to the dryer. Drum stains are not recommended. Loads are still wrinkled following Steam cycle on fabric type. Dry smaller loads that water inlet hose is connected to a partially dried load can tumble freely. Smaller loads of wrinkle-free cotton, cotton polyester blends, common knits, and synthetic garments. Check that can stain your dryer is turned on load...

Use and Care Manual
Page 15
..., abuse, fire, flood, acts of God, improper installation, installation not in accordance with electrical or plumbing codes, or use of your major appliance, to replace or repair house fuses, or to published user or operator instructions and/or installation instructions. 2. This major appliance is intended to determine if another warranty applies. This warranty gives you specific legal rights, and you . WHIRLPOOL SHALL NOT BE LIABLE FOR INCIDENTAL OR...
..., abuse, fire, flood, acts of God, improper installation, installation not in accordance with electrical or plumbing codes, or use of your major appliance, to replace or repair house fuses, or to published user or operator instructions and/or installation instructions. 2. This major appliance is intended to determine if another warranty applies. This warranty gives you specific legal rights, and you . WHIRLPOOL SHALL NOT BE LIABLE FOR INCIDENTAL OR...


