Use and Care Guide
Page 1
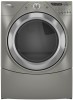
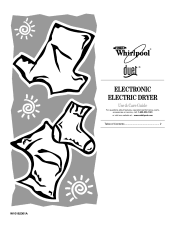
® ® ELECTRONIC ELECTRIC DRYER Use & Care Guide For questions about features, operation/performance, parts, accessories or service, call: 1-800-253-1301 or visit our website at...www.whirlpool.com Table of Contents ...2 W10182361A
® ® ELECTRONIC ELECTRIC DRYER Use & Care Guide For questions about features, operation/performance, parts, accessories or service, call: 1-800-253-1301 or visit our website at...www.whirlpool.com Table of Contents ...2 W10182361A
Use and Care Guide
Page 2
......2 INSTALLATION INSTRUCTIONS ...3 Tools and Parts ...3 Options ...4 Location Requirements ...4 Electrical Requirements ...6 Electrical Connection ...8 Venting Requirements...13 Plan Vent System ...14 Install Vent System...15 Install Leveling Legs ...15 Connect Vent...16 Level Dryer ...16 Complete Installation ...16 DRYER USE ...17 Starting Your Dryer...17 Stopping Your Dryer ...18 Pausing or Restarting...18 Control Locked...18 Drying and Cycle Tips ...18 Status Lights...19 Cycles ...19 Additional Features ...20 Changing Cycles, Options and Modifiers ...21 Drying Rack Option ...21 DRYER CARE...
......2 INSTALLATION INSTRUCTIONS ...3 Tools and Parts ...3 Options ...4 Location Requirements ...4 Electrical Requirements ...6 Electrical Connection ...8 Venting Requirements...13 Plan Vent System ...14 Install Vent System...15 Install Leveling Legs ...15 Connect Vent...16 Level Dryer ...16 Complete Installation ...16 DRYER USE ...17 Starting Your Dryer...17 Stopping Your Dryer ...18 Pausing or Restarting...18 Control Locked...18 Drying and Cycle Tips ...18 Status Lights...19 Cycles ...19 Additional Features ...20 Changing Cycles, Options and Modifiers ...21 Drying Rack Option ...21 DRYER CARE...
Use and Care Guide
Page 3
IMPORTANT SAFETY INSTRUCTIONS WARNING: To reduce the risk of fire, electric shock, or injury to persons when using the dryer, follow basic precautions, including the following:
IMPORTANT SAFETY INSTRUCTIONS WARNING: To reduce the risk of fire, electric shock, or injury to persons when using the dryer, follow basic precautions, including the following:
Use and Care Guide
Page 4
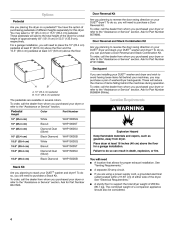
...) above the floor. Ask for Part Number 8558694 (White). To do so, you will need to reverse the door swing direction on your ® ® DUET dryer and stack your dryer or refer to do so, you purchased your DUET washer and dryer? For a garage installation, you can result in several colors. To do so can purchase a Door Reversal and Stack Combination Kit. Failure to the "Assistance or...
...) above the floor. Ask for Part Number 8558694 (White). To do so, you will need to reverse the door swing direction on your ® ® DUET dryer and stack your dryer or refer to do so, you purchased your DUET washer and dryer? For a garage installation, you can result in several colors. To do so can purchase a Door Reversal and Stack Combination Kit. Failure to the "Assistance or...
Use and Care Guide
Page 6
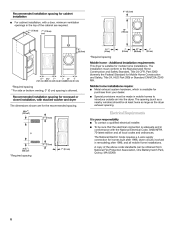
Recommended installation spacing for cabinet installation
Recommended installation spacing for cabinet installation
Use and Care Guide
Page 8
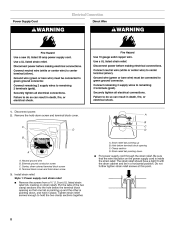
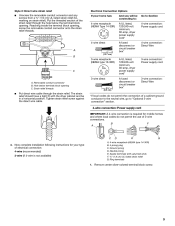
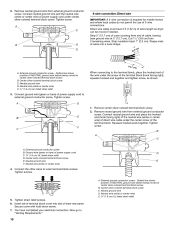
...Remove the hold-down screw and terminal block cover. Securely tighten all electrical connections. Disconnect power before making electrical connections. Failure to remaining 2 terminals (gold). Disconnect power before making electrical connections. Ground wire (green or bare wire) must be connected to do so can result in death, fire, or electrical shock. 1. Securely tighten all electrical connections. Failure to green ground connector. Use a UL listed strain relief. Use a UL listed strain relief. A B C D B C D A Electrical Connection Power Supply Cord Direct Wire...
...Remove the hold-down screw and terminal block cover. Securely tighten all electrical connections. Disconnect power before making electrical connections. Failure to remaining 2 terminals (gold). Disconnect power before making electrical connections. Ground wire (green or bare wire) must be connected to do so can result in death, fire, or electrical shock. 1. Securely tighten all electrical connections. Failure to green ground connector. Use a UL listed strain relief. Use a UL listed strain relief. A B C D B C D A Electrical Connection Power Supply Cord Direct Wire...
Use and Care Guide
Page 9
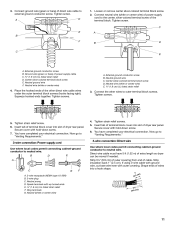
Style 2: Direct wire strain relief
Style 2: Direct wire strain relief
Use and Care Guide
Page 10
Connect neutral ground wire and the neutral wire (white or center wire) of dryer rear panel. Neutral wire (white or center wire) D E 4. External ground conductor screw - Insert tab of terminal block cover into a hook shape. 1" (2.5 cm ) A C B D E 5" (12.7 cm) A. You have 5 ft (1.52 m) of power supply cord C 1.9 cm) UL listed strain relief D. 2. Direct wire cable must have completed your electrical connection. Strip insulation back 1" (2.5 cm). Neutral ground wire D. Remove center silver-colored terminal block screw. 2. External...
Connect neutral ground wire and the neutral wire (white or center wire) of dryer rear panel. Neutral wire (white or center wire) D E 4. External ground conductor screw - Insert tab of terminal block cover into a hook shape. 1" (2.5 cm ) A C B D E 5" (12.7 cm) A. You have 5 ft (1.52 m) of power supply cord C 1.9 cm) UL listed strain relief D. 2. Direct wire cable must have completed your electrical connection. Strip insulation back 1" (2.5 cm). Neutral ground wire D. Remove center silver-colored terminal block screw. 2. External...
Use and Care Guide
Page 11
... screw. 6. Now go to "Venting Requirements." 3-wire connection: Power supply cord Use where local codes permit connecting cabinet-ground conductor to outer terminal block screws. Ground wire (green or bare) of the terminal block. Neutral wire (white or center wire) E 1.9 cm) UL listed strain relief 4. You have completed your electrical connection. You have completed your electrical connection. Strip 3¹⁄₂" (8.9 cm) of outer covering from end of dryer rear panel. Insert tab of the...
... screw. 6. Now go to "Venting Requirements." 3-wire connection: Power supply cord Use where local codes permit connecting cabinet-ground conductor to outer terminal block screws. Ground wire (green or bare) of the terminal block. Neutral wire (white or center wire) E 1.9 cm) UL listed strain relief 4. You have completed your electrical connection. You have completed your electrical connection. Strip 3¹⁄₂" (8.9 cm) of outer covering from end of dryer rear panel. Insert tab of the...

Use and Care Guide
Page 12
... the terminal block (hook facing right), squeeze hooked end together and tighten screw, as shown. Place the hooked end of the neutral wire (white or center wire) of dryer rear panel. External ground conductor screw B. Neutral wire (white or center wire) E 1.9 cm) UL listed strain relief F. Squeeze hooked ends together. Tighten screws. 3. Insert tab of terminal block cover into slot of direct wire cable under the outer terminal block screws (hooks facing right). You...
... the terminal block (hook facing right), squeeze hooked end together and tighten screw, as shown. Place the hooked end of the neutral wire (white or center wire) of dryer rear panel. External ground conductor screw B. Neutral wire (white or center wire) E 1.9 cm) UL listed strain relief F. Squeeze hooked ends together. Tighten screws. 3. Insert tab of terminal block cover into slot of direct wire cable under the outer terminal block screws (hooks facing right). You...
Use and Care Guide
Page 13
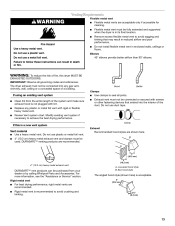
Venting Requirements WARNING
Venting Requirements WARNING
Use and Care Guide
Page 16
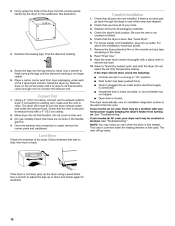
... a Timed Dry heated cycle, and start , check the following: 3. Do not select the Air Only Temperature setting. If the dryer will not start the dryer. Use a wrench to connect the exhaust vent. Leave enough room to finish turning the legs until it is clean. Dryer is connected. Once the exhaust vent connection is closed. Complete Installation 1. See "Level Dryer." 6. Screw the legs into an outlet and/or electrical supply is plugged into the leg holes by hand. Dryer door is...
... a Timed Dry heated cycle, and start , check the following: 3. Do not select the Air Only Temperature setting. If the dryer will not start the dryer. Use a wrench to connect the exhaust vent. Leave enough room to finish turning the legs until it is clean. Dryer is connected. Once the exhaust vent connection is closed. Complete Installation 1. See "Level Dryer." 6. Screw the legs into an outlet and/or electrical supply is plugged into the leg holes by hand. Dryer door is...

Use and Care Guide
Page 17
... dryer and shut door. 3. DRYER USE Starting Your Dryer WARNING WARNING Explosion Hazard Keep flammable materials and vapors, such as gasoline, away from the default time based on the size and fabric type of the load. Do not dry anything that has ever had anything that has ever had any type of oil on it (even after washing). This manual covers several different models. Press the POWER button...
... dryer and shut door. 3. DRYER USE Starting Your Dryer WARNING WARNING Explosion Hazard Keep flammable materials and vapors, such as gasoline, away from the default time based on the size and fabric type of the load. Do not dry anything that has ever had anything that has ever had any type of oil on it (even after washing). This manual covers several different models. Press the POWER button...

Use and Care Guide
Page 20
..., sheer nylon Low 20 *Reset time to a damp level using Air Only To be adjusted. Manual Preset Cycle Settings Manual Cycles Load Type TIMED DRY Heavyweight items, bulky items, bedspreads, work clothes TOUCH UP Helps to smooth out wrinkles QUICK DRY Small loads Temperature High Default Time (Minutes) 40 Automatic Preset Cycle Settings Automatic Cycles Load Type HEAVY DUTY Heavyweight items, towels, jeans BULKY ITEMS Jackets, comforters, pillows NORMAL Corduroys, work clothes, sheets CASUAL Permanent press, synthetics DELICATE...
..., sheer nylon Low 20 *Reset time to a damp level using Air Only To be adjusted. Manual Preset Cycle Settings Manual Cycles Load Type TIMED DRY Heavyweight items, bulky items, bedspreads, work clothes TOUCH UP Helps to smooth out wrinkles QUICK DRY Small loads Temperature High Default Time (Minutes) 40 Automatic Preset Cycle Settings Automatic Cycles Load Type HEAVY DUTY Heavyweight items, towels, jeans BULKY ITEMS Jackets, comforters, pillows NORMAL Corduroys, work clothes, sheets CASUAL Permanent press, synthetics DELICATE...

Use and Care Guide
Page 22
... flow of the drying rack. NOTE: You must select a time by pressing the DRY TIME up . B DRYER CARE Cleaning the Dryer Location A A. Place dryer at least 18 inches (46 cm) above the floor for normal tumbling. Items containing foam, rubber, or plastic must be rack dried and the suggested cycle, temperature setting and drying time. This chart shows examples of moisture items hold START button (about 1 second). A screen blocked by using the Air Only temperature setting. 6. Roll lint...
... flow of the drying rack. NOTE: You must select a time by pressing the DRY TIME up . B DRYER CARE Cleaning the Dryer Location A A. Place dryer at least 18 inches (46 cm) above the floor for normal tumbling. Items containing foam, rubber, or plastic must be rack dried and the suggested cycle, temperature setting and drying time. This chart shows examples of moisture items hold START button (about 1 second). A screen blocked by using the Air Only temperature setting. 6. Roll lint...
Use and Care Guide
Page 24
www.whirlpool.com/help - TROUBLESHOOTING First try the solutions suggested here or visit our website and reference FAQs (Frequently Asked Questions) to possibly avoid the cost of a service call...In U.S.A. In Canada www.whirlpool.ca Dryer Operation Dryer will not run
www.whirlpool.com/help - TROUBLESHOOTING First try the solutions suggested here or visit our website and reference FAQs (Frequently Asked Questions) to possibly avoid the cost of a service call...In U.S.A. In Canada www.whirlpool.ca Dryer Operation Dryer will not run

Use and Care Guide
Page 25
Dryer Results
Dryer Results
Use and Care Guide
Page 26
... 4 ft (1.2 m) gas line dryer connector installation kit 4 ft (1.2 m) dryer cord, 3-wire, 30 amp 4 ft (1.2 m) dryer cord, 4-wire, 30 amp 6 ft (1.8 m) dryer cord, 4-wire, 30 amp Dryer vent lint brush All-purpose appliance cleaner Laundry supply storage cart LP gas conversion kit Door reversal kit (all colors) Dryer rack Stack kit For assistance and service Call the Whirlpool Customer eXperience Center toll free: 1-800-253-1301. If you need further assistance, you can write to order replacement parts, we recommend that you still need to Whirlpool Corporation...
... 4 ft (1.2 m) gas line dryer connector installation kit 4 ft (1.2 m) dryer cord, 3-wire, 30 amp 4 ft (1.2 m) dryer cord, 4-wire, 30 amp 6 ft (1.8 m) dryer cord, 4-wire, 30 amp Dryer vent lint brush All-purpose appliance cleaner Laundry supply storage cart LP gas conversion kit Door reversal kit (all colors) Dryer rack Stack kit For assistance and service Call the Whirlpool Customer eXperience Center toll free: 1-800-253-1301. If you need further assistance, you can write to order replacement parts, we recommend that you still need to Whirlpool Corporation...

Use and Care Guide
Page 28
... associated with the product, Whirlpool Corporation or Whirlpool Canada LP (hereafter "Whirlpool") will need service, first see the "Troubleshooting" section of your complete model number and serial number. This major appliance is designed to correct defects in -home service is required to repair or replace appliance light bulbs, air filters or water filters. Repairs to parts or systems resulting from warranty coverage. 3. The removal and reinstallation of the Use & Care Guide. DISCLAIMER OF IMPLIED WARRANTIES; LIMITATION OF REMEDIES...
... associated with the product, Whirlpool Corporation or Whirlpool Canada LP (hereafter "Whirlpool") will need service, first see the "Troubleshooting" section of your complete model number and serial number. This major appliance is designed to correct defects in -home service is required to repair or replace appliance light bulbs, air filters or water filters. Repairs to parts or systems resulting from warranty coverage. 3. The removal and reinstallation of the Use & Care Guide. DISCLAIMER OF IMPLIED WARRANTIES; LIMITATION OF REMEDIES...


